New or Edit Row
The New Row screen displays when the blue +ADD ROW button is selected on the View Batch screen and allows a new payment record to be entered. Selecting any record in View Batch opens the Edit Row screen which provides the details for the selected payment and allows updating.
Adding a Row
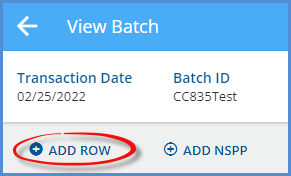
Select the blue +ADD ROW found at the top of the filters column on the View Batch screen to add a payment record to the selected batch.
The following screen displays.
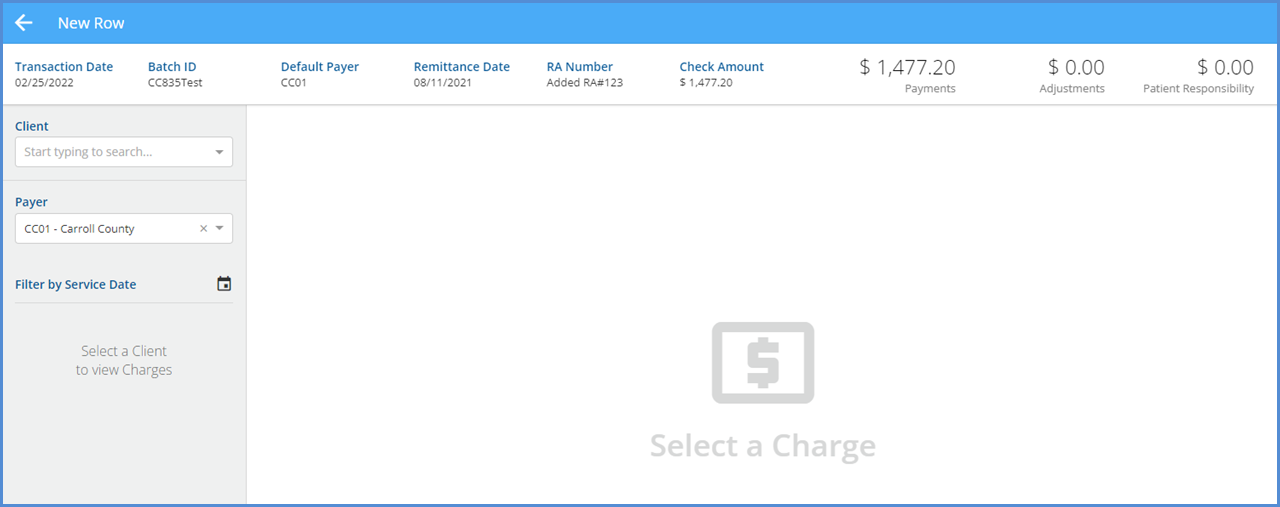
- The header has the same information as the View Batch screen.
- Note the values for Payments, Adjustments, and Patient Responsibility for comparison later.
- The value for the Payer is populated with the Default Payer.
- This Payer can be changed or removed if desired.
- If the batch did not have a Default Payer specified, the Payer field would not be populated on the New Row screen.
- All charges display for the selected Client when the Payer is field is not populated.
- A Client must be selected from the drop-down list to display the list of Charges.
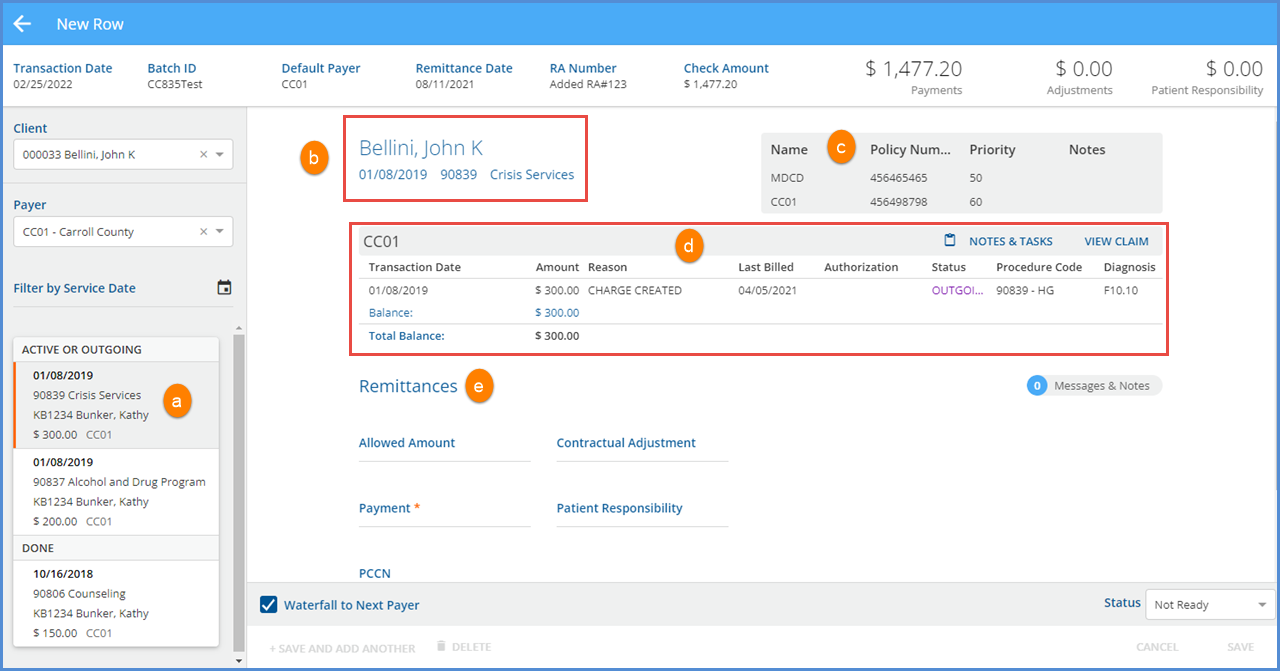
The Charges list is grouped by Active or Outgoing first, then sorted by Service Date, newest to oldest, followed by the Done Charges. If the Payer field is populated, the resulting Charge list is limited to that Payer's Charges only.
(a) The orange vertical line and grey shading indicates the currently selected Charge.
(b) The Client Name and summary information for the Service associated with the Charge displayed is a clickable link to the Service.
(c) The list of Client Payers displays in the upper right-hand corner, like the Claim Details screen.
(d) Current Payer Claim information is displayed with links to the Claim Details – Notes & Tasks and View Claim.
(e) Remittances
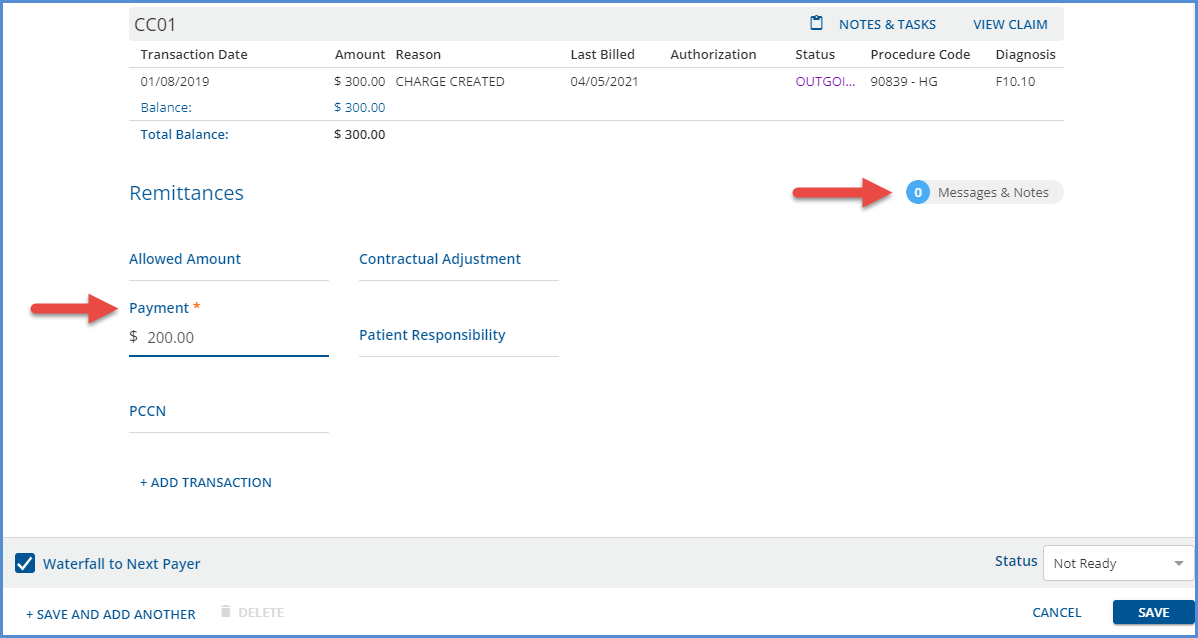
- The Messages & Notes button has a count to indicate if any are present and is also a clickable link to access the message and note details.
- Payment is the only required field, and Transaction Types are assigned based on the value of the Payment amount.
- Positive Amount = Payer Payment
- Zero Amount = Denial
-
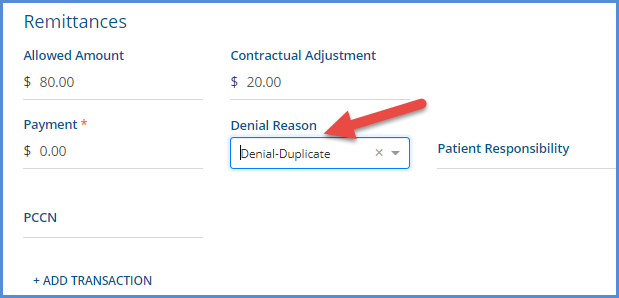
- If a $0.00 Payment amount is entered, a Denial Reason field displays.
- The Denials column on the View Batch screen is also updated with the selected reason.
-

-
- Negative Amount = Reversal of Prior Payment
-
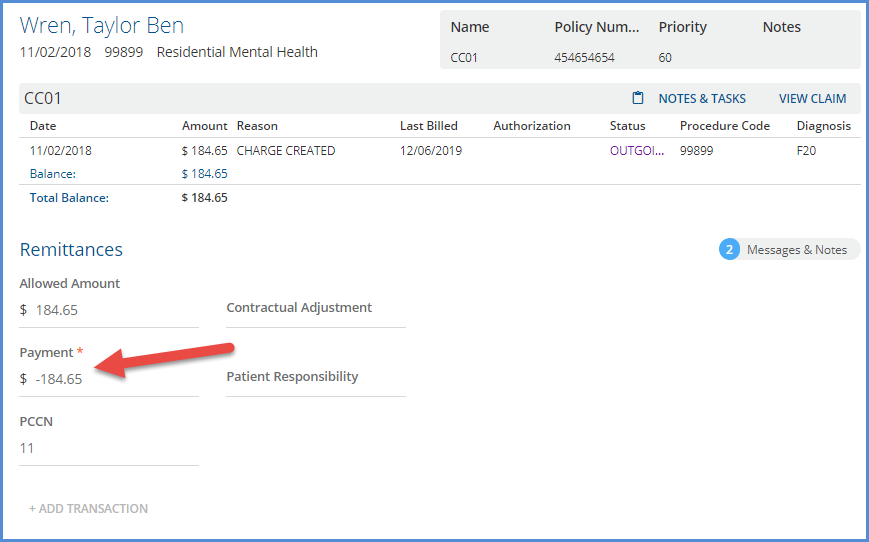
- The record in dbo.Remittances for this transaction shows the following TransactionDefinition assigned.
-

-
- The following fields may be optionally populated: Allowed Amount, Contractual Adjustment, Patient Responsibility, and PCCN.
- The Batch supplies the Transaction Date, Remittance Date, Batch ID, and RA Number, so these values are not repeatedly entered.
- Use the +ADD TRANSACTION button to enter other Transaction Types related to this Payment and Charge combination.
- The Transaction Type list uses the same Transaction Types as the original Remittances screen apart from the excluded Non-Specific Payer Payment type.
- A Denial, Contractual Adj, and a Psychiatric Reduction are all captured in a single row entry in the example below.
-
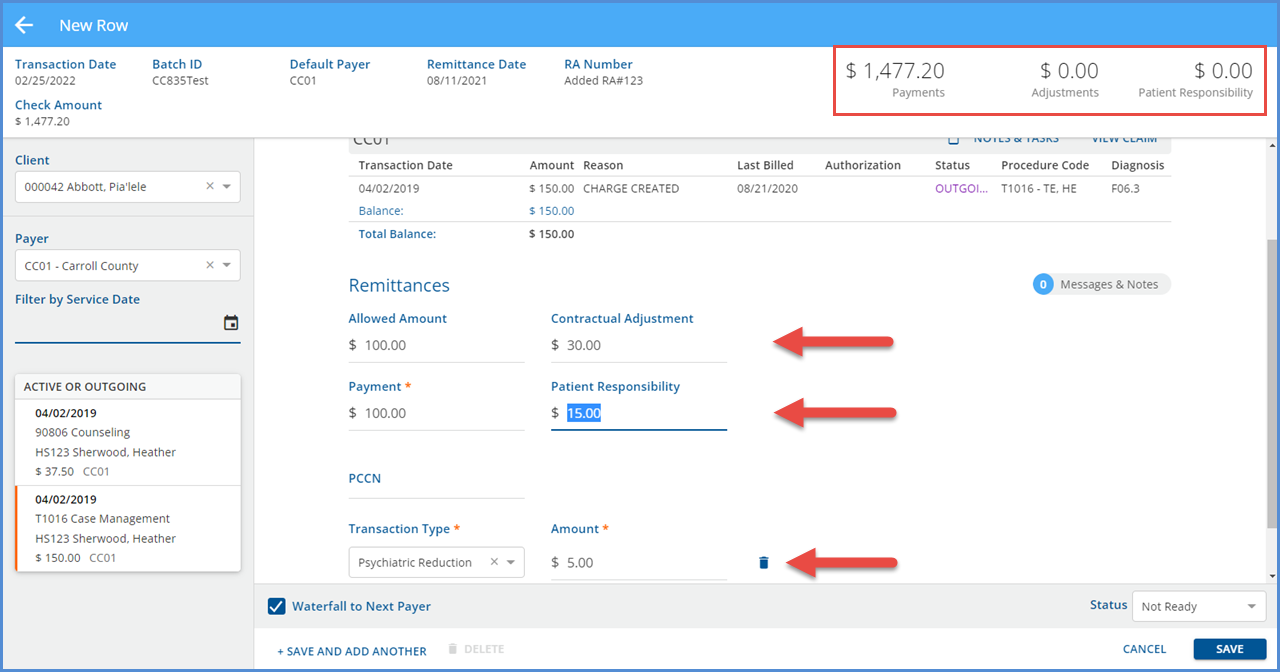
- After the payment above is saved, the system calculated balances in the header are updated.
-

- Payments increased to $1,577.20 from $1,477.20.
- Adjustments increased to $35.00, the sum of all adjustments (contractual plus psychiatric reduction in this example) from $0.00.
- Patient Responsibility increased to $15.00 from $0.00.
-
- If an additional Transaction Type is added in error, use the delete icon (blue trash can) to remove it.
- If the Waterfall to Next Payer checkbox is selected, all Transactions in the row (Payment and Adjustments) will have that setting applied.
- Selecting the blue +SAVE AND ADD ANOTHER saves the new row and clears the screen so the next Client and Charge can be selected for a new row.
- Selecting the blue SAVE records the new entry and remains on the Edit Row screen for that new entry.
Editing a Row
Select an existing row on the View Batches screen to view and update that transaction group. The example below is an imported 835 batch that has some Not Ready payment rows.

Selecting the first Not Ready row displays the following Edit Row screen.
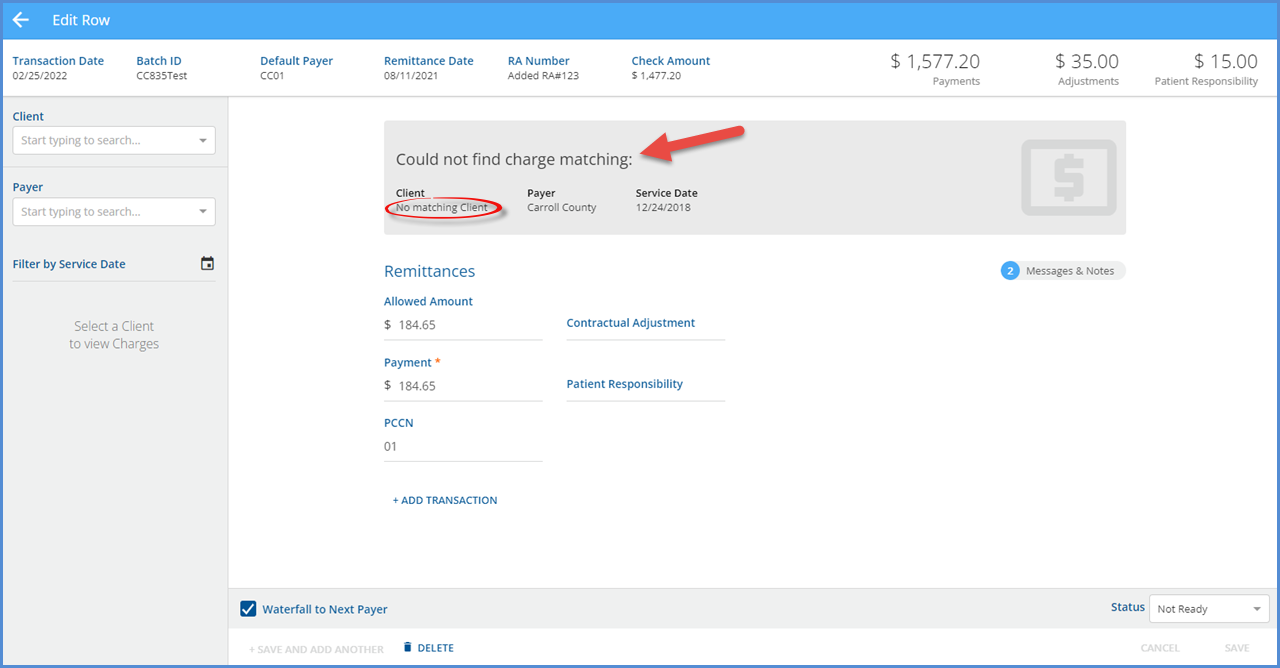
The payment information was imported, but a Charge needs to be attached.
The Client and Charge is matched using the unique identifier CLP and REF*6R segments which should match the CLM and REF*6R values sent in the corresponding 835 submission file. Often when a clearing house is used, the values for the CLP and REF*6R segments are replaced by values meaningful to the clearing house, but these no longer tie back to EchoVantage. The Remittance Advice should have sufficient detail, i.e., the Client Name, to successfully match these payments manually.
Find the Client in the drop-down list on the left to display a list of Charges. Then enter a Payer and Service Date to refine the results further.
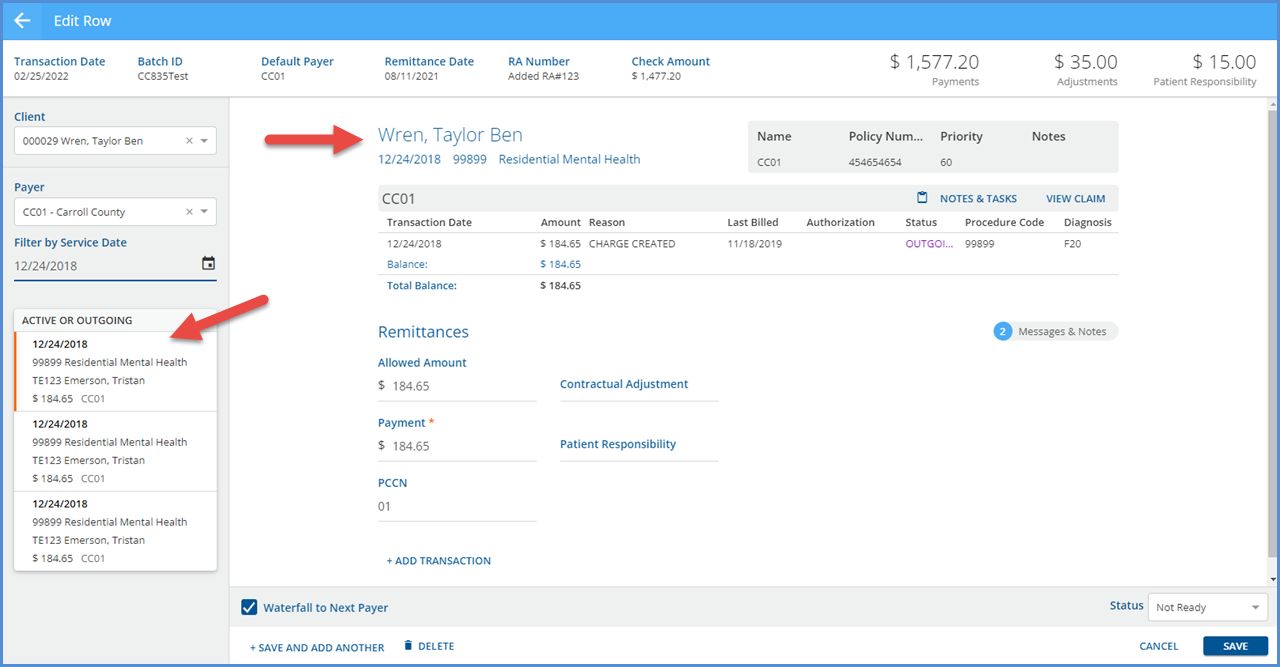
After selecting a Charge, Claim information displays for that Payer, and +SAVE AND ADD ANOTHER and SAVE buttons are enabled.
Non-Specific Payer Payments
A Non-Specific Payer Payment (NSPP) or PLB Segment amount can be added, imported, and managed using the Remittances > Batches feature. When imported, the NSPP is included in the Batch with a Not Ready status, whereas imported Payments matched to a Client and Charge have a Ready status. Note that a negative NSPP amount in the 835 is reflected in EchoVantage as a positive payment amount. Conversely, a positive amount in the 835 is reflected in EchoVantage as a negative amount. For example, the highlighted PLB Segment is from the imported 835 file.

The records created after this file is imported are below. The NSPP record is imported with a Not Ready status and is outlined in red in the image below.
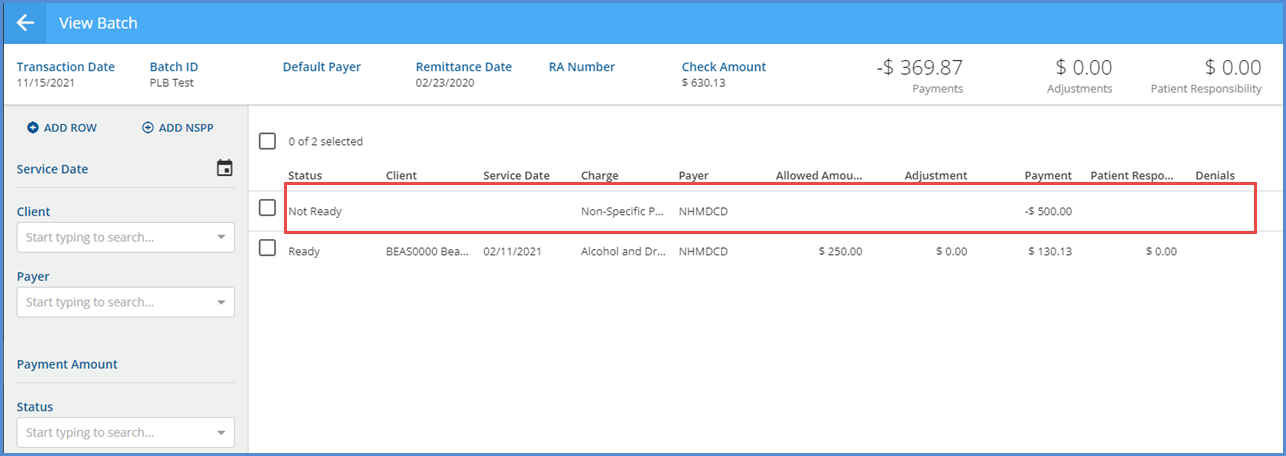
Select the row of the non-specific Payer Payment to view the details in the Edit NSPP screen.
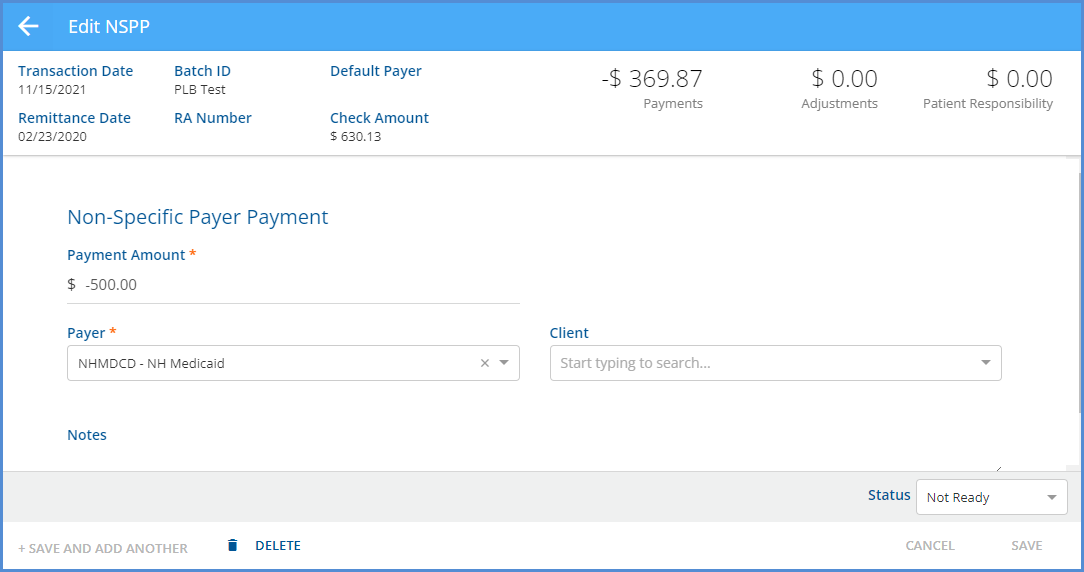
The Edit NSPP screen displays limited information. There are no filters available on the left-hand side, and because this payment is not matched to a charge, Service and Claim information is not displayed. The Payment Amount field is required but can be updated to any amount, positive or negative, but cannot be $0.00.
Select the blue ADD NSPP button on the View Batch screen to manually add an NSPP to an existing or user created batch.

The New NSPP screen opens and has the same fields and entry requirements as the Edit NSPP screen.
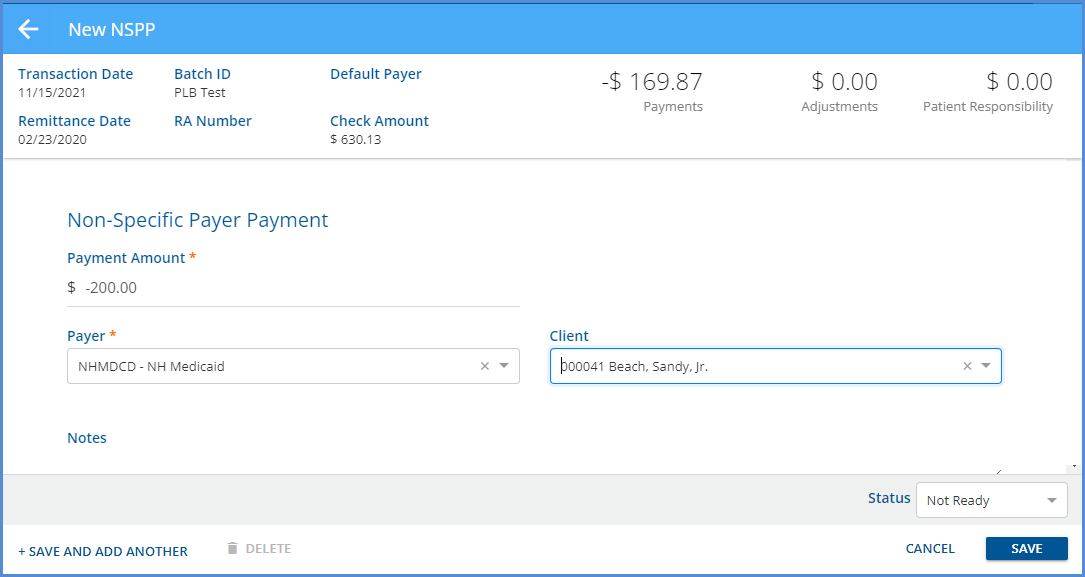
The NSPP can be marked as Ready/Not Ready or Deleted from the New NSPP or Edit NSPP screens or by using the bulk actions on the View Batch screen. An NSPP can also be deleted when an entire Batch is deleted on the Batches home screen; however, selecting the blue Mark as Ready button on the Batches screen only affects non-NSPP Remittances.
When an NSPP is marked as Ready and processed in Fiscal Overview > Unprocessed Remittances, the amount becomes an Unapplied Payment WITHOUT CHARGES and is included in the count of Unapplied Payments on the Fiscal Overview screen. Negative NSPPs become Takebacks; positive NSPPs become Overpayments.
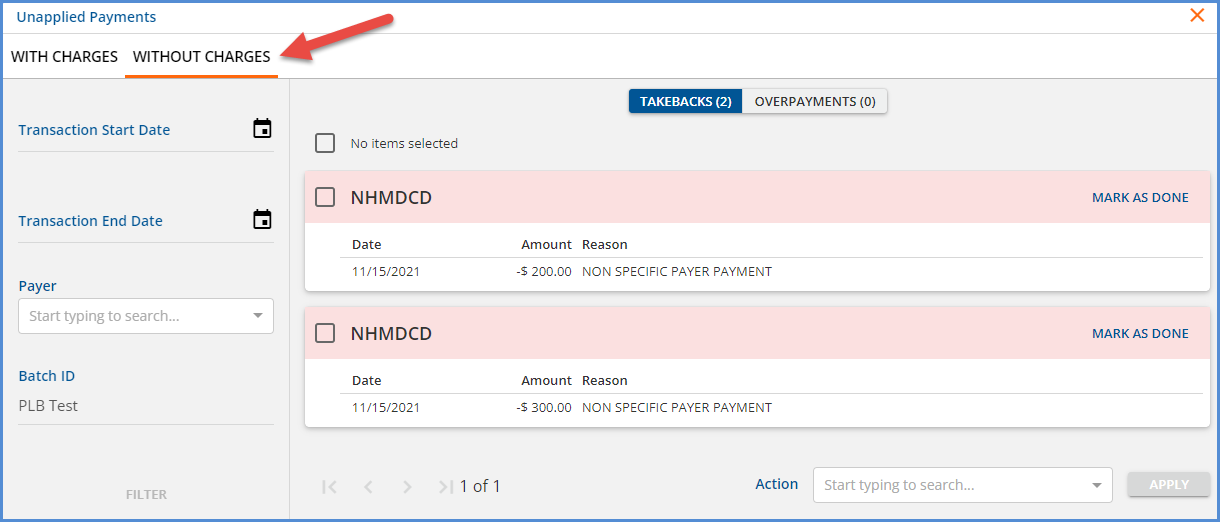
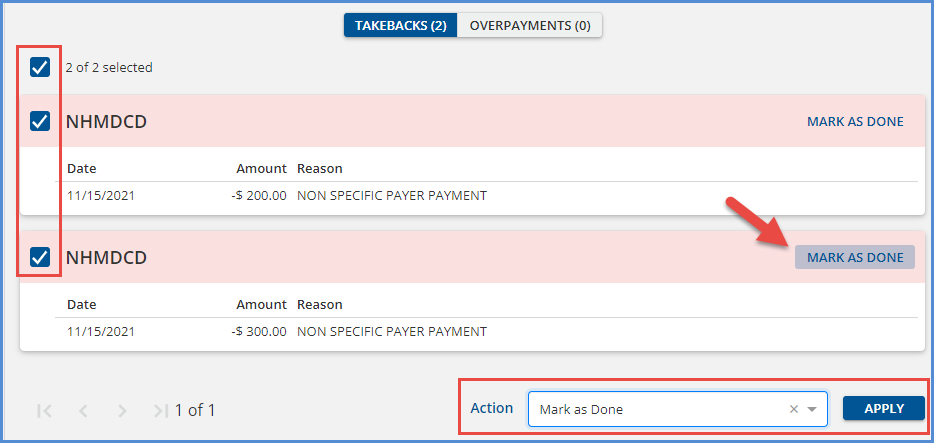
Search for specific Unapplied Payments WITHOUT CHARGES by using the filters on the left to limit results. Use the blue MARK AS DONE button to update a single Unapplied Payment or select the checkboxes to use the bulk Mark as Done Action.
Unmatched Payments, v3.37+
Unmatched payments is the term used by Echo for non-specific payer payments that do not have a matching charge but are specific to a client and date of service. These payments may be in error, possibly due to a billing mistake, and this feature allows the agency to account for the payment while keeping track of the associated client and service date until the details of how it will be handled are sorted.
The upgrade creates a new user-defined payment transaction definition, Unmatched Payment, with the value of NON in the UserTransactionDefinition column of the TransactionDefinitions table. Like custom denial types, additional non-specific payer transaction definitions can be created to further track these types of payments by inserting records into dbo.TransactionDefinitions provided the UserTransactionDefinition value is NON. Please contact support for additional information.
When importing a payment from an 835, an unmatched payment is created in Not Ready status when the payment is for a VOID charge (not a VOID REQUEST) and no new charge exists for the same client and date of service. The 835 may contain an Id837 from one of the void charges or a non-matching Id837. These Not Ready payments include Payment Amount, PCCN, Payer, Client, and Service Date, as shown below.
If manually entering an NSPP (Non-Specific Payer Payment) in Remittances > Batches or original Remittances, the new Unmatched Payment option is available in the Type drop-down list. When the transaction type is NON SPECIFIC PAYER PAYMENT or Unmatched Payment, the PCCN, Client, and Service Date can be recorded but no cards display to associate a charge.
|
Remittances > Batches |
|
|
Remittances > Remittances |
|
When an Unmatched Payment type Remittance is associated with a Client and Service Date AND finalized in a Fiscal Overview > Unprocessed Remittances > Process Transactions job, it is displayed in the Unmatched Payment section of the newly restyled Claim Details modal. The same unmatched payment displays for each claim that matches both the Client and Service Date.
The payment becomes a Without Charges type of Unapplied Payment, as either an Overpayment or a Takeback, in Fiscal Overview > Unapplied Charges. Clicking on the blue VIEW UNMATCHED PAYMENTS button in Claim Details opens the Unapplied Payments > Without Charges > Takeback or Overpayment page with the new filters, Client and Service Date, pre-populated with the associated Client and date of Service information.
In Fiscal Overview > Unapplied Payments > Without Charges, the payment can be marked as DONE or REFUNDED just as before OR REVERSED which removes the payment from the Unapplied Default GL accounts.
Reversing the unmatched payment clears it from the Unmatched Payments section of the Claim Details screen.
Reversing the unmatched payment also creates a copy remittance with a status of Reprocessed.
The following two sections document the workflow for using the Reprocessed remittance to create a Payer Payment.
Applying the Reversed Unmatched Payment in Remittances > (Legacy) Remittances
A second, separate copy remittance with a status of Reprocessed is created by the reversing action. If the original unmatched payment was entered via the legacy Remittances page, the copy remittance may be located by searching for remittances with a Status of Reprocessed for the associated Client and Service Date. Then select the reprocessed remittance to open the Edit Remittance screen.
-
Change the Status to Not Ready and select SAVE.
-
Change the Transaction Type to Payer Payment.
-
Then locate the appropriate Charge on the now visible cards, and select the radio button to associate the payment.
-
Change the Status to Ready and select SAVE again or leave Not Ready if marking items in bulk.
The payment is now ready for the next Process Transactions job in Fiscal Overview > Unprocessed Remittances.
Applying the Reversed Unmatched Payment in Remittances > Batches
When the original Unmatched Payment is entered via Batches, the copy remittance is added to that same batch. If the associated batch information is not already known, locate the Reprocessed remittance in the legacy screen and select the row.
Then select the blue View in Batch button to view the selected reprocessed remittance in the batch. Note that batches do not display Done or Voided transactions so the original Unmatched Payment transaction does not show.
-
The reprocessed (copy) remittance can remain untouched for now.
-
Batches use a separate form for NSPP type payments so the reprocessed remittance cannot be converted to a Payer Payment as on the legacy Remittances page.
-
The ability to delete a remittance with the Reprocessed status will be available with the release of v3.38.
-
-
Add a new row to the batch for a payer payment transaction type for the same amount as the original Unmatched Payment.
-
The newly added Payer Payment is now ready for the next Process Transactions job in Fiscal Overview > Unprocessed Remittances. The reprocessed remittance can be deleted in v3.38.
