Auditing provides the tools for an agency to track who accessed system information, what was done (views or changes), and when the actions took place. Audit information is useful for compliance reporting, monitoring access, especially to PHI, and evaluating workflow. Once Audit is installed on the ShareCare database, the agency configures the tables and columns for which changes are tracked and defines the screens on which view access is tracked. The Auditing feature also includes a search capability for recalling and viewing audit records. The sections below detail the installation, configuration, and search processes.
Installing ShareCare Auditing
A separate installation is required to add the Auditing feature to the ShareCare application and create the audit database. Echo provides the audit.zip file; please contact your account manager with any questions. From the server or a networked machine, find the installation file, echosetup.exe, in the audit.zip file. Right-click to run as administrator, the following setup screen displays.
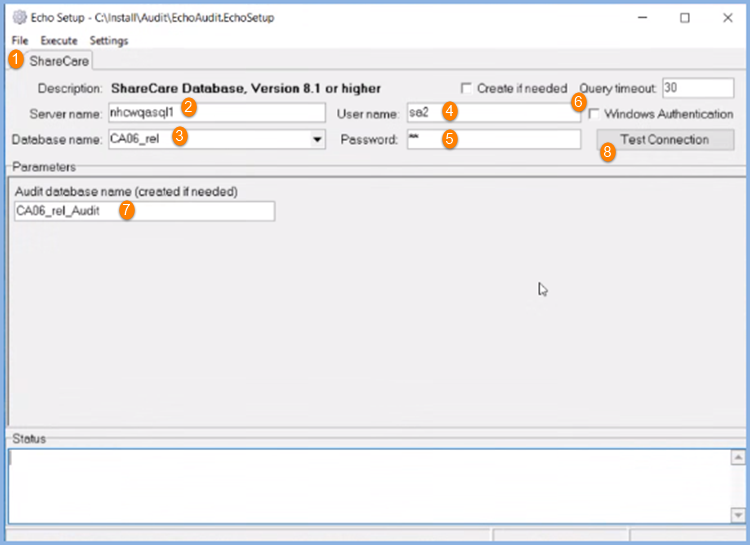
1. The screen defaults to the File tab.
2. Server name - This is the server that hosts the ShareCare database.
3. Database name - The name of the ShareCare database where Auditing is being installed.
4. User name - The system admin login name to the ShareCare database server.
5. Password - The system admin login password to the ShareCare database server.
6. SQL Server Authentication security protocol is used by default. Windows Authentication may be used by selecting the checkbox.
7. Enter a name for the Audit database. In the image, the database name is CA06_rel, and the audit database name is CA06_rel_Audit.
8. Verify that the connection information entered in steps 2-5 is correct by selecting the Test Connection button. The test connection must be successful before selecting Execute.
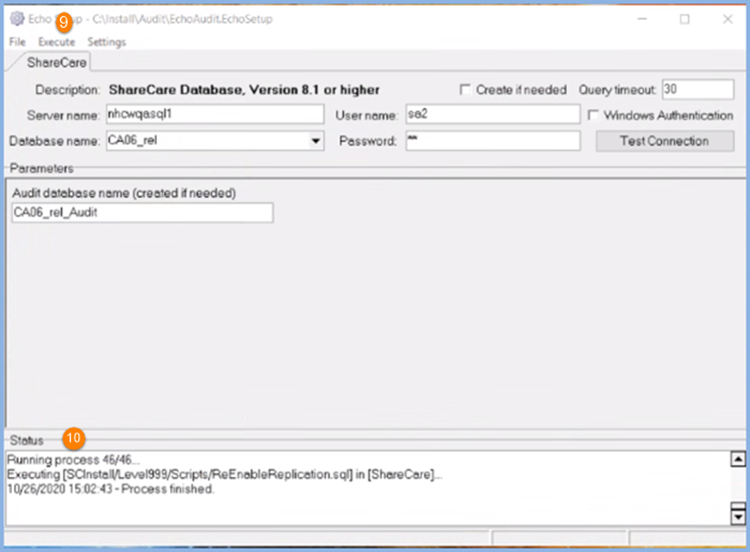
9. Select Execute to start the installation process.
10. The Status section of the screen displays the installation information. When complete, a Processed finished message displays.
No changes are required in the Settings tab. The install defaults to using the EchoAudit.EchoSetup, provided in the .zip file, as the Setup file.
Access the ShareCare server defined in step 3 and verify that the audit database defined in step 7 appears in the database list.
Enabling Auditing Screen Access
After Auditing is installed, Echo must enable the feature, so the Auditing screen is available to assign to User Groups. Unauthorized, Select, and Update are the permissions available to assign. Access defaults to Unauthorized for all User Groups once the screen is enabled. Update access is required to complete the configuration process in the Audit Config tab. Select access is sufficient to view and perform audit information in the Audit Search tab.

Configuring ShareCare Auditing
Once a user has the appropriate User Group access, Auditing is visible in the Administration menu. The Auditing menu has two tabs, Audit Search and Audit Config. Audit Search requires the audit configuration setup to be complete and is covered in detail after the Audit Config section.

Select the Audit Config tab to display the configuration screens.
Audit Config
Track Changes are not enabled for any tables or columns, and no screens have view tracking enabled. Configuration requires the agency to decide which tables, columns, and screens to enable for tracking. Agencies are encouraged to work with their compliance or legal departments when deciding what information to capture for auditing. Some important questions to consider are:
- Is it Consumer related?
- Can it be accessed from the application UI (User Interface)?
- Who has direct database access?
- Are changes made directly in the database?
- Will Audit information be used for compliance reporting, workflow analysis, or both?
- What are the resources available for storing the captured audit information?
The Audit Config tab consists of two configuration screens, Change Audit and View Audit—the Change Audit screen displays by default.
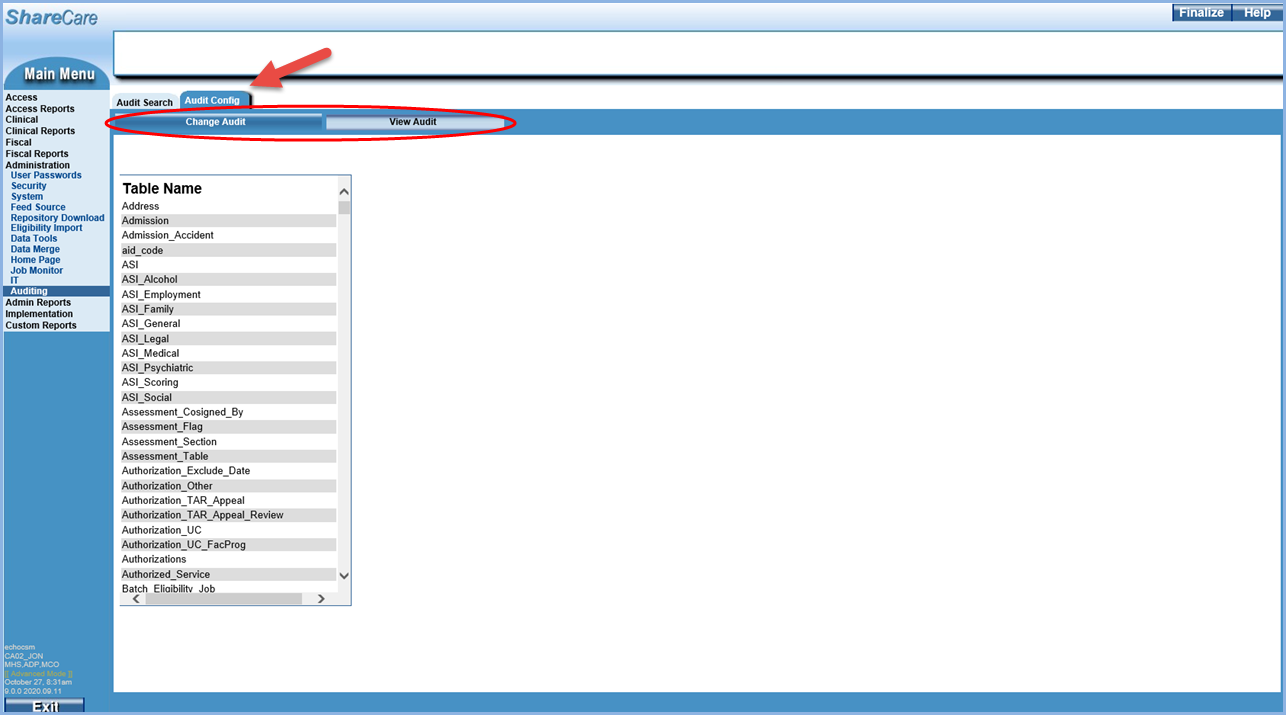
Change Audit
The Change Audit configuration screen defines which tables and columns are used for tracking changes. Database changes are the result of additions, deletions, and updates. Configuration in this section is per table and column.
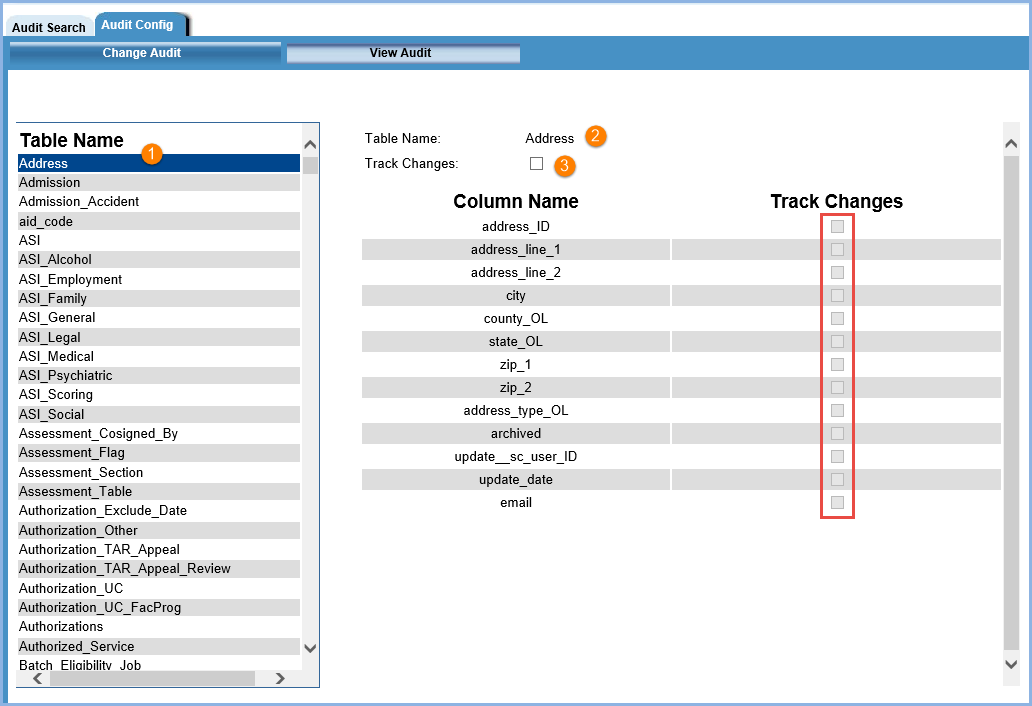
1. The Table Name section lists the tables that qualify for auditing. A table must have the following three columns to qualify for auditing:
- id
- Update date
- Update User
2. Once a table is selected, the column detail displays in the right-hand pane. The selected Table Name displays at the top.
3. The Track Changes checkbox must be selected to enable the column Track Changes checkboxes.
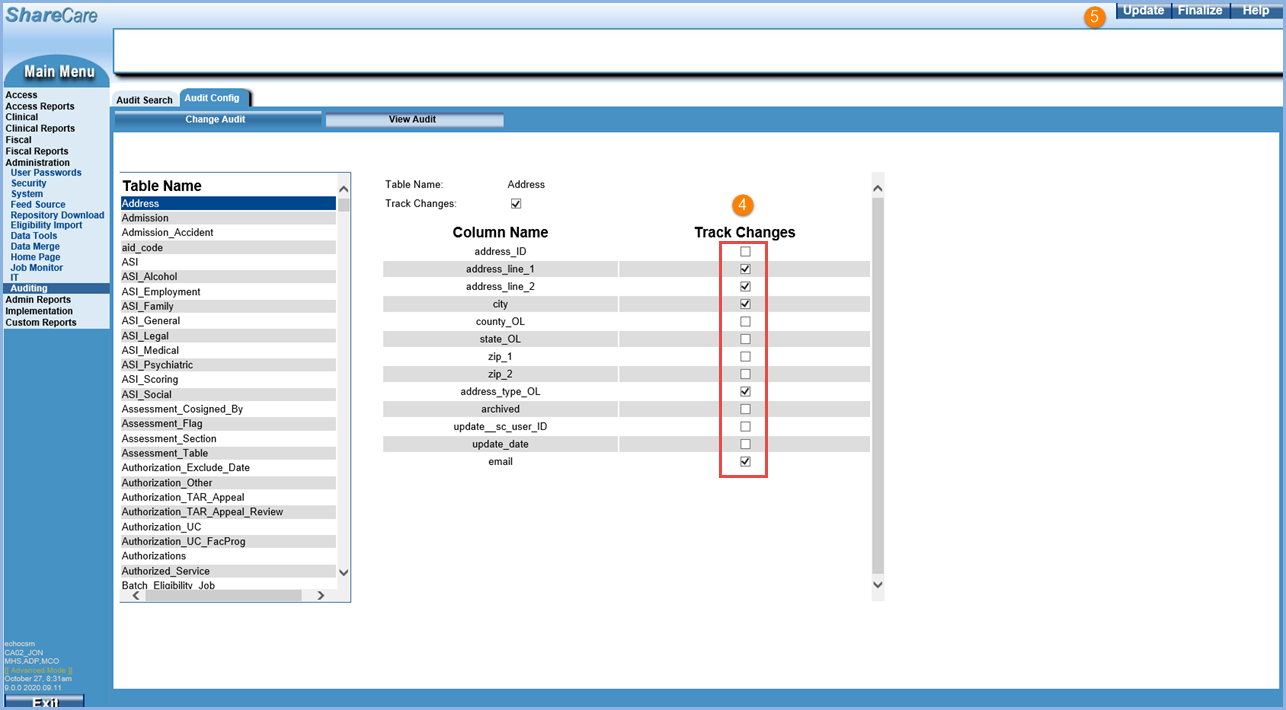
4. Once column Track Changes are enabled, select the checkbox for each column to include for auditing.
5. When Track Changes are enabled for the desired columns, select the blue Update button to save the changes.
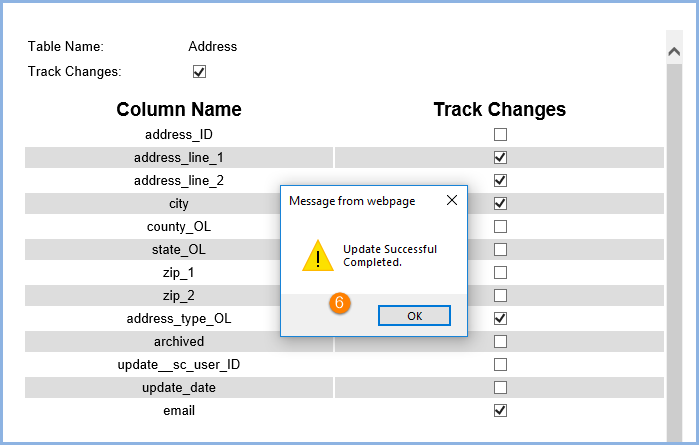
6. Look for the Update Successful Completed message and select OK to acknowledge the confirmation.
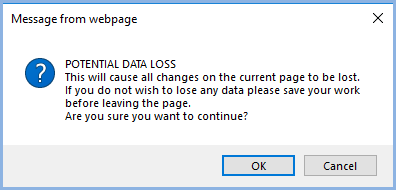
If changes are made but not saved via the Update button, the system displays a warning message and requires confirmation.
Repeat steps 1-6 until the desired tables and columns are configured. When complete, select the View Audit tab to continue the configuration.
View Audit
The View Audit tab configures auditing for screen access or views. Where Change Audit is purely based on the schema, View Audit is concerned with app routes and screen sets. By default, Audit Views are tied to the Consumer table on the backend, and this configuration is not visible or editable in the UI.
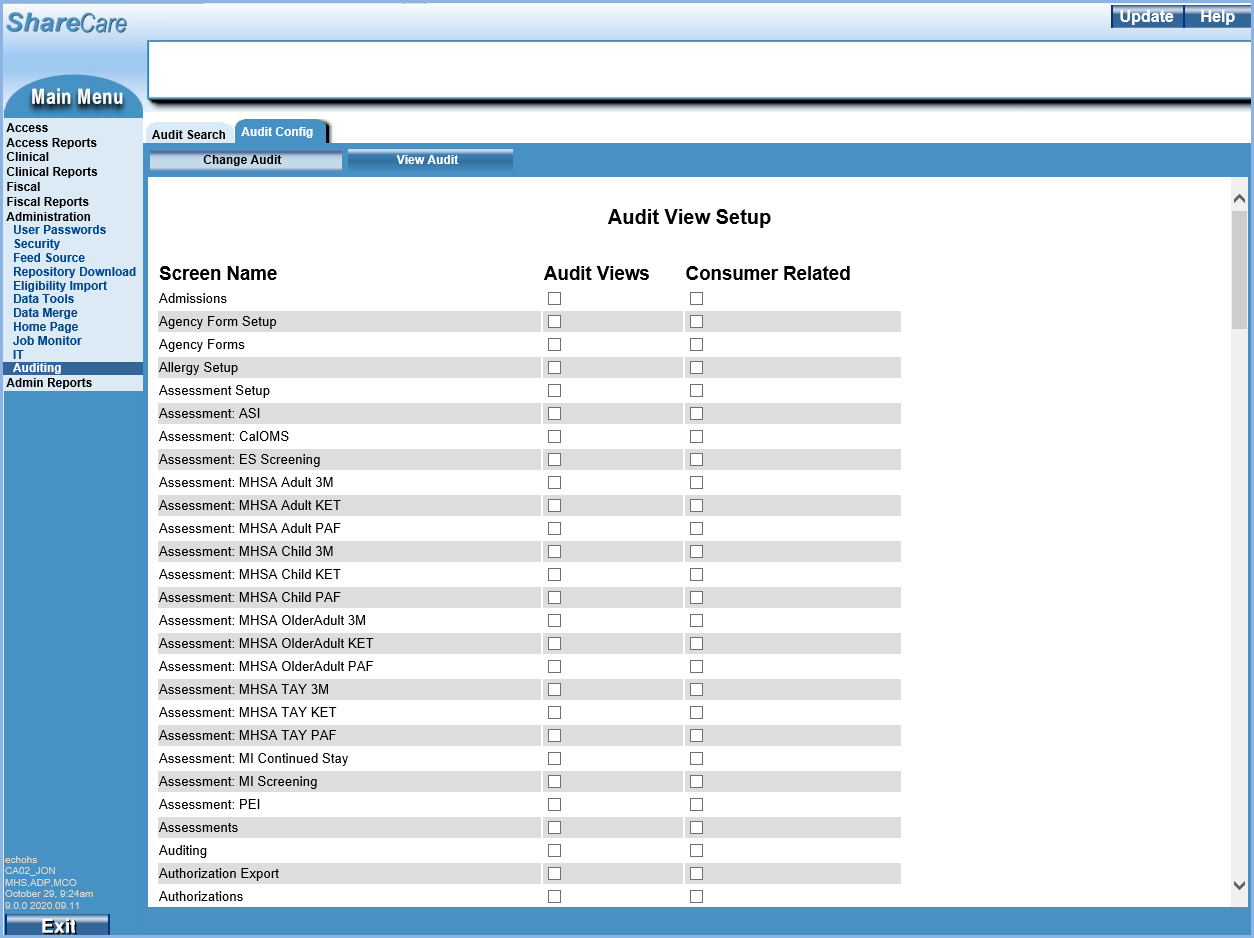
The Audit View Setup lists the screens in alphabetical order by name with checkboxes enabled for Audit Views and Consumer Related. Note that the Consumer id is only stamped in the Audit Records when the Consumer Related checkbox is selected.
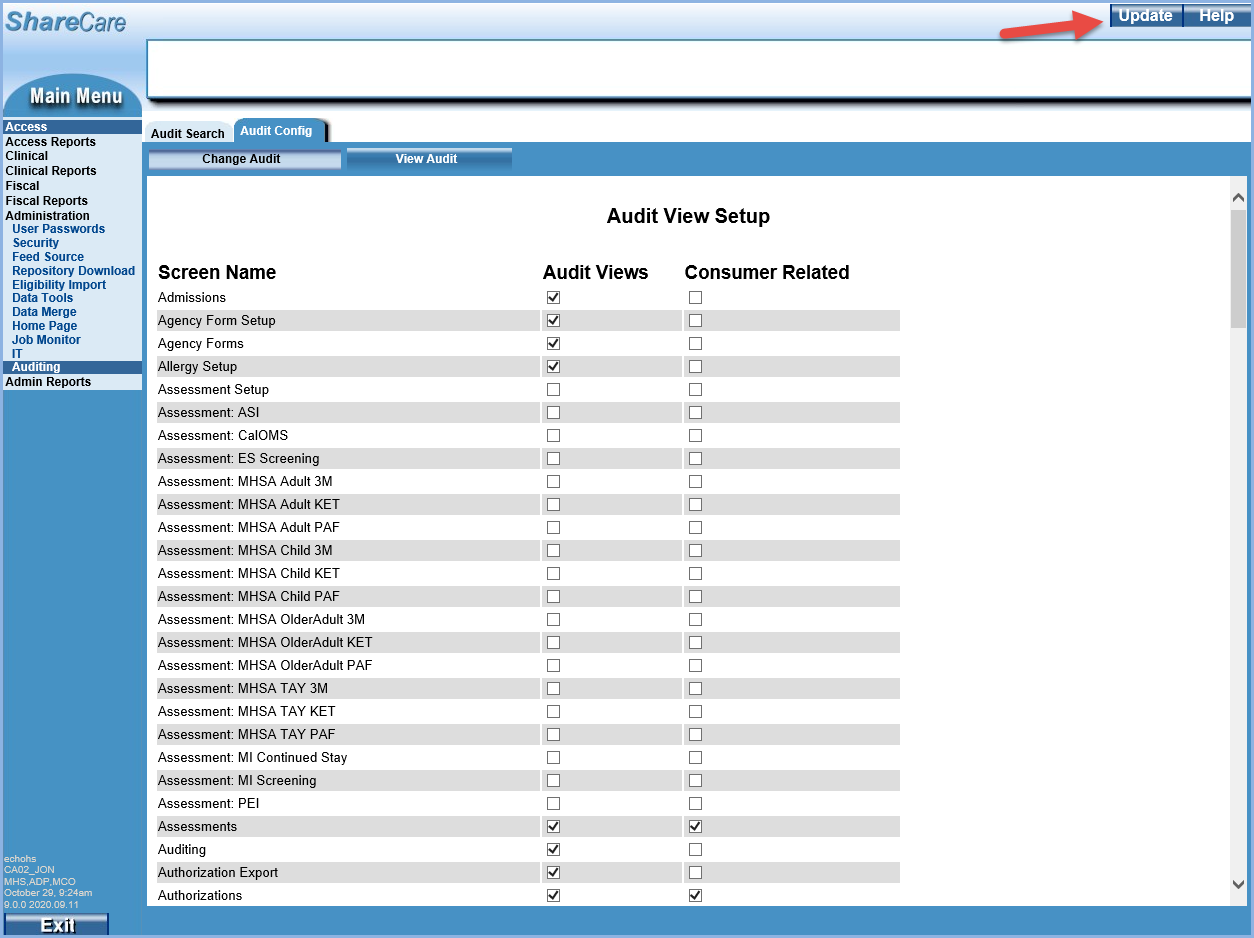
Once the checkboxes are selected to turn on auditing for each desired screen, select Update in the upper right-hand corner to save the changes.
Audit Search
Once the setup for Audit Config is complete, users with Select access to the Auditing screen can use Audit Search to query and view information stored in the audit database.
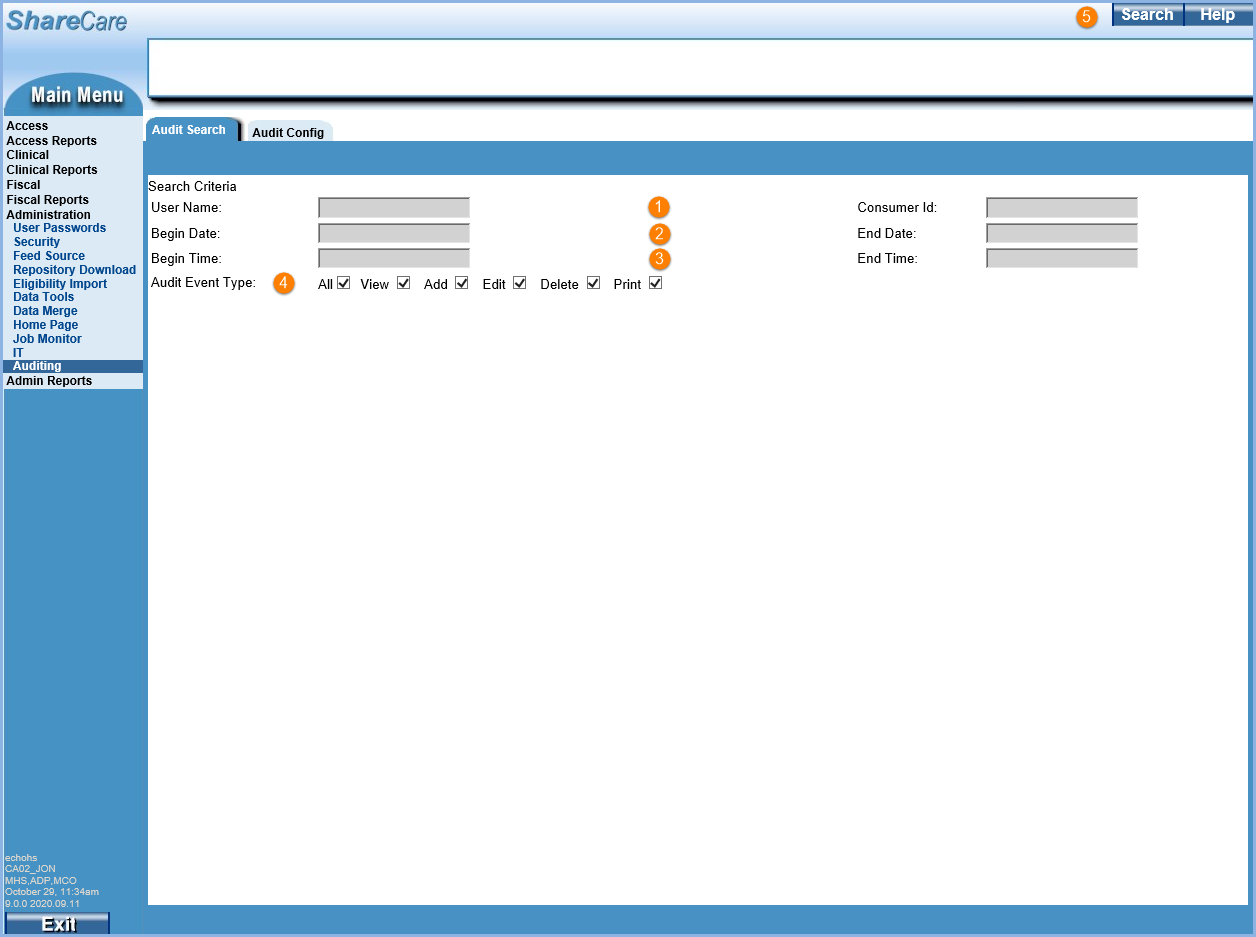
1. Searches may be performed by User Name, Consumer Id, or both. At least one of these fields is required to be populated.
2. Begin Date and End Date are required fields. The date range can only span a maximum of one week.
3. Begin Time and End Time are optional fields. Use these fields to further restrict the search to a specific window of time within a 24 hour period.
- Enter numbers without the colon to populate the Time fields.
- Time is based on a 24-hour clock.
- For example, enter 1800 for a Begin Time of 6:00 pm and 2359 for an End Time of 11:59 pm.
4. Audit Event Type - Select the checkboxes of the Event Types to include in the results. The Print Events are currently not included in the Search Results and will be corrected in a future release.
5. Once the search fields have been populated, select the blue Search button in the upper right-hand corner of the screen to display the results.
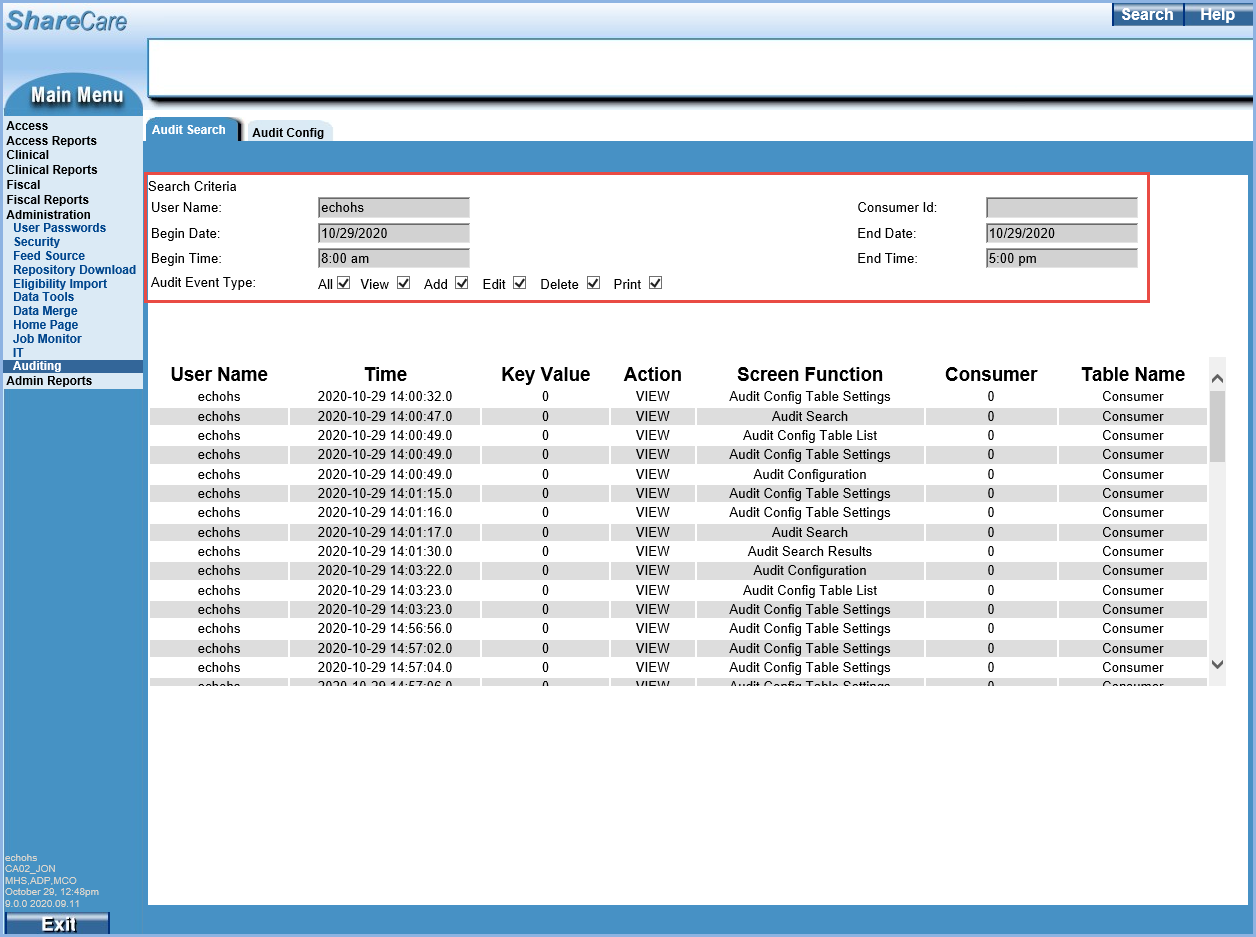
A search for a single day for user "echohs" between 8:00 am and 5:00 pm with all Audit Types selected was created in the example above. The results display in a grid with column headers.
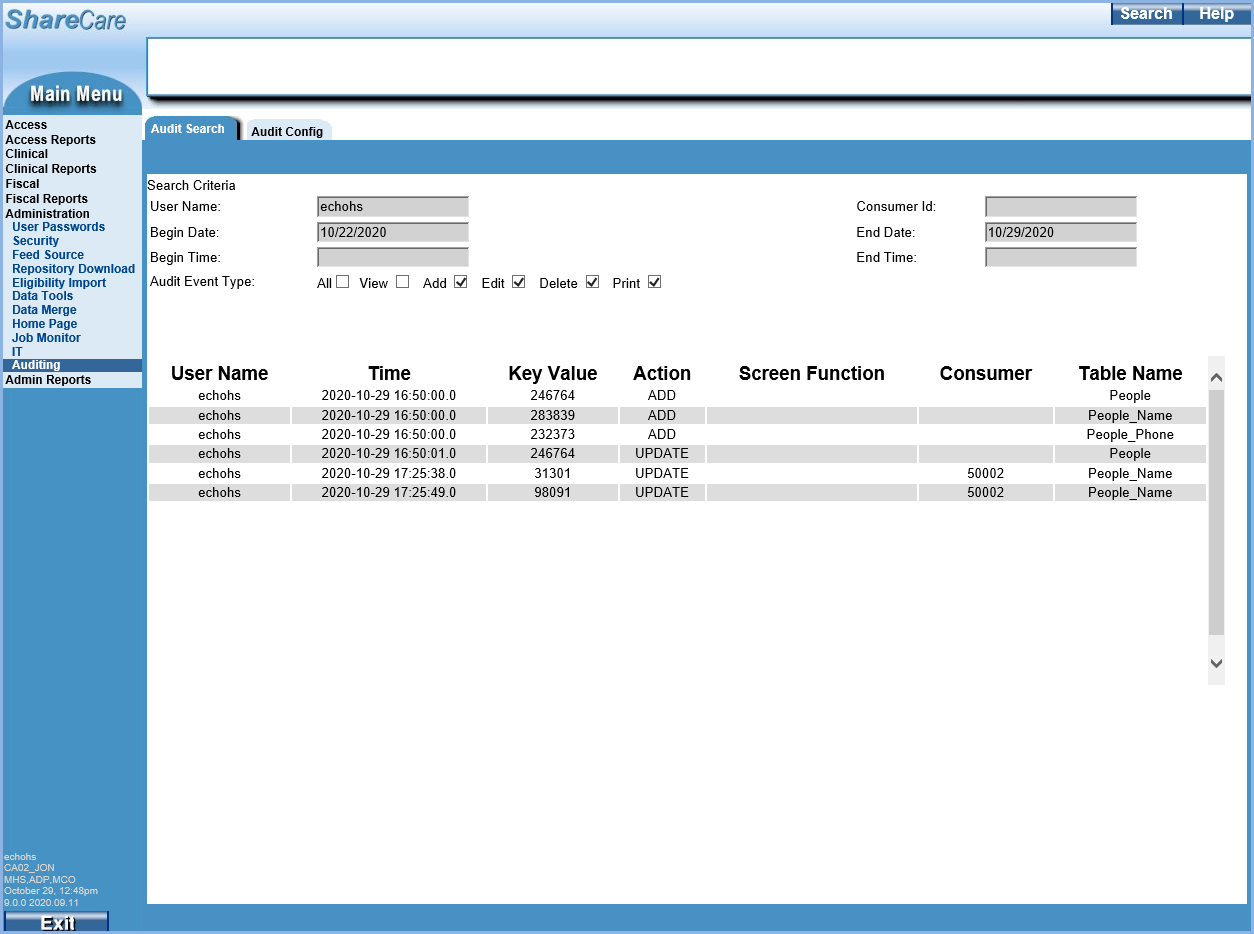
Removing the View Audit Type from the search parameters produces a much smaller result set in this example.
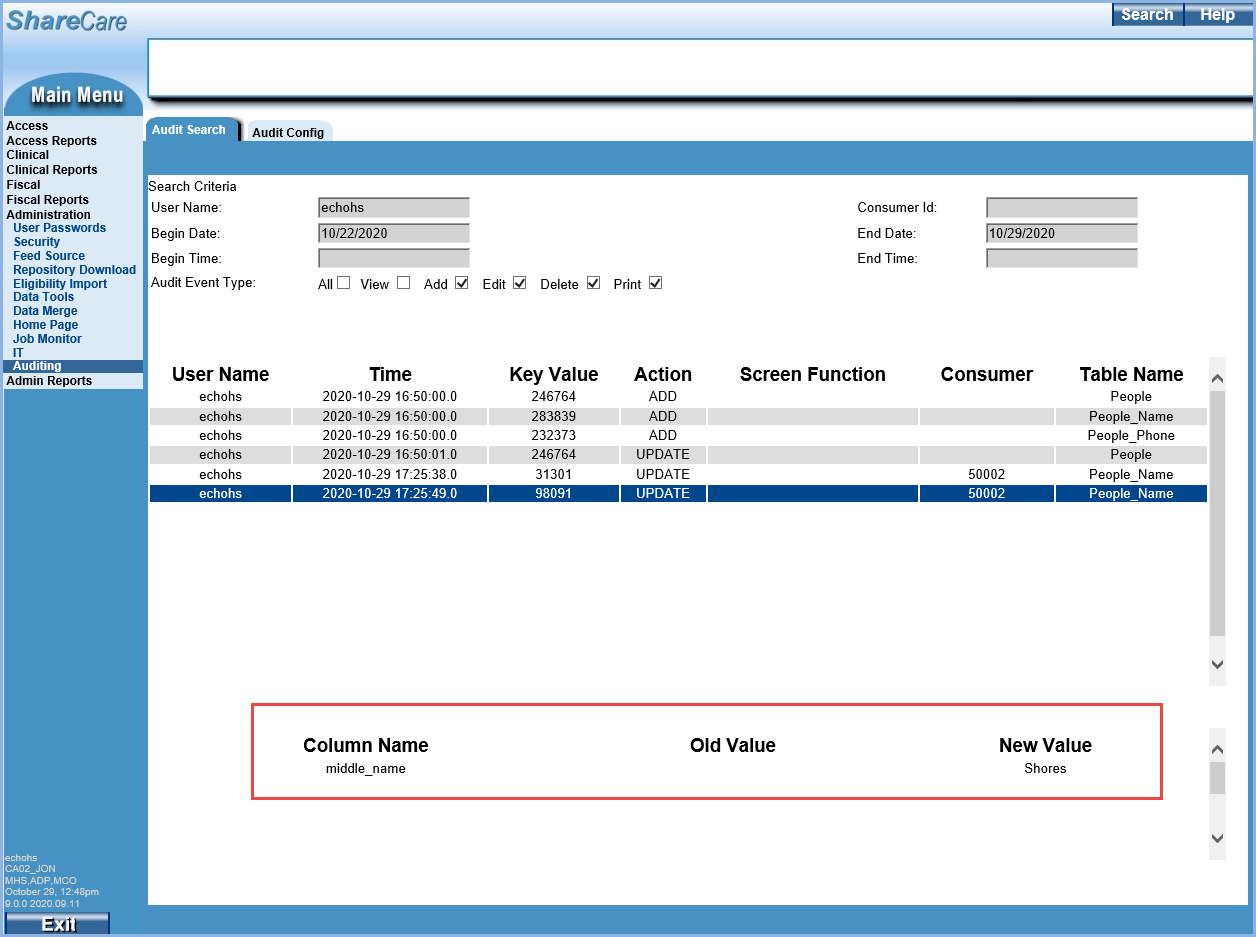
Selecting a View Audit Type result does not yield any additional information. However, selecting any Add, Edit, or Delete Audit Type Event row displays more information. Note that these change type Audit Events are tied directly to the schema, table, and column name, so the Screen Function is not populated.
