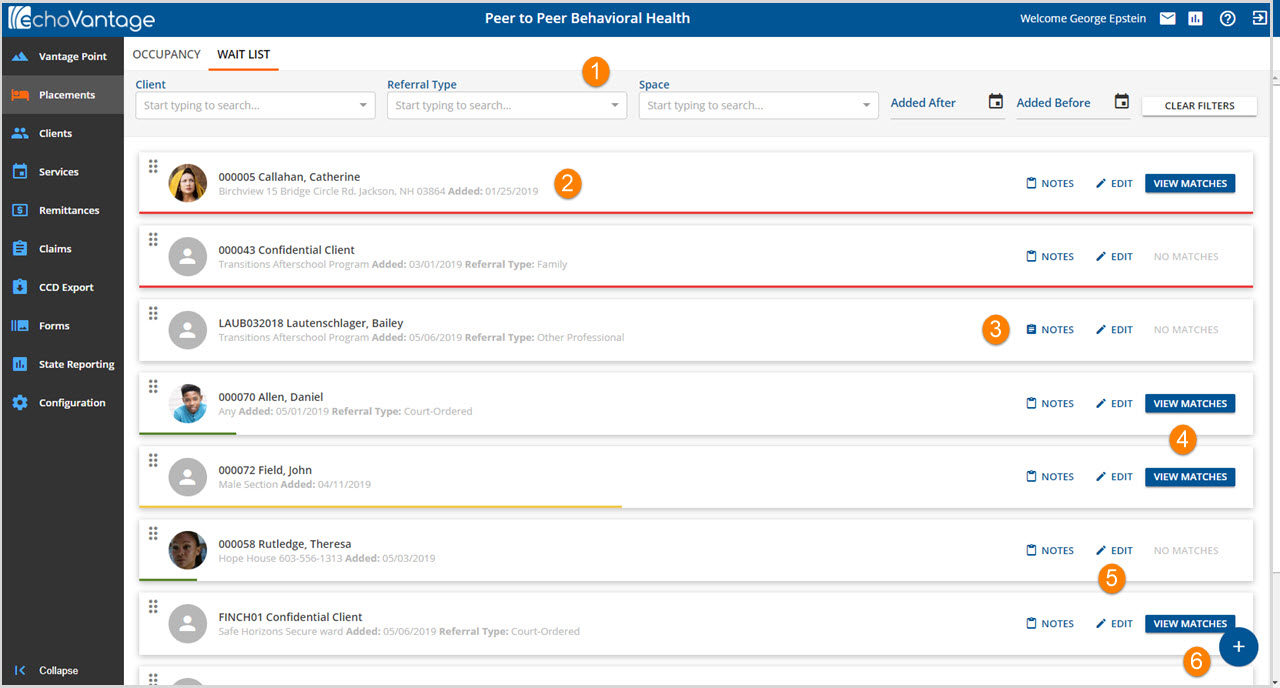
The Wait List screen helps manage and track those clients currently waiting for a placement. Clients are matched with available spaces based on criteria specified when adding client to the wait list. As currently placed clients are discharged, the application updates availability against the wait list and indicates when a match is available.Depending on configuration, a Wait List Opening Alert may also be triggered.

1. Filters across the top of the page are used to determine which clients are displayed in the list. Filters available are:
- Client - Enter any portion of the first or last name or client code to search for a specific client.
- Referral Type - This is the Referral Type selected when the client was added to the wait list. It is defined in Configuration>Setup>Defined Lists>Referral Types
- Space - This is the Space selected when the client was added to the wait list. The Spaces are defined in Configuration>Setup>Occupancy
- Added After and Added Before - These dates are compared to the Added Date that is completed when client is added to the Wait List. Both Added After and Added Before include the date entered in the search results. For example, entering Added Before 05/06/2019 will return any clients added to the Wait List on or before 05/06/2019.
- Clear Filters - Select to clear filters and display all clients currently on the Wait List.
2. The clients are listed with summary information. It displays the space the client is waiting for, the date added and the Referral Type if entered. A colored line (red, yellow, green) is a visual representation of the length of time the client has been waiting for a placement.
3. Notes - Waitlist notes are Continuous Notes and keep a running log of calls and other activities related to a client's Waitlist entry.
- Notes may be viewed for any client by selecting the Notes icon.
- Current notes display or No Notes will be indicated.
- To add a New Note, click on the blue plus "+" and click on New Note.
- When finished entering note, click on SAVE.
- An on-screen action box will flash momentarily indicating that the Note has been saved successfully.
- A client with an existing note will have a clipboard with a blue background.
4. VIEW MATCHES - As placements become available, the application looks for matches on the Wait List. When a match is found, the VIEW MATCHES button is enabled.
5. EDIT - The Edit pencil icon may be selected at anytime to make changes to the placement request.
6. NEW PLACEMENT REQUEST - Click on the blue plus "+" to enter a New Placement Request.

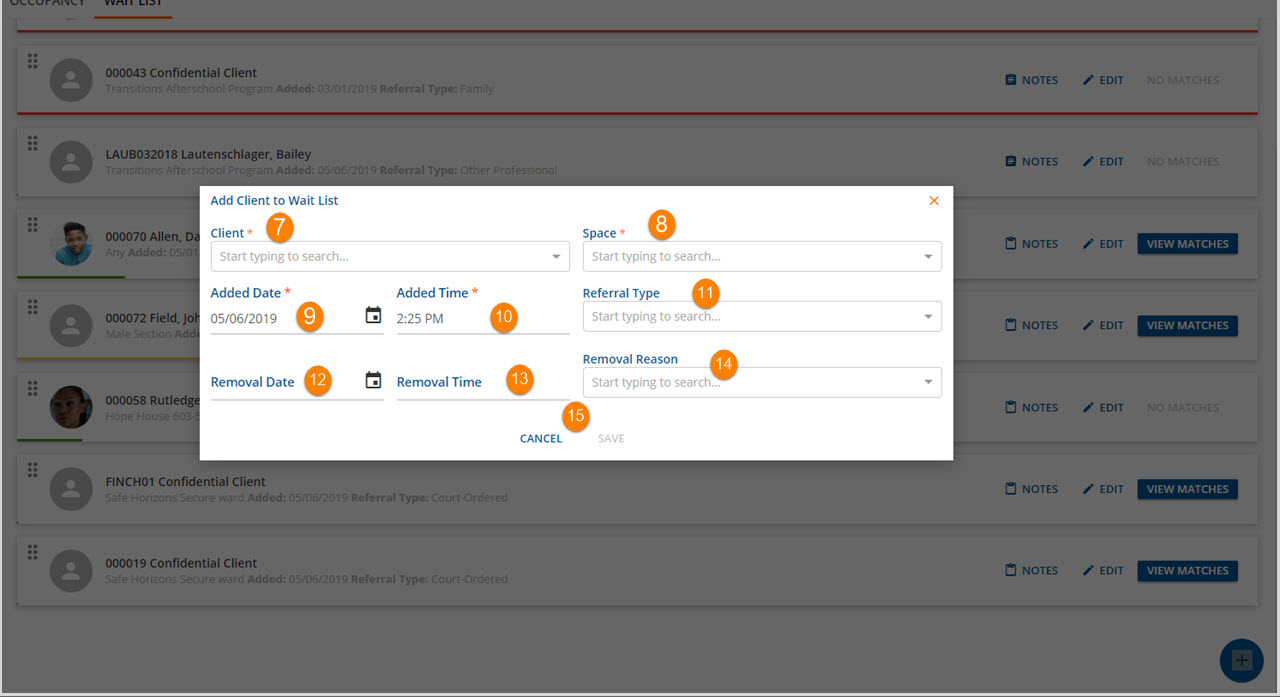
7. Client - Select the client to be added to the Wait List;
8. Space - Select the Space the client is waiting for.
9. Added Date - This is the effective date of the client being added to the Wait List. It can be the current date, pre-dated or post-dated.
10. Added Time - This is the time the client was added. This is helpful to determine the priority order if many clients are waiting for the same spaces.
11. Referral Type - This is the person or reason the client is being added to the wait list. This is defined in Configuration>Setup>Defined Lists.
12. Removal date - This is the date the client is taken off of the wait list.
13. Removal Time - This is the time the client is taken off of the wait list.
14 Removal Reasons - Select the reason for removal from the list. This is defined in Configuration>Setup>Defined Lists.
15. Remember to click SAVE to record the new entry. Click CANCEL to exit without saving.
