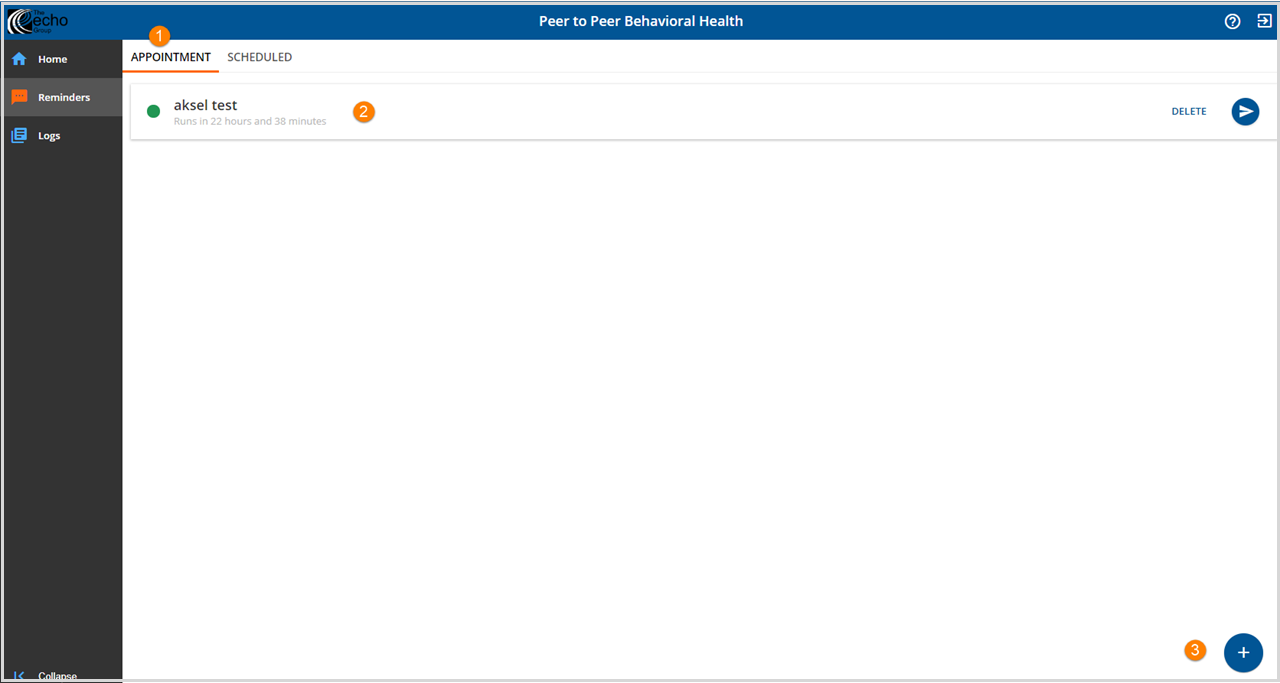
1. Clicking Reminders on the main menu defaults to the Appointment tab. Note that the horizontal orange bar indicates the currently selected tab.
2. Pending reminders are displayed on the tab. The run time count down is displayed beneath the reminder title.
- Single click on any reminder title to view the details.
- Click SAVE if any changes or edits are made.
- To permanently delete a job, click DELETE to the right of the reminder title. A box confirming deletion will pop up.
- The blue circle icon will be a Run Now option in future releases.
3. Click the blue plus icon to add a new Appointment Reminder.

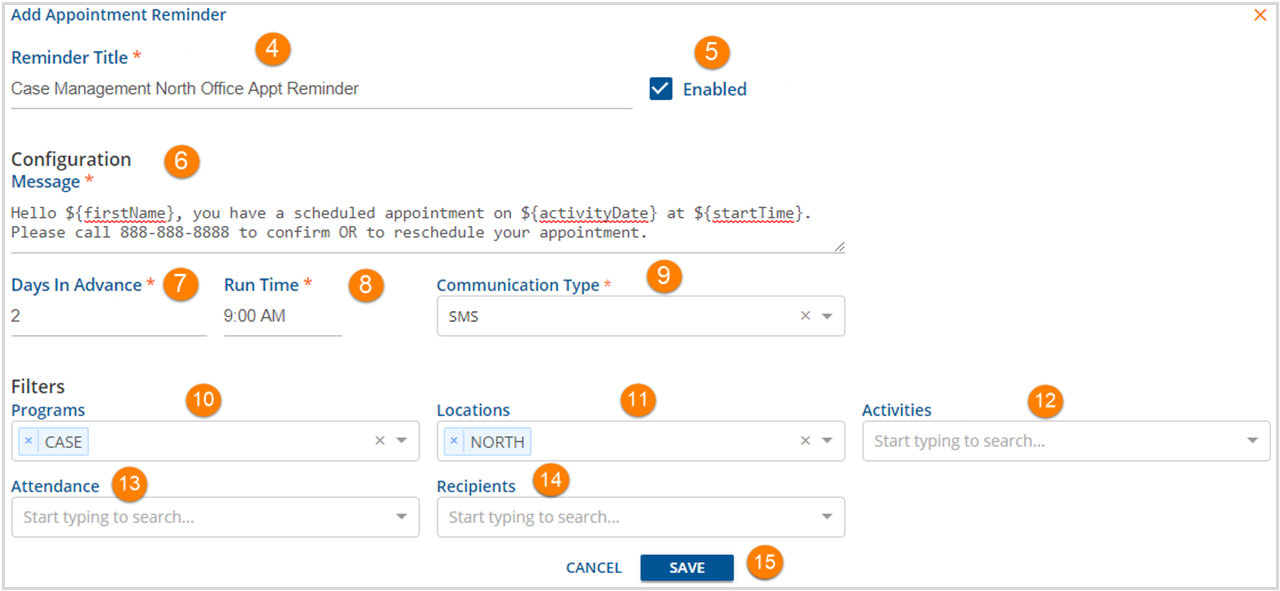
4. Reminder Title - Enter a reminder title in this field. This is the name displayed in the pending reminder on the Appointment tab.
- This is a 100 character free text field.
- Currently exceeding this count results in the job not being saved and an Internal Server Error displays.
- In an upcoming Release, this field will be validated so that the title may not exceed 100 characters.
5. Enabled - Check this box to make the Appointment Reminder active. Leave blank to preserve selections but not enable. The reminder will still show on the main tab but the status will be disabled rather than a pending countdown.
Tasks 6 through 9 make up the Configuration section of the Appointment Reminder. This sections defines the message that is sent, when it is sent and to which number it is sent.
6. Message - This is the message the recipient receives.
- A standard SMS message is 160 characters long. This includes letters, numbers, spaces and punctuation.
- Messages longer than 160 characters will be split into two or more texts for delivery purposes.
- In the example above, the following tokens are used: ${firstName}, ${activityDate}, and ${startTime}. Click HERE for more information about tokens.
- If this reminder is run on April 17th, Client Ernesto Stilson with a Case Management appointment on Friday, April 19th at 2:00 PM. will receive the following text message "Hello Ernesto, you have a scheduled appointment on April 19th at 2:00 PM. Please call 888-888-8888 to confirm OR reschedule your appointment." For reference, the character count of the message excluding the quotation marks is 141.
7. Days in Advance - This is the number of days prior to any scheduled appointments that the job is scheduled to run. This number is set for each reminder job and does not need to be the same from job to job. For example, Counseling appointment reminders could be sent two days prior while Case Management appointment reminders could be sent just one day prior.
8. Run Time - This schedules the time of day the Reminder is run. An organization may choose to run this in the morning so any calls to reschedule are answered throughout the day.
9. Communication Type - Defines which number will receive the Appointment Reminder. It is recommended that organizations use an SMS phone type to clearly define those clients that have opted-in to the SMS message reminder system.
- This is the Type field in the Phone Numbers grid on the Communications tab of the Client screens in the EchoVantage application.
- This is the Type field on the Communications page of the Client Record in Clinician's Desktop, VHR view.
- This is the Type field on the Communications tab of the Client Profile in Clinician's Desktop, Admin view.
Note that the blue SAVE button is now enabled. If the same message is being sent to all clients with any appointment type 2 days from the current date, proceed directly to step 15.
Tasks 10 through 14 make up the Filters section of the Appointment Reminder. This section defines and refines who will receive the reminder based on information found in the Service Definition (PLAAR) of each appointment (scheduled Service or Event). These fields may have different names in the EchoVantage application as all Service Components may be renamed in Configurations>Services/Payer>Components. If a selection is made in error and needs to be removed, click the x in left hand corner of each selection.
It is important to understand the relationships within and between the Filter fields. Typically the more filters used will result in a smaller number of recipients being selected to receive the reminder.
- There is an OR relationship within a filter field. Multiple selections within any Filter field will return results that meet any one of those selections. If CASE and ADP are chosen for Programs all clients that have either CASE OR ADP appointments will be selected.
- There is an AND relationship between the Filter Fields. Now enter a Locations filter of HOME. For this single filter it returns any appointment that is scheduled to meet at HOME. When used in combination with the Programs filter, only clients with a CASE appointment scheduled to meet at HOME AND clients with an ADP appointment scheduled to meet at HOME will receive reminders.
- Expanding on the example above, this also means that all other types of CASE OR ADP program appointments that meet anywhere other than HOME will not receive the reminder AND all HOME appointments for any program that is not CASE or ADP will not receive the reminder.
10. Programs - Use to include recipients enrolled in a specific Program during the scheduled appointment. More than one Program may be selected. In example screen above, only the Case Management program (CASE) has been selected.
11. Location - Use to include recipients that have an appointment scheduled at a particular location. In the example screen, only the NORTH office location has been selected. More than one location may be selected.
12. Activities - Use to include recipients that are scheduled for a specific activity. More than one activity may be selected.
13. Attendance - Use to include recipients based on attendance.
- Clinicians Desktop Users
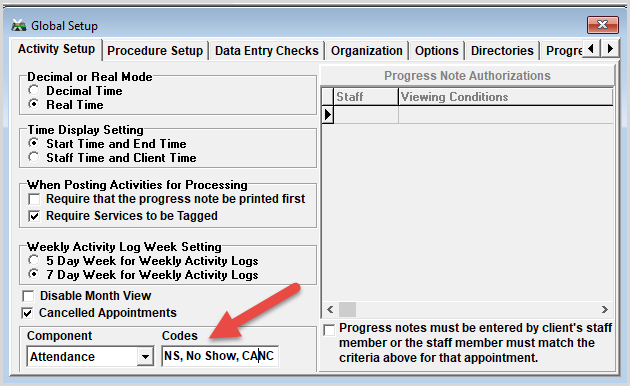
- Leaving this filter blank sends to all codes except those specifically excluded in Admin View Tools>Global Setup>Activity Setup>Cancelled Appointments
-

- EchoVantage Users
- Leaving this filter blank allows messages to be sent for any attendance type.
- Users can specifically select the attendance codes to include on each job. OR
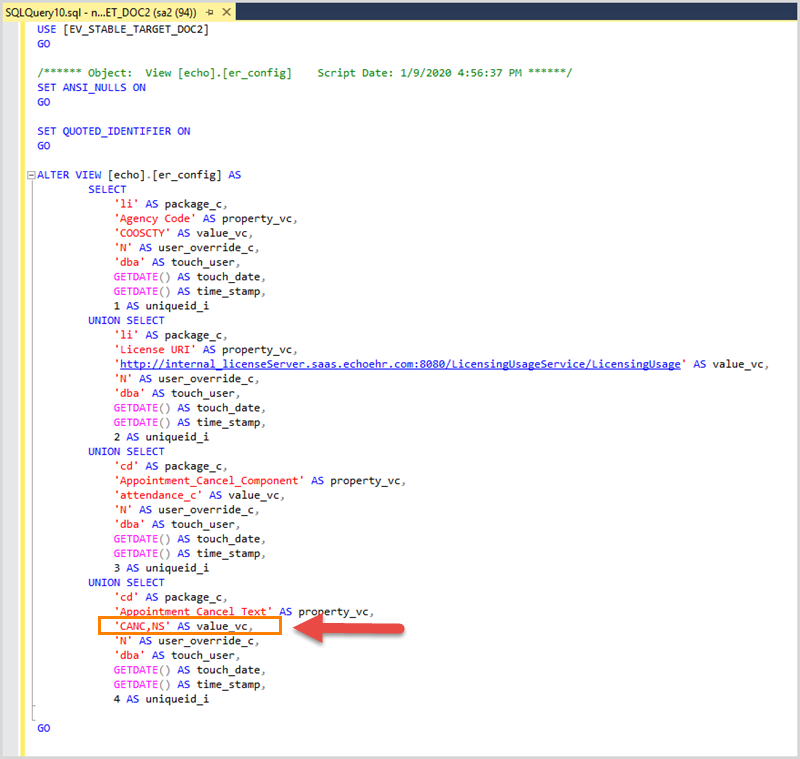
- The echo.er_config view may be modified in the database to specify which attendance types are cancellations and should be excluded.
- echo.er_config can be found in the production database under Views
- Right click on the view and select Script View As>Alter To>New Query Editor Window
- Modify the values to reflect the attendance codes you wish to exclude using a comma delimited format. The default is CANC and NS as per the red text in the area indicated in the image below.
- Remember to select Execute to apply the changes made to the View
- In the example below, both CANC and NS attendance types are excluded. Any Events or Services with this attendance code will not be included in the SMS Appointment Reminder job.
-

14. Recipients - Use to only include specific recipient types. These are agency specific and are defined in the Recipient Service Component, some examples include: direct, indirect, adults, outpatient. More than one recipient type may be selected.
15. When entry is complete, the SAVE button will be enabled. Click SAVE to Add the Appointment Reminder.
