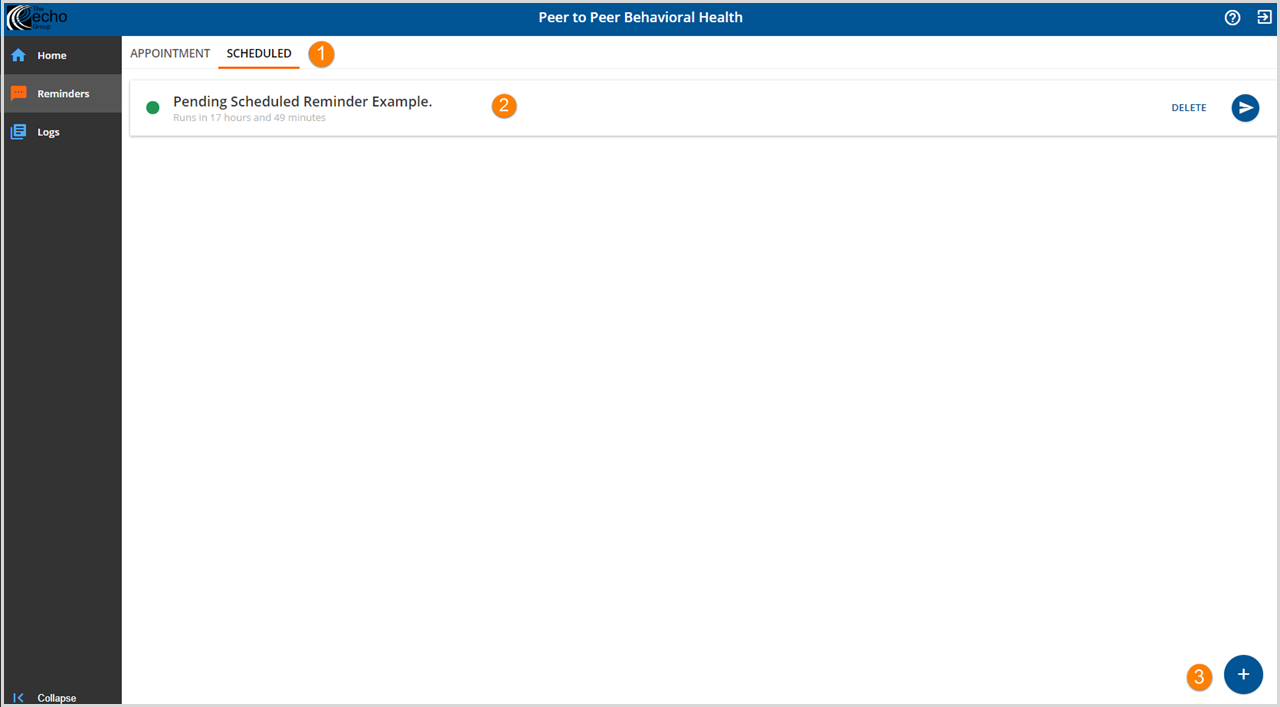
1. Click SCHEDULED to display the Scheduled Reminders tab. Note that the horizontal orange bar indicates the currently selected tab.
2. Pending and disabled reminders are displayed on the selected tab. The run time count down is displayed beneath the reminder title.
- Single click on any reminder title to view the details.
- Click SAVE if any changes or edits are made.
- To permanently delete a job, click DELETE to the right of the reminder title. A box confirming deletion will pop up.
- The blue circle icon will be a Run Now option in future releases.
3. Click the blue plus icon to add a new Scheduled Reminder.

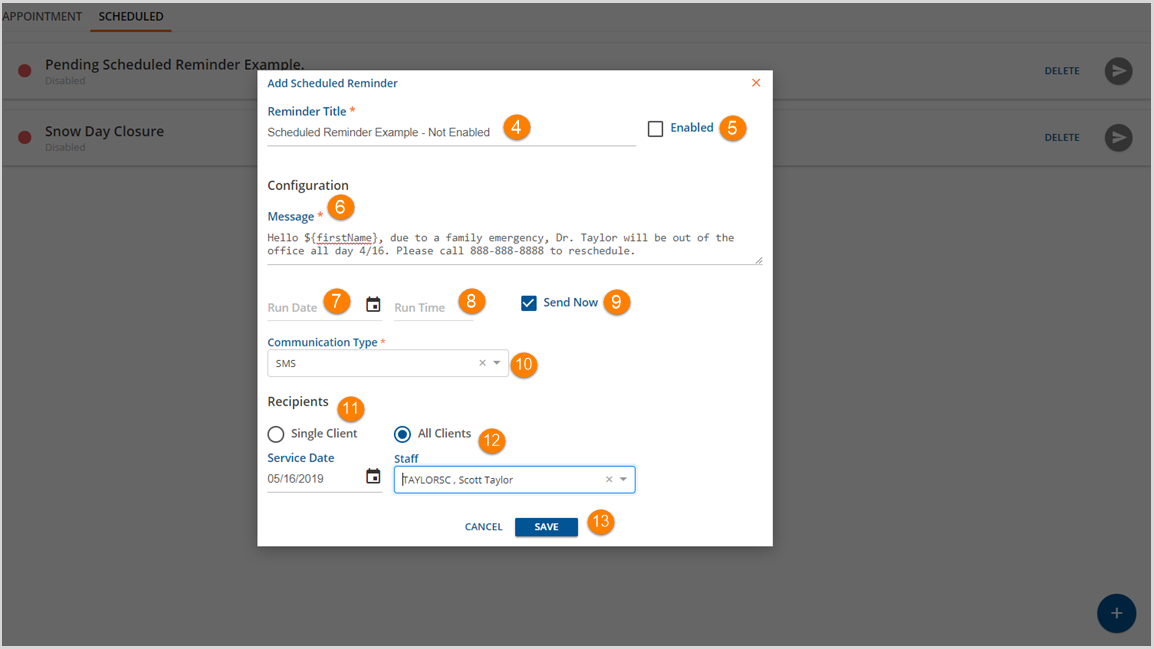
4. Reminder Title - Enter a reminder title in this field. This is the name displayed in the pending reminder on the Scheduled tab.
5. Enabled - Check this box to make the Scheduled Reminder active. Leave blank to preserve selections but not enable. The reminder will still show on the main tab but the status will be disabled rather than a pending countdown.
Tasks 6 through 10 make up the Configuration section of the Appointment Reminder. This section defines the message that is sent, when it is sent and to which number it is sent.
6. Message - This is the message the recipient receives.
- A standard SMS message is 160 characters long. This includes letters, numbers, spaces and punctuation.
- Messages longer than 160 characters will be split into two or more texts for delivery purposes.
**NOTE**
Use of any characters not included in the GSM-7 standard alphabet table reduces the characters allowed per segment, often resulting in additional segment counts. Entering the reminder text directly into the application prevents non-GSM-7 characters from being used. Any message text copied from another source should first be pasted into an ASCII editor to strip unwanted formatting before pasting it into the message field.
- In the example above, the following token ${firstName} is used. Click HERE for more information about tokens.
- If Ernesto Stilson is a recipient, he will receive the following text message "Hello Ernesto, due to a family emergency Dr. Taylor will be out of the office all day 4/16. Please call 888-888-8888 to reschedule." For reference, the character count of the message excluding the quotation marks is 130.
7. Run Date - This is the date on which the Scheduled Reminder job will run.
8. Run Time - This schedules the time of day the Reminder is run. An organization may choose to run this in the morning so any calls to reschedule are answered throughout the day.
9. Send Now - Check this box to send the reminder immediately after saving the new Scheduled Reminder. If this box is checked, The Run Date and Run Time are no longer required.
10. Communication Type - Defines which number will receive the Appointment Reminder. It is recommended that organizations use an SMS phone type to clearly define those clients that have opted-in to the SMS message reminder system.
- This is the Type field in the Phone Numbers grid on the Communications tab of the Client screens in the EchoVantage application.
- This is the Type field on the Communications page of the Client Record in Clinician's Desktop, VHR view.
- This is the Type field on the Communications tab of the Client Profile in Clinician's Desktop, Admin view.
- The start and end dates are take into account when the application selects the number to use.
Tasks 11 and 12 define the Recipients of the Scheduled Reminder.
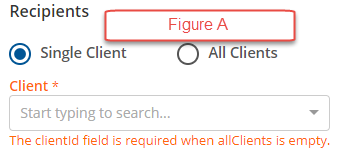
11. Single Clients - When the Single Client radio button is selected, the screen will display a client search bar only. (See Figure A) Use the drop-down list to select the desired client. And then see step # 13 to Save.

12. All Clients - Select the All Clients radio button and move on to task #13 if the message is to go to every client. Note that when the All Clients radio button is selected, the Service Date and Staff drop-down list become available. In the example above, all clients of Dr. Taylor who have an appointment scheduled on 4/16 will receive the text message in task #6.
With the release of v2.2.1, the application checks for an Open Episode when sending to All Clients.
13. When entry is complete, the SAVE button will be enabled. Click SAVE to Add the Scheduled Reminder.
