Echo InForms allows sharing agency-created, and EchoVantage core Form DesignEHR forms with another PC/Device, the Client Portal, or new in version 3.21, via an emailed URL link. Client or Other designees can complete these forms at their own pace in the office or anywhere they have internet access. This feature is available on a trial basis for a limited time, cost, and licensing information to be shared at a future date. The following configuration is required to make the InForms feature available:
- If sharing forms to a Device, the Device User(s) must be created in Configuration > Staff/Users > Supplemental Users. Click HERE for detailed Supplemental User configuration information.
- If sharing forms to the Client Portal, the Client Portal feature must be enabled with the Forms component selected in Configuration > Setup > Client Engagement > Client Portal. Click HERE for detailed Client Engagement configuration information.
- If sharing forms via an emailed URL link, the InForms email link feature must be enabled and configured in Configuration > Setup > Client Engagement > InForms. Click HERE for detailed Client Engagement configuration information.
- The user responsible for sharing forms (to a Device, Client Portal, or Email Link) must be a member of a User Group with the Sharing Forms Features Permission enabled. Click HERE for detailed information on User Group Permissions.
- For forms to display in the Forms Available section, they must be tagged with the INFORMS and TIMELINE Form Locations in the Form Properties using Form DesignEHR.
Navigate to the Client header and select the Share Forms icon, shown below, to select, share, and clear forms.
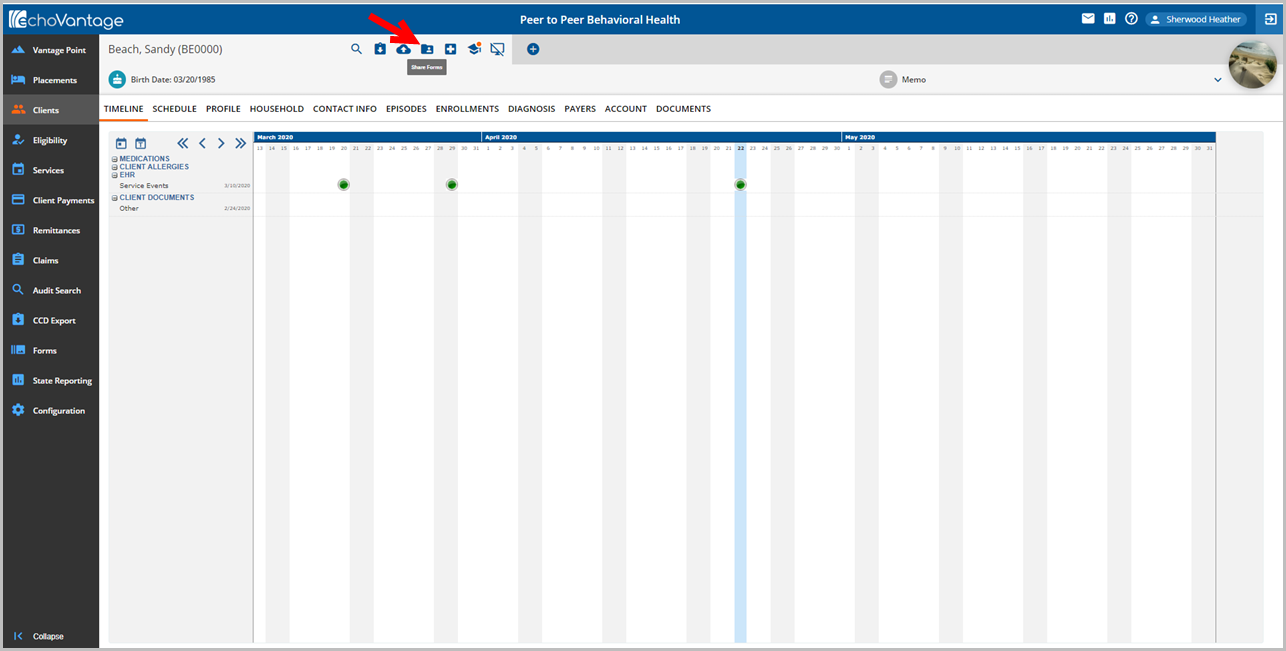
The Share Forms screen allows users to select forms from a list of available forms, indicate if a signature is required, and select and share the forms to an available device or the Client Portal. There are three sections to the Share Forms screen:
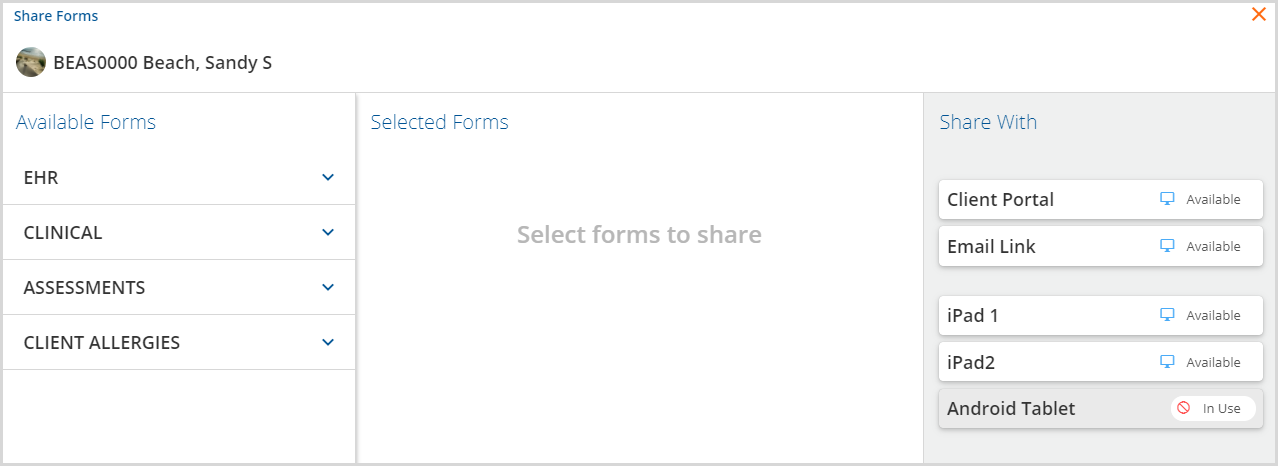
Available Forms
The Available Forms list displays the forms that can be selected to share. Forms display in the same order as the VHR Timeline categories using the same depictions. For a form to show in the available list:
- It must be tagged with both the INFORMS and TIMELINE locations.
- It must be configured to display on the Timeline via the Category Depiction Manager.
- The currently logged-in user must be a member of a user group granted access to the form in the Category Header Editor.
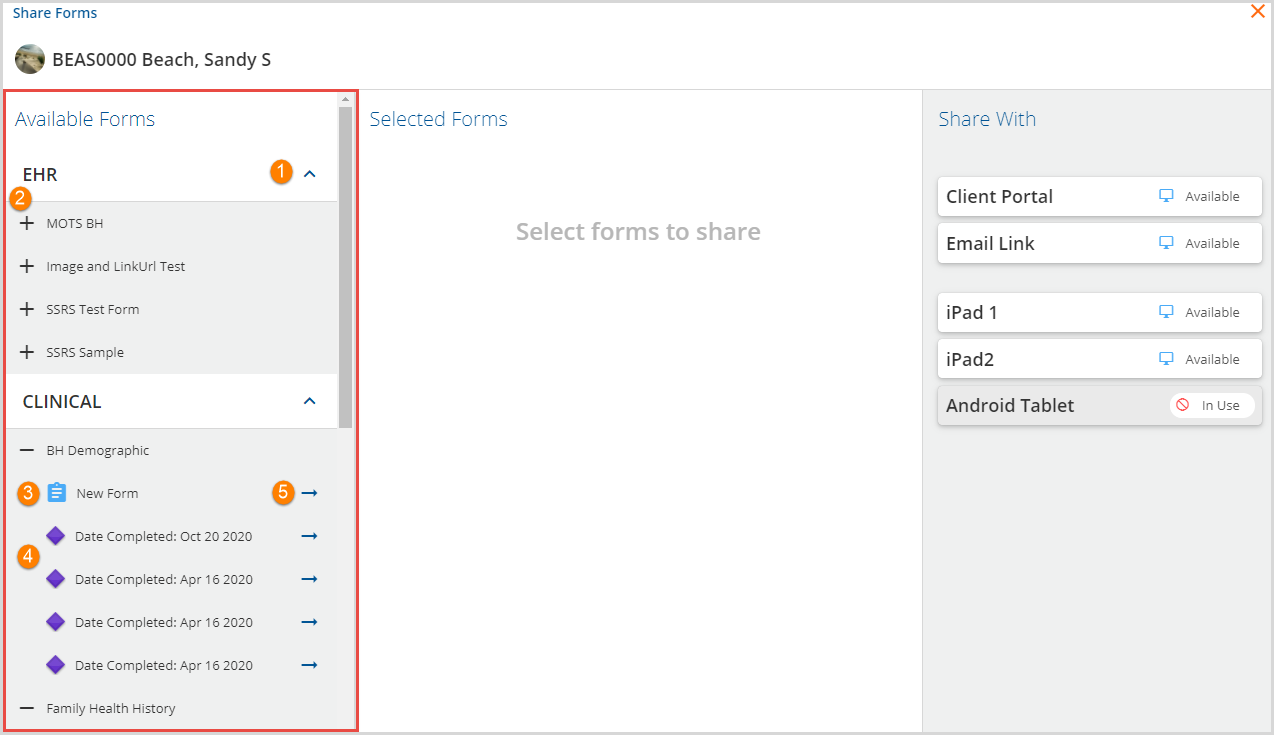
1. Click the up/down arrows to expand or collapse each Category.
2. Click on the plus/minus to expand or collapse the individual form row.
3. Each form row has a New Form option with a blue clipboard icon.
4. Previously completed forms can be selected to share for review, and a signature can be requested if the form is signable.
- Previously completed forms are identified by the assigned depiction AND the Label defined in the Category Editor.
- Using a date within the label may help Share Forms users identify the correct form when selecting previously completed versions.
5. Click anywhere on the desired form row to move it to the middle Selected Forms section.
- The row will be disabled when selected.
- The same form cannot be added more than once.
- Both a New Form and an existing version of that same form CAN be selected to share.
- Note that once forms are Shared with a device, additional forms cannot be shared until the device is cleared.
Selected Forms
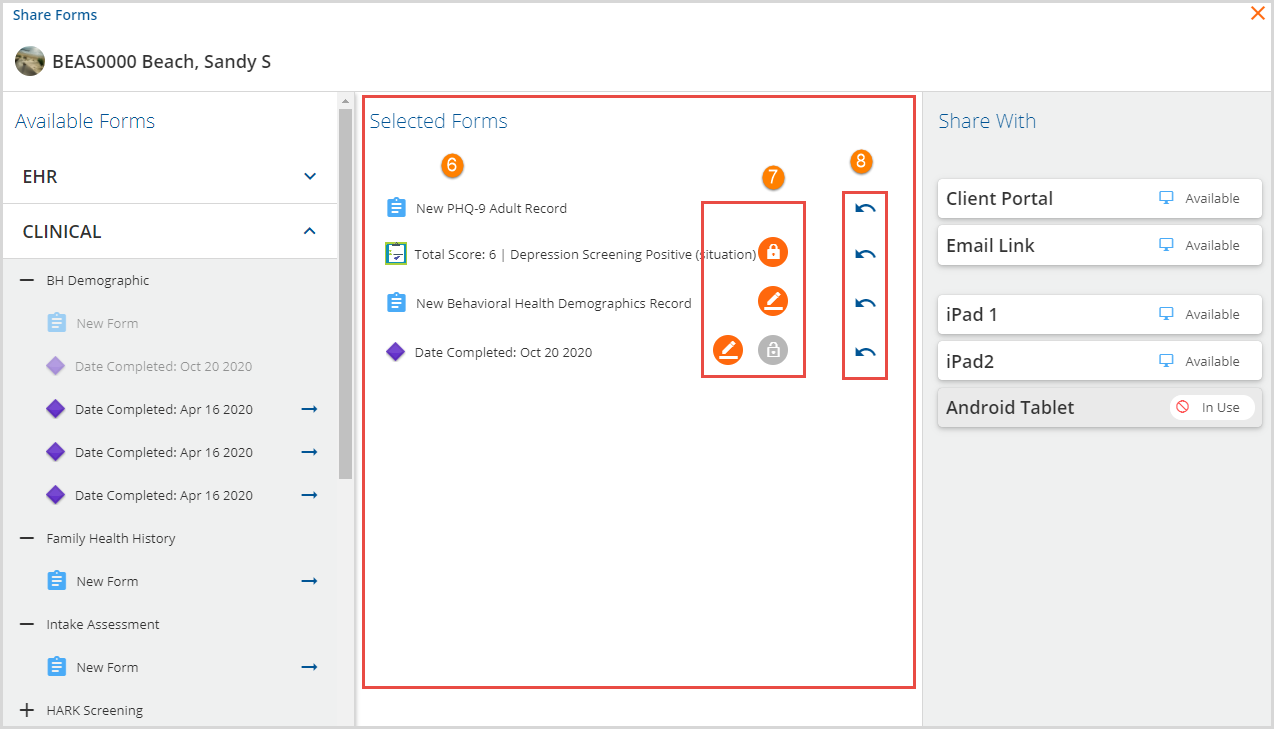
6. The Selected Forms list displays in the order that the selections were made from the Available Forms list.
- New forms have the blue clipboard icon and are prefaced with the word New.
- Existing forms are displayed with the depiction and label as defined in the VHR Timeline configuration.
- All forms selected to share are editable by default.
7. Icons allow the user further control over how forms are shared. Hovering over an icon displays a brief description of the intended purpose.
| Set form as read only |

|
| Form is read only |

|
| Request a signature |

|
| Signature requested |

|
- Enabled icons are orange.
- Disabled icons are grey.
- The lock icon is available for all forms except New forms. When selected, the shared form is set as Read-Only and is not editable.
- The pencil icon indicates that a form is signable. When selected, a signature is required of the Client or Contact before the form is considered complete.
- Users can enable any combination of icons or leave the icons disabled.
8. Click on the blue "back" arrow to remove a form from the Selected Forms list. When a form is removed from the Selected Forms list, it is returned to the Available Forms list, enabled that form row again.
Note that once forms are Shared to a device, forms may not be moved back to the Available Forms list. The device must be cleared, and the form selection process started again.
Share With
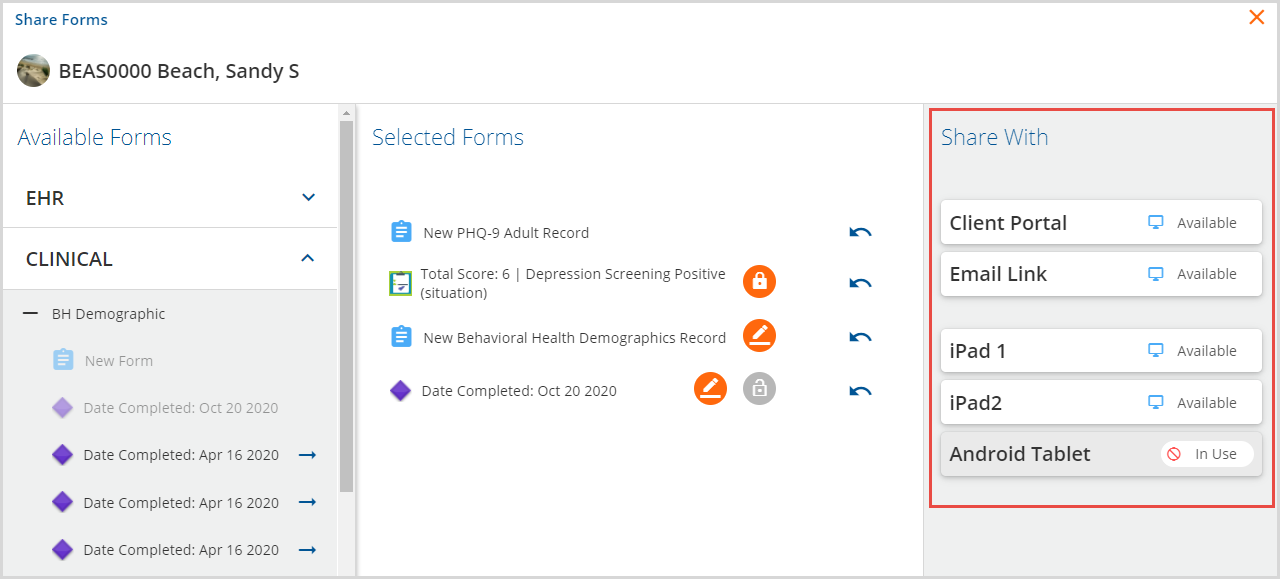
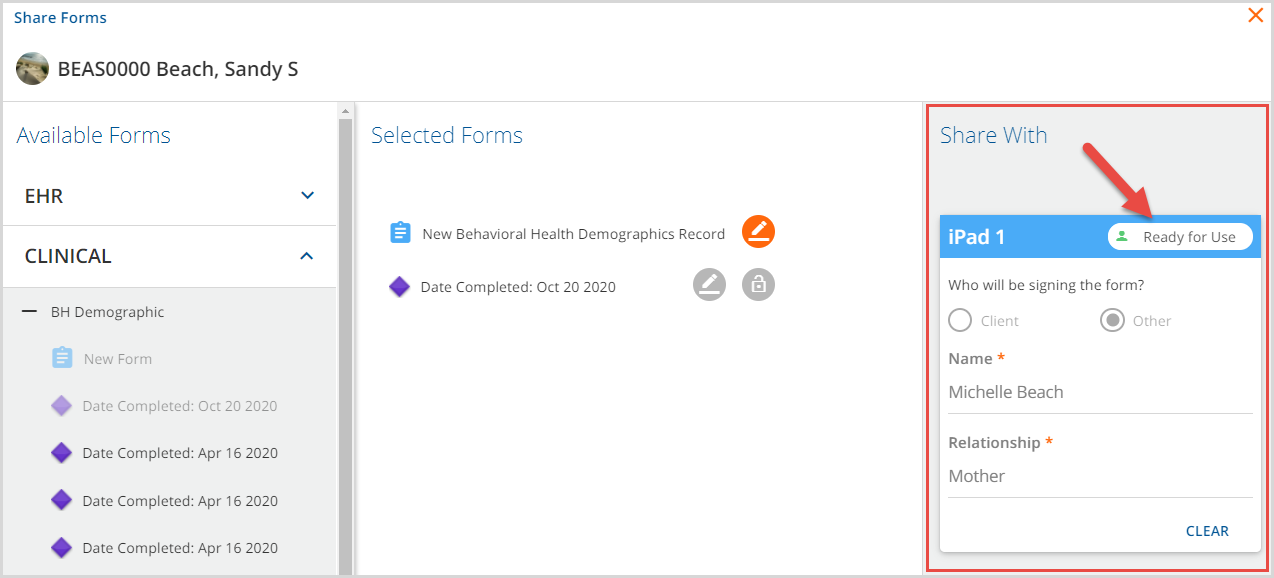
The Share With section lists the Device Users, defined in Configuration > Staff/Users > Supplemental Users, and the Client Portal and Email Link options if these were enabled in Configuration > Setup > Client Engagement. Each Share With option's availability is displayed on the card's far-right; there are four status indicators.

|
The device is available and may be selected for use. |

|
Selected forms for the current Client were shared with this device, and it is ready to use. |

|
Selected forms for the current Client were shared with the Client Portal or Email Link option. |

|
Forms for a different Client have been shared with the device. It is not available to select. |
A signature requested for any form prompts additional questions from some of the Share With options. Each Share With option is covered below.
Client Portal
When forms are shared with the Client Portal, it is assumed that the Client is completing the forms. A message displays on the card based on the signature request selections.

|

|
Select the blue SHARE button to share the forms—the status indicator changes to the Shared status.
Email Link
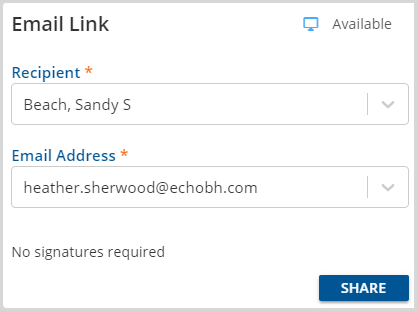
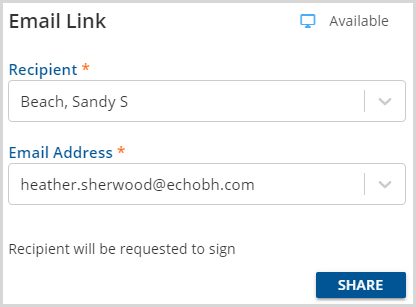
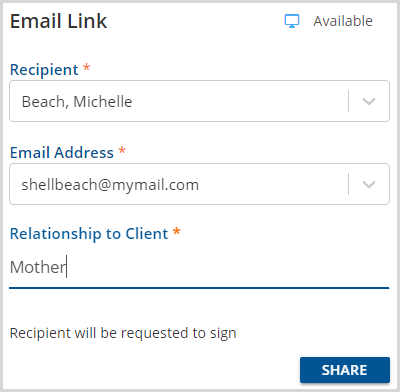
When forms are shared with the Email Link, the user must select the Recipient and Email address. Values for the Recipient and Email Address drop-down listings are pulled from the Client > Contact Info entries. tab. A No signatures required message displays if a signature is not requested for any of the shared forms. If a signature is requested and:
- The Client is selected as the Recipient; a message displays that the Recipient will be requested to sign
- A Contact is selected as the Recipient
- A required, free text Relationship to Client field must be completed and
- A Recipient will be requested to sign message displays.
|
|
|
Select the blue SHARE button to share the forms—the status indicator changes to the Shared status.
Devices
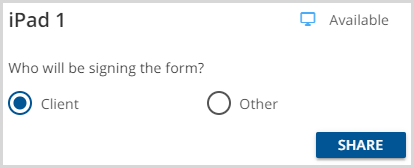
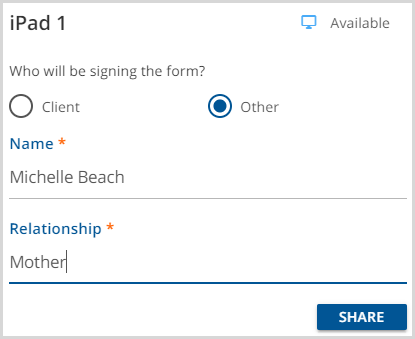
Devices are identified by the Device Name assigned when created in Configuration > Staff/Users > Supplemental Users. If a signature is requested, the agency user must indicate who will be signing the form. If Other is selected, the user is also required to enter the other signer's Name and Relationship.

|
|
|
Select the blue SHARE button to share the forms—the status indicator changes to the Ready for Use status.
Clearing Forms
After forms are shared, the blue CLEAR button is enabled. CLEAR is used to disassociate selected forms from the Device, Client Portal, or Email Link, and the Client. Once forms are shared, the only way to make a change, i.e., add another form or request a signature, is to CLEAR the shared forms, reassign the forms, and share again. When shared forms are cleared from:
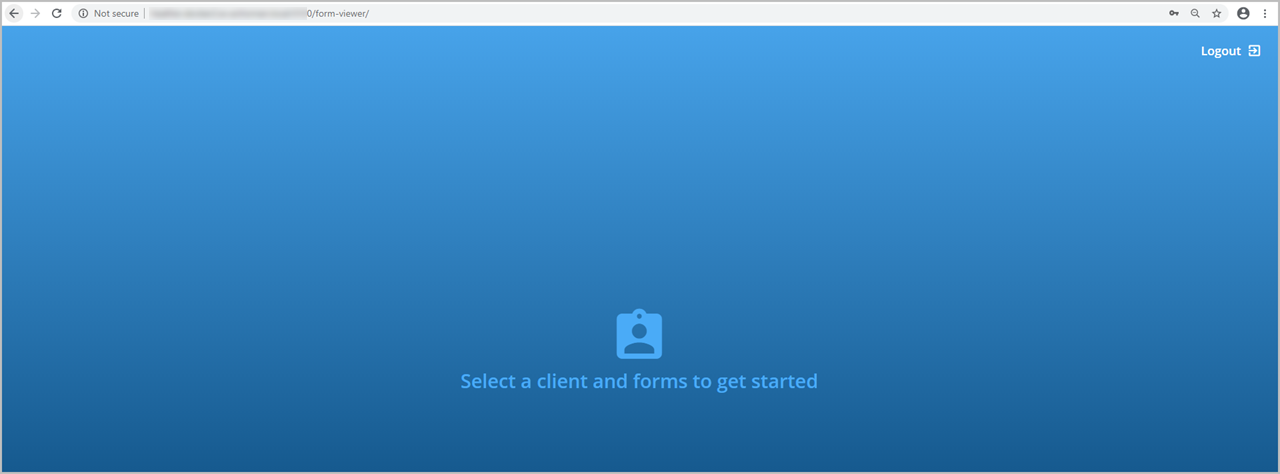
- A Device - the InForms page displays Select a client and forms to get started on the home screen.
- The Client Portal - the Forms page in the Portal displays No Assigned Forms.

- An Email Link - the URL is invalidated even if not past the original expiration date. If a Client or Contact accesses the link after the forms are cleared, they see This link is no longer valid in place of the date of birth validation.
Accessing Echo InForms
The Echo InForms feature hosts the shared forms for Device Users, the Client Portal, Authorized Representatives in the Client Portal, and emailed URL links. The following sections cover accessing Echo InForms using a Device User or via an emailed URL link. Use the following links for more information on accessing forms in the Client Portal for Clients and Authorized Users.
Accessing Echo InForms from a Device
The Device User credentials, as defined in the Supplemental User configuration, are used for logging into the Echo InForms application from the Device. The application is designed so that the agency user may log in to the Device in the morning, and then a polling process updates the device screen automatically as forms are shared and cleared. Get started by navigating to the agency's EchoVantage URL from the Device's internet browser.
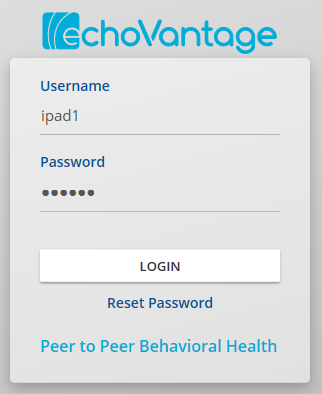
Enter the Username and Password for the Device that is being used. EchoVantage recognizes that the credentials are for a Supplemental User and redirects to the Echo InForms application, "/form-viewer" shows in the URL address after being redirected.

A screen like the one above displays until forms are shared to the Device. The Device User remains signed-in until the Logout button is selected. When forms are shared to this Device, the screen refreshes and displays the selected forms after the polling interval. The time to refresh should be 10 seconds or less.
Accessing Echo InForms from an Emailed URL Link
Sharing forms with the Email Link option triggers the sending of a "New Forms Available" email to the address specified on the Email Link card. This email contains the URL link and also indicates when the link expires. An example email is shown below.

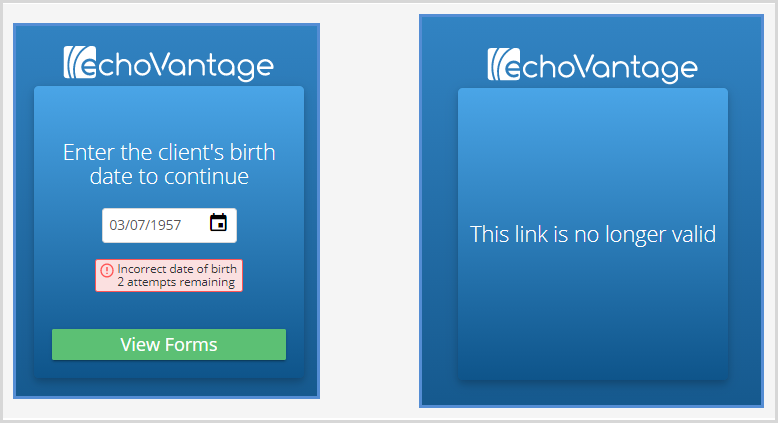
When the link is selected, a login verification screen is displayed in a new browser tab or window. Clients or Contacts have up to three attempts to enter the correct Client date of birth to complete the login verification allowing them to view forms. The link is valid until the expiration provided in the email or until the agency CLEARS the shared forms, whichever occurs first. Clients or Contacts may use the link to log in and start forms, log out, and return later to finish, provided it is before the link expiration or form clearing.
Navigating Echo InForms
Once successfully logged in, the Echo InForms form viewer contains the same functionality for both Device Users or Email Link.
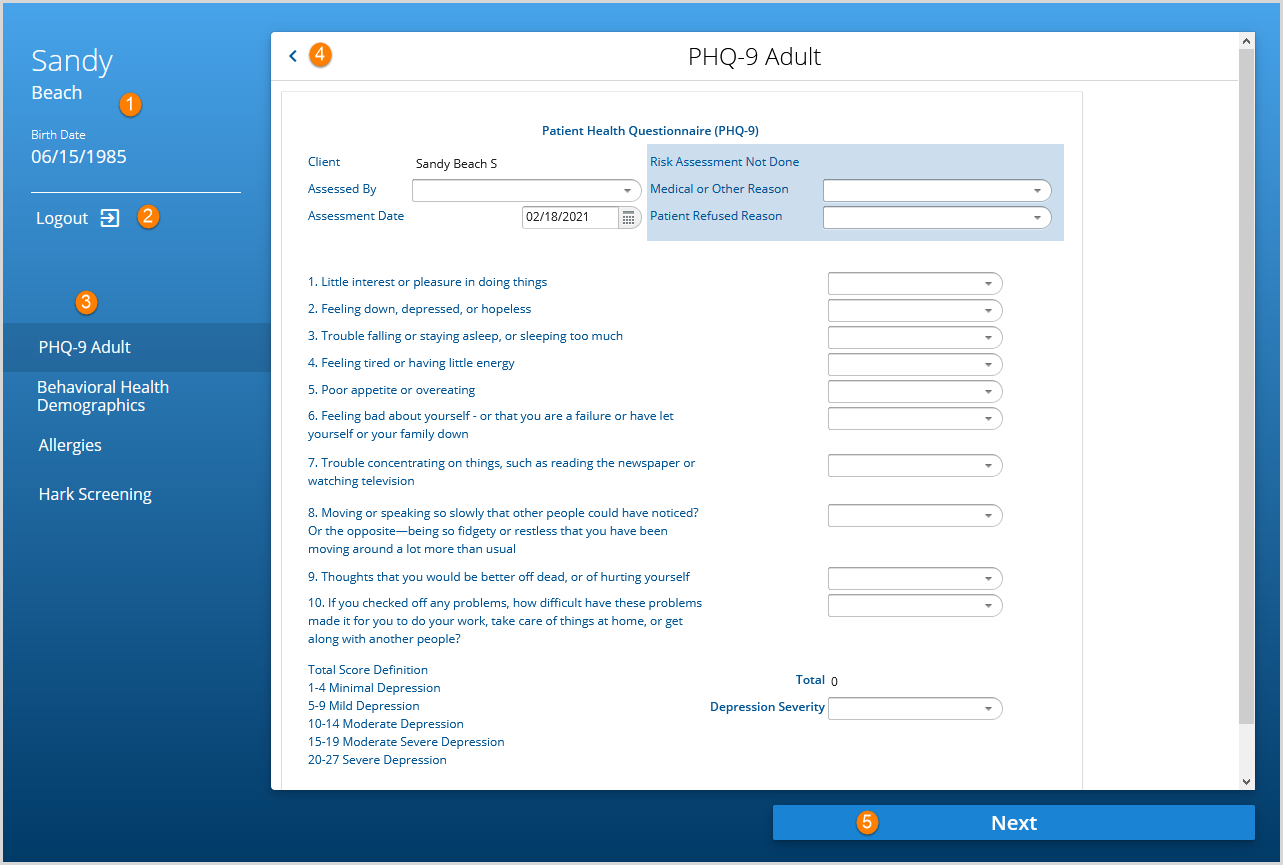
1. The client's name and date of birth display in the upper left-hand corner for the agency and client user to easily verify.
2. A Logout button is available to exit the InForms application.
3. The Selected Forms display in a list beneath the date of birth. A scroll bar is available for form lists that extend beyond the page.
4. Selecting the left arrow in the top left corner of the form expands the form to full screen and collapses the forms list to the left (shown below). Select again to return the form to the initial size and expand the forms list again.
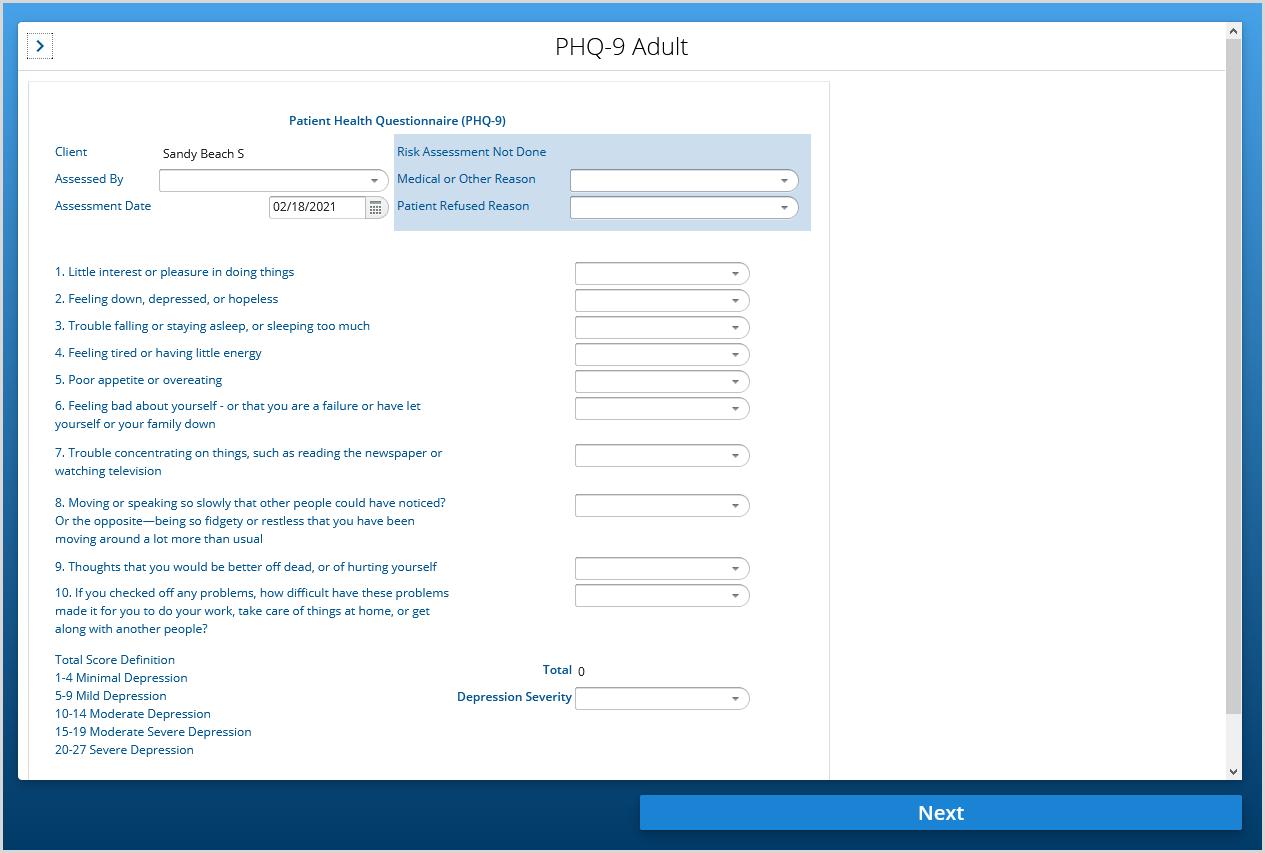
5. Navigation buttons located below the forms guide the Client/Contact user through the process of viewing, completing, and signing forms. When all requested actions for a form are complete, the navigation buttons turn from blue to green.
- If a user edits or updates a form without saving, a confirmation box appears indicating that there are unsaved changes.
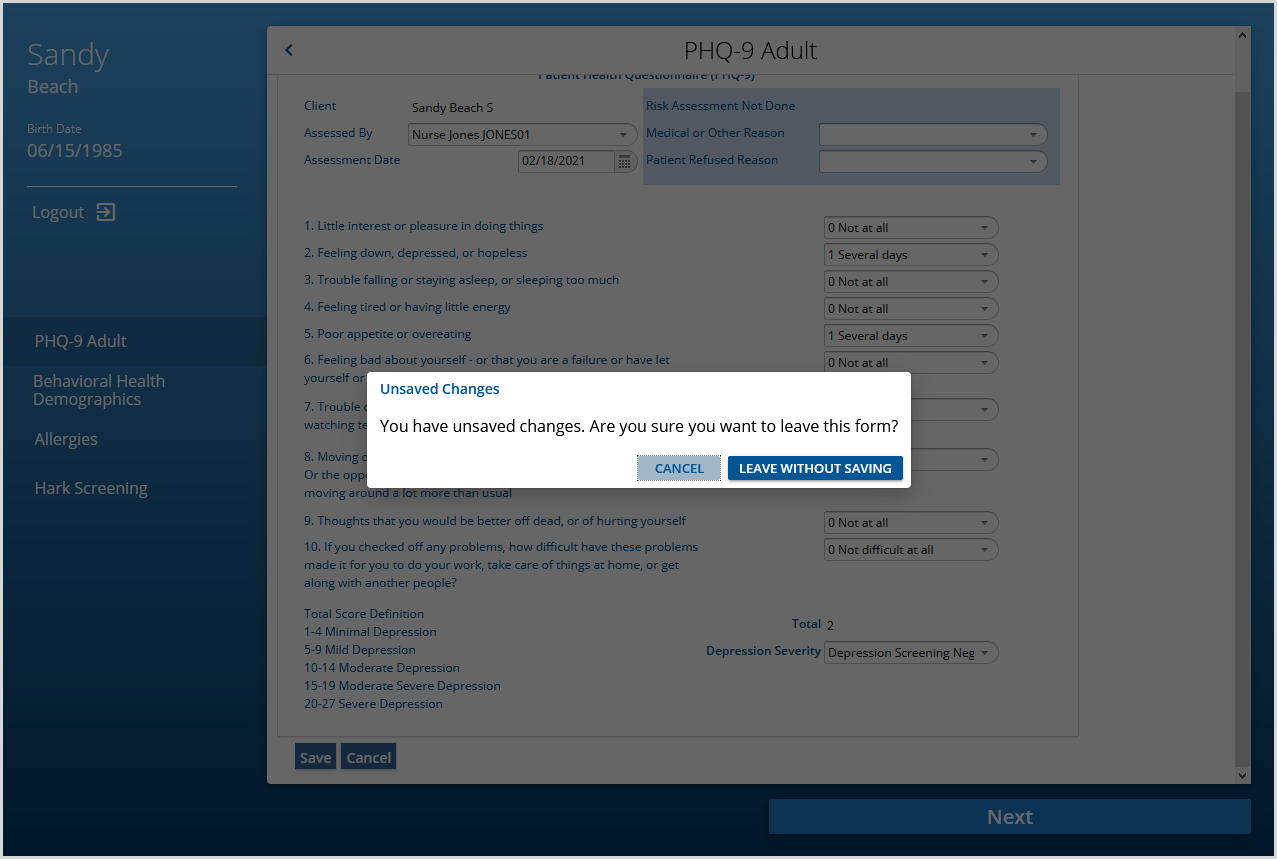
- The user can save form changes by selecting CANCEL in the confirmation box and then selecting the blue SAVE button on the form. Once saved, the NEXT button turns green if no signatures are required. A green checkmark is also added next to the form in the form list to the left providing a visual indication of progress.
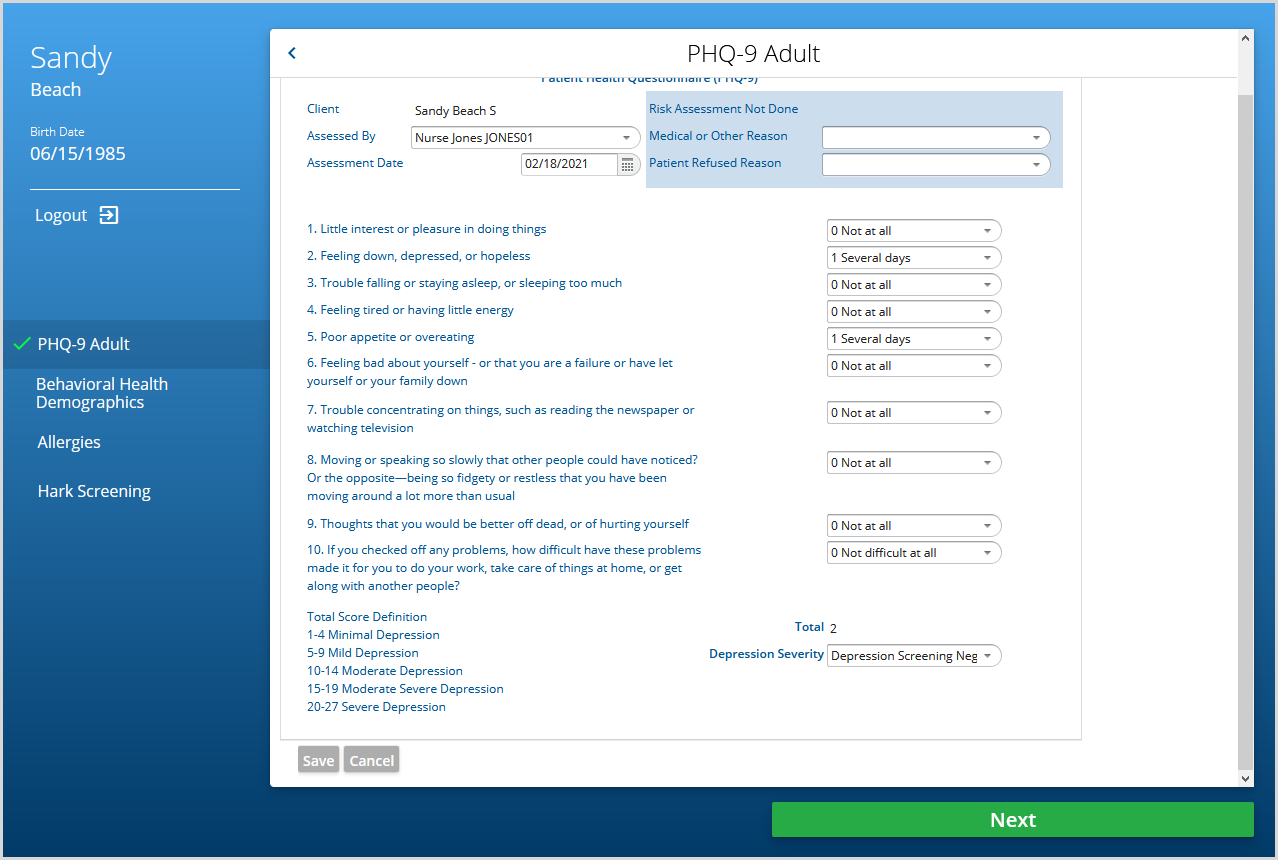
- If a signature is requested, the user is prompted to save the form to continue. A form shared in read-only mode with a signature requested skips this step.
- Any previous form signatures display but are not editable.
- If a signature capture is not acceptable, select CLEAR to clear the signature and sign again.
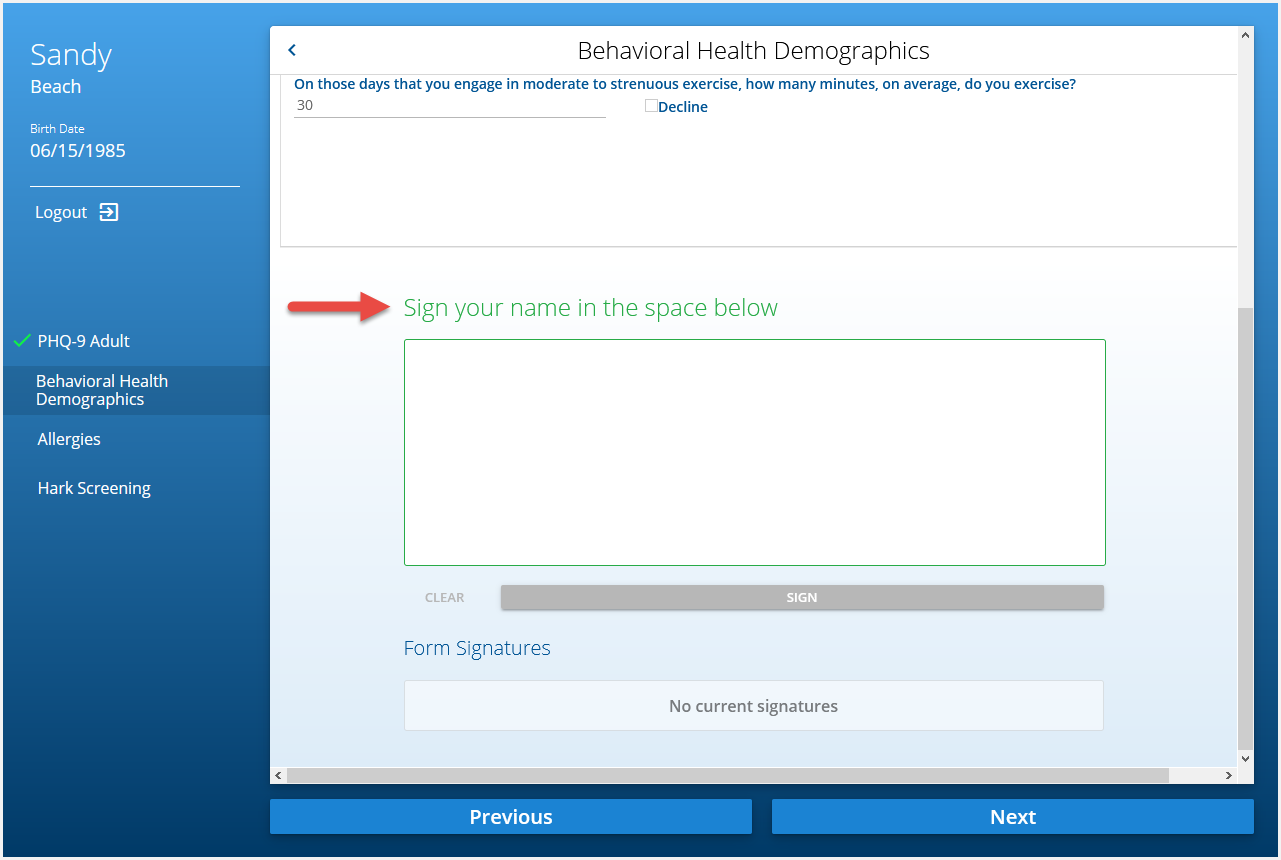
- After signing, the Sign button turns green and must be selected to save the signature and continue.
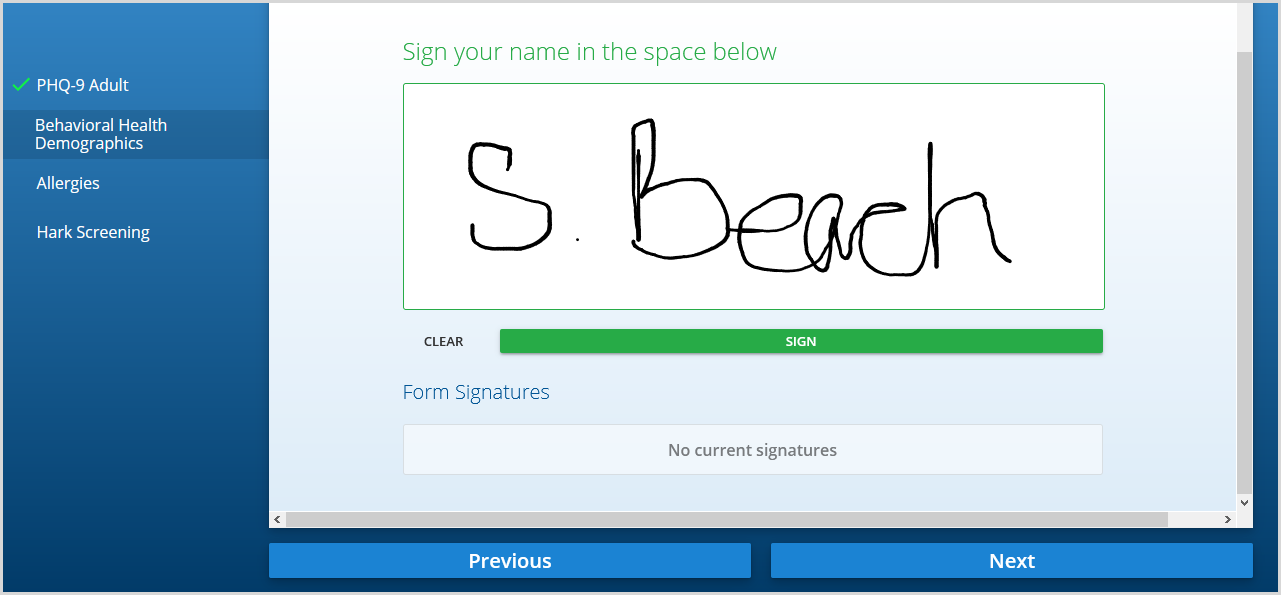
- After the signature is saved, the Next or Done button turns green. Done displays when working on the final form in the list. Select Next to continue to the next form or Done to review the forms
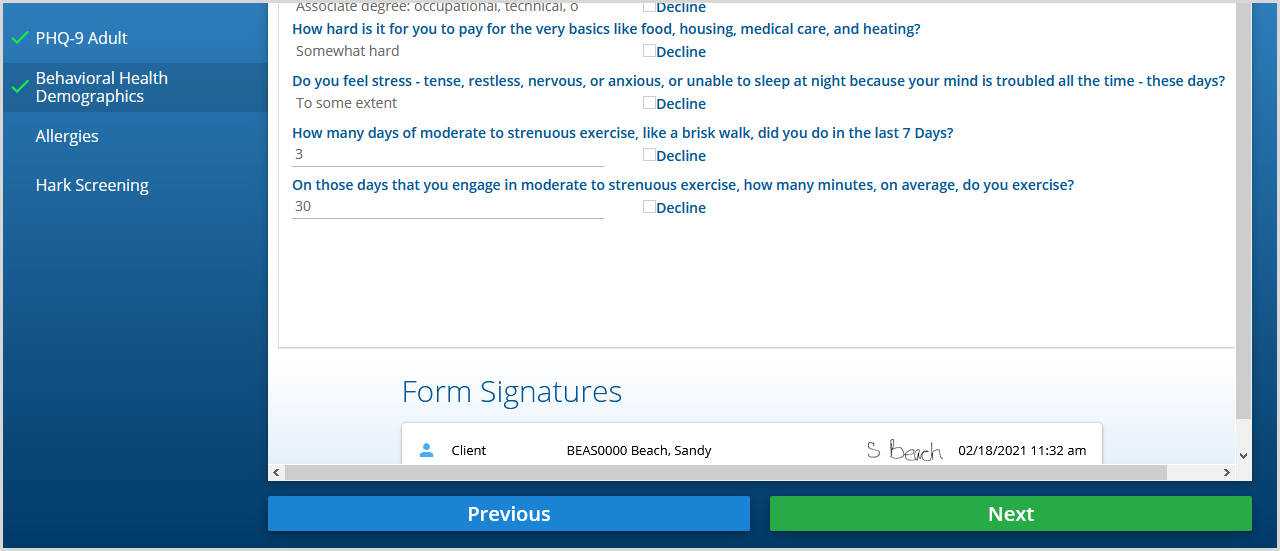
- Use the Previous button to navigate to the prior form or Select a form from the list on the left.
- Using the browser's back button logs the user out of the InForms application.
- The agency representative must log into the InForms application on the Device again for Clients using an agency Device to continue.
- Email Link users must enter the date of birth again to return to the InForms form viewer page.
- When the last form in the list is complete, a green checkmark is next to each form in the list and the NEXT button is replaced by a green DONE button.
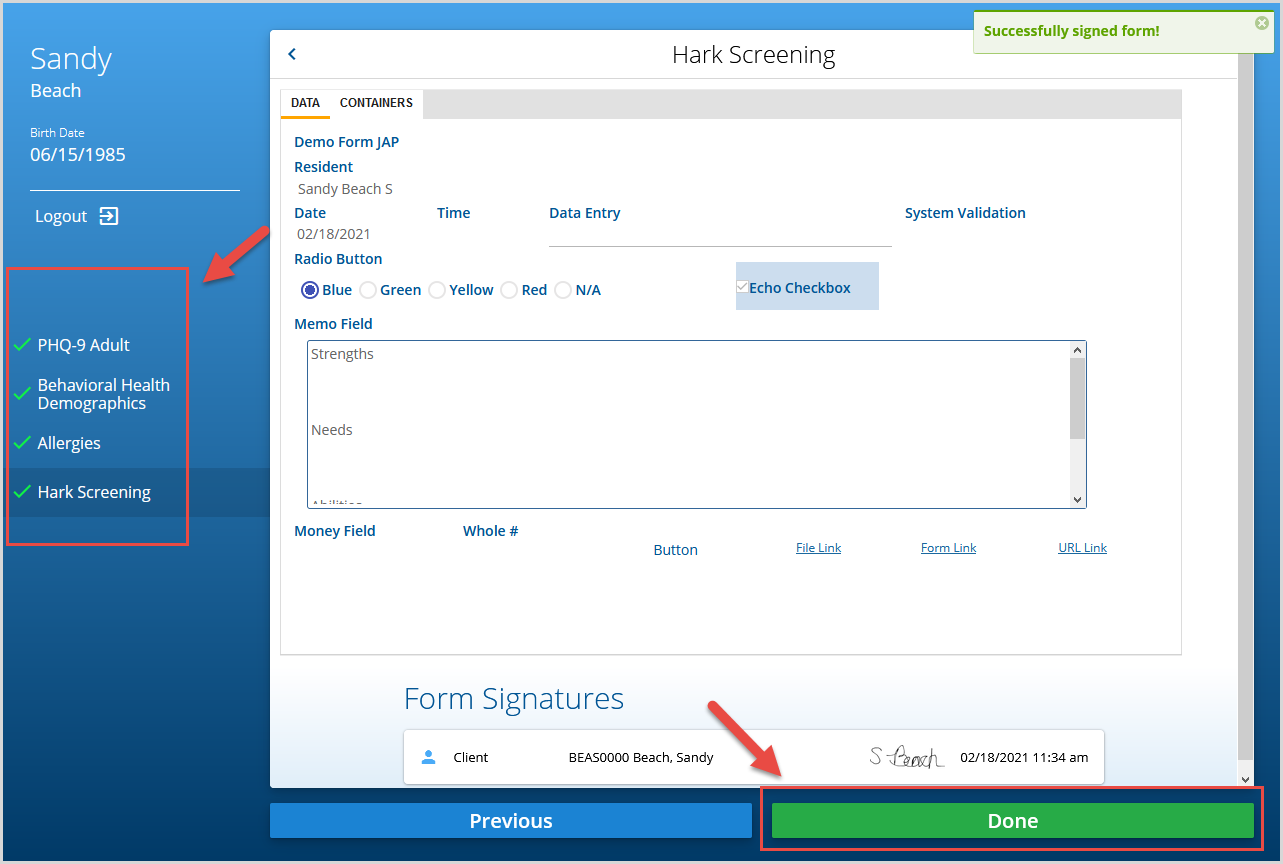
- Selecting the green DONE button brings the user to the "Review your forms" screen.
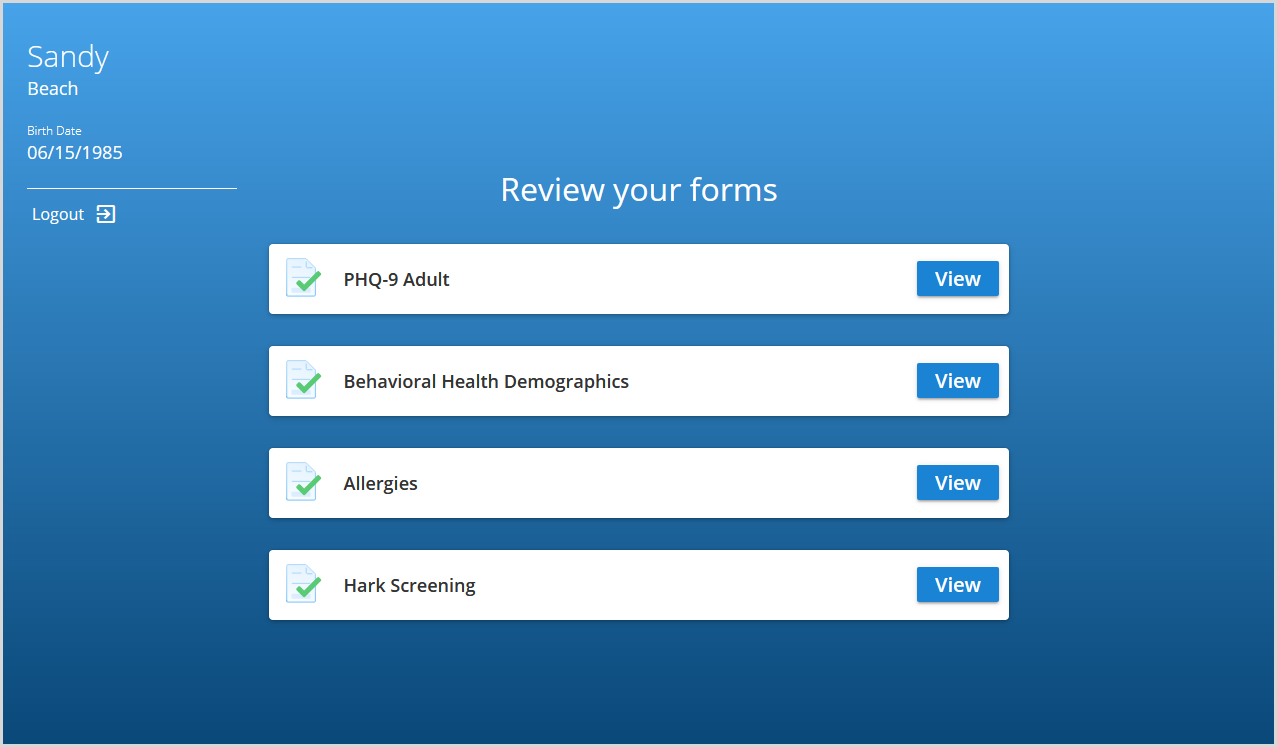
- Forms are updated on the VHR Timeline when saved.
- Use the blue View button to return to a form to view or edit.
- Just like in EchoVantage, once a form is signed it is locked and is not longer editable. Clients and Contacts should be reminded to review all entries before choosing to sign.
Viewing Progress from EchoVantage
A Client's or Contact's progress is viewable in the Selected Forms section of the Share Forms screen. The selected forms are updated with a green checkmark as each is completed. The forms are updated as completed regardless of the Share With option selected.
