The Scheduler is used to view and create events or services for Staff, Clients, and Teams. There are three types of events that can be created and added to the Scheduler:
- Service Event - an Event for a single Client
- Group Event - an Event for multiple Clients
- Staff Time Event - an Event for Staff only
Service Event
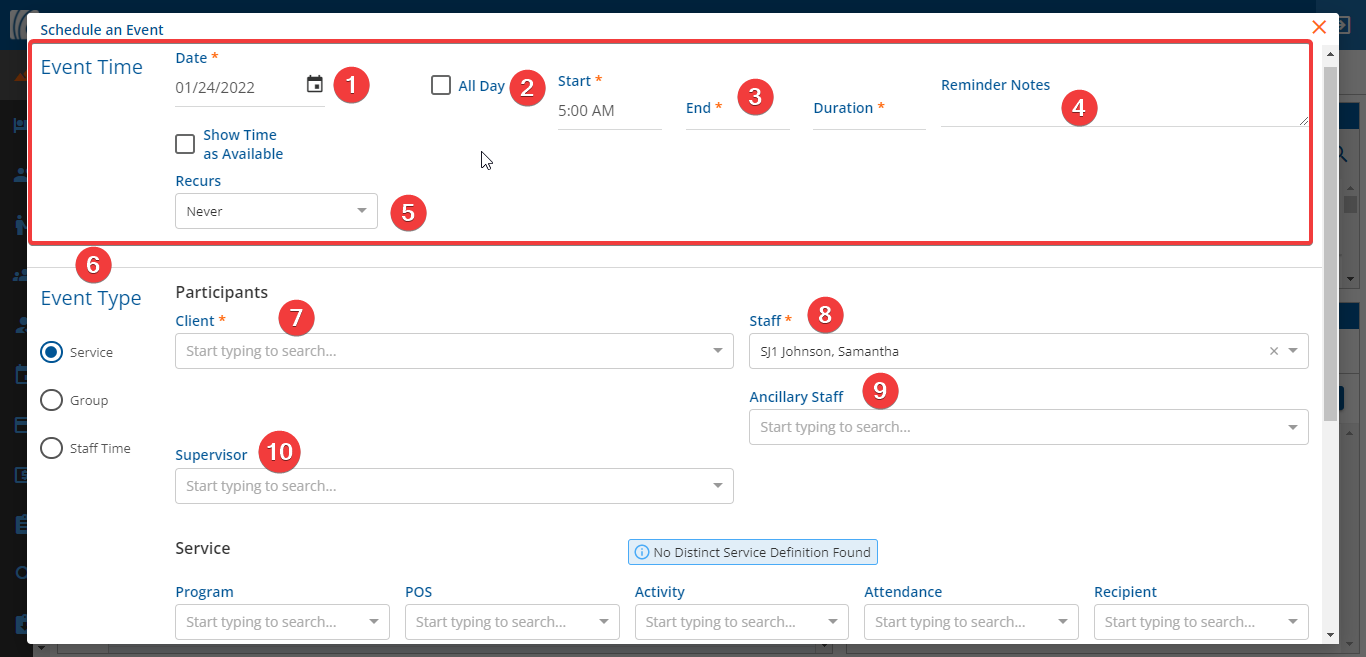
1. Date - Enter the date the event is to be scheduled. This may be the appointment date of a client or a staff out of office day.
2. All Day - Check the All Day box if the event is to be scheduled for the entire day.
3. Start, End, Duration - If the All Day box is not checked, the Start time, End time and Duration fields must be completed.
- In Start enter the time the event begins. The Start/End fields display orange text hints to aid in entry.
- In End enter the time the event ends.
- The Duration, in minutes, will automatically calculate from the Start and End time entered OR the End time will automatically calculate if the Start time and Duration are entered.
**With the release of EchoVantage version 3.02, an Event can be scheduled with a zero "0" Duration time. This allows no-show and no time Events to be tracked.**
4. Reminder Notes - Enter notes to be used with event reminders. This is a free text field.
- Reminder Notes display differently on the Services screen depending on the total number of characters in the Note.
- Reminder Notes of 120 characters or less have the full text displayed to the right of the Progress Note button on the bottom left of the screen.
-

- If the Note is more than 120 characters, the Reminder Note heading is a clickable link that displays the entire note in a new modal.
-

5. Recurs - Select the option that best describes the frequency of this event.
- Never - This is a one-time event and does not recur.
- Daily - This event will recur every day, at the same time, through and inclusive of the specified end date.
- Weekly on (Day of Week) - This event will recur on the same day of the week, at the same time, through, and inclusive of the specified end date.
6. Event Type - Select the radio button that describes the type of Event being entered. The default Type when scheduling Events is Service and the screen will be the same as shown above. Changing the Event Type will change the entry screen displayed as different information is collected for each type. The example above displays a Service Event. Template and Staff Events will be described in a later section.
7. Client - Select the Client to schedule. This is a required field.
8. Staff - Select the Staff to schedule. This is a required field.
9. Ancillary Staff - Select additional Staff associated with the Event, not required. Events, and Services created from Events, display on the Scheduler for Ancillary Staff just they do for the (rendering) Staff.
10. Supervisor - Select the Supervisor, not required.
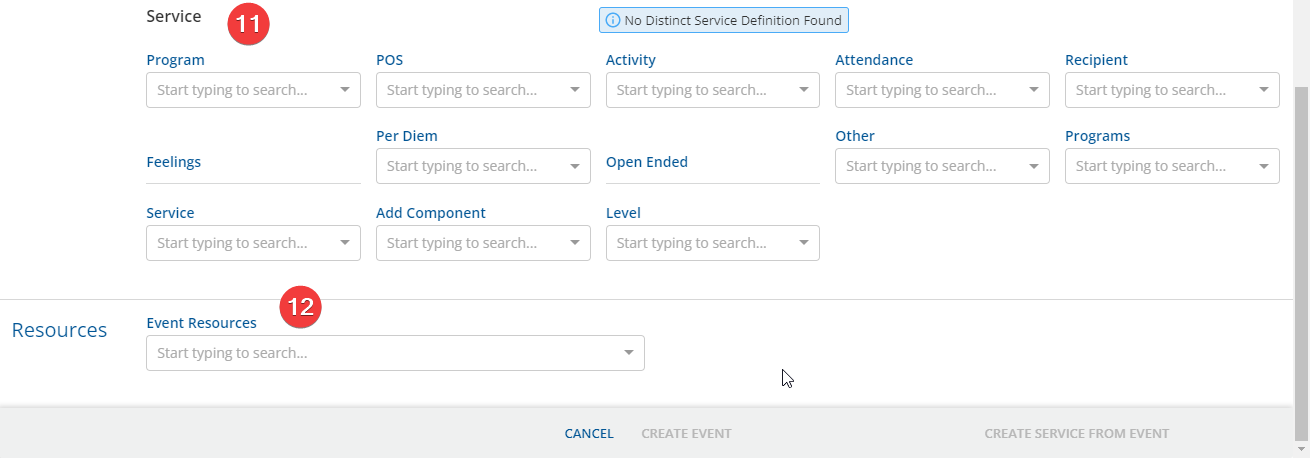
11. Enter the Service information. This is not required to create an Event in Scheduler but is needed prior to creating a Service from the Event. The fields in the Service section are defined by the organization in Configurations > Services/Payers > Service Definitions.
12. Event Resources - Select all Resources that apply to this event. Event Resources are organization-specific and are defined in Configuration > Scheduler > Resources.
13. When all required fields are populated, the Create Event button is enabled.

Click Create Event and the event will populate the schedule for both Participants (Client and Staff). This does not create an event for the Supervisor if one has been entered.
14. A service can be created from a scheduled Service Event. Click HERE for instructions.
Group Event
A Group Event is used to create an Event with more than one Client participant. Select the Group Event Type radio button to create a Group Event. Note that the center section of the screen changes from Participants to Group and the only Event Type data entry fields displayed are Group, Staff, and Supervisor.
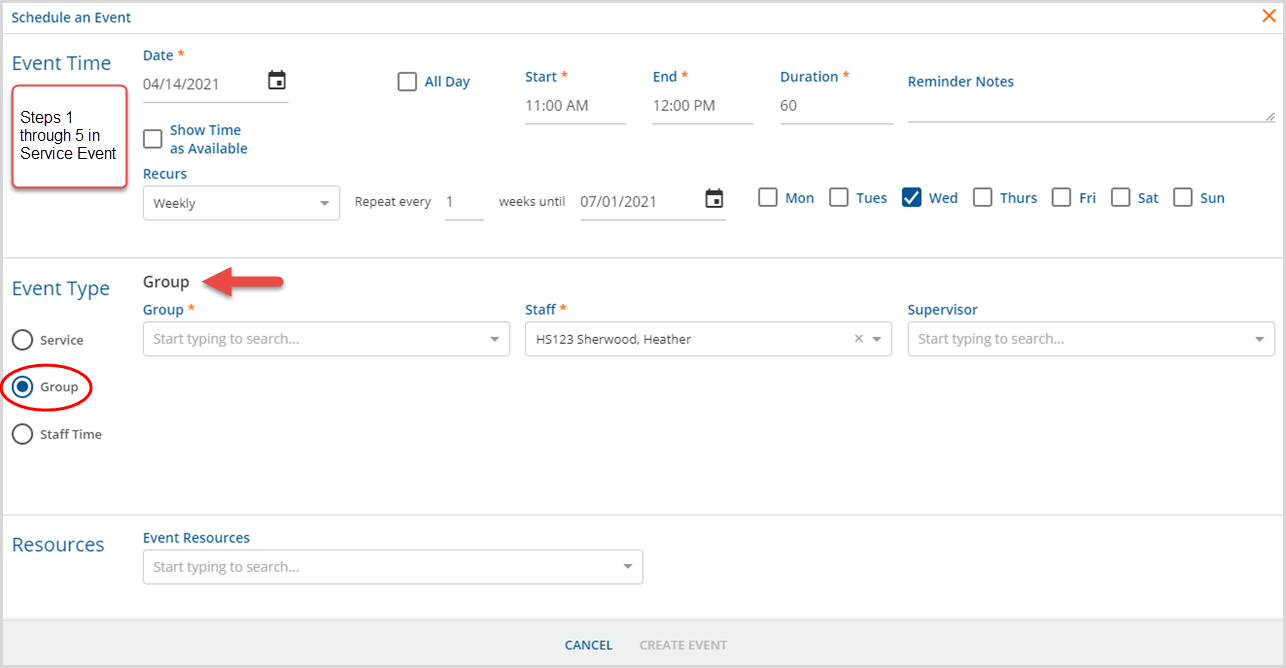
Complete the Event Time fields per steps 1 through 5 in the Service Event section.
1. Select the Group from the drop-down list. Once a Group is selected, the Participant information per the configuration for that Group in the Groups main menu displays. An example is below.

2. Select the Staff for which the Template Event is being created.
3. Select the Supervisor for this Template Event. This field is not required.
4. Select the Resources if used by your organization. This field is not required.
When all required fields are completed, the CREATE EVENT button is enabled, click to add the Group Event to the Scheduler. An example of a Scheduled Group Event is shown below.
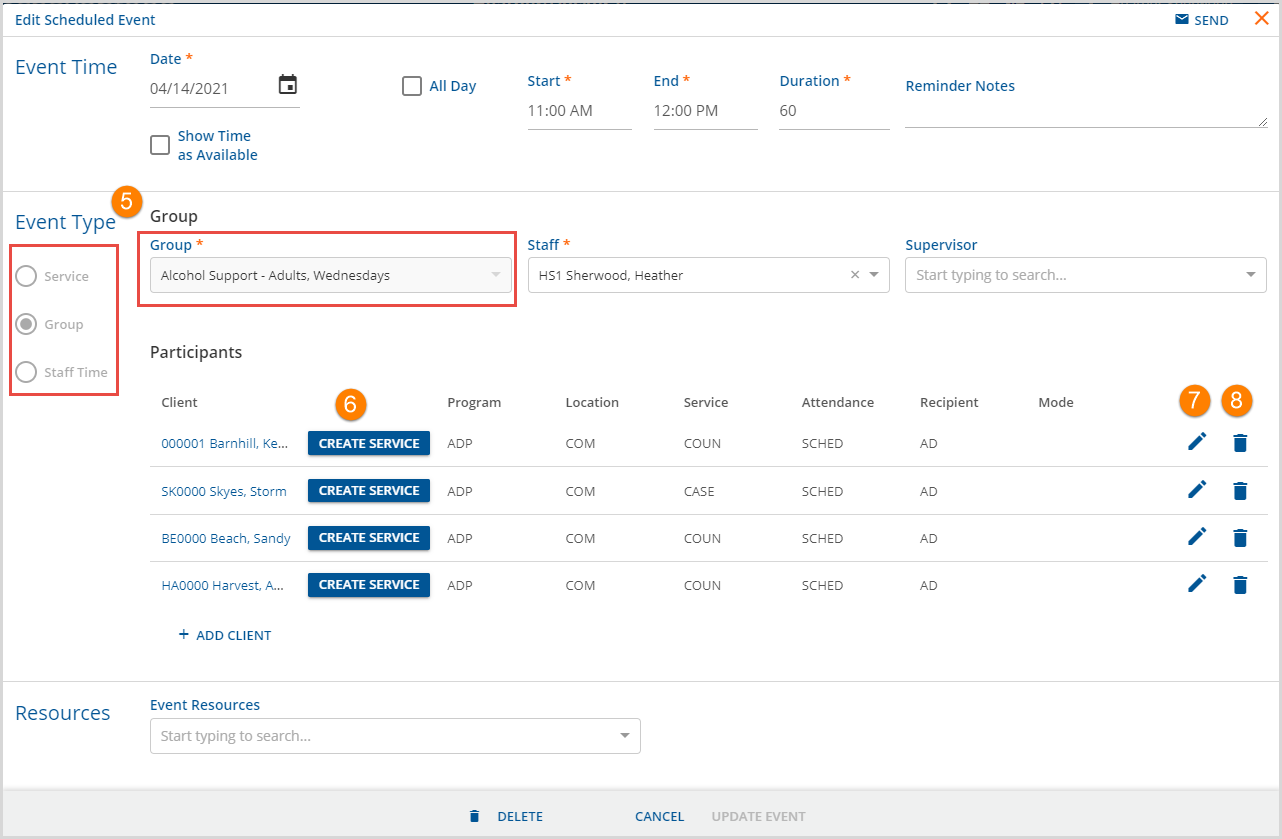
5. Please note that once a Group Event is created, the Event Type and selected Group are locked and may not be changed. If the wrong Group was selected, the Event must be deleted and reentered with the correct selections.
6. Use the blue Create Service button to create a Service for the currently selected Client Participant. Click HERE for instructions.
The following two options are available in version 3.22 and higher.
7. Use the blue pencil icon to edit the Service Components for the currently selected Client Participant for this Group Event only. For example, a Client's attendance can be updated to canceled or no show if they were absent without affecting future Events or that Groups configuration in the Groups main menu. Permanent changes should always be managed in the Groups main menu.
8. Use the blue trash can icon to remove the currently selected Client Participant from only this Group Event. Again, permanent changes should always be managed in the Groups main menu. Click HERE for more information on configuring and maintaining Groups.
Staff Time Event
Staff Time Events are scheduled times for staff only, with no client present. When Staff Time is selected for Event Type, the following screen displays. Note that the center section of the screen is now labeled Staff Members.
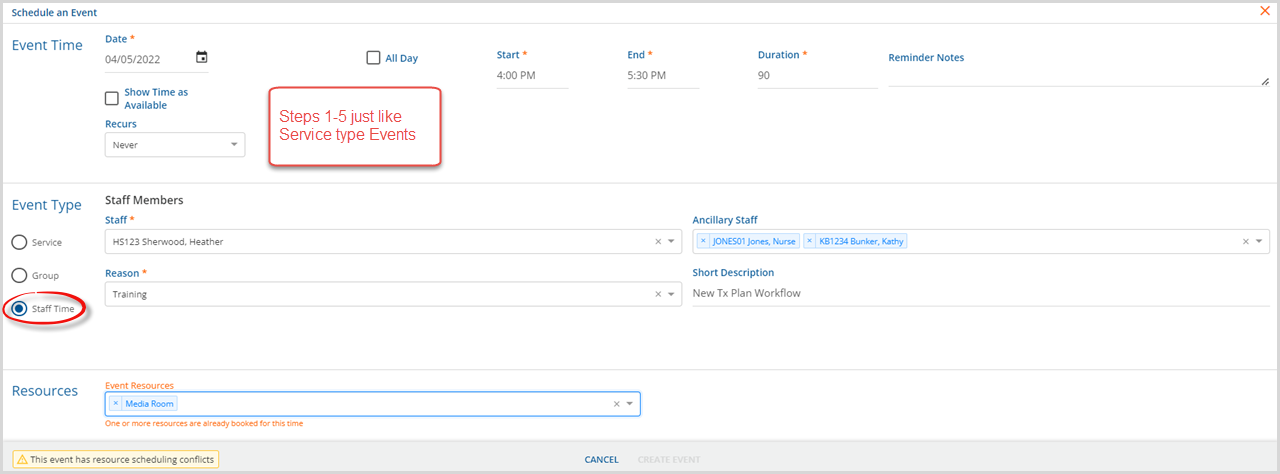
Complete the Event Time fields per steps 1 through 5 in the Service Event section.
The only required fields for a Staff Time Event are Staff and Reason.
- The Reason drop-down list is populated with the Staff Time Categories defined list values found in Configuration > Setup > Defined Lists.
- Ancillary Staff can also be included on a Staff Time Event, making it easy to schedule a Team meeting or training.
- A free text field labeled Short Description is available.
- Event Resources is again available at the bottom. If there is a conflict, a warning message displays and the Event cannot be saved until the conflict is resolved.
Once the Staff member has been entered, the blue CREATE EVENT button is enabled. Click this to save the Staff Time Event and add it to Scheduler.
Since Staff Time Events do not involve clients, the CREATE SERVICE FROM EVENT button is not an option.
Show Time as Available
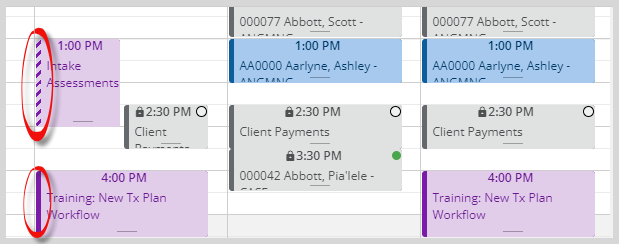
The Show Time as Available checkbox can be selected for any Event type. When this box is selected, the staff can be returned in Search for Next Available queries. The Event still displays on a Staff's schedule but when selected, the bar on the left side of the scheduled event is broken or dashed. When this box is not selected, the bar is solid. An example of both is shown below.
