
Refresh the screen by pressing F5. The system forms an organization-wide pool of services Ready for billing made up of multiple clients and services across the organization. A job may be created, with all the services in the pool, or services may be selected individually.
- These are services with a Service Entry Status of Ready, but that have no Charge created yet.
- Services may be in a Pre-charge only state or never run.
- Unprocessed Services display as a number value.
- Task actions lead to the Create Charges process.

To begin posting services and creating charges, Go to Vantage Point>Fiscal Overview and click on Unprocessed Services.
Create
Filters are available on the CREATE screen to refine the list of services with which to work. At a minimum, the Status must have a selection to perform a Search. Create jobs using all of the results of a search or select checkboxes to include/exclude services as needed. Processing with all results provides for a more significant number of services to be processed with less user effort.

1. Clicking on Unprocessed Services opens the CREATE tab.
2. SEARCH - Use the SEARCH button when entering data into the date or filter fields. These fields define which unprocessed services are displayed.
3. Check Boxes - Mark services to include in the job. Clicking the checkbox next to "Date" marks/un-marks all checkboxes.
4. Message - Enter a unique description to identify the job during processing (recommended).
5. CREATE JOB WITH SELECTED or CREATE JOB WITH RESULTS - The Create button displays
- Create Job With Selected when the checkboxes are used to select specific Services, as pictured above.
- Selecting the top Checkbox selects all Services on the current page, up to 50 Services.
- The top checkbox may be used to select or deselect all Services on the page.
- In the example above, selecting the Create Job With Selected displays the following confirmation box
-

- If no selections are made after a Search is performed, the Create button displays Create Job With Results.
- In the image above, there are 10 pages of Services.
- In the example above, selecting the Create Job With Results displays the following confirmation box
-

HISTORY

6. Click on History and select a job. Or from the Fiscal Overview page, click on Last Processed to open the History tab.
7. A vertical orange line indicates the selected row. The message from the CREATE screen is displayed to help identify the jobs.
8. Status - Status indicates which stage the selected job is in during processing.
- The preview indicates the job is ready to Finalize, Retry, or Reverse.
- Pending indicates the job is waiting to be processed.
- In Progress indicates the job is processing.
- Done indicates the processing is complete.
- Reversed indicates the job was previously created but returned to the Unprocessed Services state.
9. Errors - This indicates the number of Errors in a job. If "0" the job is ready to move on to Step 10. A job with Errors can be finalized. The services without errors will go on to the next step and the services with errors will remain. The services with errors can be corrected and added to a future batch.
10. Finalize - Click "Finalize" and then OK to confirm to process a job. Click "Reverse" to turn all charges in the job back into unprocessed services. Click "Retry" to run the job again after correcting errors.
11. Details - Confirm client service information and Charge Amounts are correct. If the Details area is blank, processing errors occurred.
A bundling indicator icon was added to the detail of Unprocessed Serviced jobs beginning with the release of v3.10. This makes identifying a bundled Service and Payer easy to do at a glance. The icon has a number representing the number of services in the bundle. There is also a tooltip that appears on hover with the bundling information.

Status (#8) changes to "Pending" to indicate the job created is actively running. (Job size determines how long "Pending" displays on-screen.)
R. "Done" status indicates the job completed successfully.
It is important to note that after Unprocessed Remittances are successfully processed, waterfall charges for secondary payers are created in Preview status in the Unprocessed Services History tab. These are ready to Finalize and Retry just like any other job. Reversing a waterfalled charge is not recommended. The option to Reverse is not available beginning in EchoVantage v3.0.
Return to Fiscal Overview>Unbilled Charges for the next billing process listed or continue to the Errors Tab.
ERRORS
Jobs can be created without correcting errors, but identifying issues early in the billing cycle reduces claim processing and payment receipt times. The Errors function helps identify issues preventing the job from processing and are tied to the Service instead of the processing job. The Errors persist after jobs are Finalized until they are resolved in a future job, facilitating error reporting between jobs.

1. The filters are listed on the left side of the screen in a single column and now include:
- Start and End Date
- Client
- Staff
- Program
- Location
- Job
Enter filter criteria and select the blue FILTER button to apply the selections.
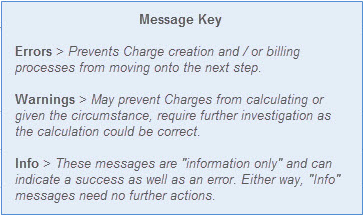
2. The count of each message type is displayed above the error results grid. The example has:
- ERRORS (14)
- WARNINGS (20)
- INFO (153)
- The following Message Key explains the meaning of each Error type.
3. Click on the type to display messages of that type in the grid.
- The currently selected message type has a dark blue background.
- The example is displaying the (14) ERRORS type in the grid.
4. Use the Ellipsis (three dots) to the right of SHOW ALL to display specific errors of that type.
-

- Click on the blue SHOW ALL to display all messages for that Error type again.
5. In the results grid navigate quickly by using the blue links:
- (a) Time & Duration links open the specific Service.
- (b) The client link opens that client’s menu.
- (c) Staff link opens that staff’s configuration page in Configuration>Staff/Users>Staff.
The previous page and filter settings are retained when you navigate away and return in the same session.