Unapplied Payments allows an agency to manage Payer Unapplied Payments created through the Remittance Process. This Fiscal Overview function was introduced in EchoVantage v3.15 with improvements released in v3.21. Client Unapplied Payments posted in the Clients > Account tab are still managed in the Client Payments main menu option; these are not included in the Fiscal Overview > Unapplied Payments function.
Payer Unapplied Payments are created during an Unprocessed Remittances > Process Transactions job when:
- There are duplicate or negative Payments by a Payer on an open or closed (Done) charge.
- The total of Payments is higher than the Charge amount.
- A Payer pre-pays for Services that have not yet been rendered.*
*Note that a pre-payment is an unapplied payment that is NOT available to manage in the Unapplied Payments function in Fiscal Overview until a Client and Charge is applied.
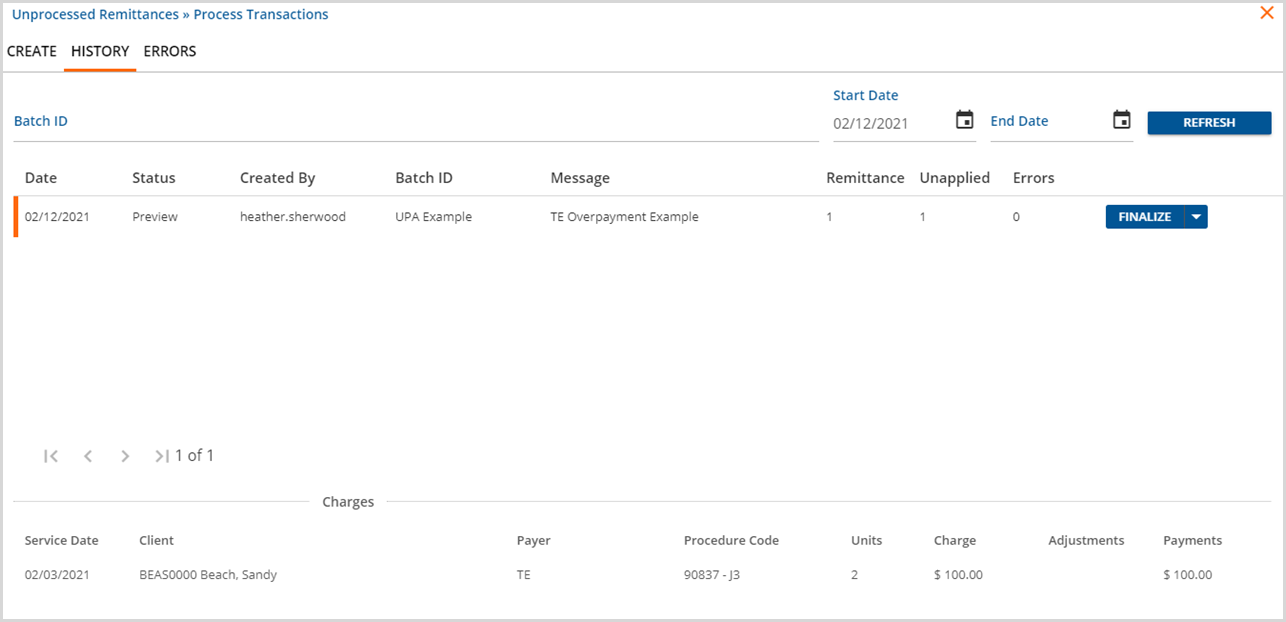
When a Process Transactions job is run, the History tab displays the total number of Remittances and Unapplied Payments created by the job and the number of Errors the job contains.

When the job is finalized, the Unapplied Payments are available to view in Fiscal Overview > Unapplied Payments.
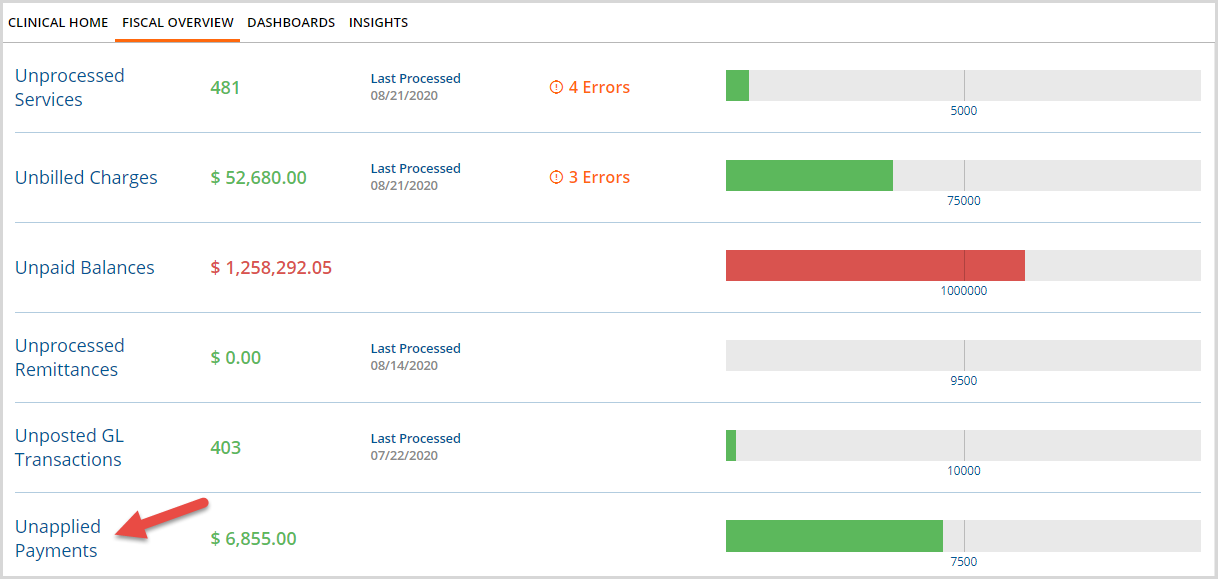
Like other Fiscal Overview functions
- Clicking on the blue Unapplied Payments opens the home screen.
- The total is displayed just to the right of the function, in green or red depending on the threshold setting.
- The target threshold can be adjusted by double-clicking the blue number beneath the bar graph.
- Green means the balance is less than or equal to the threshold.
- Red means the balance is greater than the threshold.
- The total displayed can be drilled down to a specific date range, payer, or combination of both using the Filters to the far right.
Clicking on Unapplied Payments opens the Unapplied Payments home screen.
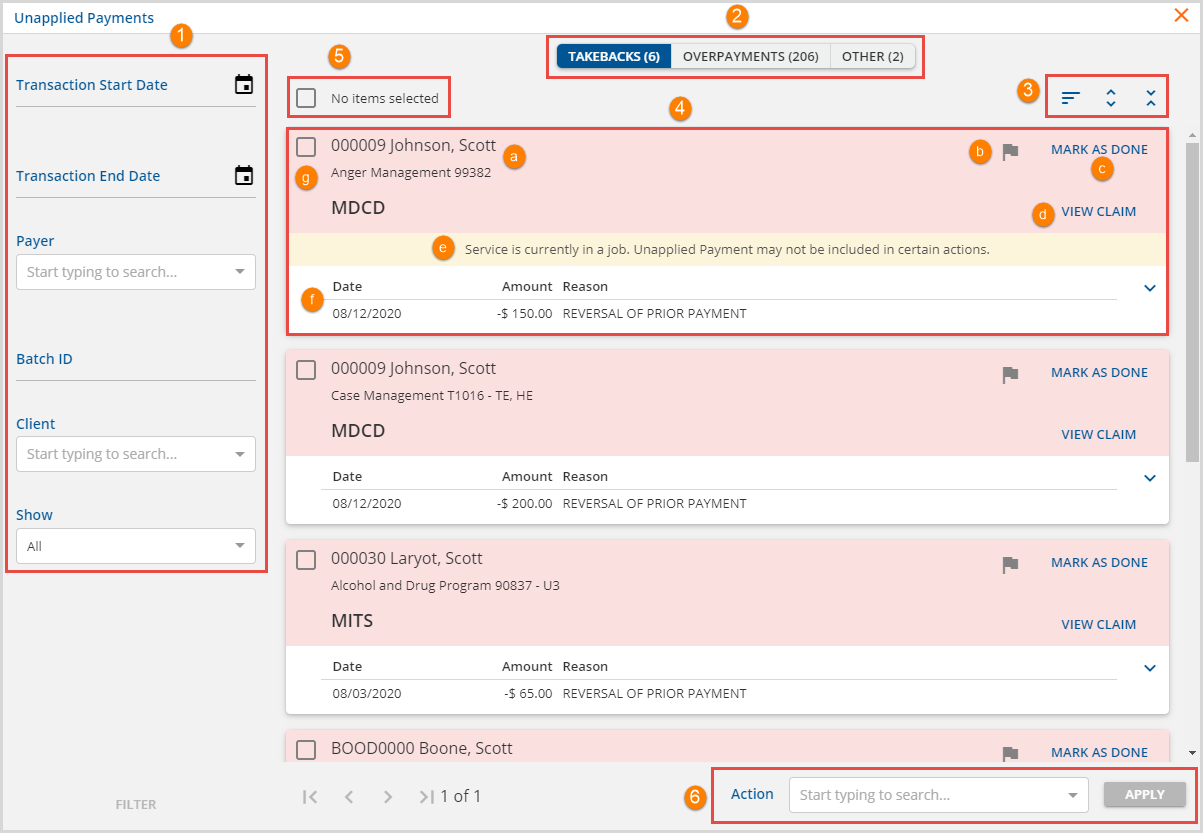
1. Filters are available to refine the number of Unapplied Payment displayed which is especially helpful when there are a large number of payments or multiple staff evaluating the validity of the payments. The filters have an AND relationship between them so only results that satisfy all of the filter requirements display.
- Transaction Start Date and Transaction End Date - Use to restrict the results to a specific date range based on the transaction date of the Remittance that generated the overpayment.
- Payer - Use to restrict the results displayed to only Unapplied Payments made by a Specific Payer.
- Batch ID - If a Batch ID field is populated during Remittance entry, it can be used as an Unapplied Payments filter.
- Client - Unapplied Payments can be displayed for a specific Client.
- Show - This filter works in conjunction with the flag icon on the results card.
- The default is ALL which displays both flagged and unflagged results
- Flagged will only display those results where the flag icon has been enabled (flag is blue).
- Unflagged will only display those results where the flag icon is disabled (flag is grey).
2. Unapplied Payments are grouped into one of the following Types with the count of the number of records displayed in parentheses.
- TAKEBACKS
- The sum of new payments on a charge is less than the balance of the original charge.
- Frequently these are the result of a Reversal of Prior Payment Transaction Type in Remittance jobs
- The header is light red on the displayed results card.
- OVERPAYMENTS
- The sum of new payments is more than the balance of the original charge.
- Takebacks, if posted with a positive Payment, display in this Type.
- The header is light green on the displayed results card.
- OTHER
- The sum of new payments is the same as the original charge.
- This Type only has the option to Mark as Done.
- The header is white on the displayed results card.
3. There are three actions that affect the currently displayed results.
The descriptions below follow the order of the images from left to right.
- Click on the filter icon (4 lines) to change the sort order of the results displayed.
- Select Expand All (arrows pointed away from each other) to show the Past Transactions details of each result.
- Select Collapse All (arrows pointed toward each other) to return the card display to just the unapplied payment transaction detail. The image shows all cards collapsed.
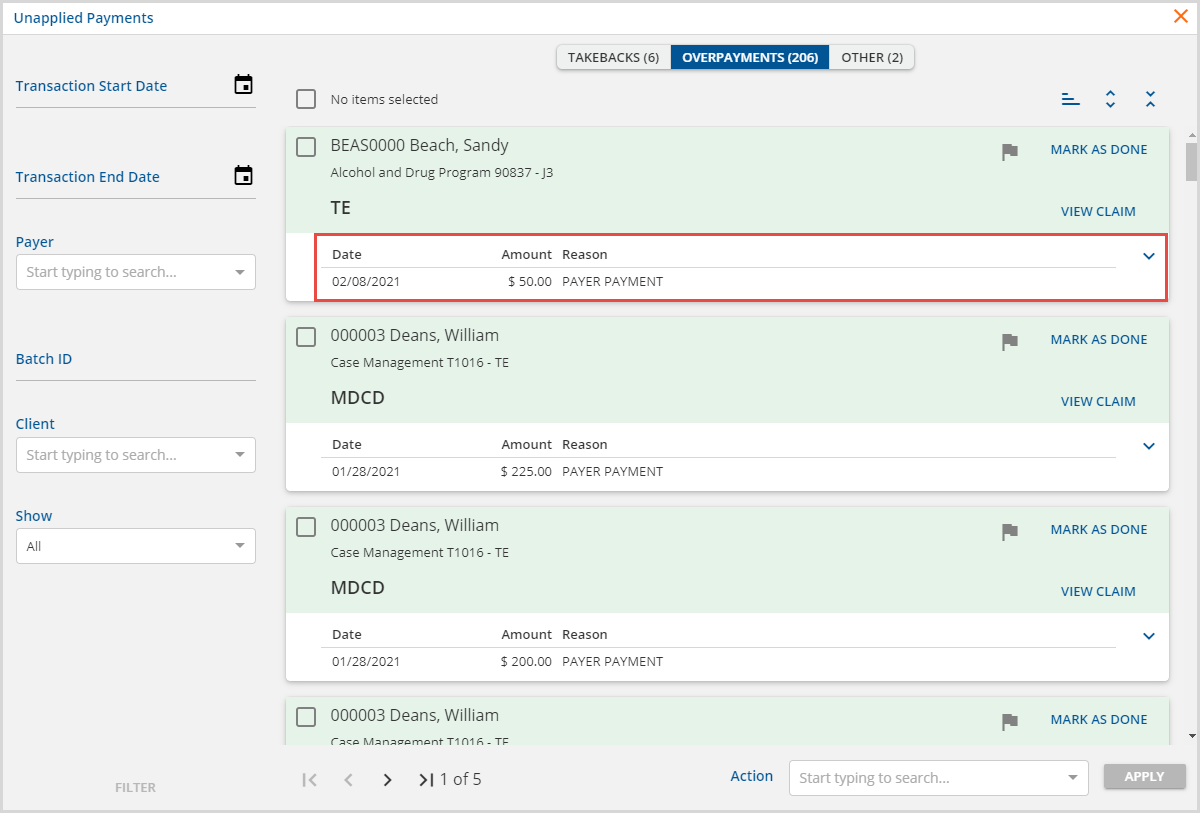
4. The results card header (red, green, or white background) contains important identifying information for the Unapplied Payment.
- (a) - Client Code, Client Name, Service Definition, Billing Code with modifiers (if any), and Payer are displayed in the upper left
- (b) - Select the Flag icon to enable or disable flagging of the results for use with the Show filter to the left
- (c) - Select the MARK AS DONE button to mark the payment as done in the database without taking any further action. This also removes the payment from the Unapplied Payments screen.
- (d) - Select the blue View Claim to open the Claim Details for the charge associated with the Unapplied Payment.
- (e) - A warning message displays on any Unapplied Payment if the Service associated with the payment is currently in a job (i.e., batched status).
- (f) - The white area of the card shows the Unapplied Payment information: Date, Amount, and Reason.
- (g) - Select the single arrow to expand or collapse the Past Transactions detail for the Service associated with the payment. This is an abbreviated version of the Claim Details information.
- (h) - Use the checkbox to select (deselect) the individual card for inclusion (exclusion) from an Action.
5. Bulk record selection and selected records messages.
- Use this checkbox which is not associated with an individual payment to select all or deselect all records of a particular type (Takebacks, Overpayments, Other) on the current page.
- Note that when an individual record is selected, a minus "-" appears in the box and the message indicates how many records are selected from the current page record count.
- Clicking in this checkbox when the minus is present clears all individual selections returning it to the No items selected state.
- The message to the right updates as selections are made.
- No items selected - when no checkboxes are selected.
- __ of __ selected - appears when all the records for the type or some records from the current page are selected.
- If a type has multiple pages of records, a SELECT ALL RESULTS button appears when all records on a current page are selected.
- When all results are selected, the button changes to CLEAR SELECTION. Clear returns to the No items selected state.
- Individual records may be selected or deselected at any time to refine the group to include in the Action selected.

|

|

|

|

|
- Note that the record selections persist even when moving from type to type but the Action only applies to the type in focus.
6. Unapplied Payments Bulk Actions - Use the drop-down list to select an action to perform on the selected items for a specific type. These actions are specific to the type of Unapplied Payment. Once an Action is selected, the Apply button is enabled. Keep in mind, that the Action is only applied to selected items of a single type.
- Takebacks - have a single option to Apply Payment Reversal. When selected,
- The Reversal of the Prior Payment amount is applied.
- The corrected payment is applied.
- A Balance Zeroing Credit is applied to close the charge to the current Payer.
- A Waterfall transaction is created to balance bill the next Payer, if applicable.
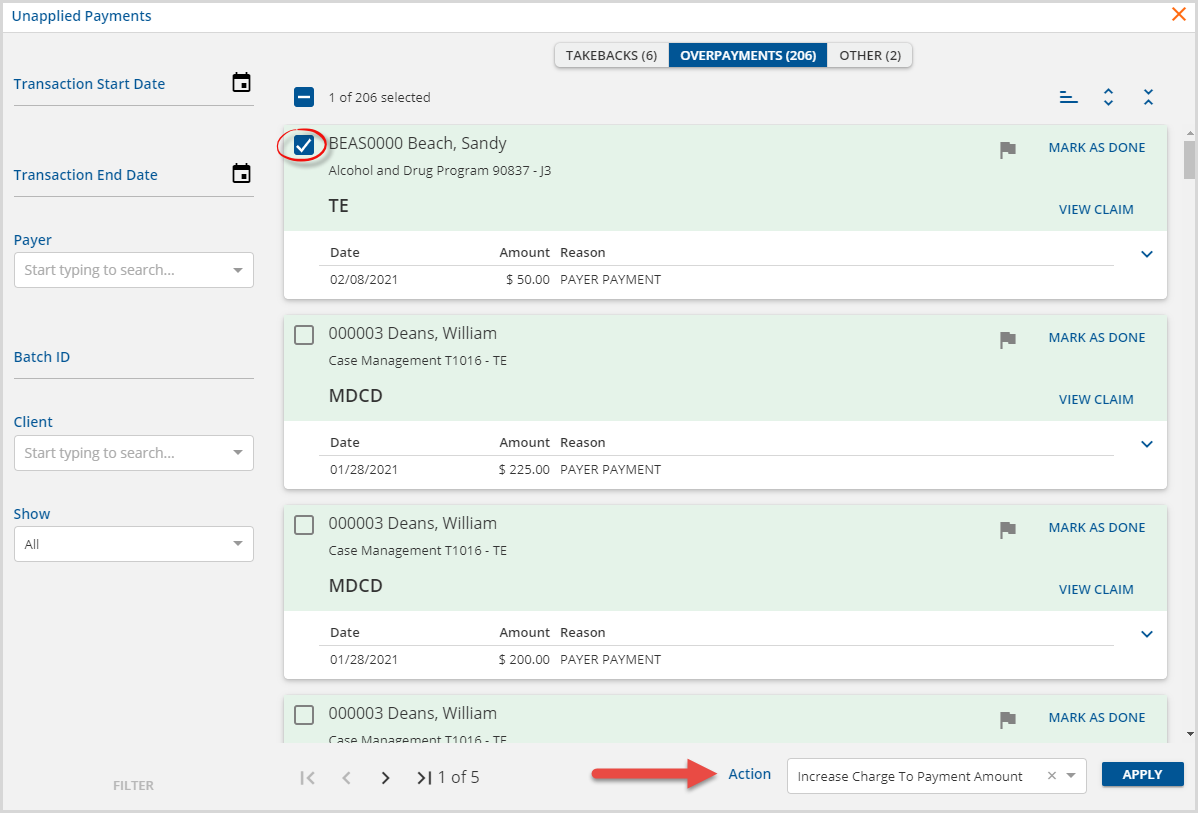
- Overpayments - has two Action options: Increase Charge to Payment Amount and Mark as Refunded
- When the Increase Charge to Payment Action is applied,
- The full payment amount is applied.
- A Charge Increasing Credit is created to accommodate the additional amount received.
- In the case of a Takeback (reversal or prior payment), the takeback is applied first.
- When the Mark as Refunded Action is applied
- Selected items are cleared from the Overpayments tab of the Unapplied Payments tab.
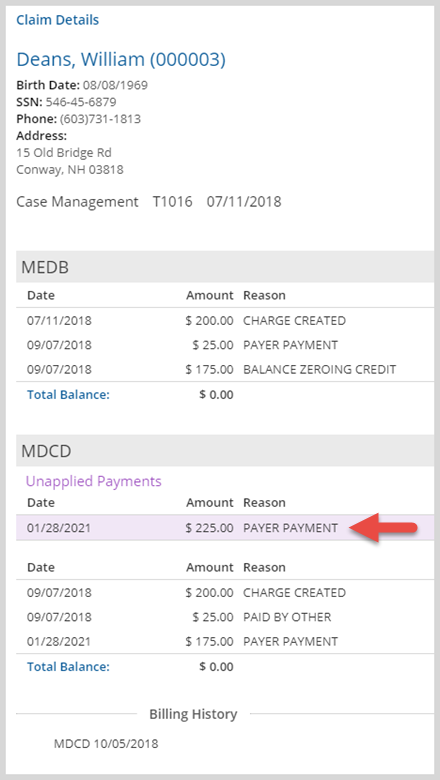
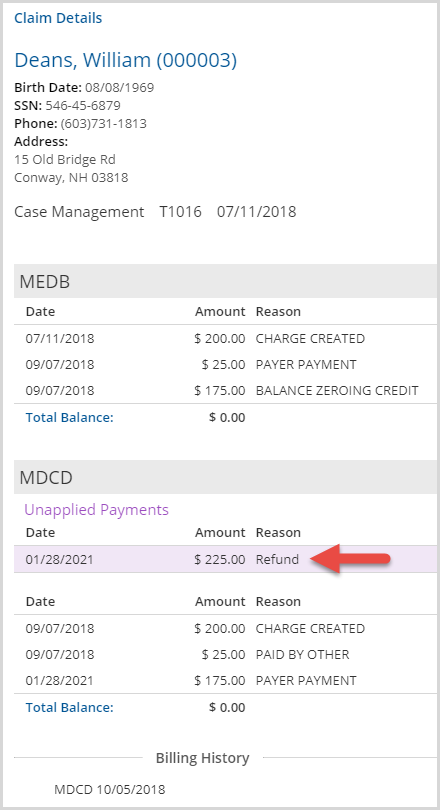
- The Unapplied Payment is marked as Refund in the Claim Details.
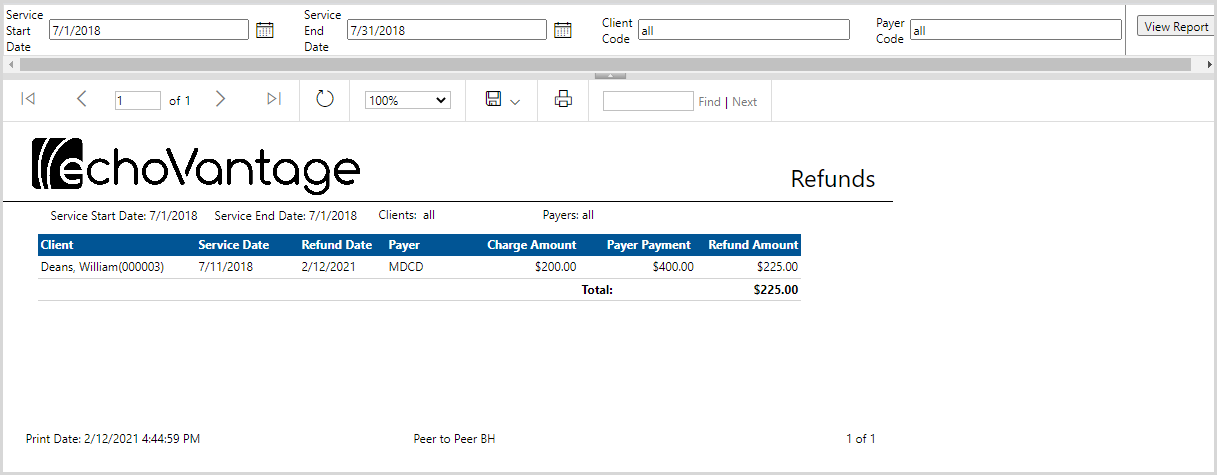
- The Refund is picked up in the Refunds report and easy to identify in the GL Audit Report.
- When the Increase Charge to Payment Action is applied,
- Other - there are no Actions for Other type Unapplied Payments at this time.
Unapplied Payment Examples
Applying a Takeback
In this example, an ADP service was provided on 02/01/2021 and billed in the amount of $100.00. The Payer remitted the full payment amount of $100.00 on 02/08/2021. The Claim Details screen for this activity is shown below.
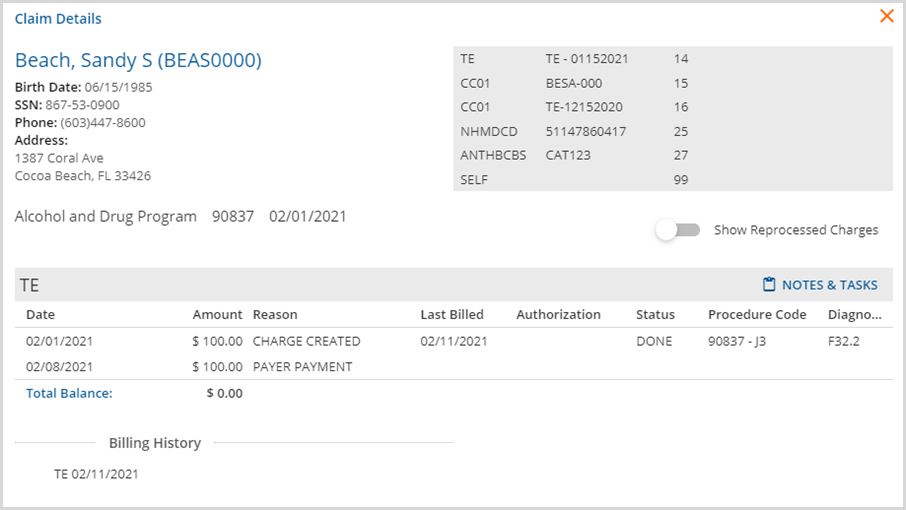
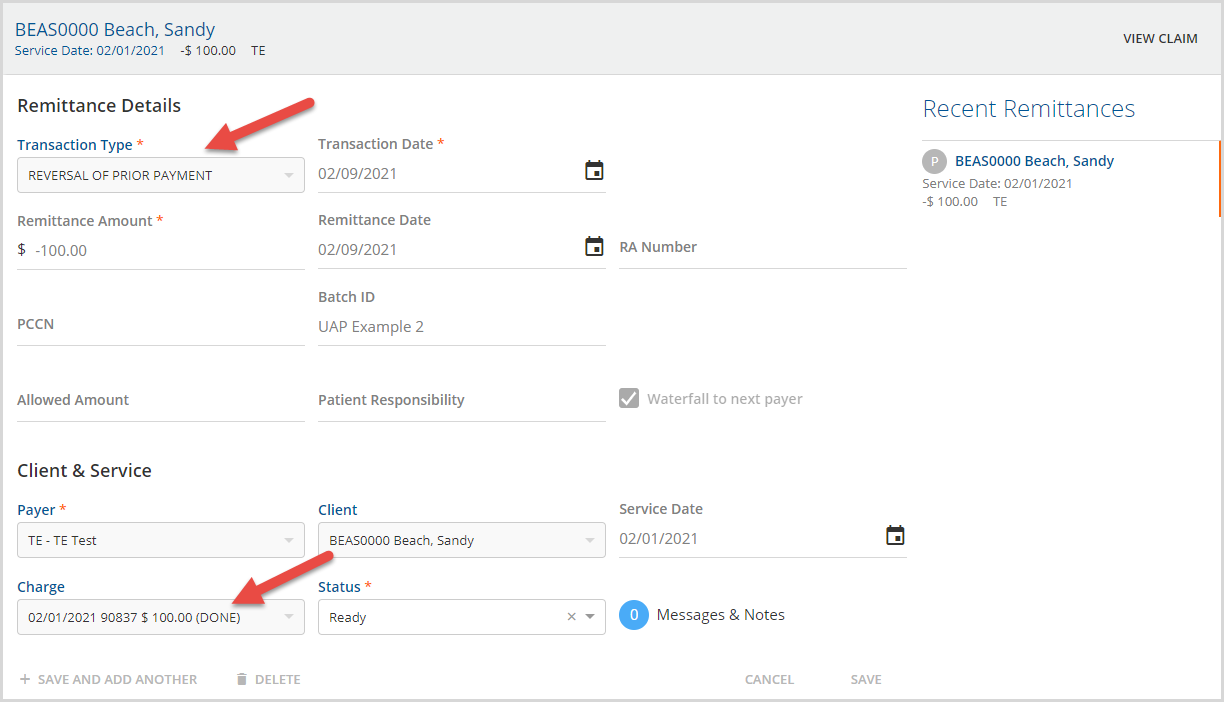
On 02/09/2021 the Payer determined the amount paid was in error and a Takeback of $100.00 is posted in Remittance Entry as a Reversal of Prior Payment. Note that the reversal is posted to a charge with a (DONE) status so it becomes an Unapplied Payment.
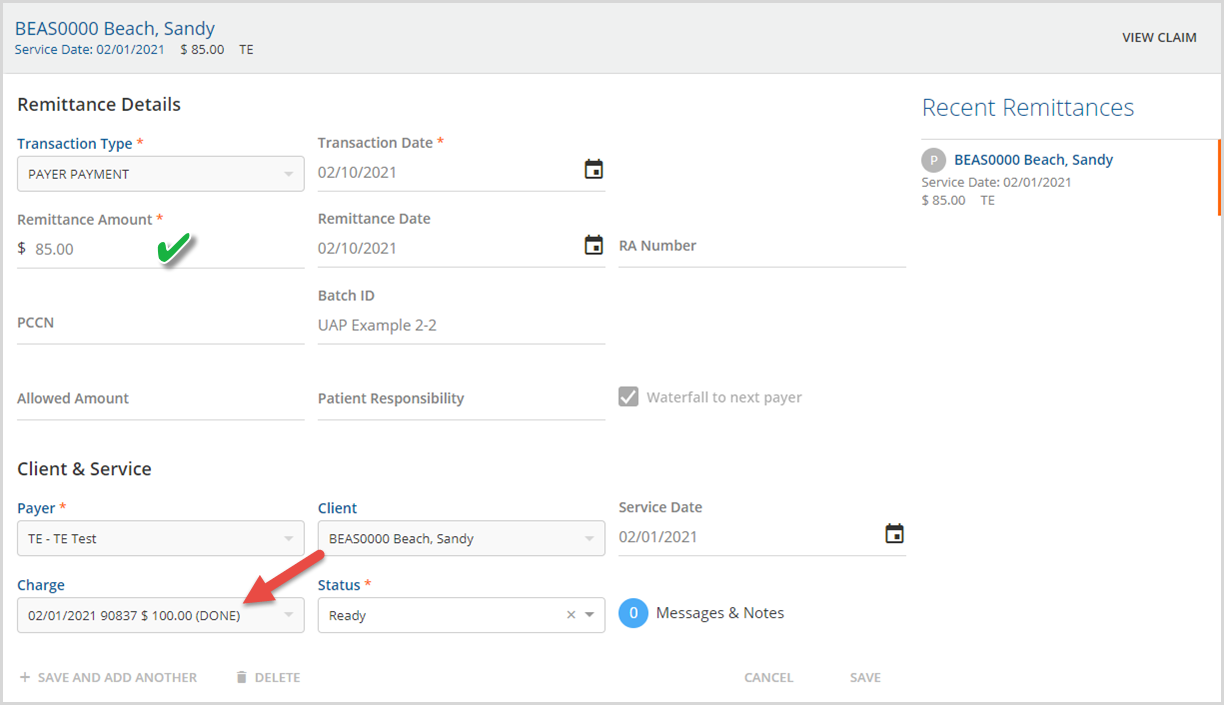
The correct payment amount of $85.00 is sent in a subsequent, 835, and posts on 02/10/2021. Again, this Remittance is posted to a Charge with a (DONE) status and becomes an Unapplied Payment.
The Unprocessed Remittances > Process Transactions job is the action that creates the Unapplied Payments.

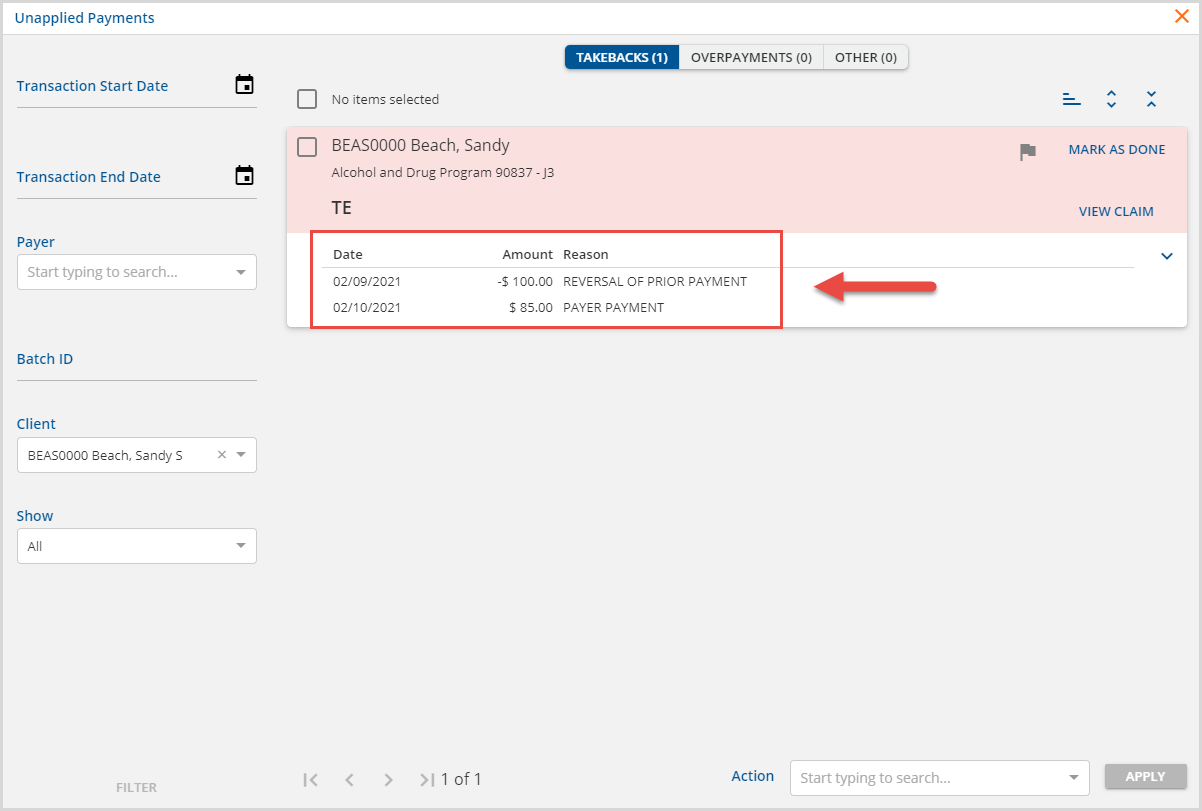
After the Process Transactions job is finalized for both payments, the Reversal of Prior Payment and corrected payment show in the Takebacks section.
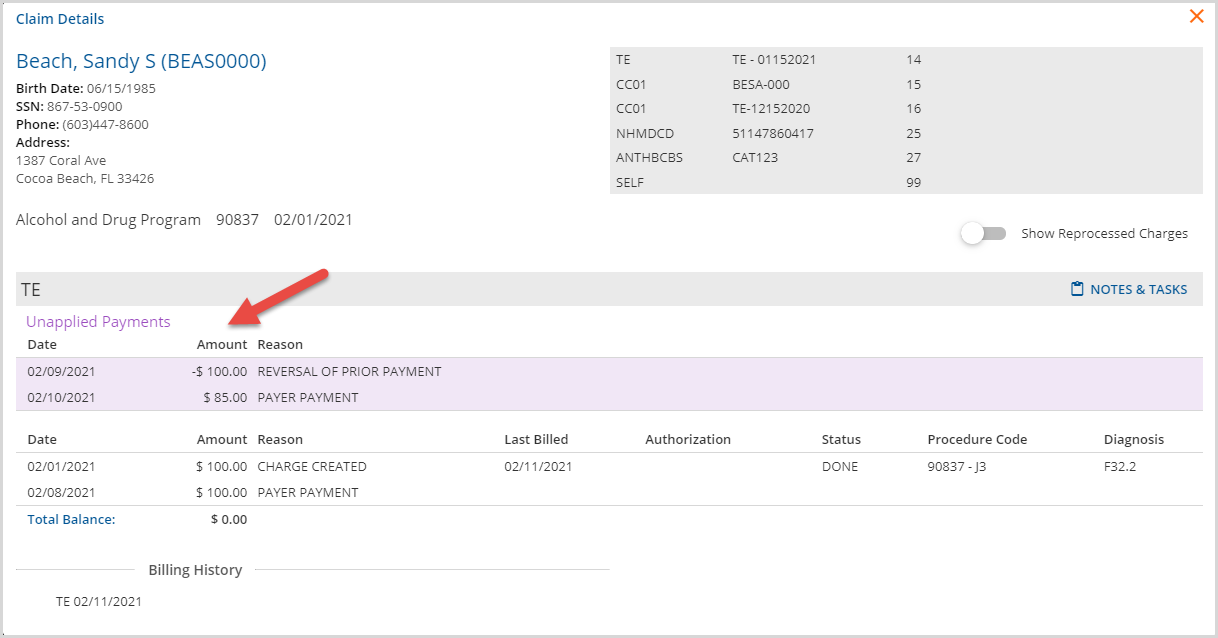
Clicking on the blue View Claim button displays the Claim Details before applying the Unapplied Payments. Note that the Unapplied Payments are listed at the top with a light purple background.
The decision is made to process this Takeback. The card's checkbox is selected and the Apply Payment Reversal Action is selected.
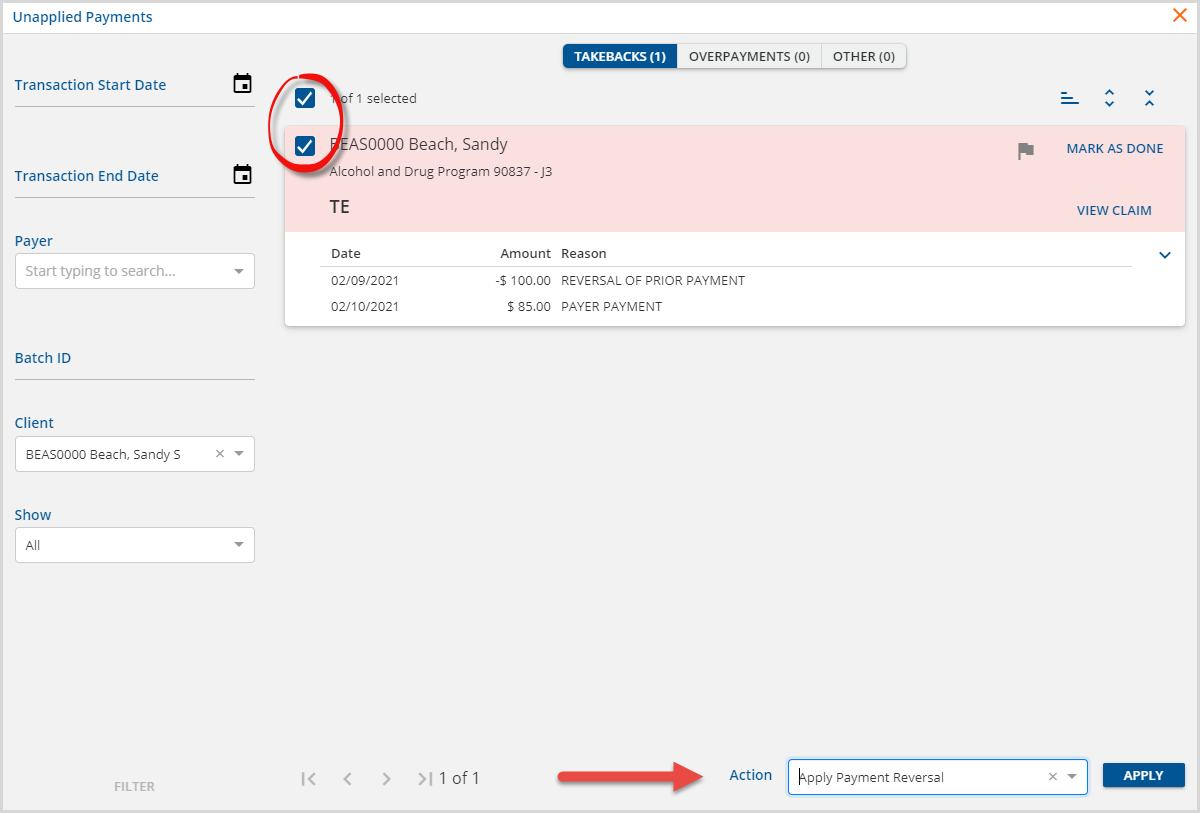
When the APPLY button is selected, the application applies the Takeback, creates any needed zeroing entries, processes the transactions to create new charges if needed, and removes the now applied payment from the Takeback tab of the Unapplied Payments screen.
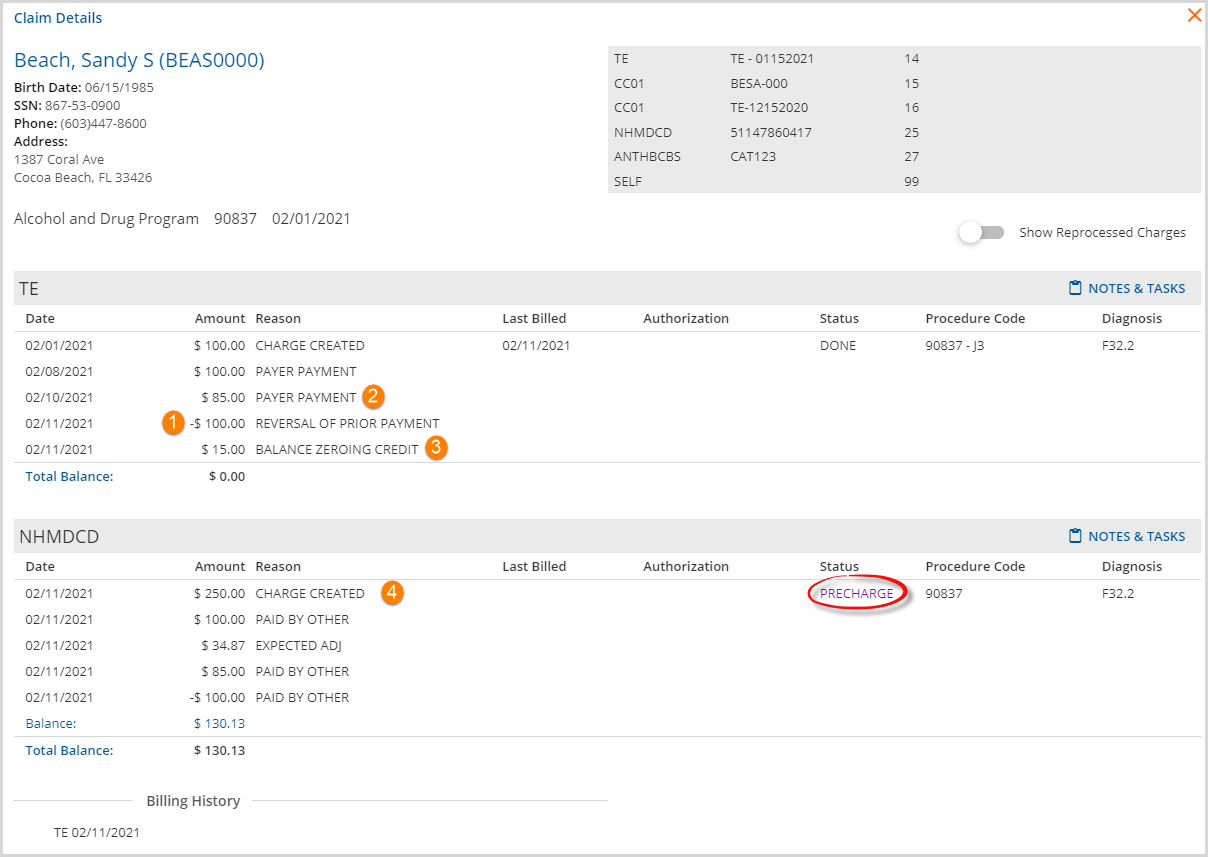
In the example, the application:
- Applies the Reversal of Prior Payment of $100.00.
- Applies the corrected payment of $85.00.
- Creates a Balance Zeroing Credit of $15.00 to close the charge to the current Payer (TE).
- Creates a Waterfall transaction to balance bill the next Payer (NHMDCD).
- Note that the Charge Status is PRECHARGE.
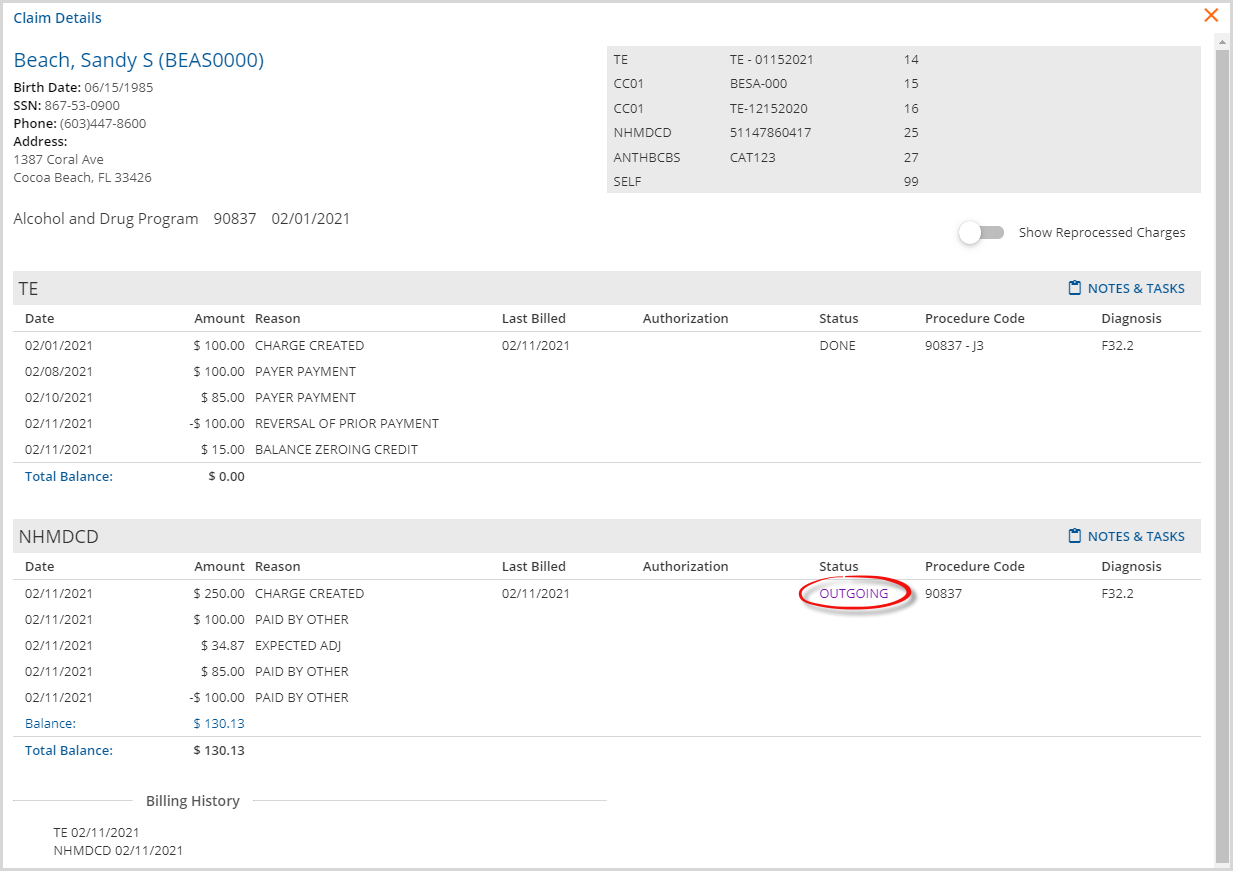
- A Waterfall: Apply Unapplied Payments job is created in the Unprocessed Services > Create Charges > History screen.

When the Waterfall job is Finalized and the Unbilled Charges > Create Bills function for NHMDCD is processed, the charge Status changes to OUTGOING.
Applying an Overpayment - Increase Charge to Payment Amount Action
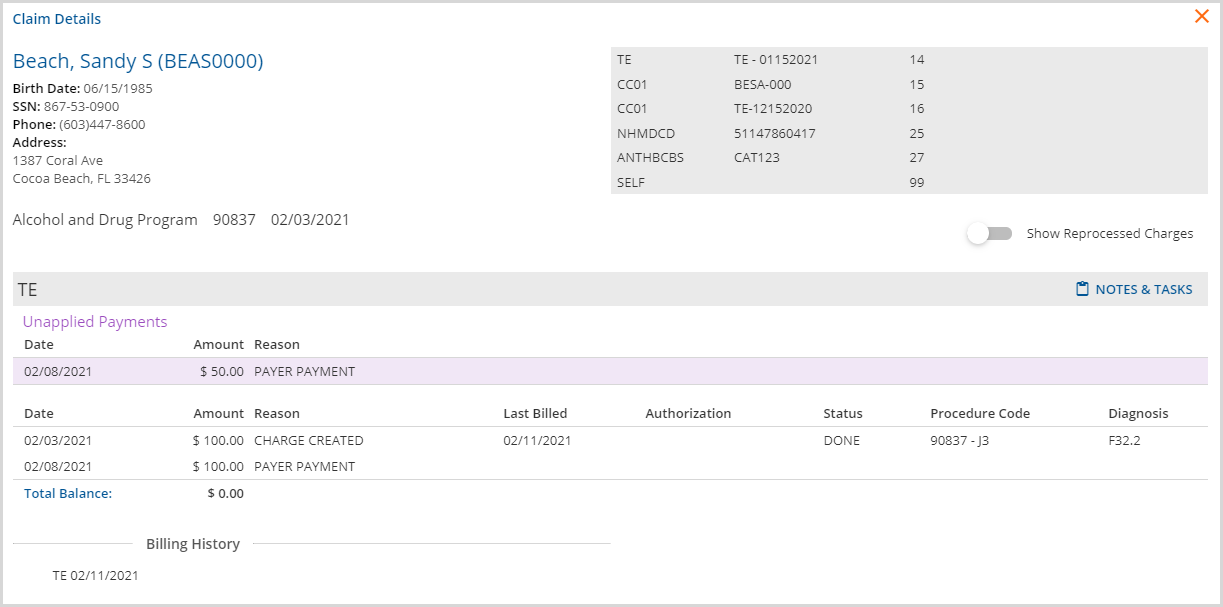
In this example, an ADP Service was provided on 2/3/2021 and billed in the amount of $100.00. The Payer (TE) remitted $150.00, $50.00 more than the billed amount, on 02/08/2021. When this remittance is processed in Fiscal Overview, an Unapplied Payment is created as shown below.
The Claim Details screen for this activity is shown below.
The Unapplied Payment now displays in the OVERPAYMENTS tab.
The decision is made to process this Overpayment. The card's checkbox is selected and the Increase Charge To Payment Amount Action is selected.
When the APPLY button is selected, the application applies the Overpayment, creates all necessary transactions to complete the processing, and the Overpayment is no longer displayed on the Unapplied Payments > Overpayments tab.
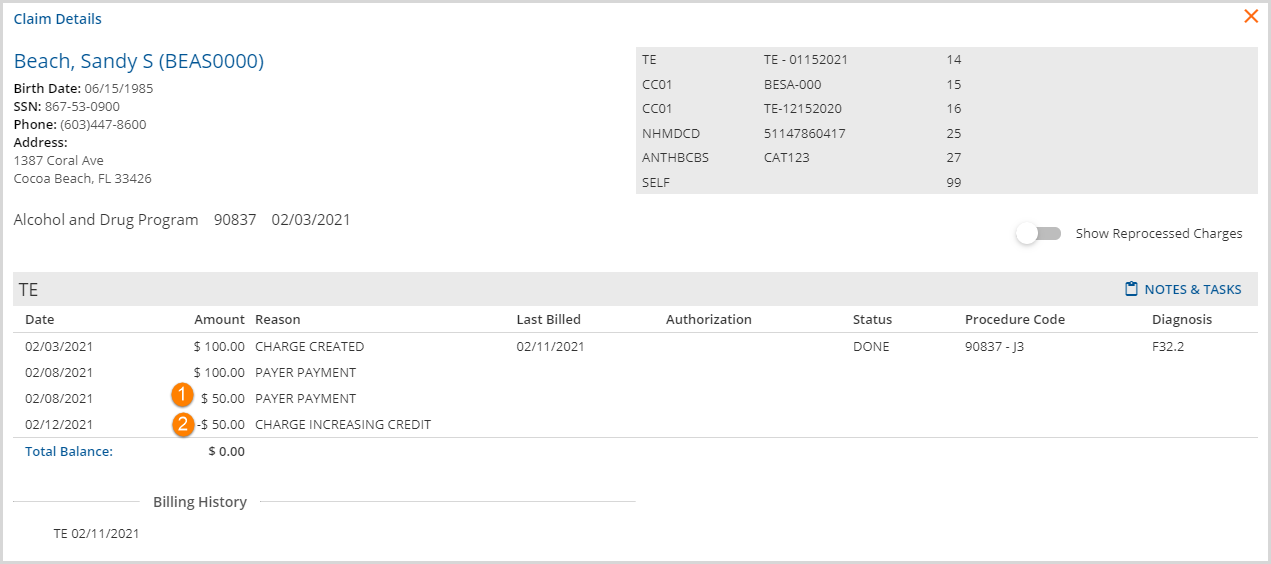
In the example, the application:
- Applies the Overpayment of $50.00.
- Creates a Charge Increasing Credit of $50.00 to accommodate the new rate.
The Charge has a zero balance and is marked Done.
Applying an Overpayment - Mark as Refunded Action
To refund an Overpayment, select the card's checkbox and choose the Mark as Refunded option in the Action checkbox.
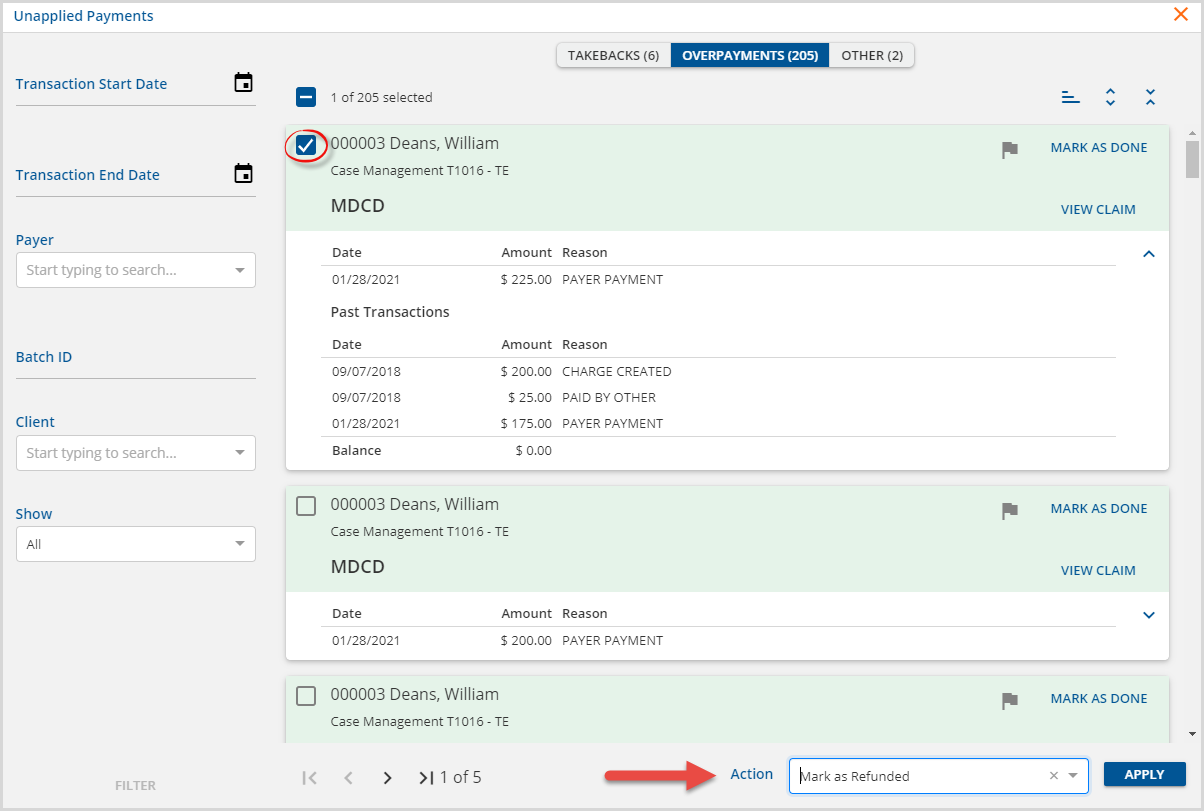
When the blue APPLY button is selected, the Overpayment is cleared from the Unapplied Payments screen and the Claim Details reason for the Unapplied Payment is updated to Refund.
|
|
Use the new Refunds Fiscal Report to track Overpayments marked as refunded. Use Service Start Date, Service End Date, Client, and Payer to refine the results.
