Selecting the Staff option below Staff/Users displays the Staff Home screen. Click HERE to review the Information Entry Screen Types.
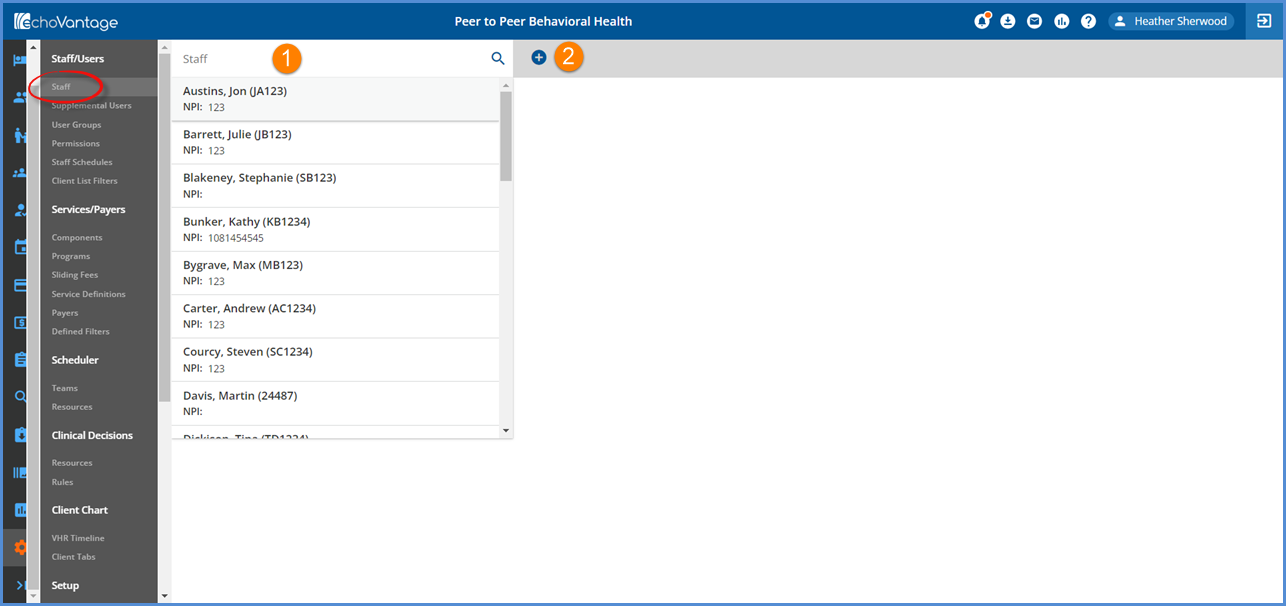
1. Staff Search - Enter any portion of the Staff first name, last name, or code to display a list of partial matches. Alternately the scroll bar may be used to move through the list of existing staff.
2. Blue Plus "+" - Click the blue plus "+" to add a new Staff member.
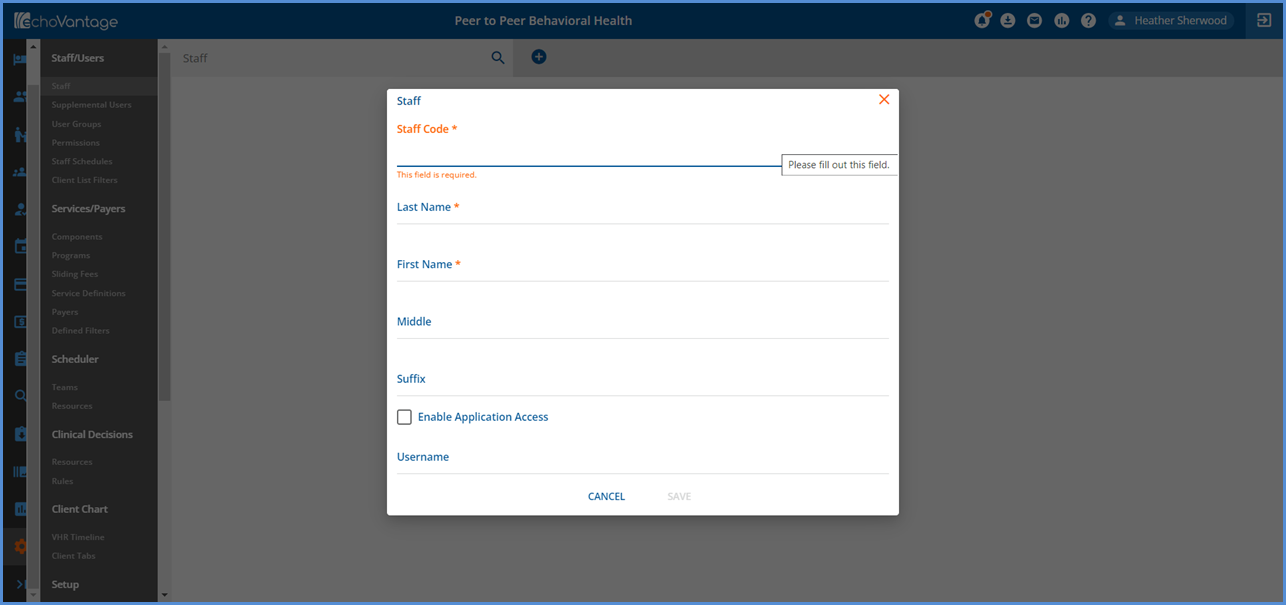
Clicking the blue plus "+" displays the Staff screen above. Fields with an asterisk are required.
- Staff Code - Staff Code is defined by the organization.
- First and Last Name - Required
- Middles and Suffix - Optional
- Application Access and Username - Application Access and Username are not required when adding Staff, which allows the ability to schedule and bill for Staff who do not use EchoVantage.
- Application access is now enabled or disabled via Application Access.
- Populate these fields for Staff that need access to the application and leave blank for Staff who do not need access.
- Note that the Username must be unique across all users.
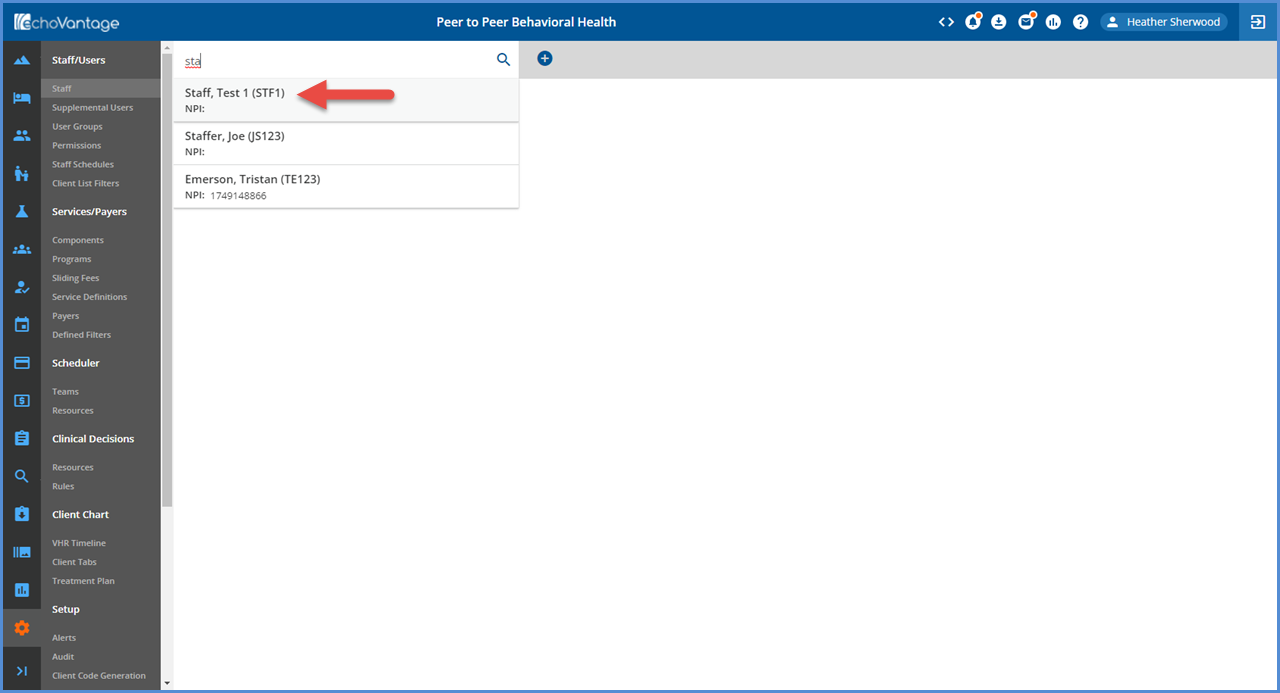
Once all required entries are entered, the blue SAVE button is enabled. Click SAVE to record the new staff entry. The user is now added to the system but is not yet active. Locate the new staff in the search list to complete the setup entry. There is a grey header bar with summary information and five screens that hold information for staff: Profile, Communications, Employment, Credentials, Payer Mappings, and Documents. The system defaults to the Profile screen, indicated by the orange horizontal bar, after selecting a staff.
PROFILE
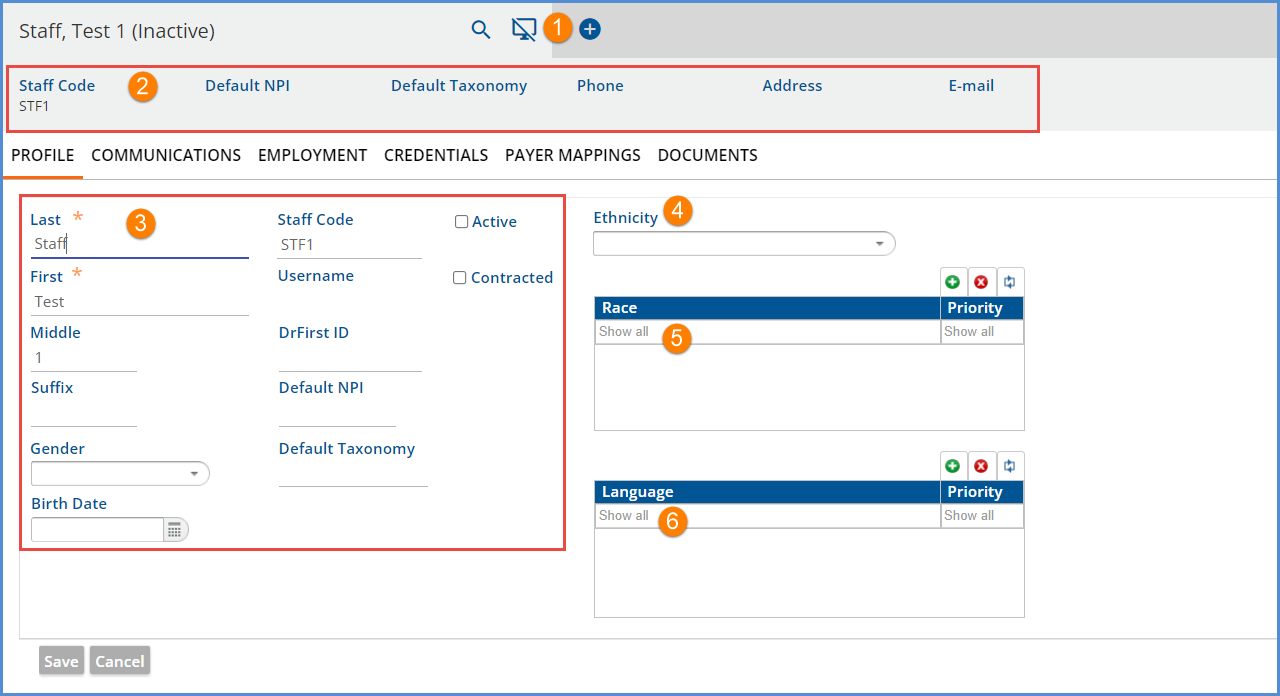
1. The application access is a visual indicator for whether the currently displayed staff has access enabled or disabled. Access may be configured when staff is first added as indicated above or use this icon to edit the access status of existing staff.
- To configure the access permissions of an existing user, select the user.
-

- Then click on the Application Access button.
-
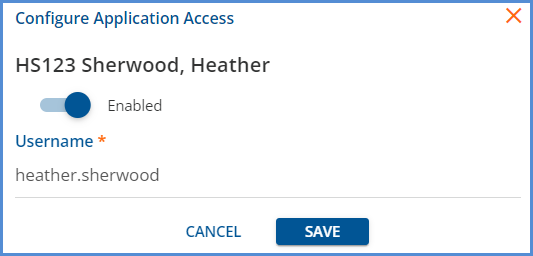
- A configuration screen pops up. Use the toggle to Enable or Disable the Staff's access, and remember to click on SAVE to record any updates. In the header, the application access icon now shows as enabled.
-

2. Just below the staff name is the grey header area. It displays Staff Code, Default NPI, Default Taxonomy, Phone, Address, and E-mail information when populated in the Staff screens.
3. Some fields in this section are populated from the initial Add Staff screen. The others provide additional details about the staff person appearing on the name bar.
- Last Name, First Name, Middle, Suffix, Staff Code, and Username are populated from the add screen.
- Gender - Select from the drop-down list.
- Birth Date - Enter the staff member's date of birth.
- DrFirst ID - Enter if this staff has DrFirst access. The staff's DrFirst id should be unique to that member and not shared in other staff profile configurations.
- Default NPI - Enter this unique 10-digit provider identification number if applicable.
- Default Taxonomy - Enter the unique ten-character alphanumeric code for identifying the provider type and the specialty at the claim level.
- Active - Check the Active box to indicate that the staff is active.
- Contracted - Check to indicate this is a contracted staff.
4. Ethnicity - Select staff members' Ethnicity from the drop-down list.
5. Race - Click the green plus "+" to enter a Race and Priority.
6. Language - Click the green plus "+" to enter a Language and Priority.
Remember to click SAVE to record changes. Click CANCEL to exit without saving entries or changes.
COMMUNICATIONS
Clicking on COMMUNICATIONS moves the horizontal bar below it and displays the following entry screen.
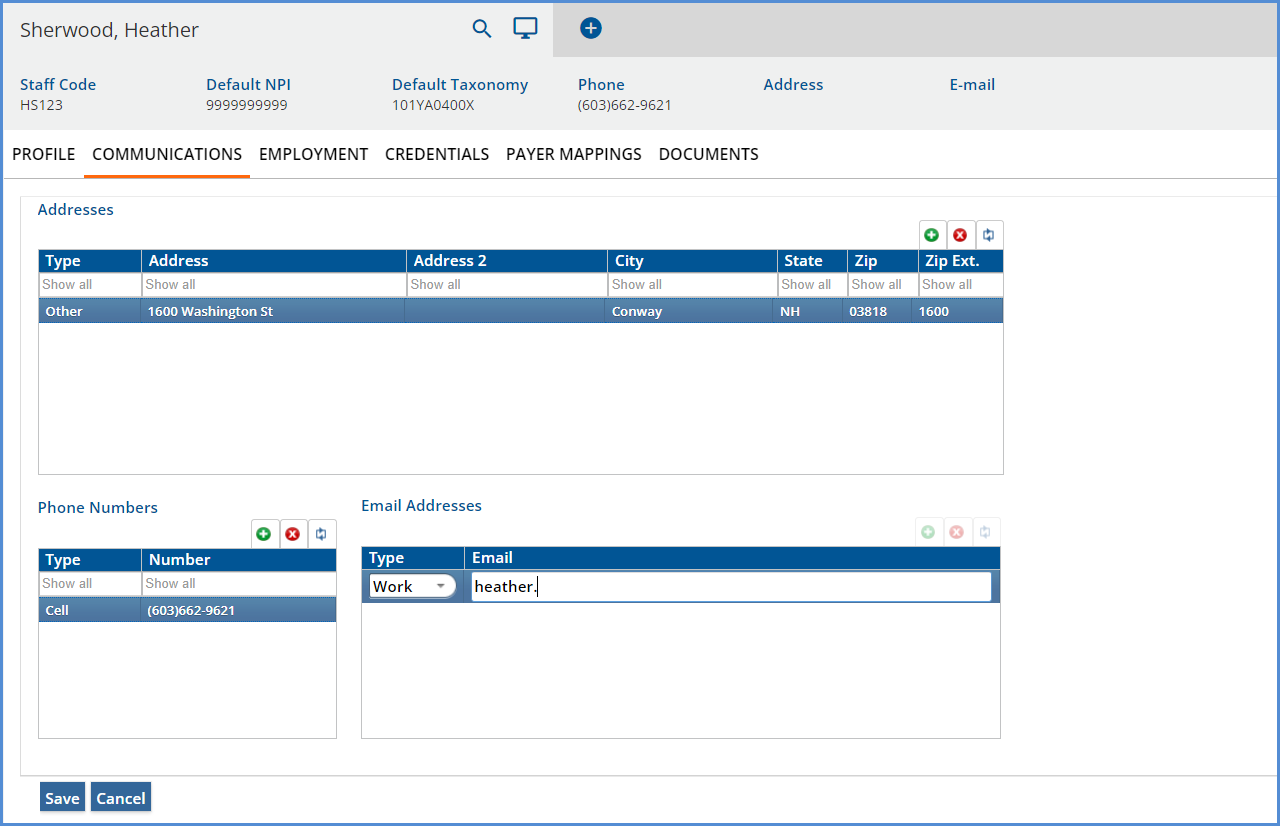
Communications holds demographic information such as addresses, phone numbers and Email addresses. The information entered is collected and displayed in the grids on the screen. The screen is designed to hold numerous addresses, phone numbers and Email addresses for each Staff. The best practice is to end-date old or invalid information and then create new records as needed. This allows the system to hold historical records.
The entry process is the same for all three.
- Click the green plus “+” to make the entry fields active and to enable the Save button.
- Type - Select from the drop-down lists.
- Enter data for the remaining field labels.
- Click the enabled blue Save button to record entries.
EMPLOYMENT
Employment holds additional information for the selected Staff. These fields are not required and may be left blank. To enter information, click the green plus "+" to make the entry fields active and to enable the Save button.
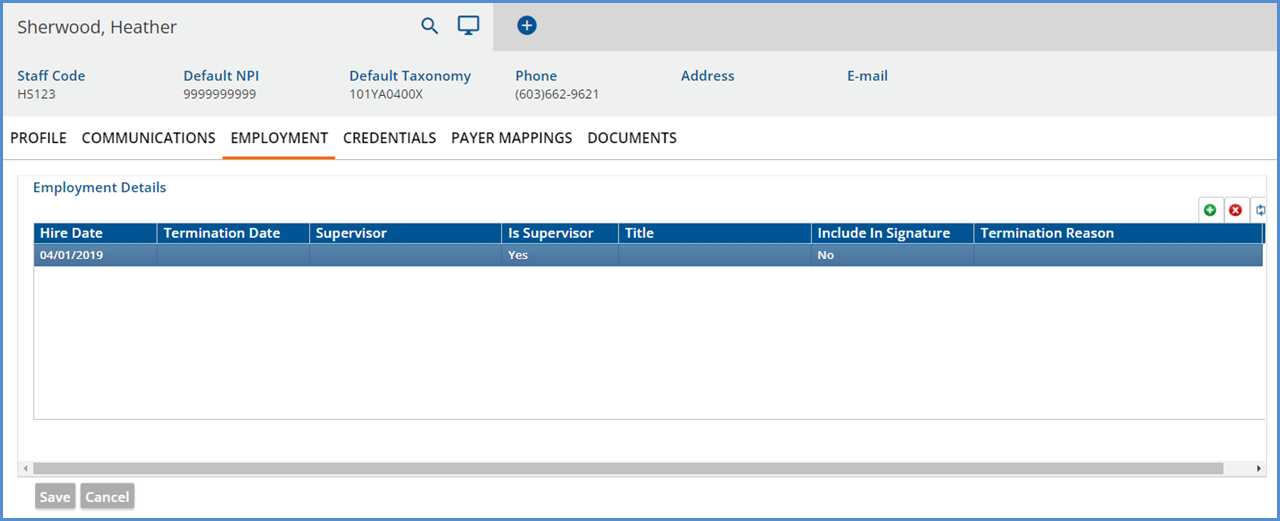
- A Hire Date on or before the current date is required for the staff to be an available selection in a Staff drop-down list.
- A Hire Date only is open-ended and considered active.
- If a Termination Date is entered for an employee, the employee is considered inactive.
- Best practices for reactivating a terminated employee, is to create a new employment row with the return to work date in the Hire Date field. This method keeps historical records accurate.
Remember to select Save to record entries or changes.
CREDENTIALS
Credential information entered is often used when processing services, creating charges, and reporting. Multiple credentials may be defined for the selected staff - a row is created for each record.
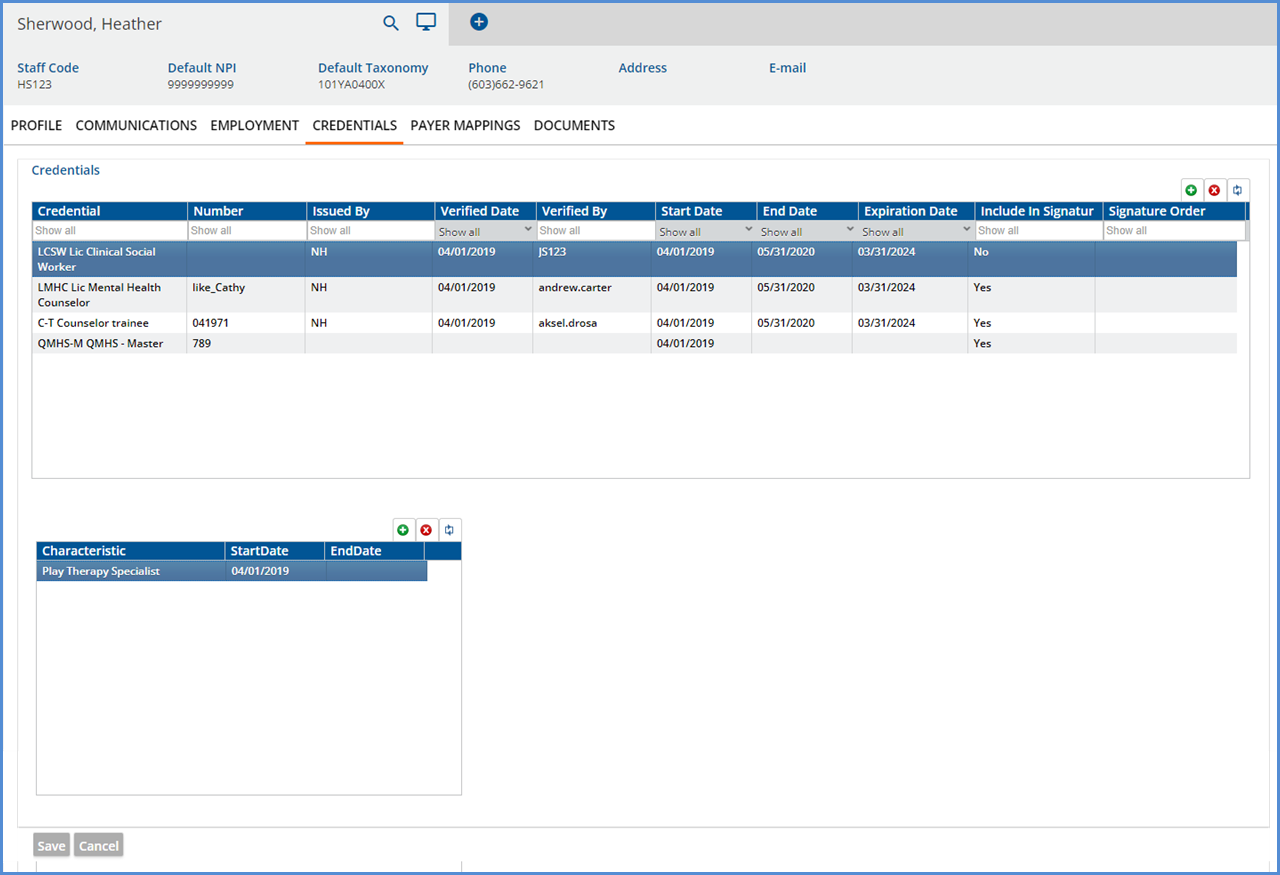
Click the green plus "+" to make the fields in the grid active and to enable the blue Save button.
Credential - Select the Credential from the drop-down list. This list is defined in Configuration>Setup>Defined Lists>Staff Credentials.
Number - Use to store license and DEA numbers. This is a 20 character alphanumeric field.
Issued By - Enter the issuing authority for the credential.
Verified Date - Enter the date the credential or license was verified by the organization.
Verified By - Enter the name of the Staff/User who verified the credential.
Start Date - Enter the effective date of the Credential.
End Date - Enter the End Date if applicable.
- If credentials are always renewed, on time, this is typically blank.
- This should be populated if credentials are not renewed or if there is a credential level change ie LNA to RN.
Expiration Date - Enter the date the credential expires.
Include in Signature - Select Yes from this drop-down list to include Credential abbreviation in the signature, ie on Progress Notes.
Click Save to record entries or changes.
Characteristics are defined by the organization in Configuration>Setup>Defined Lists>Staff Skills/Characteristics.
- The entries in this grid are not required.
- Information entered into the Staff Characteristic field is helpful when using the Search for Next Available function in Scheduler. Click HERE for more information.
- Just as in the above, click the green plus to make the fields active.
- Don't forget to select Save to record changes.
Payer Mappings
The Payer Mappings configuration allows multiple NPI and Taxonomy overrides to be defined per Staff. These mappings are in addition to the single default NPI and Taxonomy values captured on the Staff > Profile screen and are used in the Fiscal Overview > Unbilled Charges > Create Bills process to determine which NPI or Taxonomy number to report. Each mapping requires a Defined Filter, Payer, and NPI number per override. A Defined Filter can be used more than once provided each record has a different Payer; the Defined Filter and Payer combinations must be unique.
The initial Payer Mappings screen indicates that no NPIs or Taxonomies are configured.
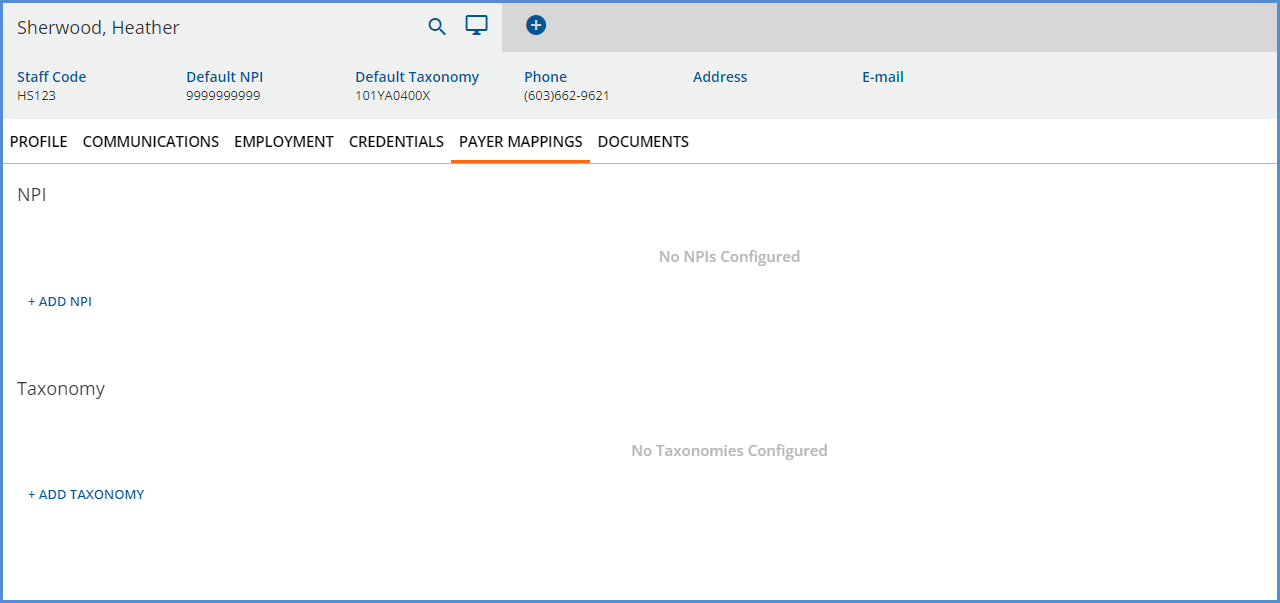
Select the + ADD NPI or +ADD TAXONOMY button to add the mappings.
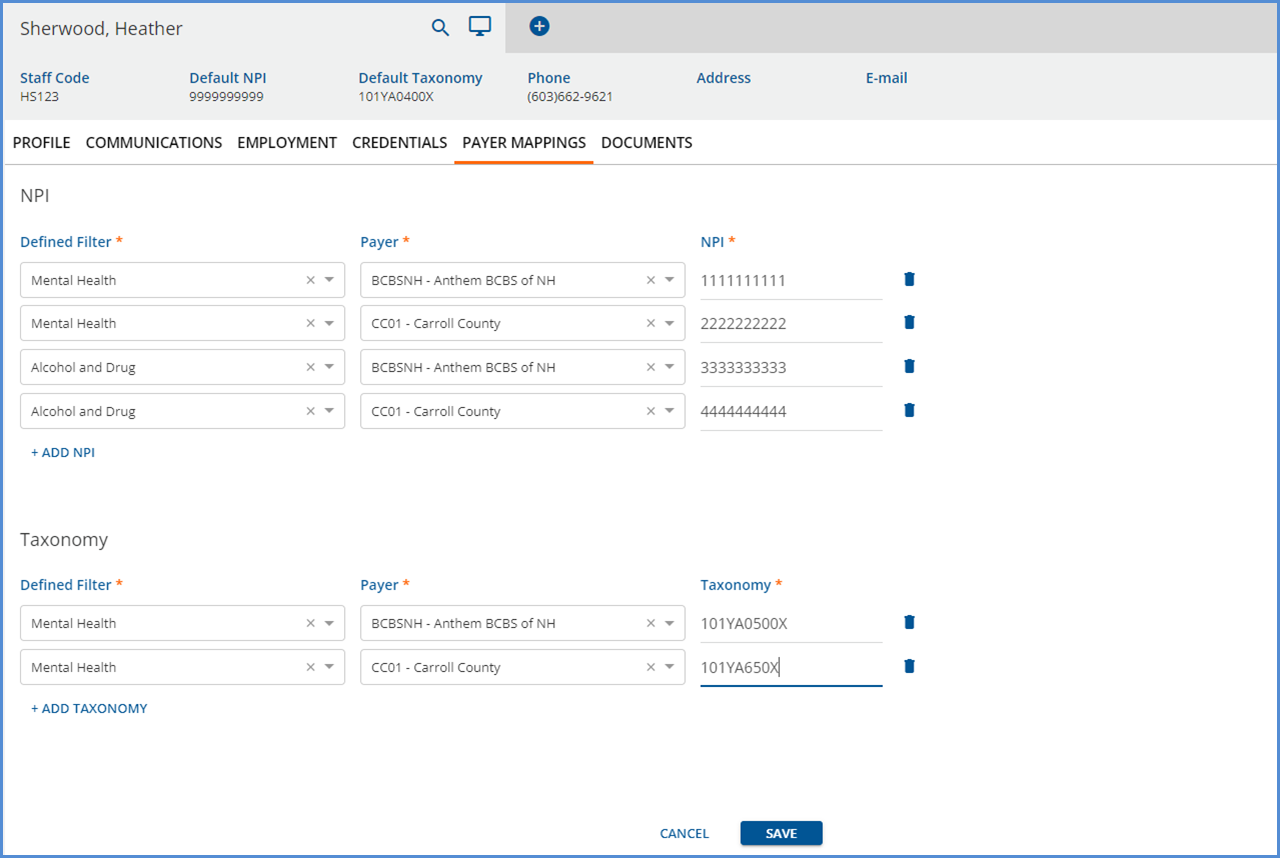
When all required fields are completed, the SAVE button is enabled. Additional mappings can be added as long as the defined filter and payer combinations are unique.
In billing, when a Payer's billing method is configured to report a Staff's NPI, or Taxonomy number, or both, and the Service associated with the Charge satisfies a mapped Defined Filter, then the override value is used. For example, if Heather Sherwood, the Staff above, is the reported Staff and the Service associated with the Charge satisfies the Mental Health Defined Filter, the following is reported.
- If the Client's Payer is BCBSNH, then 1111111111 is reported for the NPI, and 101YA0500X is reported for the Taxonomy.
- If the Client's Payer is CC01, then 2222222222 is reported for the NPI, and 101YA650X is reported for the Taxonomy.
- If the bill is for a Payer that is not mapped, then the default values from the Staff Profile are reported - 9999999999 for the NPI, and 101YA0400X for the Taxonomy.
Documents
The Documents tab allows an agency to View, Add, and Delete documents for a staff.
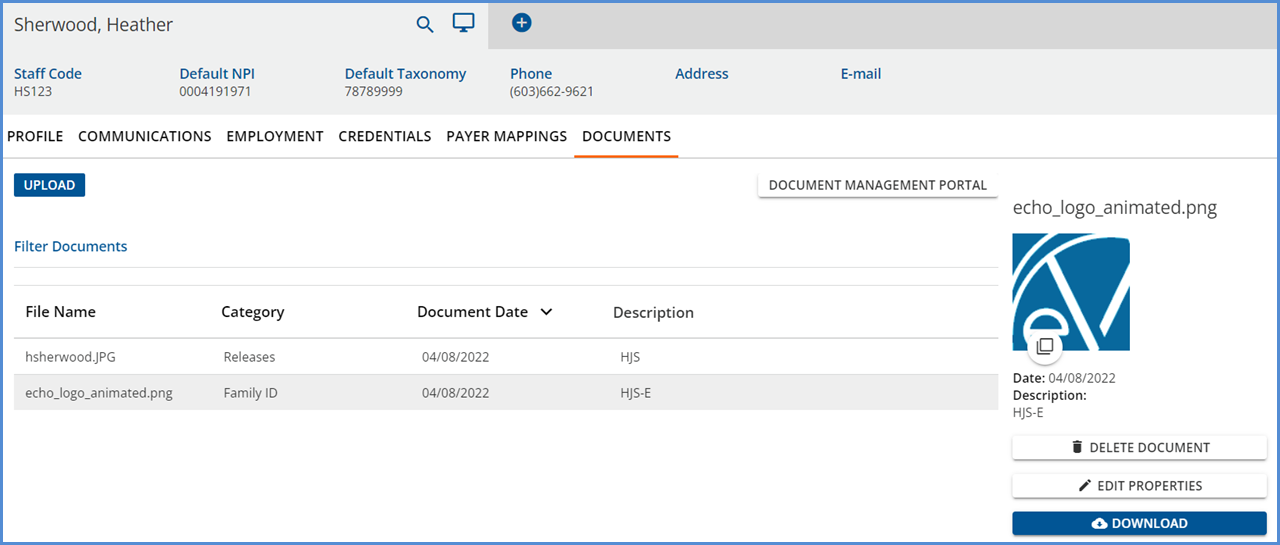
- User Group members with access to the Staff menu option in Configuration have access to the new Documents tab.
- The Document Category permissions still apply just as they do in Client or Family Documents.
- New staff documents can be uploaded, or existing ones may be edited, deleted, or downloaded.
- There is no option to set a profile picture. Profile pictures may only be defined in the Clients > Documents.
