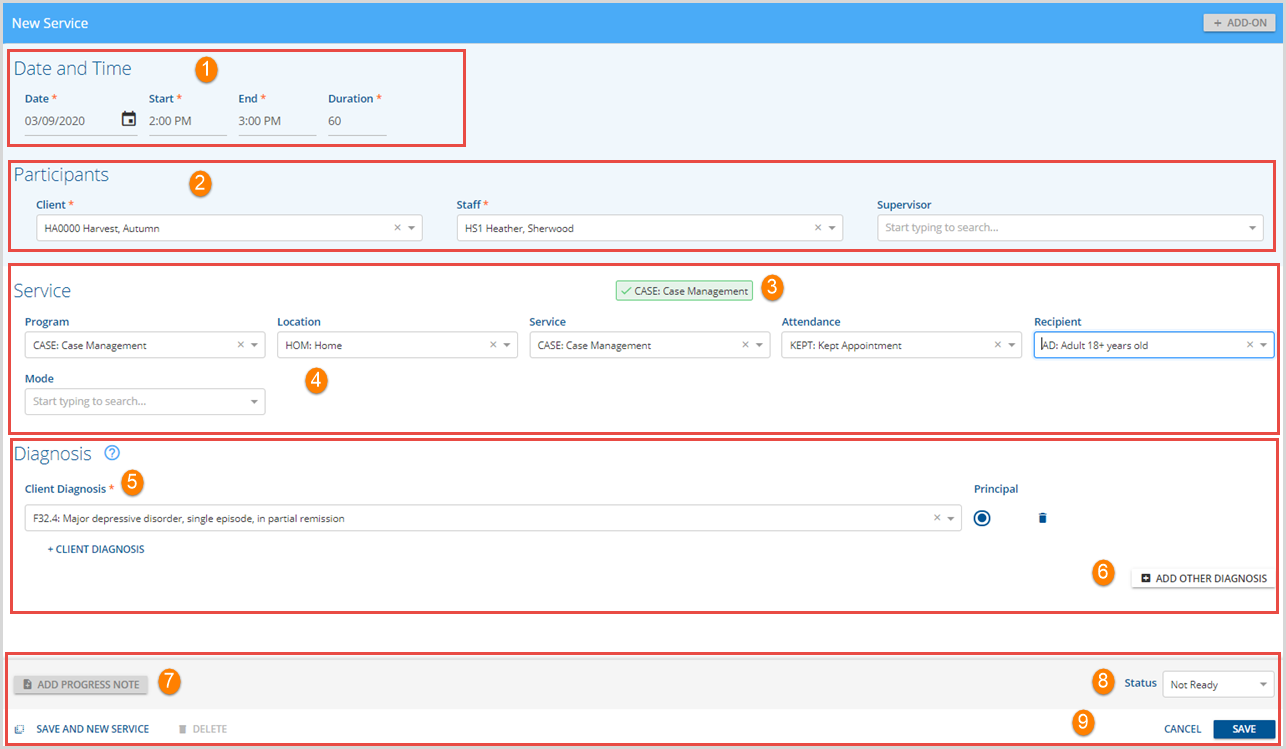
The Services screen has a clean and concise layout with clearly defined sections that keep warnings and messages from getting lost on the screen. Editing the Date of Service or Client prompts some of these warnings and messages which are covered in more detail below.
Adding a New Service
Navigate to the Services main menu option and select the blue plus "+" to add a New Service.

1. Date and Time - All fields are required.
- Date - This can be added in MM/DD/YYYY format or the Date Picker (calendar icon) can be used to select a date.
- Start Time - Must be before the End time.
- End Time - Must be after the Start time.
- Duration - This is the length of the Service in minutes.
- The system will automatically calculate the Start Time, End Time, or Duration as long as the other two fields have been populated.
- Changes to the Date, whether creating a new Service or editing an existing Service, affect the information in the Program component field and the Diagnosis fields.
2. Participants - Two fields are required, Client and Staff
- Client - Select the name of the Client for which the Service applies.
- The names available in the list are affected by the Client List filters selected.
- Changes to the Client, whether creating a new Service or editing an existing Service, affect the information in the Program component field and the Diagnosis fields.
- Staff - Select the Staff who provided the Service from the drop-down list.
- Supervisor - The Supervisor of the selected Staff may be indicated in this option field.
Service

3. Service Definition Message - Indicates the status of the Service component combination entered below.
- This message is centered on the screen.
- There are three types of messages:

|
Indicates that the component code entries are not complete or that the entered components do not match on a Service Definition. |

|
Indicates that the component codes entered match on a single Service Definition. |

|
Indicates that the component codes entered match more than one Service Definition. The count of matching Service Definitions, up to 7, is included in the message. Clicking on this message will display the matching Service Definition Codes and Descriptions. |
4. Service Components - The Service Components as defined in Configuration > Services/Payers > Components display in this section.
- There are five core Event/Service component codes or PLAAR (Program, Location, Activity, Attendance, and Recipient).
- These may be relabeled in the Configuration.
- In the example above, Activity was relabeled Service.
- There can be up to ten additional component codes.
The Program component may be affected by the Date and Client selected.
In version 3.28 and lower,
- The Program defaults to the Enrollment program that is open for the Date and Client selected.
- A change to the Date or Client clears the Program and repopulates it based on the newly selected Date and Client combination.
- When in edit mode, the following warning displays when the Date or Client is changed "Date or Client has changed. Please verify that the Service, Diagnoses, and Progress Note are correct."

In version 3.29 and higher,
Agencies were given more control over the New Service Entry page option in Configuration > Setup > Service Entry. There are three types of options, Client, Service Component, and Diagnosis and agencies have the option of enabling or disabling these. Detailed information with examples is found in the v3.29 Release Notes by click HERE. The selections in the Service Entry configuration may affect the standard options enabled as described below.
DIAGNOSIS

Onscreen help is available for the Client Diagnosis by clicking the blue question mark inside the blue circle. A tool tip displays when hovering over Other Diagnosis.
5. Client Diagnosis - The application defaults to an existing Client Diagnosis that is Primary, Billable, and Active as of the Service Date.
- Selecting the drop-down box displays only the diagnoses from the Client > Diagnosis tab.
- This makes finding or changing a Client's specific diagnosis faster and easier.
- More than one Client Diagnosis can be included on the Service.
- Add an additional Client Diagnosis by clicking on the blue + CLIENT DIAGNOSIS button
- This displays all of the diagnoses assigned to the Client that are active as of the Service Date.
- These may be billable or not billable.
- Inactive diagnoses can only be added to the service by adding an Other Diagnosis.
- Any Diagnosis can be marked as Principal. The application will automatically deselect any previously selected Principal button.
- A Client Diagnosis can be deleted by selecting the garbage can icon to the right of it.
In version 3.26, if a Client has multiple primary diagnoses, the application looks for a match between the Program indicated on the Service and the Program or Enrollment Program on the diagnosis.
- If a match is found, that diagnosis is returned.
- If there are multiple matches on either Program or Enrollment Program, then the first diagnosis is used.
- If there is only one active, billable, primary diagnosis, it is the one returned on the Service Entry screen.
Note that when a Client has multiple Enrollments, the Program from one of the Enrollments is selected as the default Program in Service Entry, and the Client Diagnosis field defaults to the appropriate selection for that Program.
- If the Program component is then changed on the Service Entry screen, the defaulted Diagnosis does NOT update.
- The user must review the selections on the screen and manually update the Client Diagnosis value to match the newly selected Program if needed.
The Client Diagnosis is affected by the Date and Client selected.
- The Client Diagnosis defaults to an existing diagnosis from the Client > Diagnosis tab that is Primary, Billable, and Active as of the Service Date.
- A change to the Date or Client clears all Diagnosis information, Client and Other, and repopulates the Client Diagnosis based on the newly selected Date and Client combination.
- When in edit mode, the following warning displays when the Date or Client is changed "Date or Client has changed. Please verify that the Service, Diagnoses, and Progress Note are correct."

6. + ADD OTHER DIAGNOSIS - Use the Add Other Diagnosis button to add a diagnosis that is not currently assigned to the Client or is not currently active for the Client.
- This is the full list of ICD-10 codes.
- An Other Diagnosis can be marked as Principal.
- Select the garbage can icon to the right of a diagnosis added in error.
A Service can be created AND marked Ready with a Client Diagnosis only, an Other Diagnosis only, or any combination of Client and/or Other Diagnoses.

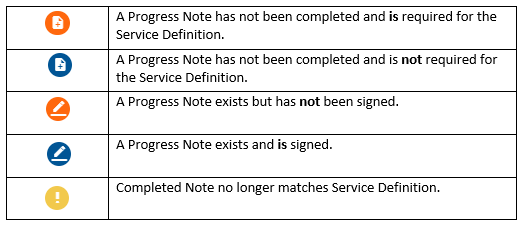
7. Progress Note - When the Service is saved, the Progress Note becomes available to view and edit.
- The status of the Progress Note is indicated by both the color and icon on the button.
- There are 5 Progress Notes Statuses:
-

8. Status - The Status button is located in the bottom right of the screen.
- This indicates if the Service is in Ready or Not Ready Status.
- Users with the Features Permission for Services:Change Status and are in a User Group with access to the Services screen, can change the Status of the Service from this field.
- Permissions can be found in Configuration > Staff/Services > Permissions > Features
9. Action Buttons - The last row contains the action buttons for the current Service.
- SAVE AND NEW SERVICE - Selecting this allows the current Service to be Saved and places the user in a new New Service entry screen.
- The new screen defaults to the current date.
- And defaults to the Client from the previous Service.
- DELETE - Select this button to remove the Service without saving any entries or changes.
- Only Not Ready Services may be deleted.
- User must have the Features Permission for Services: Delete for this action button to be enabled.
- CANCEL - Select this button to exit the Service without saving any change or additions.
- SAVE - Select this button to Save the Service.
- A Not Ready Status Service can be saved without a diagnosis.
- A billable Service requires a diagnosis before it can be Marked Ready and Saved.
- A non-billable Service can be Marked Ready and Saved without a diagnosis.
