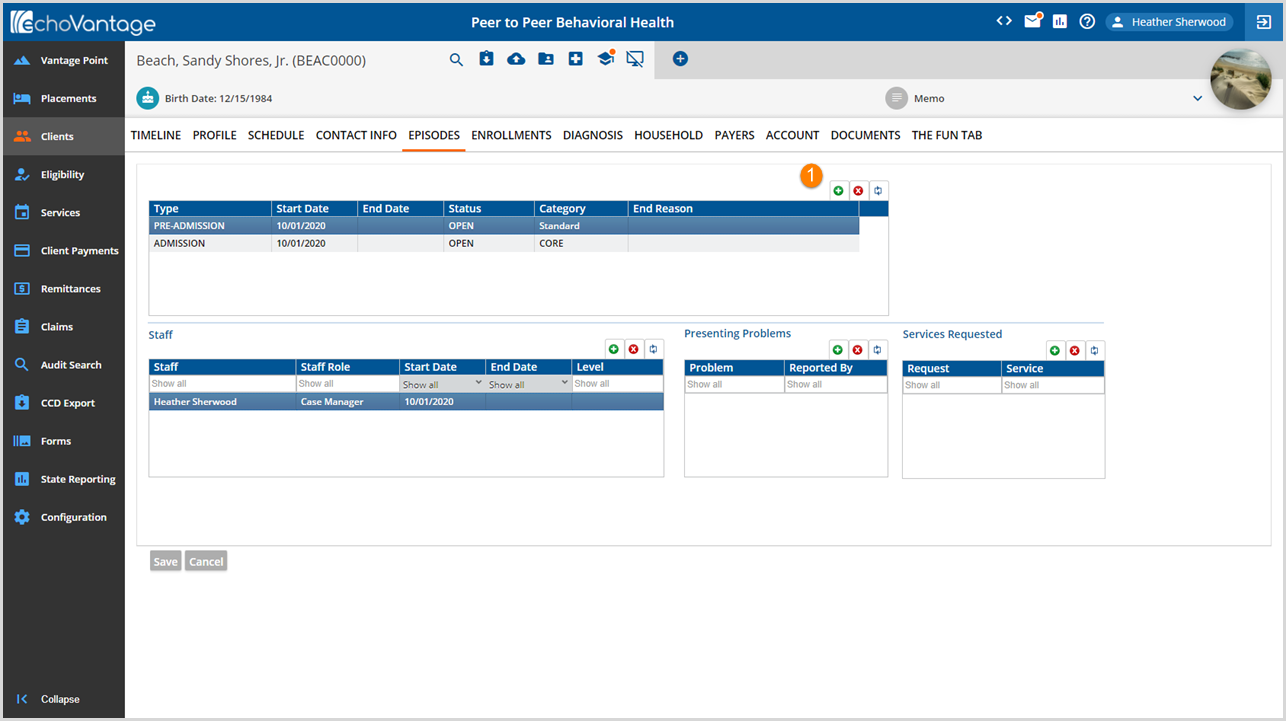
The Episodes tab records the distinct period of time a client is in continuous treatment. Existing clients may have multiple Episodes, Open or Closed on record but there can only be one open Episode per Episode Category.

1.Click (+) to begin Episode entry. The Type, Start Date, Status, and Category are the minimum required fields for new Episode entry.

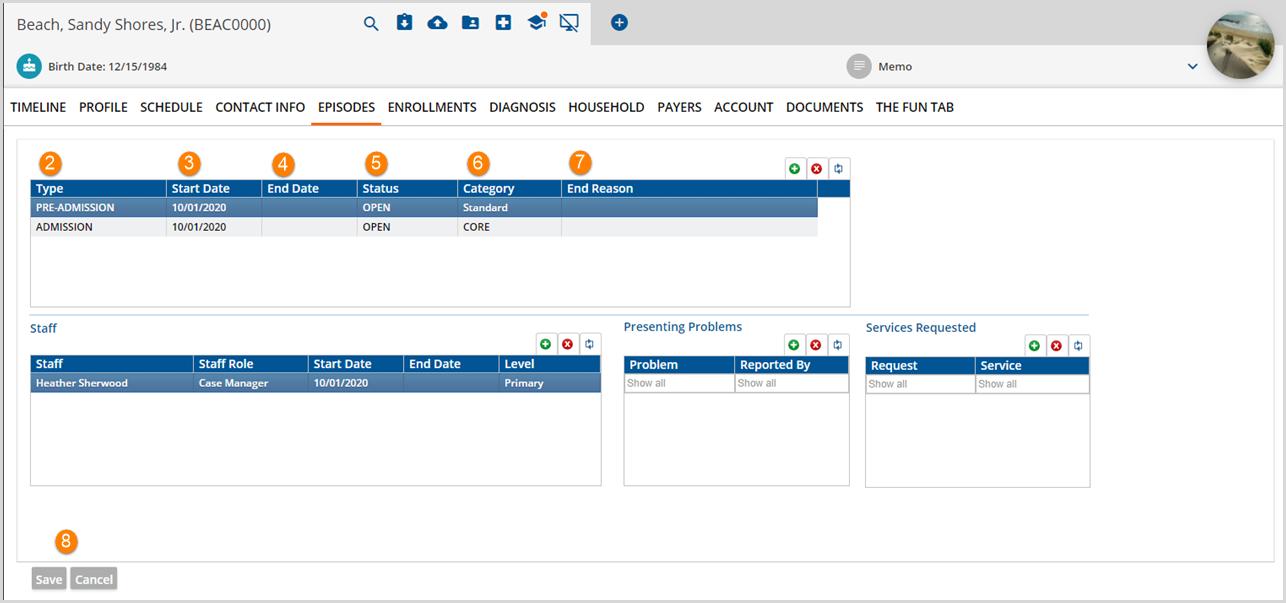
2. Type - This is the type of Episode being entered. PRE-ADMISSION, ADMISSION, and CRISIS are the available selections.
3. Start Date - For Admission, this is the date the Client enters the system or organization. Start Date along with End Date are used to determine if an Episode is active when evaluated for inclusion or exclusion for reports or other processes. Note that Episode dates cannot overlap.
4. End Date - Enter the date the Episode terminates. This field is frequently left blank when making a new Episode entry.
5. Status - The Episode Status defined list populates the values in the Status drop-down. This field is often used to indicate if the Episode is Open, Closed, or Pending. Note that any processes within the application that evaluate Episodes to determine if they are active use the Start and End Date fields. An Episode with a Status of CLOSED is still considered active until the End Date column is populated with a date on or before the current date.
6. Category - In version 3.15 and higher, Clients can now have multiple open Episodes with a restriction of just one open Episode per Episode Category. The addition of the Category field allows the existing Episodes concept to be more flexible for agency and state reporting needs. These Categories are agency defined in Configuration > Setup > Defined Lists > Episode Categories. This is a required field when adding a Client Episode. If an agency updates to version 3.15 from the prior version, any existing Episodes are assigned a default Category of Standard. The Standard Category may be renamed if desired.
7. End Reason - The Episode End Reason was also introduced in version 3.15. This drop-down list for this optional field is populated with the values from the Episode Discharge Reasons defined list in Configuration > Setup > Defined Lists. Entering an End Reason does not close or make the Episode inactive. Only Episodes with an End Date on or before the current date are considered CLOSED or Not Active.
8. Once the Episode Status entry is complete, click Save at the bottom left of the screen. Repeat steps 1 through 6/7 to add another entry.

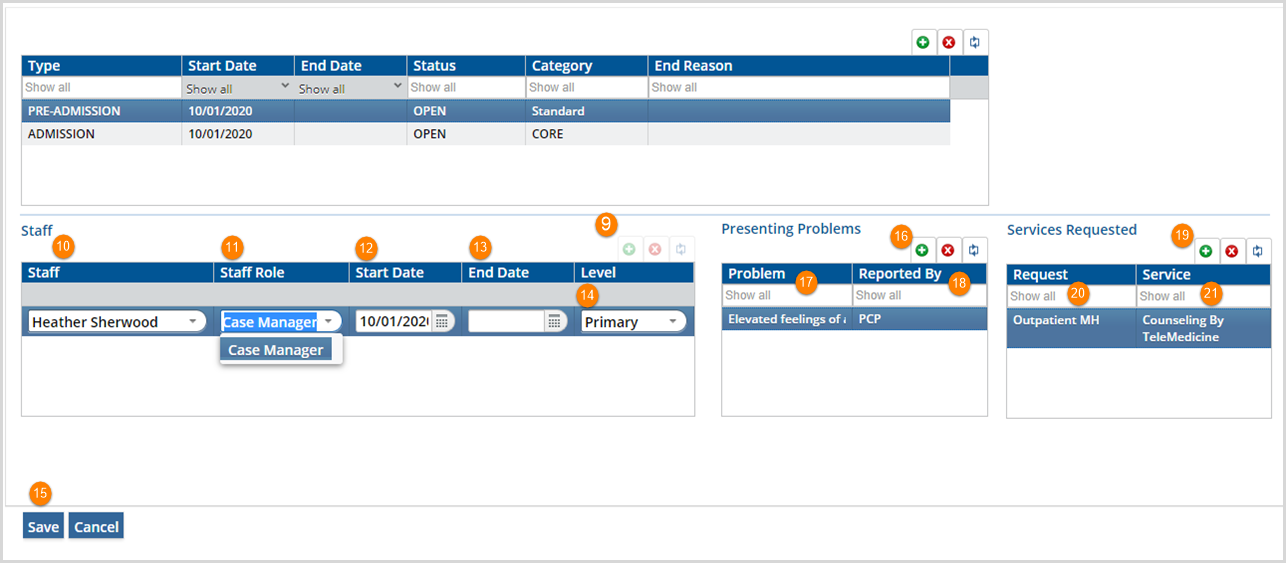
9. Add or assign Staff to an Episode.
10. Staff - This field assigns Staff to an Episode. This is the field that the Configuration > Staff/Users > Client List Filters > Filter Type Episode Staff uses when defined in Client List Filter configuration.
11. Staff Role - Display the options in the drop-down box and make selection. A Staff's Role on the Episode tab may be different than their roll, if any, on the Enrollments tab.
12. Start Date - This is the date the Staff was first assigned to the Episode.
13. End Date - If applicable, enter date the Staff Client relationship ends.
14. Level - Select if the current staff entry is the Primary, Secondary or Tertiary service provider.
15. Click Save at the bottom left of the screen. Repeat steps 9 through 14 to add another Staff.
16. Add Presenting Problems.
17. Problem - Describe the Client's issue or use an organization code. If entering multiple problems, enter them in priority order. This is a free text field up to 100 characters.
18. Reported By - Enter the name of the individual or institution that is reporting the problem.
Click Save at the bottom left of the screen. Repeat steps 16 through 18 to add another Problem.
19. Add Services Requested.
20. Request - The Request field is a free text field up to 250 characters and is used to document the Services requested.
21. Service - Select the Service that fulfills the Request from the drop-down list. *Contact your System Administrator if drop-down list values require changes.
Click Save at the bottom left of the screen. Repeat the steps 18 through 21 to add additional Services Requested.
To Delete an entry, highlight the line to be deleted and click the red (x) at the top right side of the grid. A message will appear asking to confirm deletion.
*Episodes associated with an Enrollment record or with data from the Client tabs are not removable.
To Edit an entry, double-click the field that needs to be edited in the grid. The entire row will change to editable status. Make the required edits then click Save at the bottom left of the screen.
