With the release of EchoVantage version 3.07 the Contact Info tab consolidates the information previously found on the Communications and Contacts tabs into a single location. The familiar Communications and Contacts forms are used to add or edit Client and Contact information and now have added support for memos and priorities. With just a single mouse click, a user can view the complete contact information for the client or any client contact with the numbers and addresses displayed in priority order. At a glance, the emergency contact(s) can be identified in the list.
The Contact Info page is located between the Client Profile and Episodes tabs. To access the Contact Info tab, users must be a member of a User Group that has been granted access to Clients Contact Info. Click HERE for more information on configuring user Groups.
Client
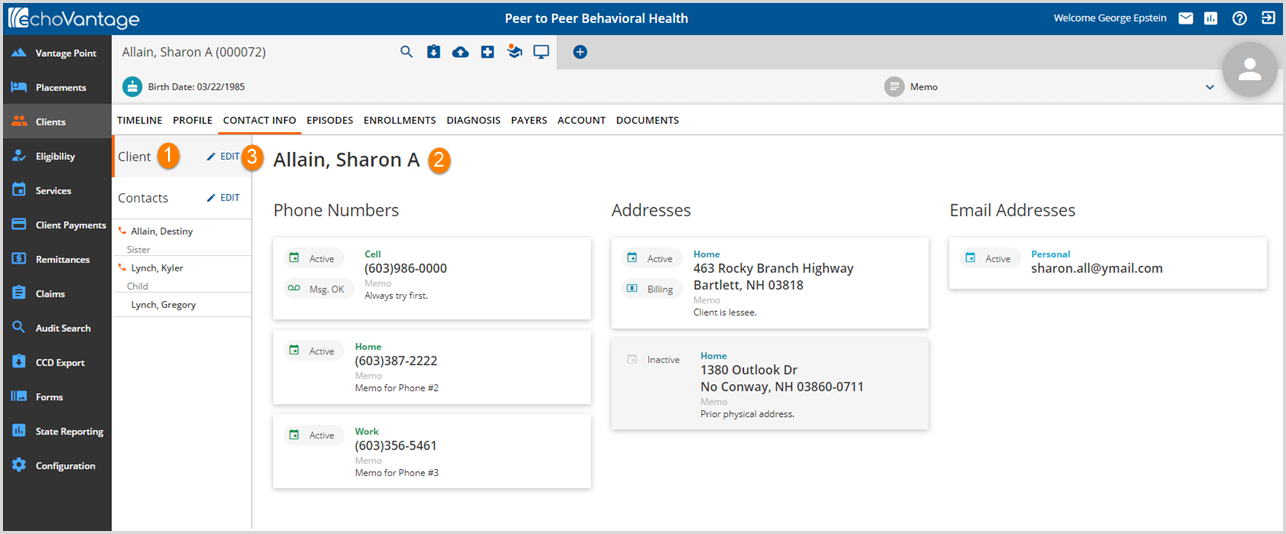
1. The Contact Info screen defaults to the Client's information. The orange, vertical line to the left of the word Client indicates the current selection.
2. On the main screen, all of the Client's contact information is displayed.
- There are three columns or types of client contact information.
- Phone Numbers
- Addresses
- Email Addresses
- Within each column, the information is displayed on its own card in priority order.
- Each card contains the details of the information for that record. For example,
- The Type of phone number, address or email address
- If the number is OK for a message to be left
- An indication if it is Active or Inactive
- An indication if the address is designated as the Billing address
- The memo
3. Client information can be added or edited by clicking on the blue EDIT (pencil icon) to the right of the word Client. This opens the familiar Communications tab form.
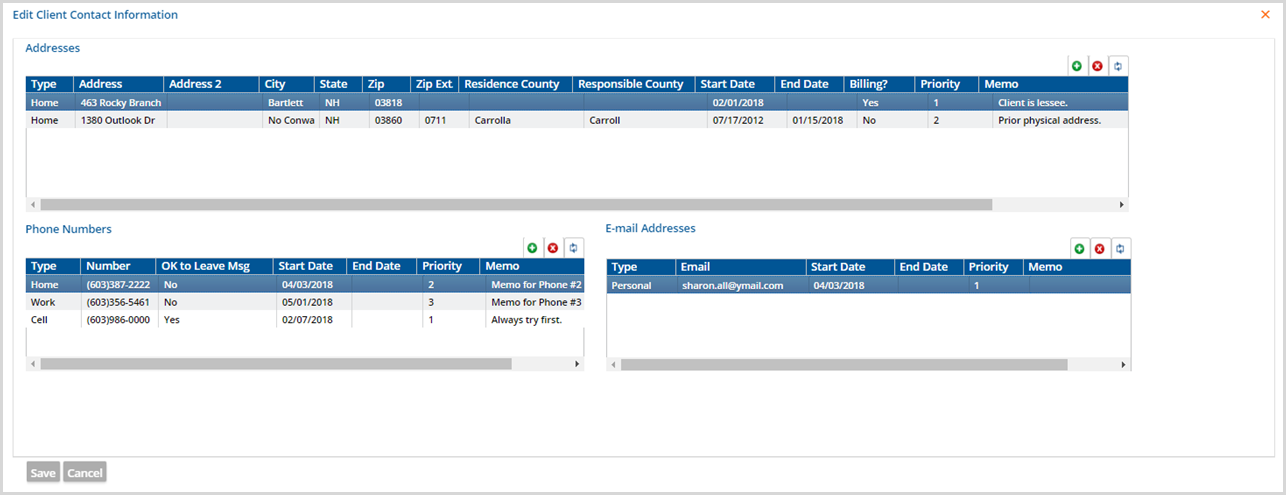
The image above is the Edit screen for the Client contact information. The information contained on this screen is the same as that displayed in Figure A.
- A new record may be added by clicking on the green plus "+".
- Double clicking any existing record will allow the row to be edited.
- A Priority number is required for each record.
- The Memo field is an optional free text field.
- The Start and End Dates are used to determine if the record is active or inactive.
Contacts
A Client Contact can be displayed by clicking on the Contact name.
- Contact Names are listed in priority order for all active contacts
- Followed by inactive contacts in priority order
- A lower priority active contact (priority 5) will be listed above a higher priority inactive contact (priority 3)
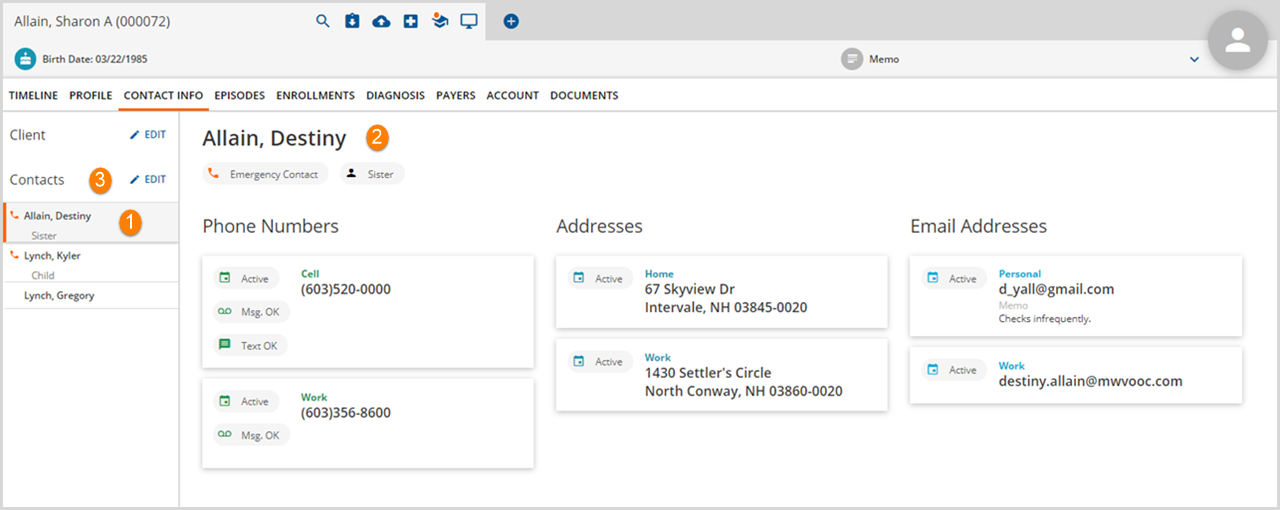
1. The orange vertical line indicates the current selection. The orange phone icon indicates an Emergency Contact.
2. The name of the currently selected Contact displays on the main screen with specific identifying information such as relationship and emergency contact if applicable.
- There are three columns or types of contact information displayed.
- Phone Numbers
- Addresses
- Email Addresses
- Within each column, the information is displayed on its own card in priority order.
- Each card contains the details of the information for that record.
3. Client Contacts information may be edited by clicking on the blue EDIT (pencil icon) to the right of the word Contacts.
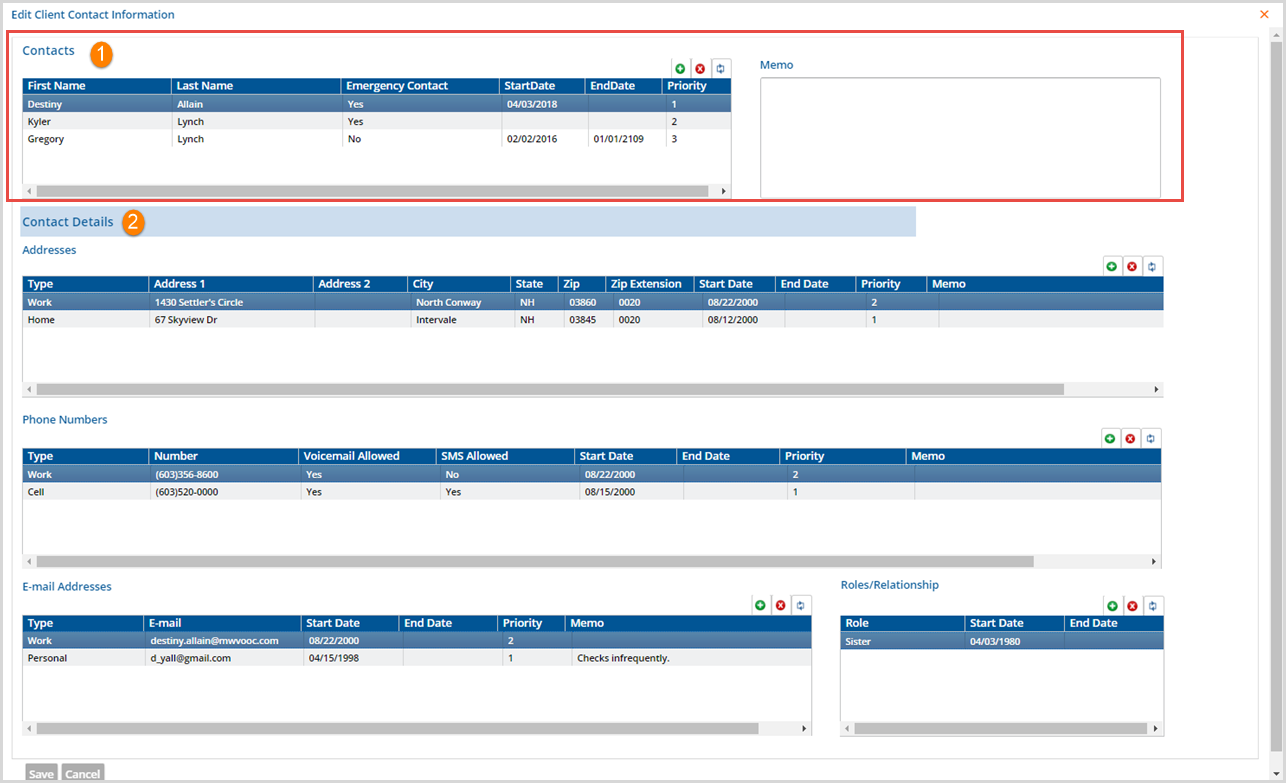
The image above shows the detail for Client Contact Destiny Allain. This is the same information that is displayed in Figure B above.
1. Contacts - This is the list of all the client's Contacts
- A Priority number is required.
- This priority, determines the order in which the contact will appear in the Contacts list on the Contact Info tab.
- The memo field is optional. The message is specific to the currently selected contact.
- Start and End Dates are used to determine if the Contact is Active or Inactive.
2. Contact Details - These are the details for the currently selected Contact in 1 above.
- This information changes based on the contact selected.
- The priority numbers assigned in this section are specific to the contact's information and do not affect the order the Contact displays in the Contacts list.
- These determine the order a contact's numbers or addresses will display on the cards.
- This is a required field.
- The memo field is optional and will display on the card if an entry is made.
- Start and End Dates are used to determine if a record is active or inactive for any type of information.
Defining a Telemed Contact
The ability to define a Client Telemed Contact is available in the release of version 3.10-SP1. This contact can be defined for any client when another party should be designated to receive all messages and emails regarding the Telemed session. An underage client is required to have a designated Telemed Contact to be successfully scheduled into a Telemed session. This contact must be over the minimum age defined in the portal and have a valid email of the type configured in the Mend Third Party Integration page. The client and the client Telemed Contact cannot share the same email address.
To define a Contact as the Telemed Contact.
- Add the Contact to the Contact Info tab if needed
- Select the Contact to be designated as the Telemed Contact
- Select the TELEMED button to open the Telemed Contact modal.
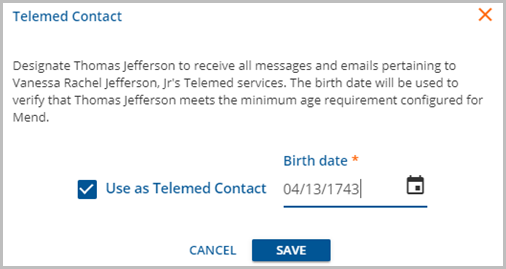
- Check the Use as Telemed Contact box, enter the Birth date, and Save.

- A designated contact is identified beneath the Contact name.
