The Payers tab stores information on the party or parties responsible for payment of a Client's claims. Payer information specific to the Client is managed on this tab, including but not limited to Policy Number, Group Number, Priority, Copays, and Authorizations.
For help with screen navigation and data entry, click HERE and view the Card screen information.
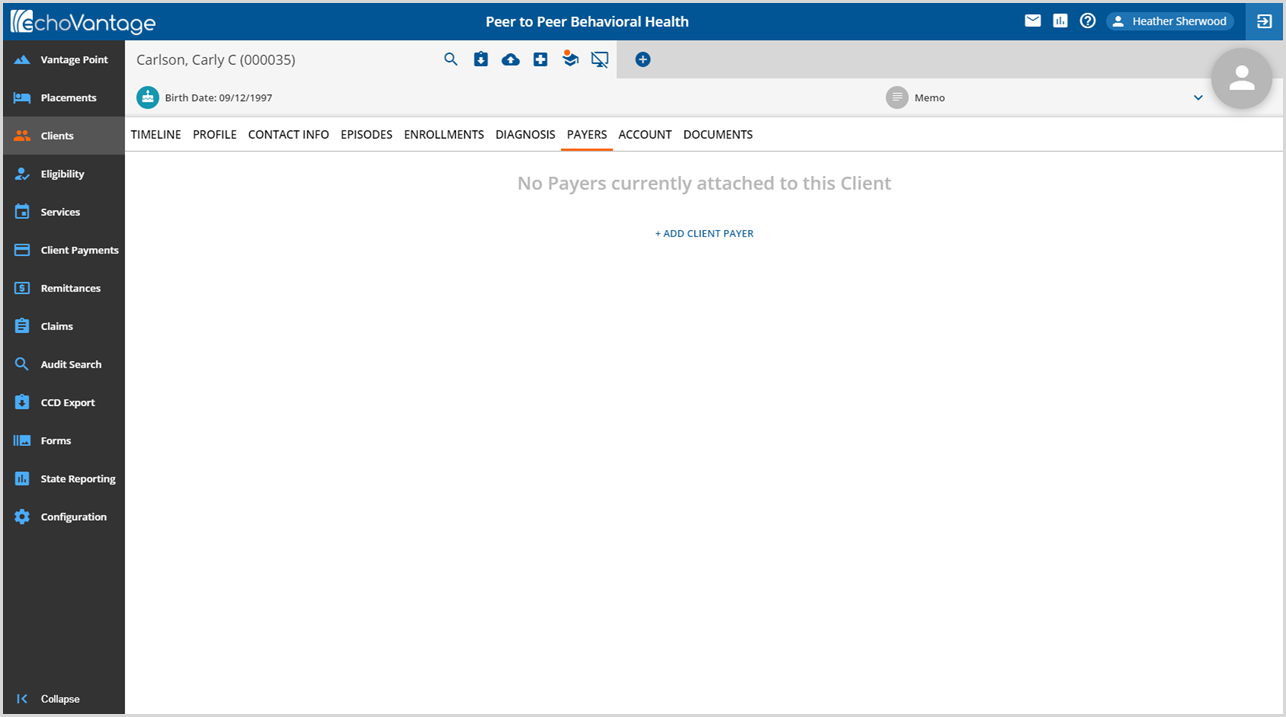
1. Click the blue + ADD CLIENT PAYER
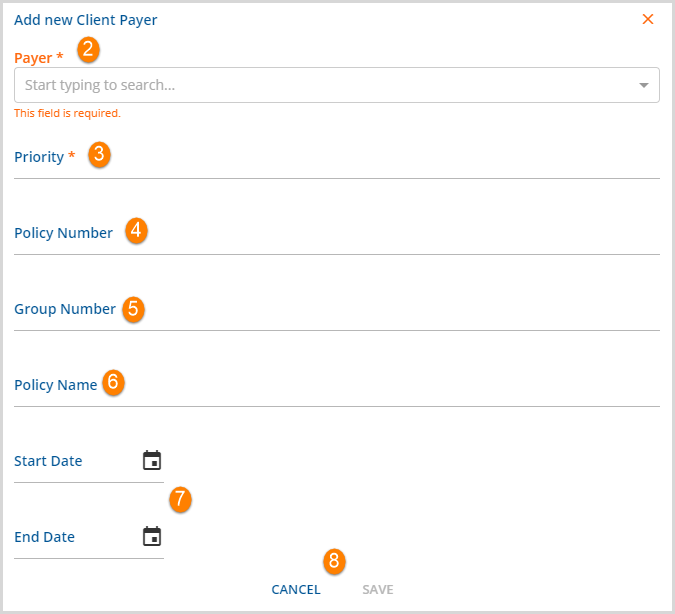
2. Payer* - Select the Payer to be added from the drop-down list. This list is populated by the Payers defined in Configurations>Services/Payers>Payers. To avoid duplication, only Client Payers not already attached to the Client's record are available for selection. *This is a required field.
3. Priority* - This numerical assignment determines the order an original charge moves through the Client Payer list.
- The lowest ascending priority, active as of the date of Service, bills first. For example, priority 10 bills before priority 25.
- If the default priority value is already in use by a currently active Payer, a warning message displays to indicate the conflict on SAVE.
-
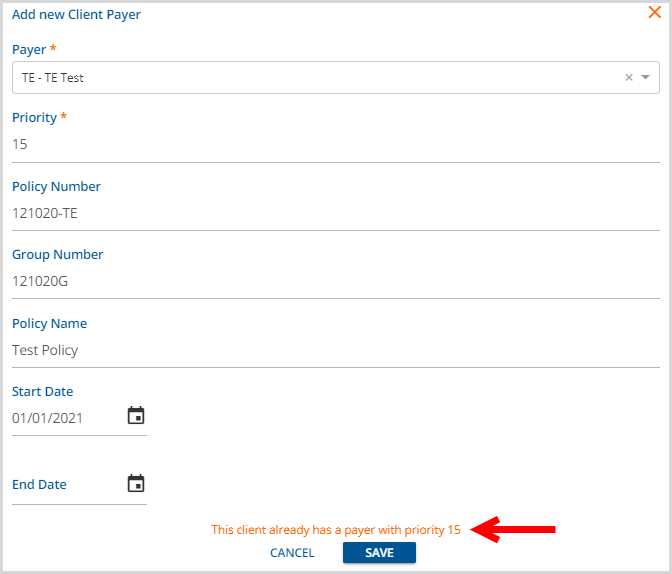
- A new Priority number must be manually entered to a value not currently use before SAVE is successful.
- *This is a required field.
4. Policy Number - This is a free text field up to a maximum of 30 characters.
5. Group Number - This is a free text field up to a maximum of 30 characters.
6. Policy Name - This is a free text field up to a maximum of 50 characters.
7. Start Date/End Date - Enter the Start and End Date of the client's policy. Entry of both the Start and End Date determines the term the insurance is valid = Payers Effective date. The Payer is not active for services received beyond the End Date entered.
8. The SAVE button is enabled once the required entries, Payer and Priority, are complete. Click Save to add the Payer; the following screen displays.
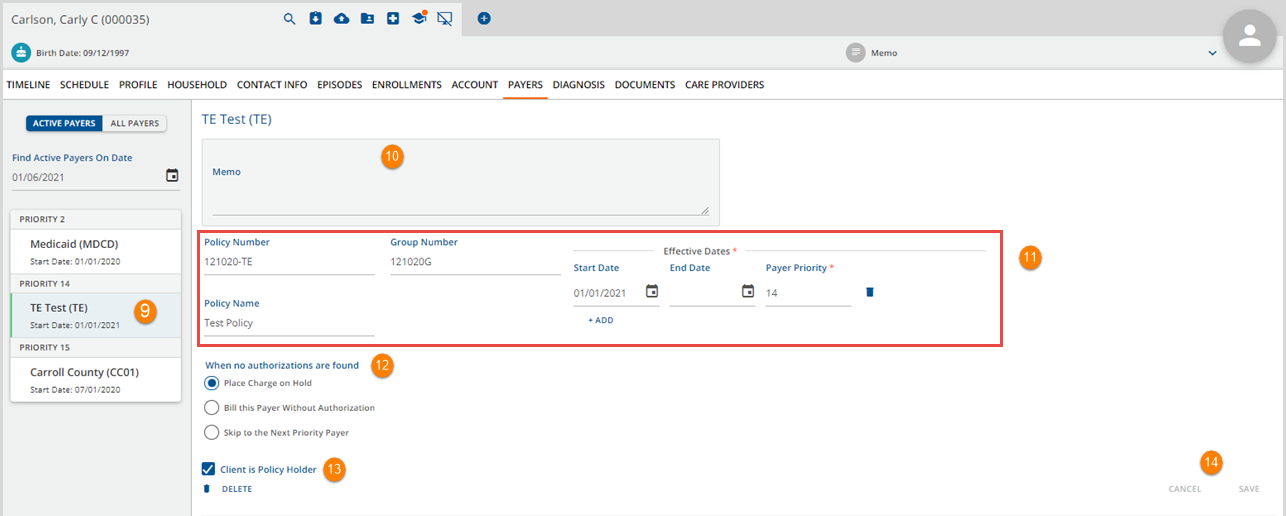
9. To access additional Payer information and/or edit information, click on an existing Payer card.
10. Memo - This is a free text field available to store notes specific to the currently selected Client and Payer. This note is visible to all users with access to the Client>Payers menu option.
11. This section outlined in red displays the information entered in 3 through 7 above. Note that Payers should be End Dated when no longer active for historical purposes. A payer may be reactivated by selecting the blue + ADD and entering a new Start and End Date combination.
12. When no authorizations are found - select the appropriate radio button to indicate what should happen to a charge when no authorizations are found. Requires the Payer's Rate for the provided Service to have the Requires Authorization checkbox selected in Configuration?Services/Payers>Payers>Rates.
- Place Charge on Hold - When Creating Charges if no authorizations or insufficient authorizations are found, the Service is placed on Hold and a Create Charges job error is available to view.
- Bill this Payer Without Authorization - When Creating Charges, the Payer is billed even if there are no or insufficient authorizations.
- Skip to the Next Priority Payer - When Creating Charges, the Payer is skipped if there are no or insufficient authorizations.
13. Client is Policy Holder - Check box if Client is the policyholder.
14. SAVE - The SAVE button is enabled if changes or updates are made to any of the values. If a required value is deleted in error, SAVE is disabled until the required field is populated again.

15. Click the + Add Authorization to open the add modal.
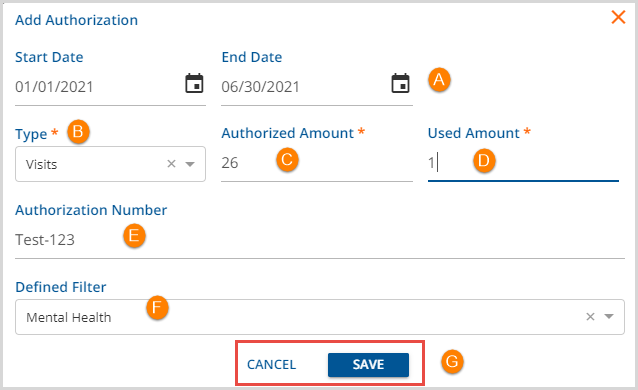
- A - Start Date/End Date - This defines the effective period of the authorization. Services received before the start date or after the end date do not have a valid authorization.
- B - Type - Enter the Type of Authorization being entered from the drop-down list.
- The Type selections available are Units, Visits, and Dollars.
- Required field.
- C - Authorized Amount - Authorized Amount represents the initial number or dollar value of the authorization based on the Type.
- Visits and Units are whole numbers.
- Dollars amounts display as currency.
- Required field.
- D - Used Amount - Enter zero up to the Authorized Amount to accurately capture the Remaining value of the authorized Units, Visits, or Dollars at the time of entry.
- The Remaining field in the Authorization record is calculated using the Authorized Amount and Used Amount.
- When Charges are created for provided Services, the Remaining and Used values update accordingly.
- Required field.
-

- E - Authorization Number - Enter the authorization number for this client provided by this payer.
- F - Defined Filter - Select a Defined Filter for greater control over which Services to apply the Authorization.
- This is not a required field.
- Defined Filters are set up in Configuration>Services/Payers>Defined Filters.
Remember to click SAVE when entry/edits are complete.
16. COPAYS - A Client Copay is a convenient way to make collecting a Client balance up-front but whether to enter a Copay amount or not should be given careful consideration. Updates to how the Patient Responsibility amounts are handled in v3.18 should be reviewed in the following link:Click Here to view Echo's Self Pay Best Practices. The highlights follow:
- A Patient Responsibility amount may be entered with a Payer’s payment.
- When the agency wants to (or is willing to) accept whatever the Payer says is the Client Fee, the Patient Responsibility amount should be entered.
- Whatever amount is entered for the Patient Responsibility becomes the Client balance, regardless of any other Client Fee, Sliding Fee, or Monthly Maximum.
- If a Self Pay charge does exist, adjustments, positive or negative, are created to make the Client Balance the same as the Patient Responsibility amount.
To add a Copay, click the + ADD COPAY to open the add modal.
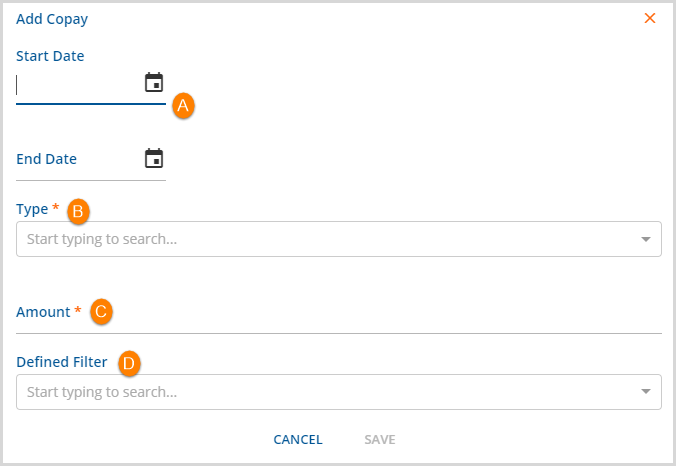
A. Start Date/End Date - This defines the effective period of the copay.
B. Type - Select an option that applies to this Copay. This is a required field when a Copay is to be added.
- A Copay applies to the primary or parent service and is not billed for an add-on service.
- Copay Types include:
- Flat
- Percent of Base
- Percent of Expected
- Percent of Remaining Balance
C. Amount - Enter the amount for this copy.
- This is a required field.
- The entry is treated as a value or a number based on the Type selected.
D. Defined Filter - Select an option that applies to this copay.
- This is not a required field.
- Defined Filters are setup in Configuration>Services/Payers>Defined Filters.
- Remember to click SAVE when entry/edits are complete.
