EchoVantage v3.46

EV Release Notes Header

Version 3.46, Released April 19, 2023                                                                                                              Previous Release Notes

New Features

Configure a Custom Message for the Client Portal

An agency can now configure custom messages to display on the Client Portal login page. This new display location allows the agency to convey information like special events, closings, or a high-priority notice indicating clients should call 911 or 988 in a crisis. The message description is inserted into dbo.AgencyLoginMessages, which now includes a new DisplayLocation column which determines where the message is displayed. The valid DisplayLocation values are 1) CLIENT_PORTAL and 2) ECHO_VANTAGE.

Any existing agency messages at the time of upgrade are assigned a DisplayLocation of ECHO_VANTAGE by default. Just like the login messages for EchoVantage users, the messages on the Client Portal login page are grouped to show the high-importance messages first (HighImportance = ‘Y'), followed by the regular login messages (HighImportance = 'N’). And similarly, the message Description column supports HTML markdown formatting.
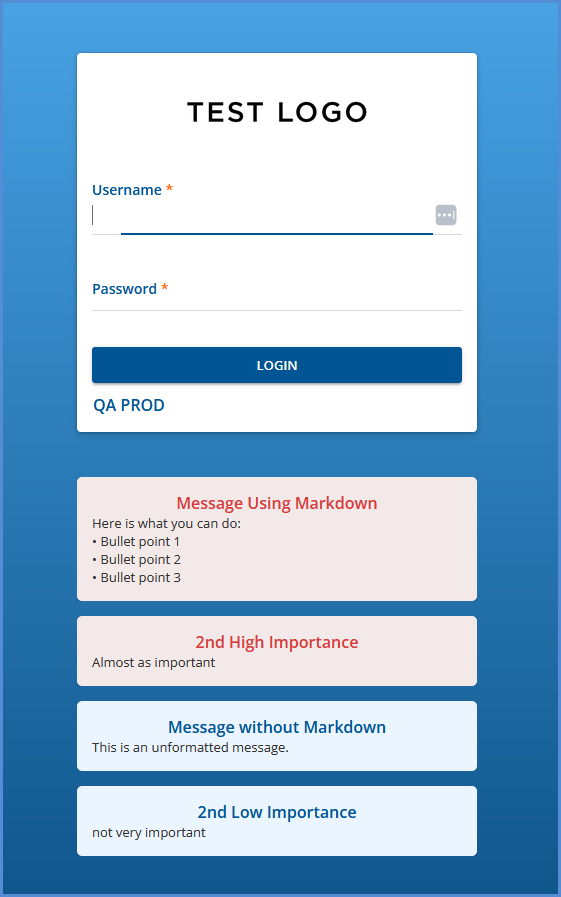
Client Portal Login Messages

Attendance Code Included with Event

The attendance code of an event now displays in the activities feed, making it easy for staff to see if an event was canceled or confirmed without leaving the Client Face Sheet.
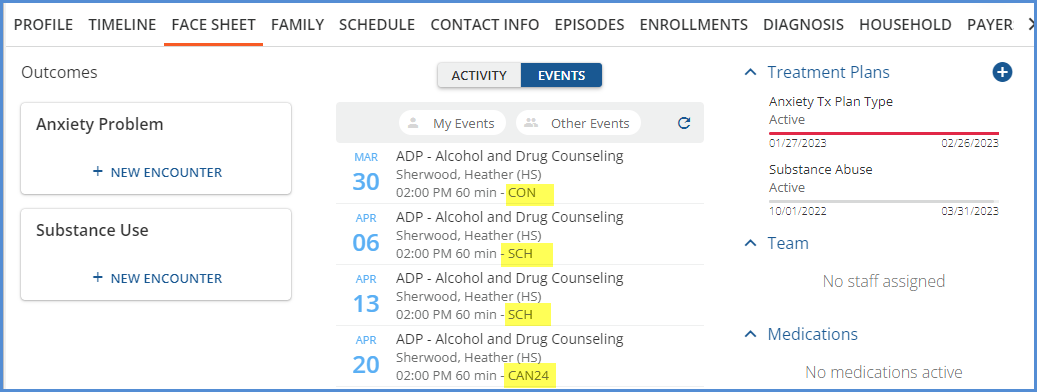
Attendance Codes Displayed in Activities Feed

Client Treatment Plan Review

Configuring the Review Period

New configuration options are available in Configuration > Client Chart > Treatment Plan to help define and guide when a treatment plan review should occur. Each Treatment Plan Type now has a new field, Review Window (Days), which defines how many days in advance of the review date a review can take place. This period before and up until the Review Date is considered the Review Period. In addition, a new section, REVIEWING EXPIRED PLANS, has two additional fields which define how reviews are handled once the treatment plan’s review date has passed. The amount of time that a review is allowed after a plan expires is considered the Grace Period.
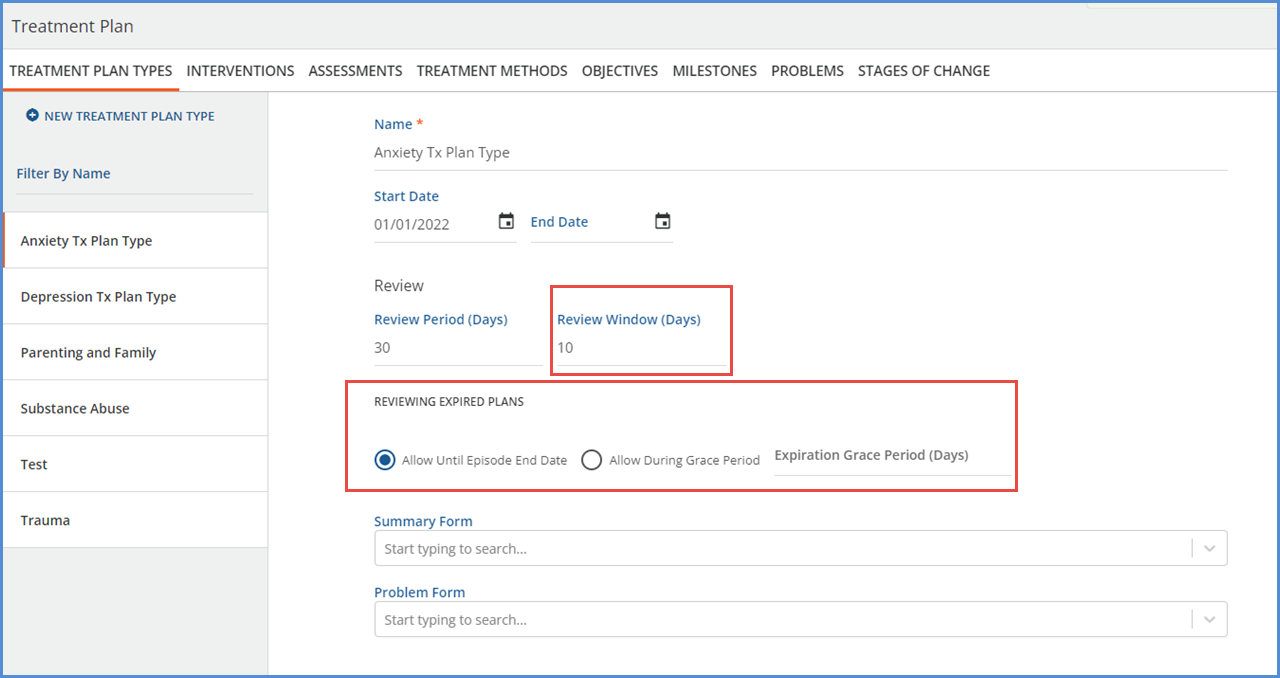
Configure Treatment Plan Review Options

Once a plan has expired (the current date is after the Review Date), the grace period is defined by one of the following options.

  • If Allow Until Episode End Date is selected, the Review option is available when

    • The current date is before or equal to the End Date of an Episode for the client.

    • And that Episode has Start/End dates that overlap the Treatment Plan Projected Review Date.

    • The client can have multiple active episodes, and the Review option is available if any one of the satisfy the date requirements.

  • If Allow During Grace Period is selected, the Review option is available when

    • The current date is before or equal to the Projected Review Date + the configured number of Grace Period Days.

    • For example, if a plan has a Projected Review Date of 2023-04-01 and an Expiration Grace Period (Days) of 7, then the Review option is available to select through 2023-04-8.

Reviewing the Client’s Treatment Plan

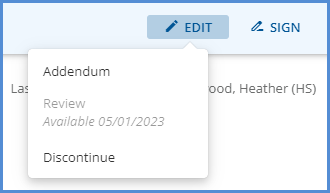
Within the Client Treatment Plan, a new Review option is available when you choose to edit a client treatment plan that is within the Review Period or Grace Period. Selecting Review creates a new Treatment Plan Version in draft status, just as an addendum does, but with a version type of REVIEW. The workflow is the same as that of an addendum all the way through signing to make the Review version active.
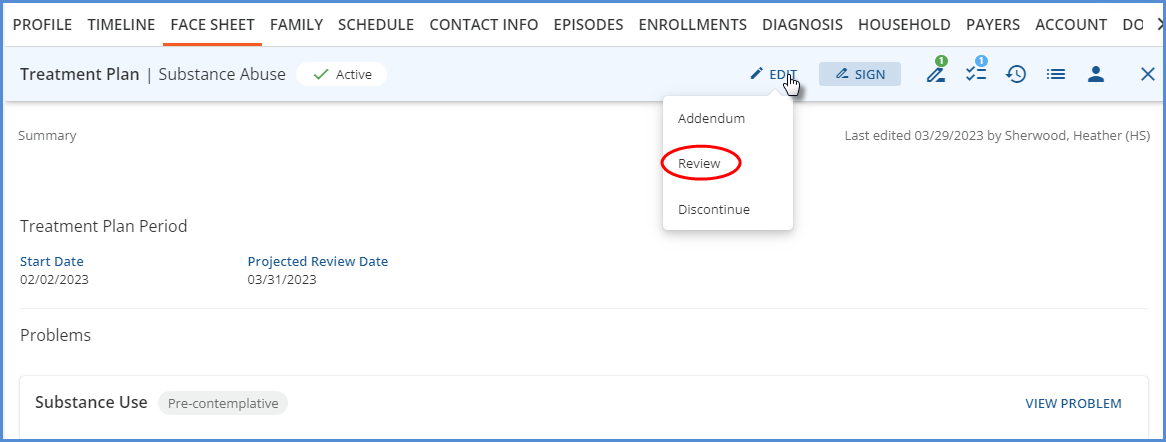
Review Client Treatment Plan

Why isn’t Review an option when I select Edit on my client’s treatment plan?

Whether the Review option displays or not when editing a client’s treatment plan depends on how that Treatment Plan Type is configured. The tables below list examples of different plan type setups and indicate if Review is available.

Reviewing Expired Plans > Allow Until Episode End Date

Today’s Date

Projected Review Date

Review Windows (Days)

Episode Start Date

Episode End Date

Can I Review?

03-31-2023

04-05-2023

0

01-01-2022

--

No. The first date a review is available is 04-06-2023 because the Review Window is 0 days.

03-31-2023

04-05-2023

10

01-01-2022

--

Yes. Today’s date is within the 10 day Review Period.

04-15-2023

04-05-2023

10

01-01-2022

04-10-2023

No. Today is after the episode end date.

04-05-2023

04-05-2023

0

01-01-2022

03-31-2023

No. The episode ends before review date, and there is no review window prior to the projected review date.

04-05-2023

04-02-2023

10

01-01-2022

04-15-2023

Yes. Today’s date is before or equal to the episode end date, AND the episode start and end dates encompass the projected review date.

 Reviewing Expired Plans > Allow During Grace Period

Today’s Date

Projected Review Date

Review Windows (Days)

Expiration Grace Period (Days)

Can I Review?

03-31-2023

04-05-2023

0

0

No. This configuration is not recommended as review will never appear as an option.*

04-06-2023

04-05-2023

0

0

No. Same reason as above.*

04-15-2023

04-05-2023

10

10

Yes. Today is the last day in the available grace period.

04-16-2023

04-05-2023

10

10

No. Today is after the last day of the grace period.

04-04-2023

04-05-2023

Null

Null

Review displays but is disabled. The message indicates that 04-05-2023 is the next Projected Review Date.*

04-05-2023

04-05-2023

Null

Null

Yes. This is the only day the plan can be reviewed as there is no days after Grace Period.*

The configuration examples marked with an asterisk '*' above are not recommended because the review option either will not ever display or the review period is limited to a single day.

Viewing Treatment Plans on the Face Sheet

On the client’s Face Sheet, the Treatment Plan progress bar colors reflect the status of that plan and indicate how close to the review date it is. The progress bars make it easy for you to see at a glance which plans are due or coming due for a review.

Client Treatment Plan Progress Bars
  • When the client’s treatment plan is Active and not within the Review Window, the progress bar is green.

    • When the edit button is selected on the client’s treatment plan, the review button is disabled and displays the first date that the review is available.

    • Upcoming Treatment Plan Review Date
  • When the client’s treatment plan is Active and within the Review Window, the progress bar is yellow.

  • When the client’s treatment plan is Active and there is no Review Window value for that Plan Type, the progress bar remains green until it is expired or discontinued.

  • When the client’s treatment plan is expired, the progress bar is red.

  • When the client’s treatment plan is discontinued, the progress bar is gray.

New Permission to Undo a Treatment Plan Discharge

The ability to undo a treatment plan discharge is now a permissible feature found in Configuration > Staff/Users > Permissions. The feature is titled Undo Treatment Plan Discharge and is disabled by default. Undo reverts the plan back to the last active version.
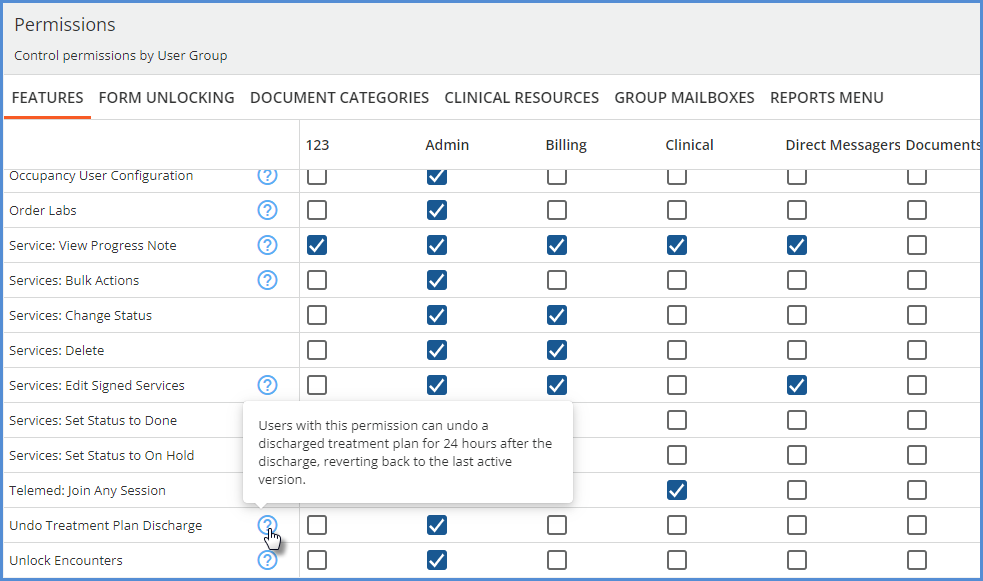
Client Treatment Plan Undo Permission

Users with this permission enabled can undo a discharged treatment plan up to 24 hours after the entry of the discharge is completed. The Undo button continues to display for 24 hours after you physically perform the Discontinue action, regardless of the End Date selected.

Improvements

View Treatment Plan History

A new icon is available on all Client Treatment Plan screens, located between the tasks and recent activity icons.

Client Treatment Plan History Icon

When selected, a list displays all previous versions of the client’s treatment plan.
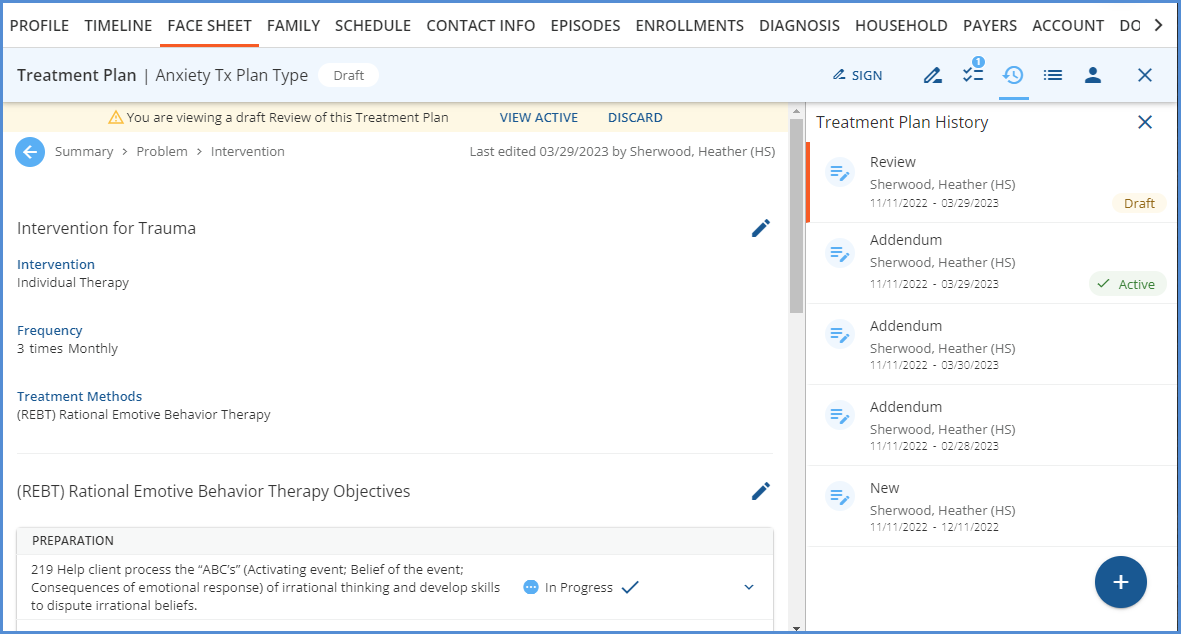
Treatment Plan History List
  • The orange vertical bar indicates the currently selected and displayed treatment plan.

  • Draft plans have visible edit buttons, all other plans display in read-only mode.

  • The signature panel displays the signatures related to the selected version.

  • If the side panel containing the Treatment Plan History list is closed when any version other than the Active Treatment Plan is selected, the history icon turns red.

Red Client Treatment Plan History Version

Sign Disabled for Future Dated Encounters

An update was made to the process for signing Encounters added from a client’s Face Sheet. When an Encounter is added, the date defaults to the current date. However, this date can be changed to a past or future date. If the date is changed to a future date, the Sign button remains disabled, even when all required information is complete. (Objective and Milestones are selected, and a Progress Note entry is saved.) Instead, a message displays in the task list indicating that you Cannot sign Encounters that occur in the future.

Sign Disabled for Future Dated Encounters

Read Only Service Date in Encounter Service Entry

When creating a Service from an Encounter, the Encounter date and the time the Encounter was created automatically populate the Service’s Date and Start fields. In prior releases, this date was editable, but now when working on the Service Entry screen, the Date is read-only. This change in workflow ensures that the dates are the same for an Encounter and the associated Service(s).

Date Disabled When Encounter is Future Dated

Individual Client Exclusions Without a Client List Filter Applied

The Client List Filter configuration option was updated to allow the exclusion of a specific client or clients without requiring a Client List Filter to also be applied. This change is available in both Configuration > Staff/Users > Client List Filter and Configuration> Staff/Users > Staff > Client List Filter tab. When No filter is selected for the filter type, the Individual Client Exclusions section now displays.
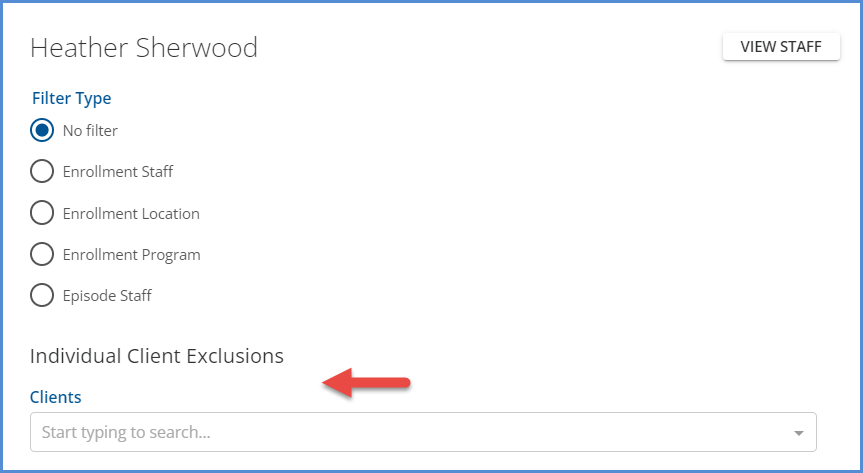
No Client List Filter Applied

It is important to note that when No filter is selected as the Filter Type for any staff, the Emergency Access button is not available in the Clients search header. This Emergency Access button remains hidden even when an individual client is excluded. Staff should have a client list filter configured with a Filter Type other than No filter if they may ever need emergency access to the excluded client(s).


Current Date as Eligibility Date in 270 File

The current date, the date the Eligibility Request file is created, can now be used as the Eligibility Date when creating a 270 Eligibility Request file. Using the current date as the eligibility date is useful as it allows you to run eligibility for future appointments when the payer does not accept requests with a future eligibility date.
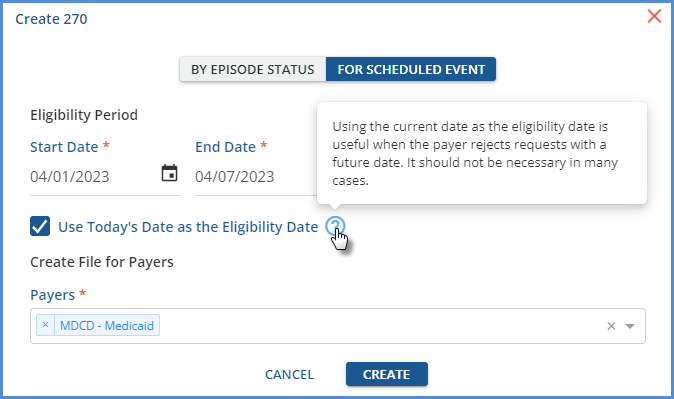
Use Current Date as Eligibility Date
  • The Use Today’s Date as the Eligibility Date option is found on the Create 270 > For Scheduled Event.

  • This box is unchecked by default.

  • When this box is selected, the date the file is created is sent as the Eligibility Date in the DTP*291 section.

  • The request file only includes those clients with scheduled events between the entered Eligibility Period Start Date and End Date.

Import Client Address to Self Pay Guarantors

A new option was added to the Clients > Payers self-pay payers screen, which copies the client’s address to the self-pay guarantor because these addresses are often the same even though the subscriber is not the client. The client’s active billing address is copied to the guarantor’s address fields with a single click when this option is selected, streamlining the data entry process when new client payers are added.
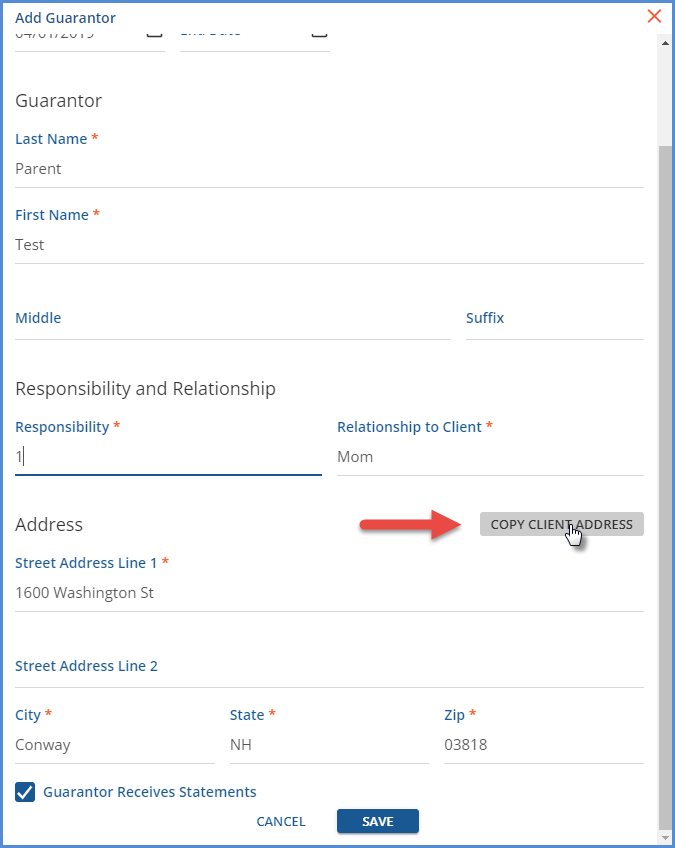
Import Client Address to Self Pay Guarantors

Reports

The following Fiscal reports were updated to improve performance, the functionality remains the same. Those marked with an asterisk '*' now also use a stored procedure as part of the performance improvement.

Fiscal

Aging Detail By Payer

Aging Detail By Program

Aging Report by Payer With Claim Counts

Aging Report by Payer

Aging Report by Program

Average Days In AR

Billed vs Received*

Bundled Services

Cash Receipts Journal

Claims Report

Client Account Inquiry*

Client Credit Balance

Client Payment Allocation Report

Expiring Authorizations*

GL Activity Report

Historical Aging* - The query was also updated to ensure that all items posted to the GL as of the GL period selected are included.

Payment Summary*

Refunds

Remittance Report

Service Authorization Status

Service Detail With Charges By Client

Service Detail With Charges By Staff

Service Detail With Charges

Service Detail by Defined Filter

Service Processing Report

Service Status Report

Services List

Unapplied Payments

Unprocessed Services

_Aging Detail For Export

_Aging Report For Export

_Aging Report With Claim Counts For Export

_Billed vs Received for Export

_Bundled Services for Export

_Cash Receipts Journal for Export

_Claims Report for Export

_Historical Aging Report for Export*

_Payment Detail for Export

_Remittance Report for Export

_Service Authorization Status for Export

_Service Detail With Charges By Client for Export

_Service Detail With Charges By Staff for Export

_Service Detail With Charges for Export

_Service Detail by Defined Filter For Export

_Service Processing Report for Export

_Service Status Report for Export

_Services List for Export

Updates

Ticket Number

Description

EV-3806

In the Clients menu search (sycamore), Episode staff were not able to see a client’s name if they were marked as confidential. If viewing the list of clients on the Fiscal Overview > Clinical Home page (elm), the client name was visible to Episode staff, which is the correct behavior. This task updated the sycamore search to correctly display a confidential client’s name for episode staff.

EV-5501

The query responsible for service processing jobs was updated to improve performance and decrease running time.

EV-6186

The User Group Staff tab was updated in Configuration > Staff/Users > User Groups.

  • The +Add Staff button was moved to the top of the screen.

  • A search filter was added to make finding a specific staff fast and easy. Search is available by Staff Name or Code.

  • The list was paginated for faster loading times.

EV-6208,

EV-6256

In Configuration > Setup > Alerts, the following updates were made.

  • The save button is not enabled unless a value for at least one priority (Notice, Warning, Critical) is populated. The following message displays.

    • Alerts Missing Priority Message
  • If two or more priorities have the same configuration (Days value and Before/After selection match) the save button is not enabled. The following message displays.

    • Alerts with Overlapping Priorities Message
  • If the alert has a Role drop-down, a role must be selected for the save button to be enabled.

  • An alert can only be enabled or disabled by using the main toggle. Previously, clearing the number value in the alert would disable it.

EV-6303

An improvement was made on the Clients > Scheduler screen to prevent An unexpected Error Occurred message from displaying when clicking on a Group Event that was scheduled for a Group with no members. Now the correct behavior of not opening the Group Event (because you are working in the Clients > Scheduler not Clinical Home) occurs.

EV-6343

The client list in the Client Payments > Apply Payments tab is now sorted by client Last Name, then First Name.

EV-6369

In Configuration > Setup > Organizations, there is a new Fax Number field for both Billing Provider and Service Facility type Organizations.

EV-6498

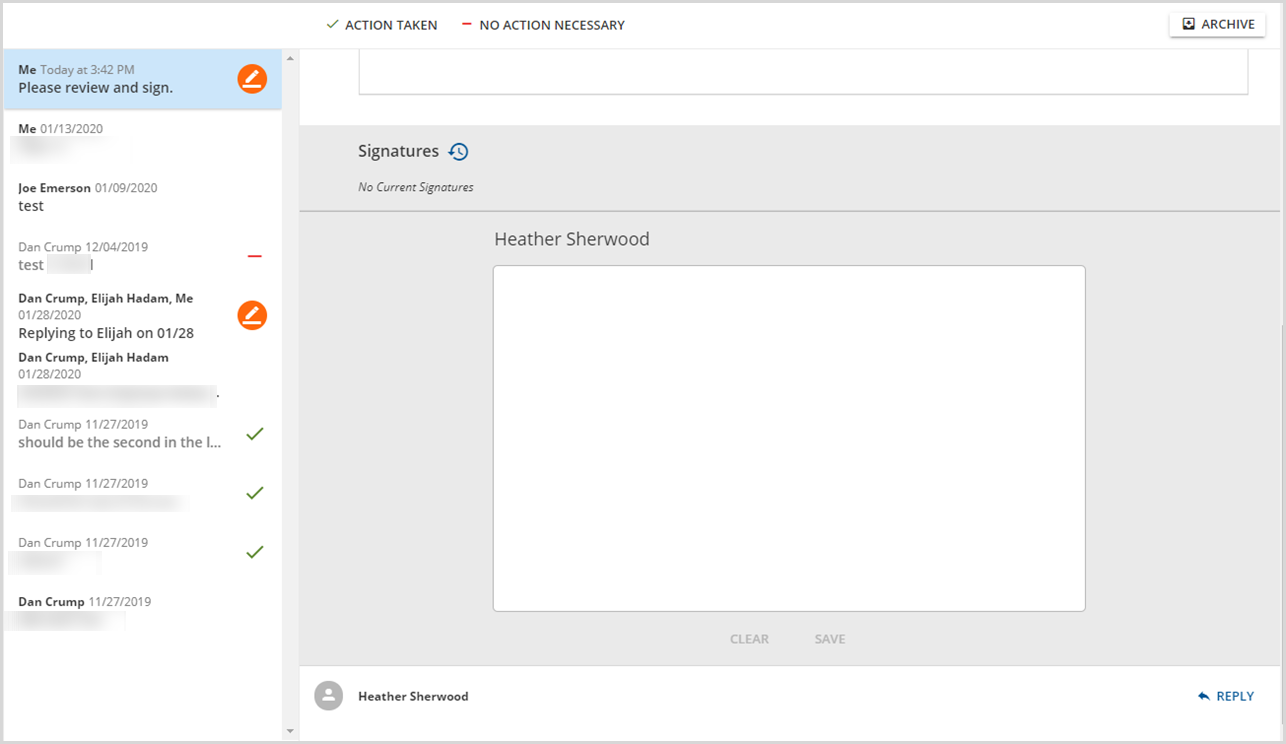
In the Inbox > Messages, the archive button is no longer displayed when viewing messages in the archive folder.

EV-6536

The State Reporting > History tab is now paginated with a default page size of 50 records. The page(s) are sorted using the job run date in descending order, the most recent jobs listed first, and the header and page controls are also visible when scrolling or navigating through the pages.

State Reporting History Tab Header
State Reporting History Tab Page Controls

Bug Fixes

Ticket Number

Case Number

Description

EV-4964

19184

An issue was addressed in Event creation where selecting a Recurs value (daily, weekly, monthly) for a recurring event resulted in an infinite loading spinner due to a failed validation from the back end. Now, when selecting the recurring event values, the loading spinner is stopped if a failed validation is returned.

EV-5150


Two issues were addressed in the Edit Interventions modal on the Client Treatment Plan. First, when an existing Intervention was edited by deleting the currently selected one and choosing a new Intervention, it saved successfully as expected. Then if the Edit Intervention modal was immediately reopened, the Intervention deleted, and the cancel button selected, the first, initial Intervention was recalled, not the last successfully saved one. This issue was corrected and now the application correctly recalls the last successfully saved Intervention after selecting cancel, even if the screen was not refreshed in between selections. For the second issue, deleting the selected Intervention was successful, but it was not returned to the drop-down list values. Now if the selected Intervention is removed, it appears in the drop-down list and can be reselected.

EV-5543

12410

An issue was reported where the red message notification dot was not displayed when a new message was received while a user was working in the application. This has been corrected, and now if you receive any new messages, the notification dot appears without needing to refresh the messages and alerts page or logging out and back into the application.

EV-5991

18737

An issue was reported where Confidential Client names were displayed in error on the new Group Session Workflow screens. The issue has been addressed. Now if the logged in user is not listed as an Episode Staff for a Client, when they view the Group Event or any Group Session Workflow screen, the Client Code is listed with Confidential Client instead of the Client name.

EV-6072

19000

An issue was reported where changes made to an event in a recurring series only updated the selected event. The future events in the series were not updated even when the Save This Event and Future Events option was selected. Further review found that the issue was specific to changing the event date when it was part of a weekly or monthly recurring series. The “Recurs” message was updated with the new day of the week based on the date selected, making it appear that the whole series would be updated.

For this release, the “Recurs” message is no longer updated when the date of an event in a recurring series is edited. Only the currently selected event date is updated. For example, an Event is scheduled to recur weekly on Wednesday at 12:00 am starting May 3, 2023 and ending May 31, 2023.

Scheduled Recurring Event

The date of the third event in the series is edited to take place on a Tuesday, May 16, 2023.

Edited Scheduled Recurring Event

Note that the “Recurs” message stays the same. The 5/24 and 5/31 events are still scheduled on Wednesday after saving the change above. However, other updates such as changing the Start or End Time or component code values will propagate through to the future events.

Additional work on this issue is planned for a future release to allow changes to the date to remove the associated future events and recreate them on save.

EV-6189


An issue was addressed where the title on the Labs Details screen incorrectly displayed Lab Order Details when the Results tab was selected. Now the correct title displays based on the tab selected.

EV-6207


In Configuration > Setup > Alerts, the Alert titles now display when the page loads. Previously, text was required to be entered in the search bar before the Alert list was populated.

EV-6230


An issue was addressed where the Group Session Workflow was not respecting the Scheduler Options defined for a Group. Participants could be added or removed from a Group Session Event regardless of the Group Scheduler Options settings.

Now, if the Additional participants may be added to events setting is disabled in the Scheduler Options for a Group, the Add Client button is hidden. If the Participants may be removed from events setting is disabled, the delete icon (trash can) is hidden for each participant.

EV-6231


Another Group Event issue was addressed where disabling the ability to add a participant to a group also prevented staff from editing existing group participants. The problem was present whether the Group Session Workflow was enabled and disabled. This issue was addressed and now when the Additional participants may be added to events option is disabled, you may still edit the existing Group Event participants.

EV-6341

18830

An issue was reported where charges were not calculated correctly when the Bill for Supervising Staff and Use Supervisor's Rate options were selected in Configuration > Services/Payers > Payers > Processing. Instead, the service definition default rate was used in error, even though the service did have a supervisor with the correct credential for the credentialed rate defined on the Service Definition. The charge did calculate correctly if a Payer override rate, including credentialed rates, was defined.

This issue has been fixed, and now the charge is calculated correctly using the supervisor's rate from the service definition default when the Service has a supervisor with the matching credential for the rate AND the Payer is configured to bill using the Supervisor's rate.

EV-6352

19596, 19405

An issue was reported where the Unapplied Payment amount in Clients > Payments was not correct in some cases. The cause was traced back to reprocessing and voided payments. The query that calculates the Unapplied Balance was updated and now only includes Client Payments that do not have a status of DONE or VOID less associated Remittances that do not have a status of VOID.

EV-6513

GRAND

An issue was reported where the 270:DMG segment was not included in the 270 file if the “Send Client Gender” option was not selected in Configurations > Services/Payers > Payers > Eligibility. This issue was addressed, and now the 270 file includes the DMG segment, and sends Gender or DOB or both depending on the eligibility configuration for the Payer.
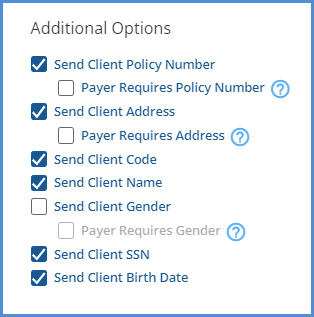
270 Config Options

EV-6553


An issue was reported where closing the Progress Note entry returned the user to the Attendance tab rather than the Services tab when the using the Group Session workflow. This issue has been addressed and now closing the progress note correctly returns the user to the Attendance tab.

EV-6564


Performance improvements were made to decrease the length of time it takes for the Objectives to load on an Encounter after selecting the +Choose Objectives button. The average load time is now down to 3-4 seconds from twenty.

EV-6612


When a staff member was deleted from a User Group, the confirmation message incorrectly displayed “Are you sure you want to delete this user group?” The message was updated and now displays “Are you sure you want to delete this user group staff member?”

Delete a User Group Staff Confirmation
Changed
Fri, 05/19/2023 - 09:22

Setup

The Setup section of the Configuration menu controls much of the organization specific information. This is where Organization names and address(es) are stored, where Alerts, Client Code Generation, and Treatment Plans are defined and Diagnoses and GL accounts are mapped plus more. Click on a Setup Menu item below to view the description and instructions.

Alerts

Audit

Client Code Generation

Defined Lists

Diagnosis

Forms

GL Mapping

Group Mailboxes

Insights

Occupancy

Organizations

Third Party Integration

Treatment Plans

VHR Timeline **The VHR Timeline is now located in the Client Chart section of the Configuration menu.

Changed
Tue, 12/22/2020 - 15:44

Creating Services From Events

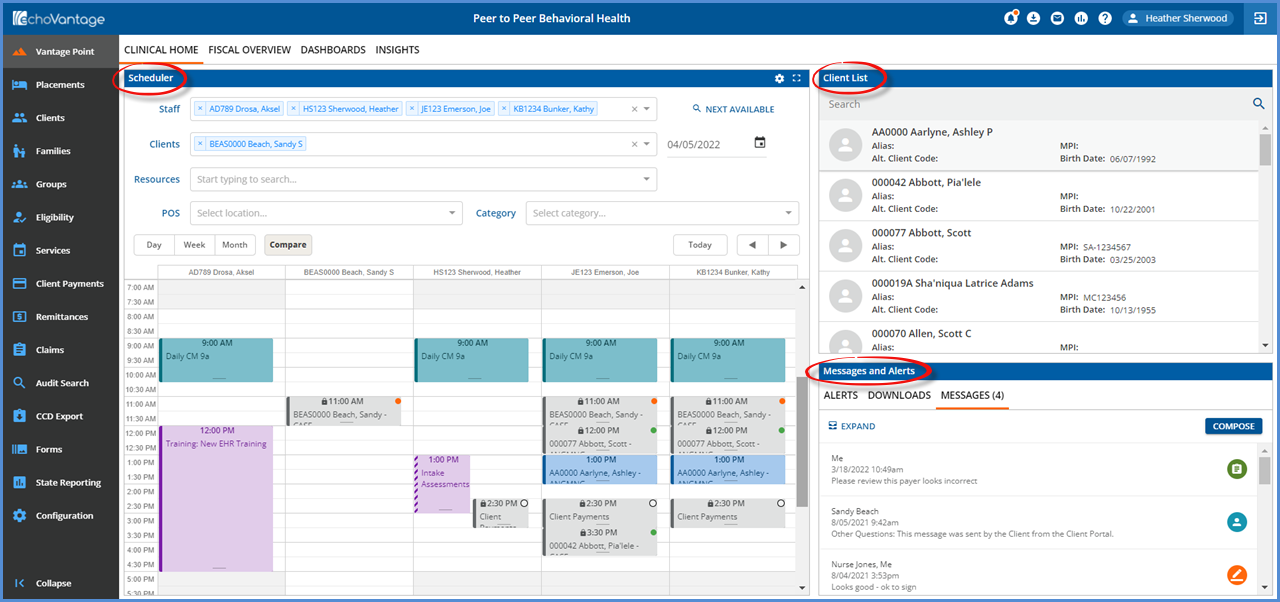
A Service may be created directly from a Service or Group Event. Scheduler displays all Events for the selected Staff or Client rendering a convenient, complete, and visual list for Service creation.

Create Service from Event

To create a Service from an Event, double-click the desired Event to display the Edit Scheduled Event screen. Select CREATE SERVICE FROM EVENT (bottom right).

Create Service From Event Button

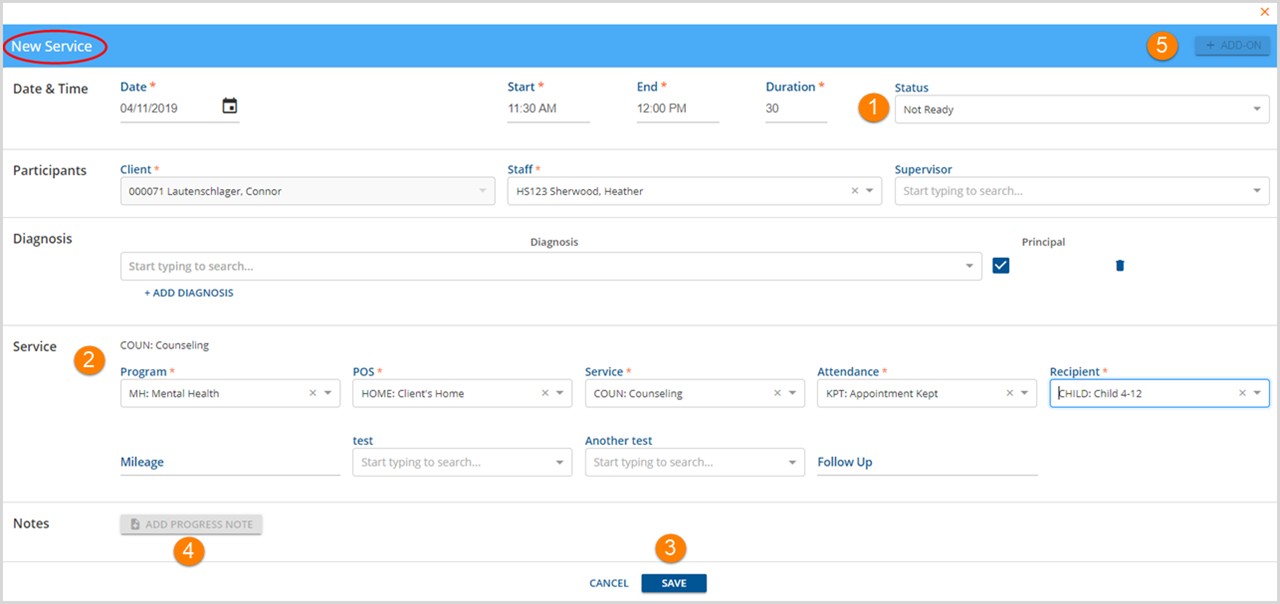
The New Service screen displays with the fields pre-populated with the Event information.

New Service from Event

1. Status defaults to Not Ready.  

  • Only services showing Not Ready on-screen are editable.
  • For example, the Status might remain Not Ready until Progress Notes have been entered and/or reviewed. Or the Status may be changed to Ready once the Client has Kept the appointment.

2. Review and enter Service Detail. 

  • No Distinct Service Definition Found - Remains red until the system identifies the Service Definition unique to the components entered. Service then displays the name of the successful Service Definition ID, for example, “COUN: Counseling” in the example above. Note that Events do not require Service Component fields to be completed.
  • Fields with an asterisk are required.

**Service Definition Display was enhanced with the release of EchoVantage versions 3.03 and 3.04. Click Here for more detailed information on these enhancements.

3. Once the required Service Components are entered, a Distinct Service Definition will be displayed and the blue SAVE button will be enabled. Click SAVE to finish the Service creation.

4. Progress Note - The Progress Note button will be available to select once the Service is Saved.

Enabled Progress Note
  • If Note Required is checked on the Configuration>Services/Payers>Service Definition screen for the current Service Entry, the Progress Note icon will change from blue to orange to indicate the note is required.
Enabled Progress Note
  • Alerts may also be configured to indicate a missing Progress Note or an Unsigned Progress Note. This may be done in Configurations>Setup>Alerts.

5. +ADD-ON - The +ADD-ON button will be enabled after the service is saved. Use this to enter an Add-On service as defined in the Configuration>Services/Payers>Service Definitions. 

Click HERE for more detailed instructions on New Service entry.

Click HERE for more detailed instructions on Configuration>Services/Payer>Service Definitions.

Create Service from a Group Event

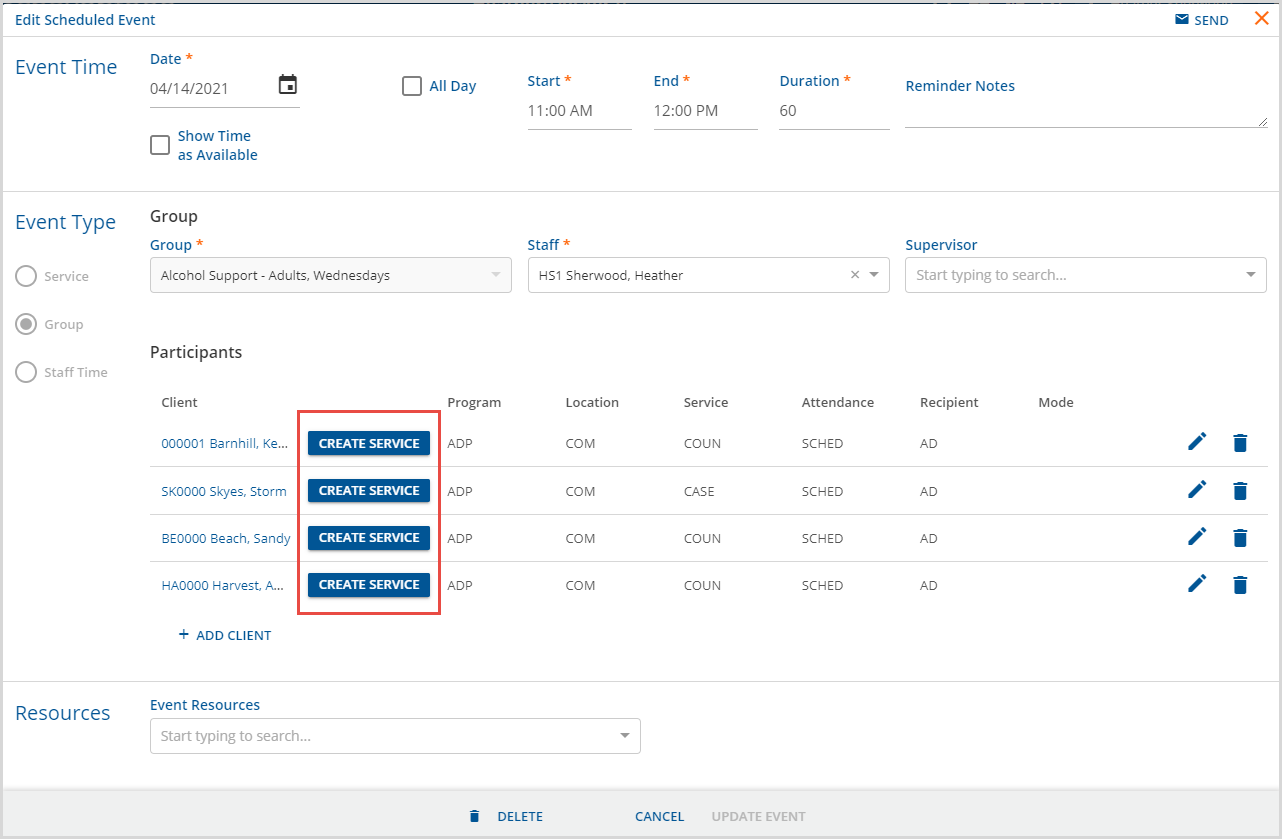
To create Services from a Group Event, double-click the desired Group Event to display the Edit Scheduled Event screen. 

Create Services from a Group Event
  • Click the CREATE SERVICE button
  • To return to the Edit Scheduled Event screen without creating a Service, use the back button as shown below.
Back Button Without Creating a Service
  • Complete steps 1 through 5 outlined above, as needed to updated the Service information.
  • Click SAVE to finish and record Service.
  • The header information updates and the Add Progress Note button is now enabled.
  • Use the back icon, image below, to return to the Edit Scheduled Event screen for quick access to the other Group Participants.
Back Button from Created Service


Changed
Wed, 04/14/2021 - 12:04

EchoVantage v3.36

Version 3.3, Released April 20, 2022                                                                                                                                Previous Release Notes

A Hotfix is available for v3.36 - Click HERE to view the details.

New Features

Requesting Voids

When a payment is received for a charge by mistake or any other reason, billing users can now request the Payer take the payment back using the new REQUEST VOID feature. The following conditions must be met for this feature to work.

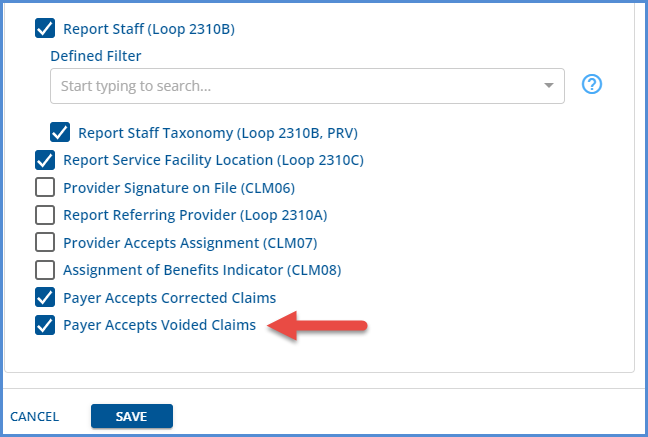
  • The Payer is configured to accept voided claims.
    • A new configuration option is available on the 837P Billing Method only.
    • Payer Accepts Voided Claims
  • The PCCN field on the Remittance for the Void Request is not blank.
  • The Remittance amount is greater than zero.
  • The Remittance Status is Done.
  • A Void has not already been requested for the selected Remittance.

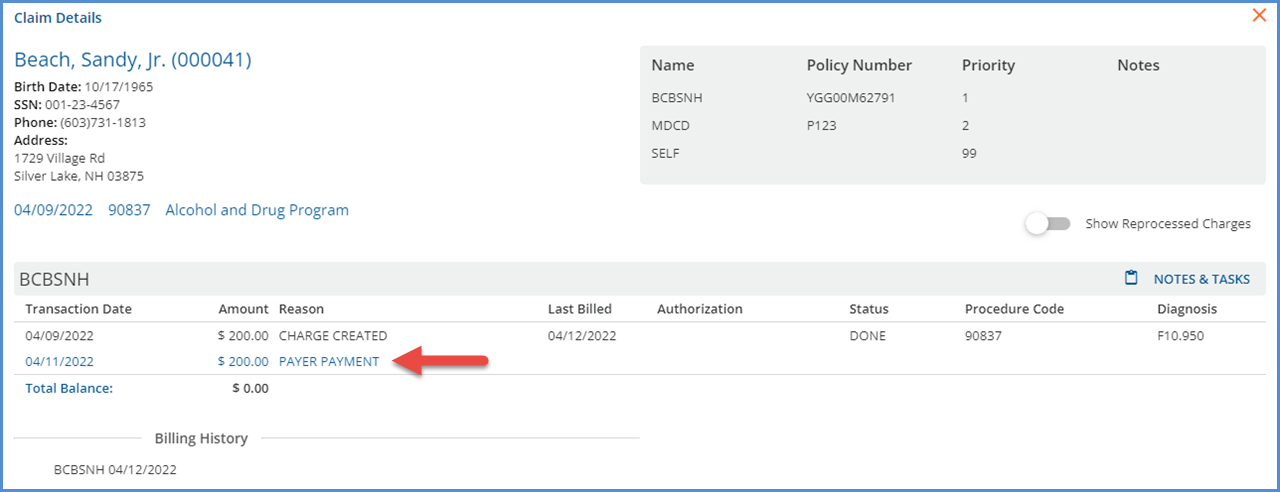
Easily locate the Remittance to review and request a void using the new link to Remittances from the Claims Detail screen, as Claims Management provides the ability to search for a specific Client and Date of Service. A link is available for any Transaction code of ‘P’ Payer Payment.

Link from Claims to Remittances

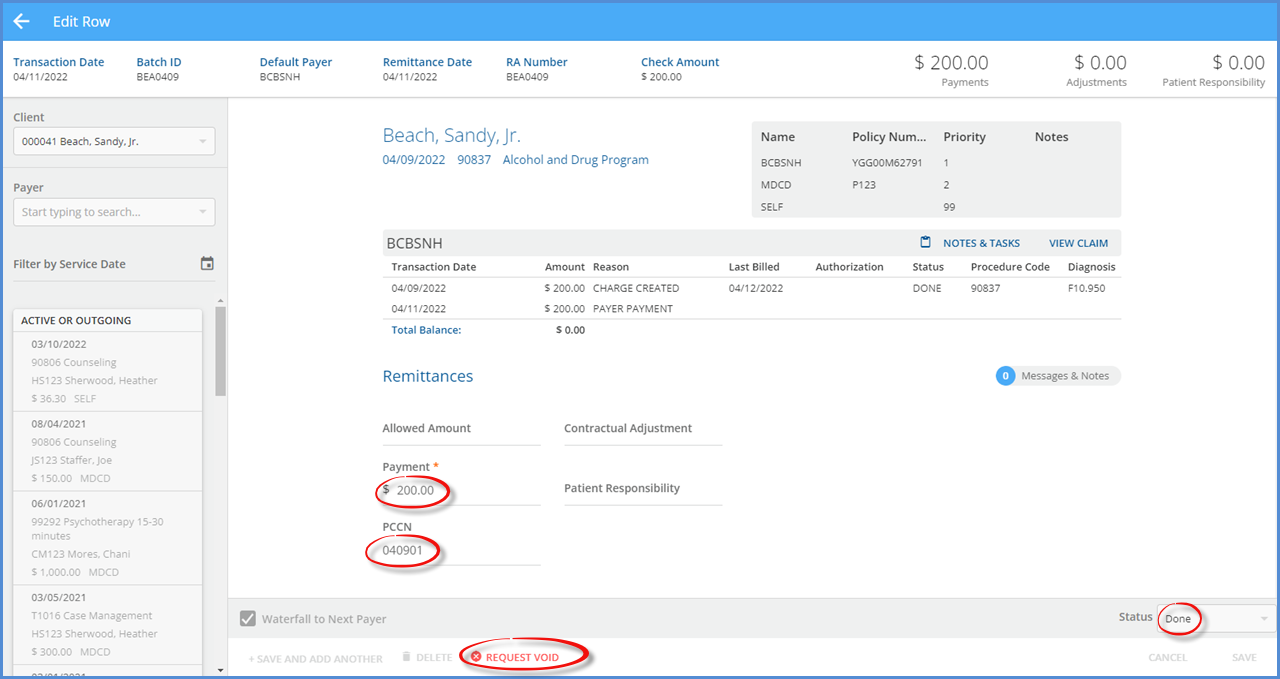
When the required conditions are met, a REQUEST VOID button is available at the bottom of the Batches > Edit Row screen.

Request Void Button Enabled

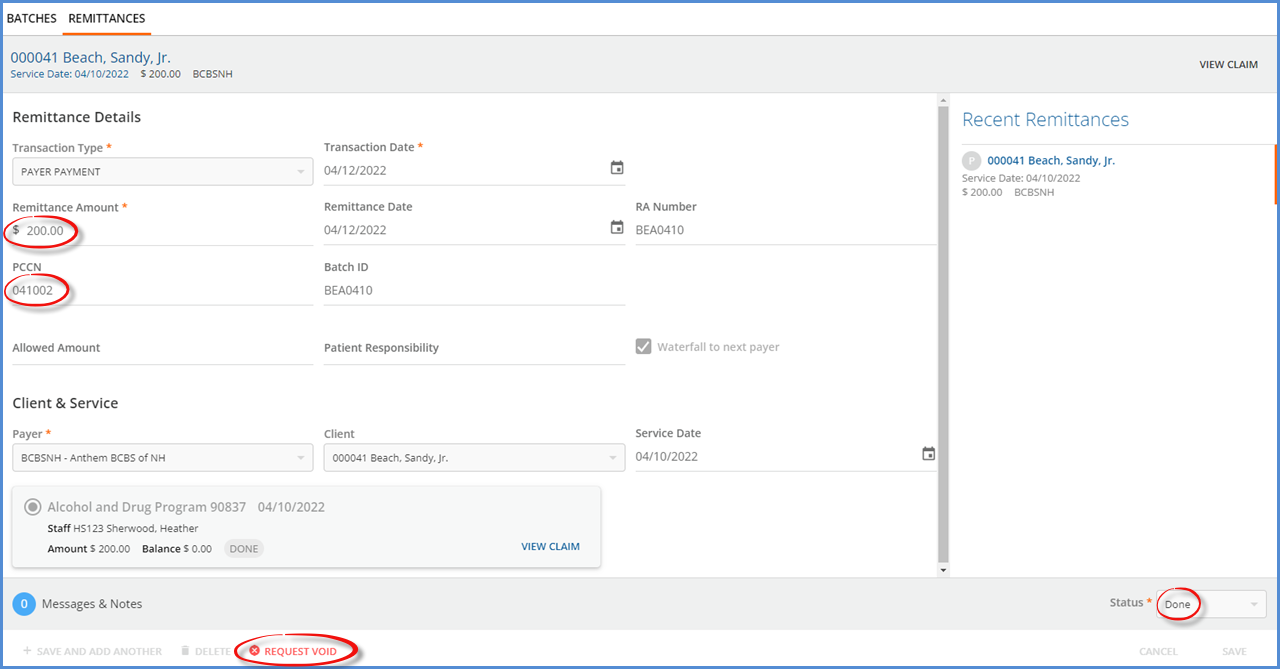
Or a Request Void button is available from the Original Remittances screen, depending on where the Remittance was posted. 

Request Void Enabled on Original Remittances

If any of the conditions are not met, the REQUEST VOID button is disabled, and the help icon to the right provides an explanation.

Request Void Button Disabled

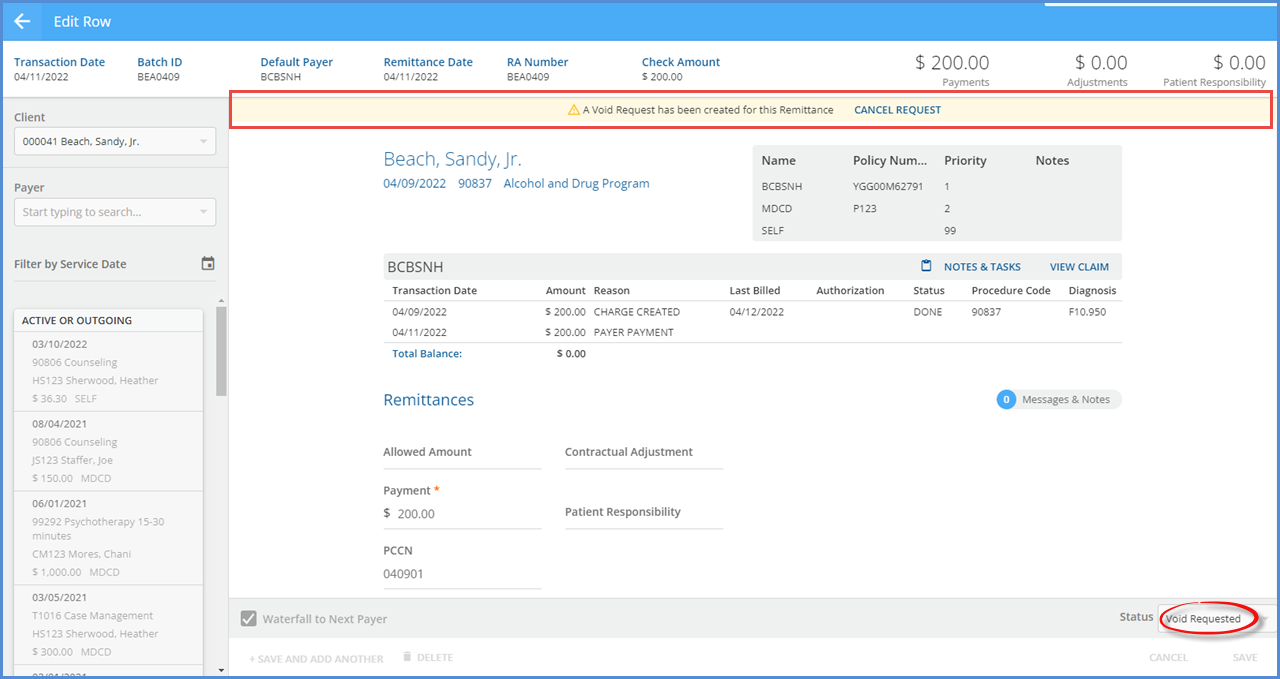
Click on REQUEST VOID to create the void request.

  • The Remittance Status is updated to Void Requested (a new Remittance Status).
  • The Request Void button no longer displays.
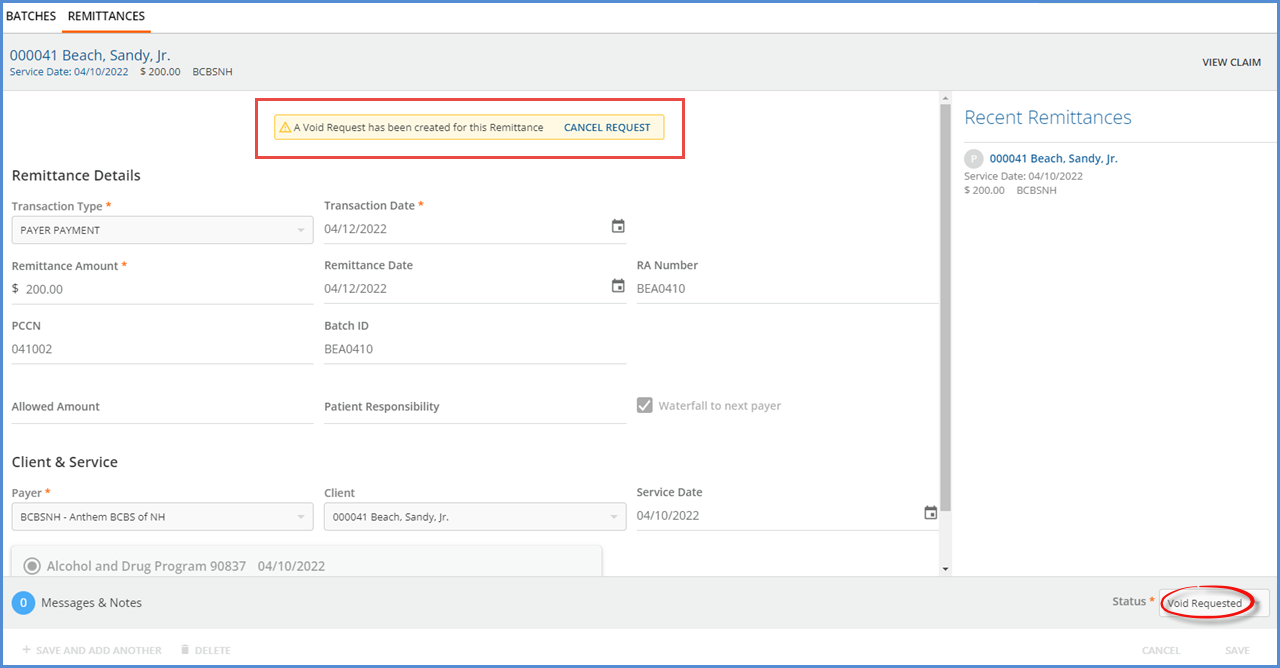
  • And a yellow banner displays across the top of the Edit Row page indicating that a void has been requested.
  • If the void request was created in error, use the blue Cancel Request button to reverse the request and return the Remittance to a DONE Status.
Void Requested

A similar yellow banner displays on the original Remittances screen to indicate that a void has already been requested, the Status is updated to Void Requested, and the Request Void button is suppressed. The blue CANCEL REQUEST button is also available.

Void Requested Original Remittances

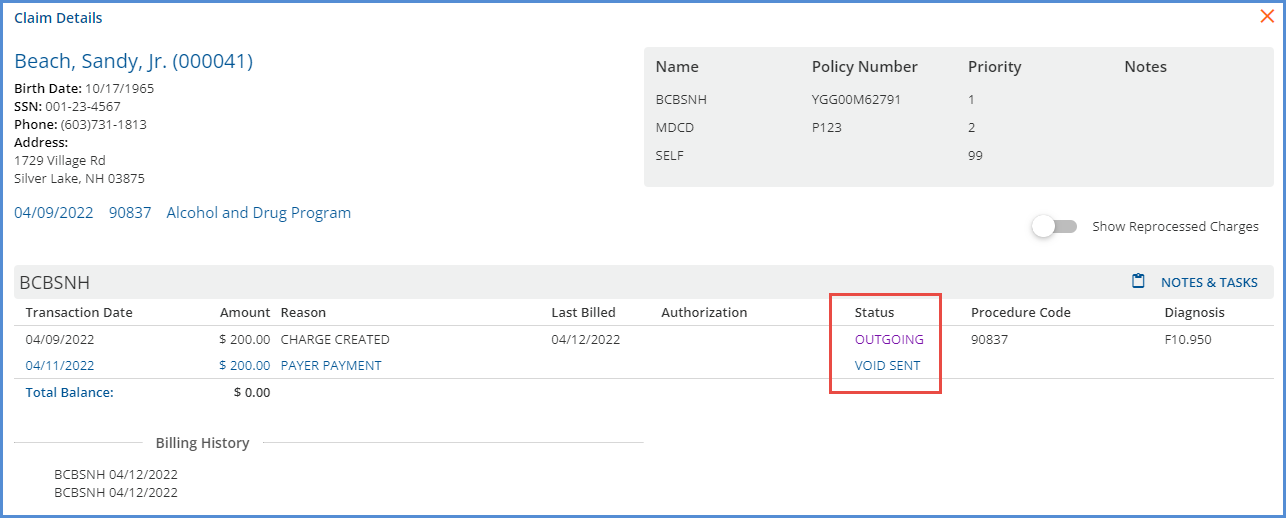
The Remittance Status is updated on the Claim Details page after a void is requested.

Void Requested Status on Claim Details

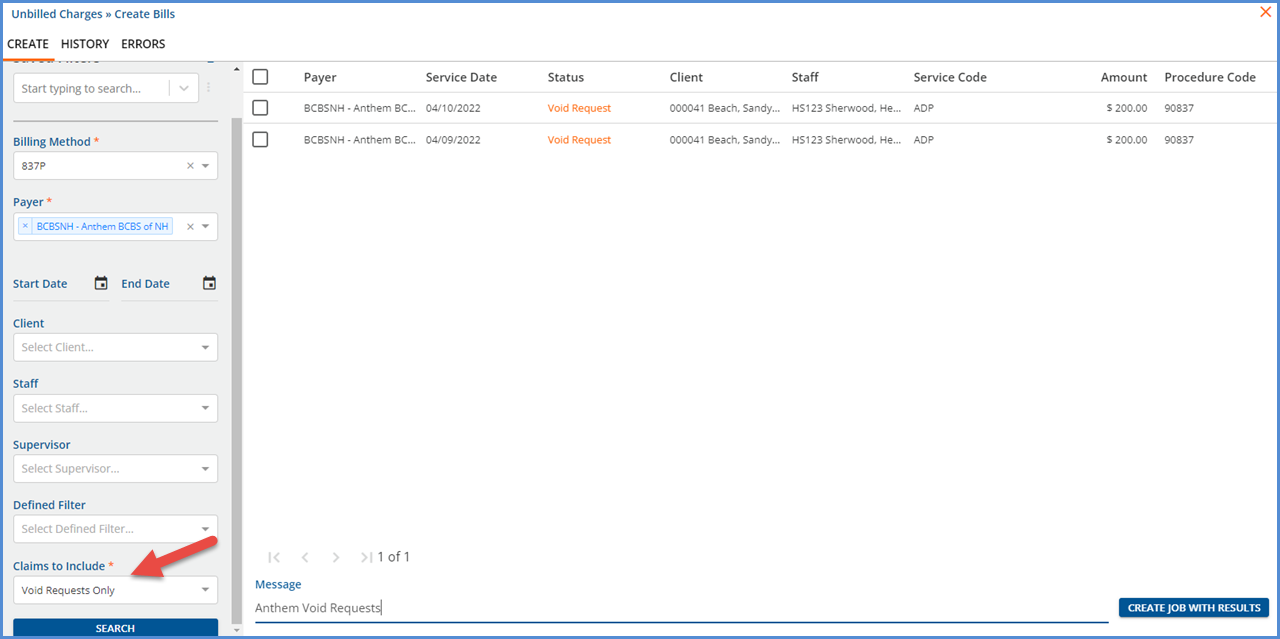
Charges associated with a Remittance with the Void Request status are eligible for inclusion in an 837P billing job from the Fiscal Overview > Unbilled Charges > Create screen even though the Charge Status is still DONE. A new required filter option, Claims to Include, was added to easily manage the inclusion or exclusion of void requests. Use this option to filter by Active Charges Only, Void Requests Only, or All.

Claims to Include Filter
Saved Filters May Need Updating

When a Charge with Void Request status is included in the Create Bills job, 

[L.2000B!L.2010BA]NM1*IL*1*BEACH*SANDY***JR.*MI*YGG00M62791
[L.2000B!L.2010BA]N3*1729 VILLAGE RD
[L.2000B!L.2010BA]N4*SILVER LAKE*NH*03875
[L.2000B!L.2010BA]DMG*D8*19651017*M
[L.2000B!L.2010BB]NM1*PR*2*ANTHEM BCBS OF NH*****PI*ANTHEM
[L.2000C!L.2300]CLM*000041-6479*200***15:B:8*Y*C*N*I*P
[L.2000C!L.2300]REF*F8*040901
[L.2000C!L.2300]HI*ABK:F10950
[L.2000C!L.2300!L.2310B]NM1*82*1*SHERWOOD*HEATHER****XX*0004191971
[L.2000C!L.2300!L.2310B]PRV*PE*PXC*78789999
[L.2000C!L.2300!L.2320]SBR*S*18*G123******MC
[L.2000C!L.2300!L.2320]OI***Y*P**I
 
  • The Claim Frequency Code is reported as “8” in the CLM05-3 segment (15:B:8).
  • The PCCN from the associated Remittance, 040901, is reported in the REF*F8 segment. This is the same PCCN entered for the 04/09/22 Service on the Batches Remittance above.
  • The payment amount is not reported.

When the Create Bills job is finalized, the Charge Status is updated from Done to Outgoing, and the Remittance Status is updated from Void Requested to Void Sent, a second new Remittance Status. Once a Remittance is updated to Void Sent Status, the request can no longer be canceled.

Void Sent

Requesting a Void and Unapplied Payments

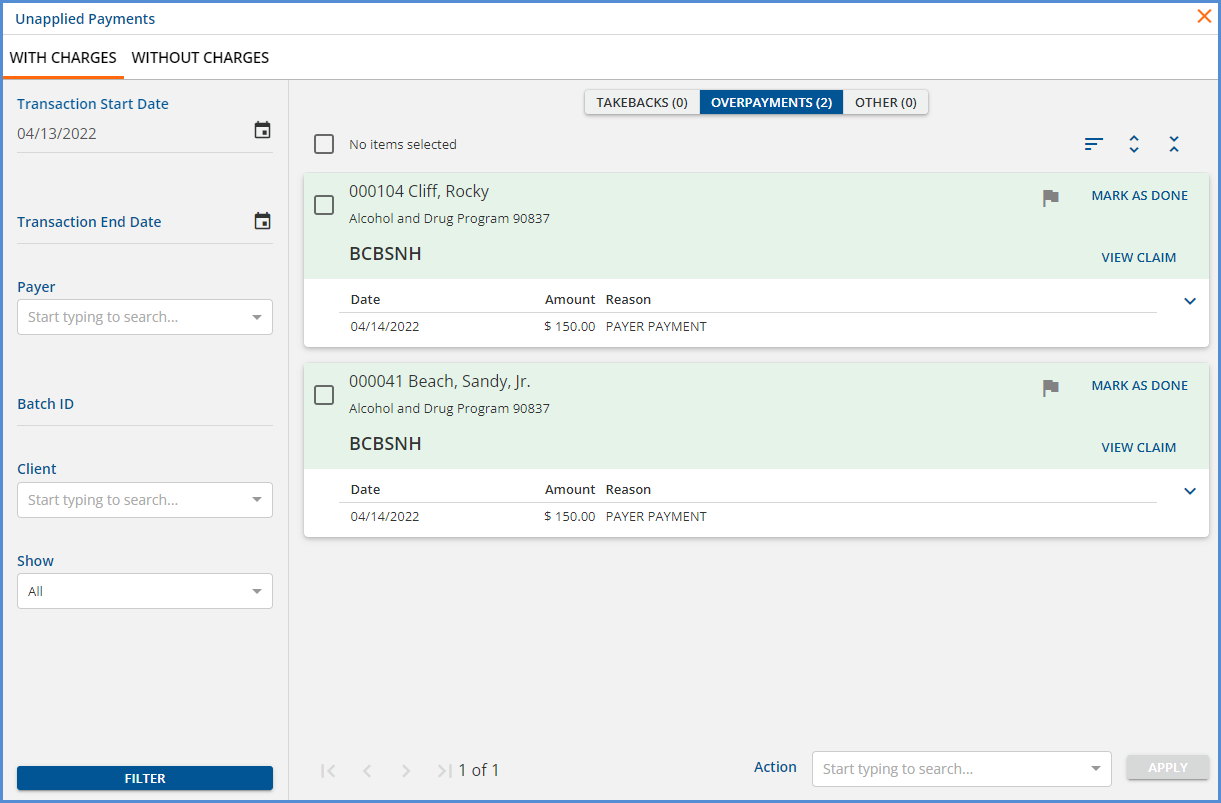
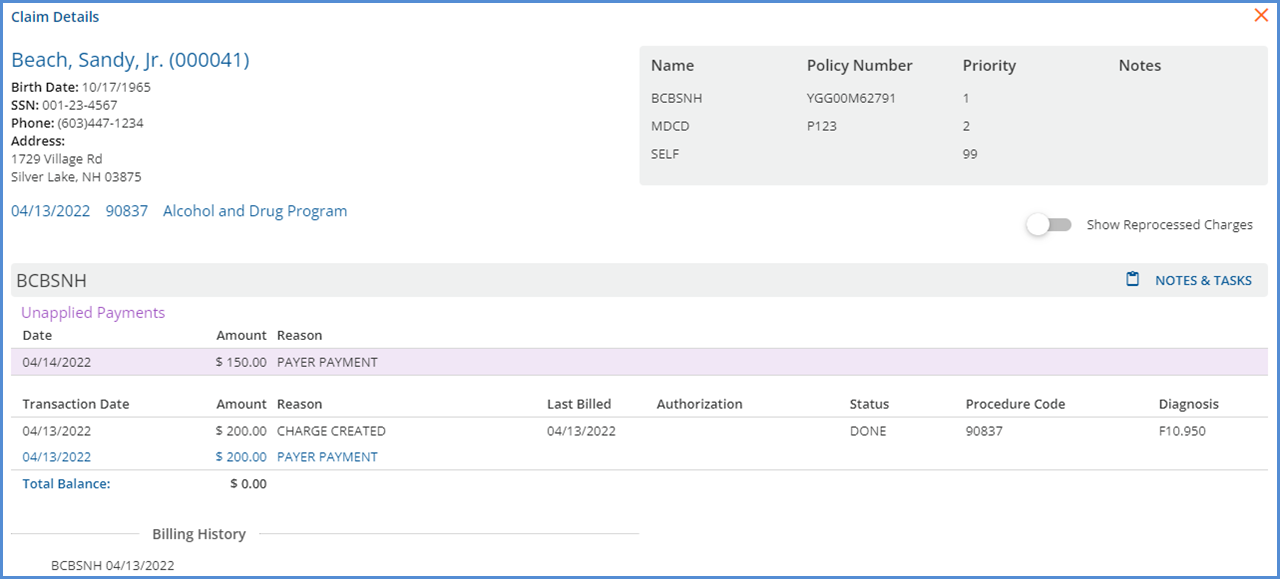
A void can also be requested and sent for a Remittance associated with an Unapplied Payment, whether applied or unapplied, provided the conditions stated in the beginning of this section are met. The method chosen depends on your agency’s workflow. Take the two Overpayments below for example. A link to the Remittance from the Unapplied Payment in both the Unapplied Card and the Claim Details is planned for a future release.

Overpayments Example

Requesting a Void for an "unapplied" Unapplied Payment

Requesting and sending the void for the Remittance associated with an Unapplied Payment is the same with one exception. There is no indication of either status, Void Requested or Void Sent, on the Claim Details or Unapplied Payments screen. The void is sent in the example below.

  • Void Requested Unapplied Payment
  • Displaying the status of the Unapplied Remittance is planned for a future release.
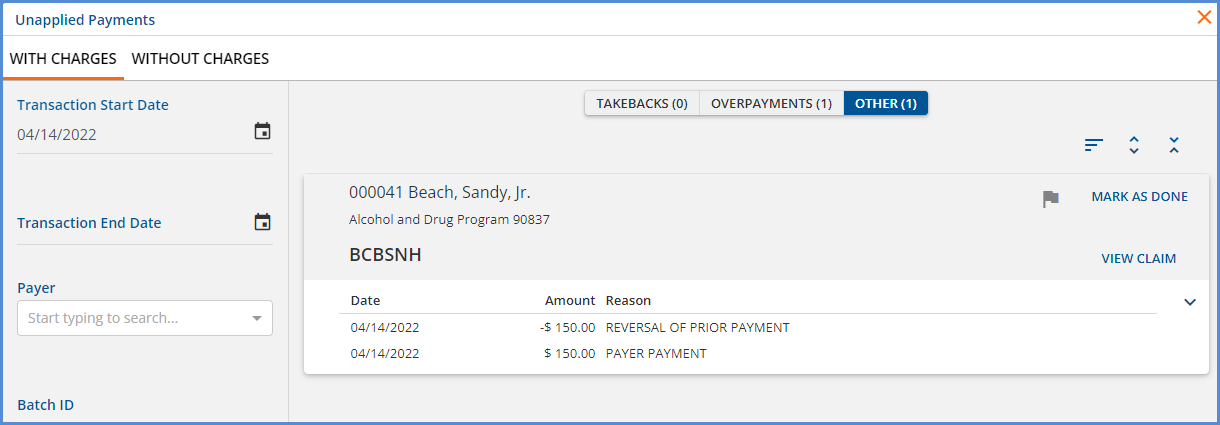
  • This has the benefit of minimizing the information that flows to the general ledger as both the Overpayment and subsequent Takeback are captured in the Unapplied Default account only.
  • When a Reversal of Prior Payment is received, both the Overpayment and Takeback are moved to the OTHER Unapplied Payments tab as both are associated with the same charge.
  • Other Type Unapplied Payment
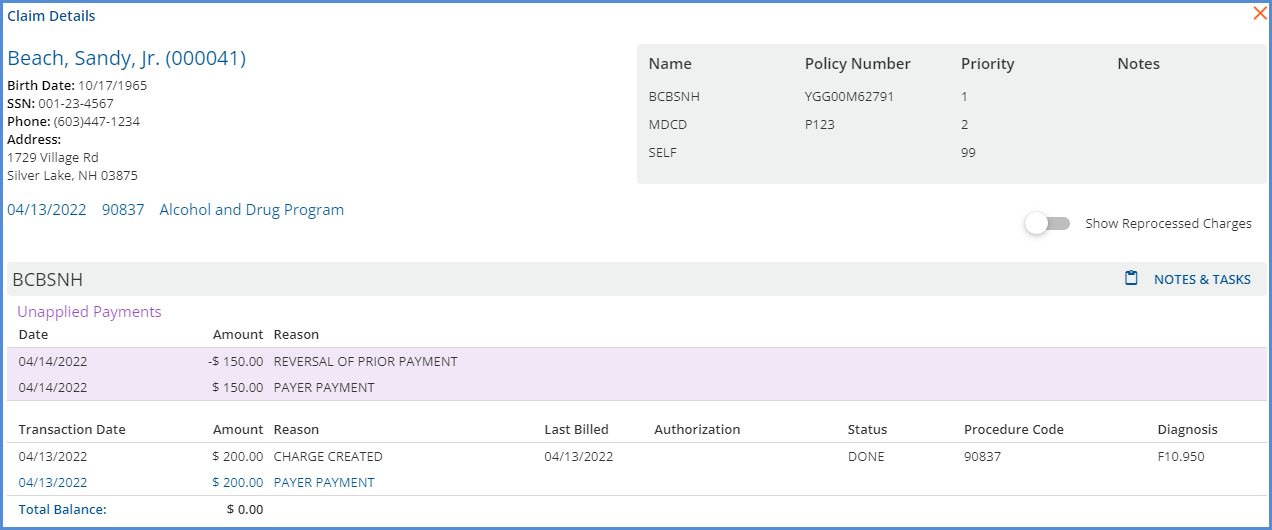
  • After marking this Other type Unapplied Payment as DONE, the Claim Details screen continues to show both the Overpayment and Takeback associated with the Charge; the information passed on to the General Ledger is minimal.
  • Other Type Unapplied Payment Marked as Done Claim Details

Requesting a Void for an "applied" Unapplied Payment

The Remittance link is available in Claim Details and the Status is updated when a void is requested or sent.

  • Applied Overpayment
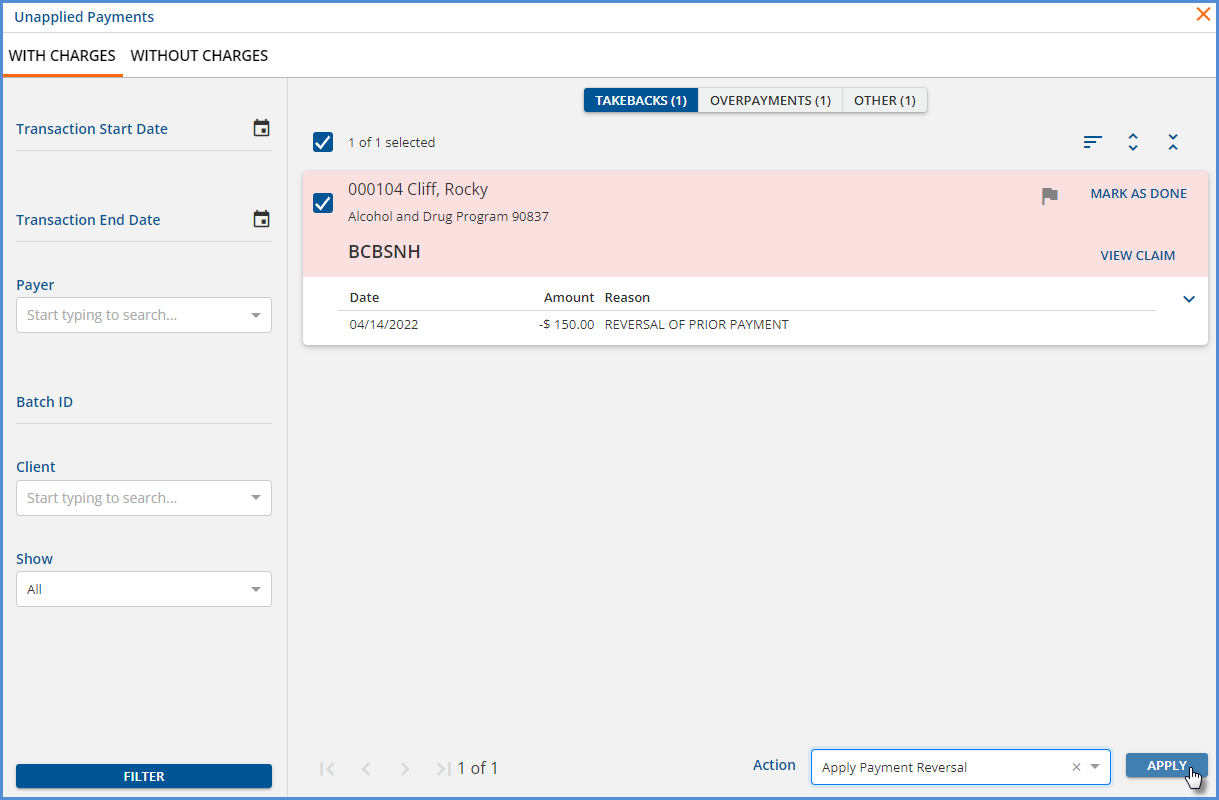
  • If a Reversal of Prior Payment is received, a Takeback is created and must be applied (Apply Payment Reversal action).
  • Apply Takeback
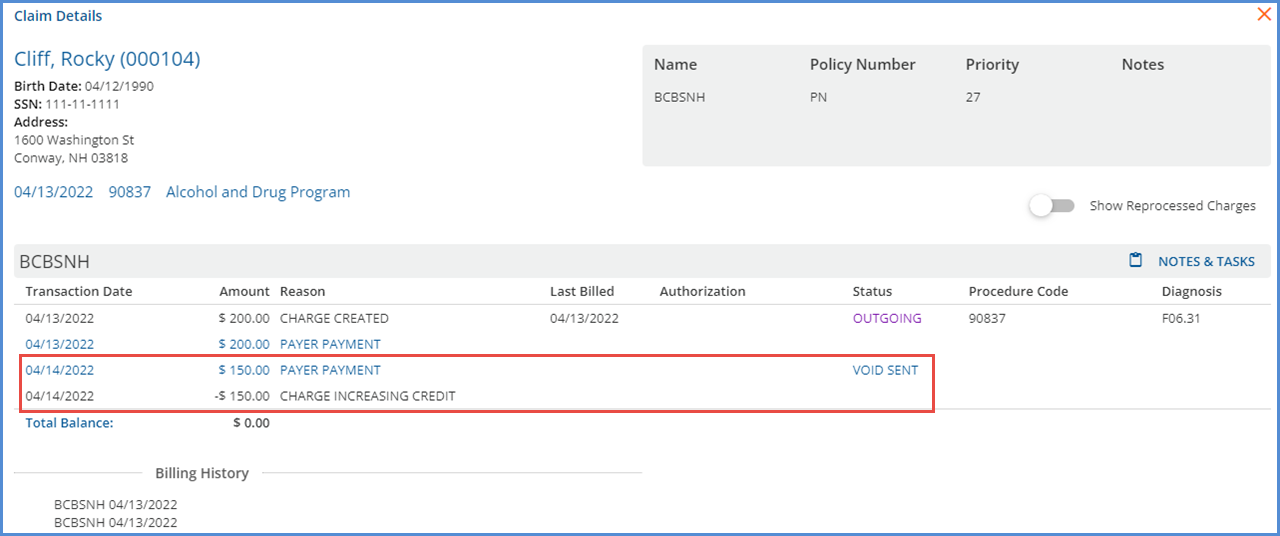
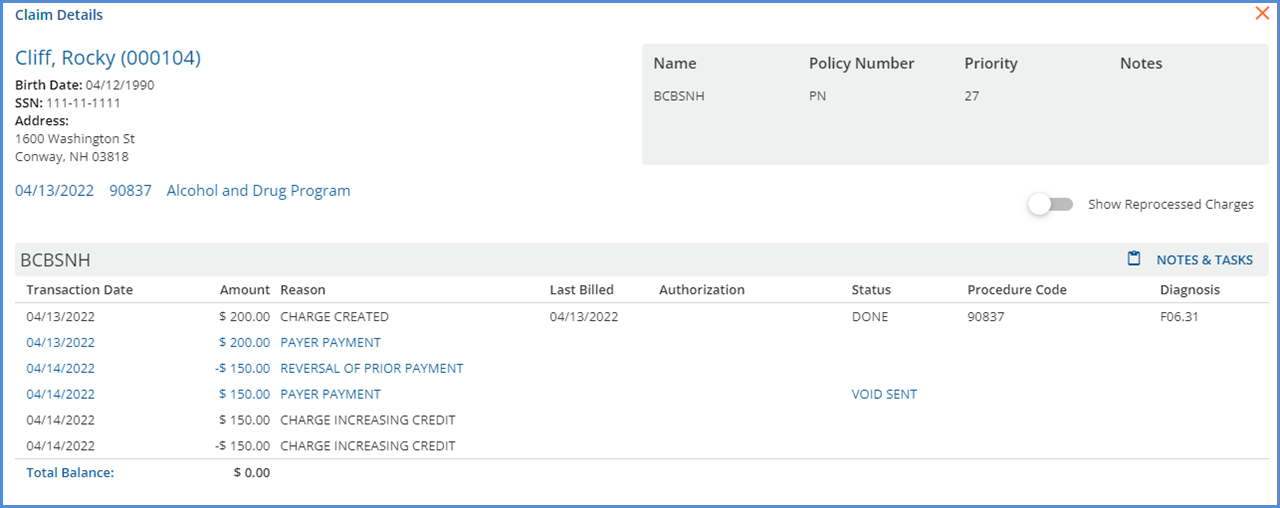
  • The Claim Details screen lists Payer Payments for both the Overpayment and Reversal of Prior Payment and a Charge Increasing Credit and reversal of the Charge Increasing Credit.
  • Claim Details After Takeback Applied
  • General Ledger Entries, including moving into and out of the Unapplied Default account, are created for the transactions associated with applying each Unapplied Payment.

Reprocessing and the Void Requested Status

If at any point it is determined that a Charge must be reprocessed, and that Charge is associated with a Remittance in Void Requested Status, the void request must be canceled before reprocessing. Once reprocessing is complete and the reprocessed Remittance is associated with the new Charge, a void can again be requested if needed.

Documents for Placements

Users can now add and manage Documents for Spaces in Placements. Access to Users, Forms, and Documents within Placements was added to an overflow menu to accommodate the changes needed for Documents.  Select the ellipse (three dots) to open the overflow menu.

Open the Overflow Menu for a Space

Then select DOCUMENTS to open the document management modal.

Documents in Spaces
  • The modal displays the documents specific to the selected space only.
  • User Group members with access to Placements have access to the Documents modal; the Document Category permissions still apply just as they do in Client or Family Documents.
  • New documents can be uploaded, or existing ones may be edited, deleted, or downloaded. However, there is no option to set a profile picture.
  • If a Space is renamed, a new folder is created in Alfresco but it is associated with the same owner ID, allowing documents from both folders to display for the newly renamed Space.
  • The application associates a document with a Space via an owner ID in Alfresco.
    • The Owner Id identifies the Space which has a Name and Description.
    • The Folder is stored with the Name.

Documents for Staff

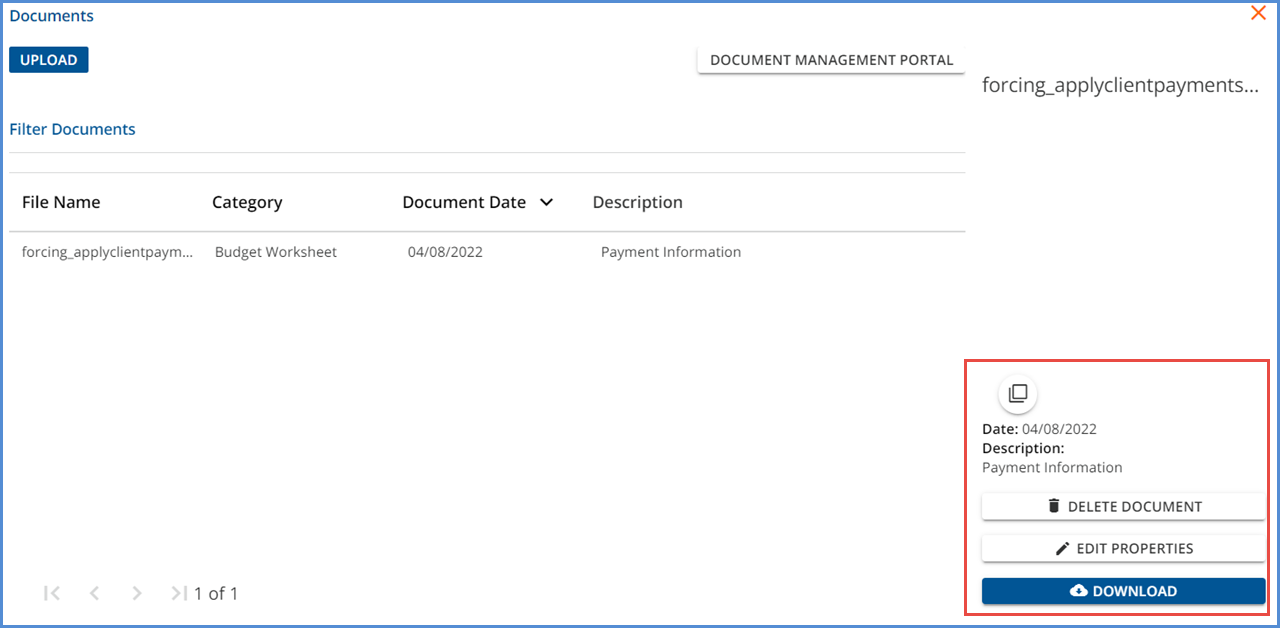
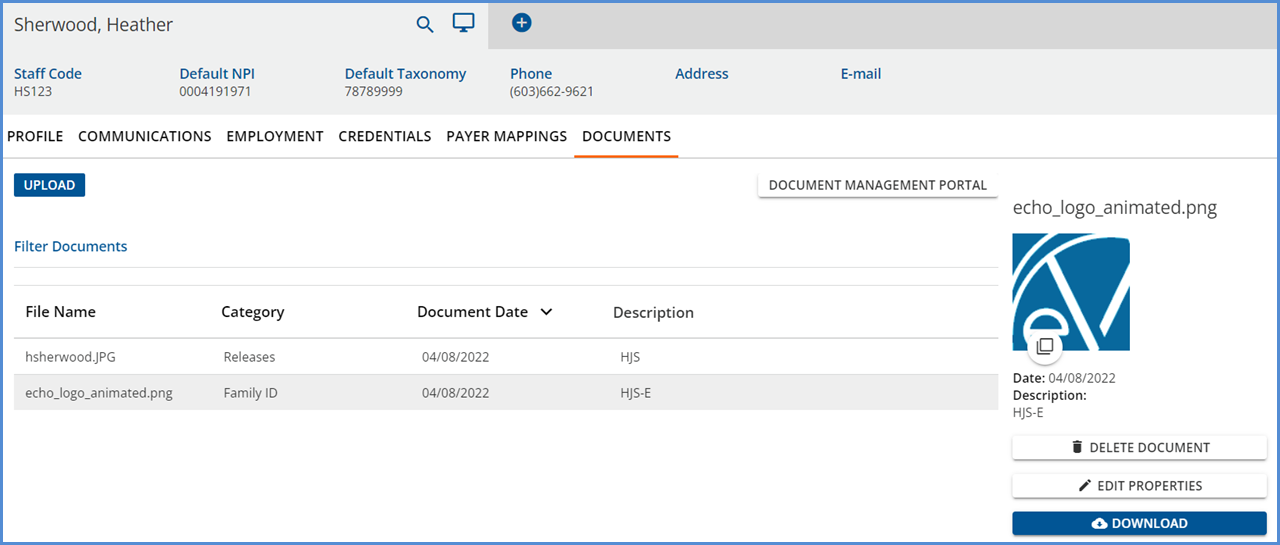
The ability to associate documents with Staff is also available in this release. A new DOCUMENTS tab was added in Configuration > Staff/Users > Staff.

Documents in Staff
  • User Group members with access to the Staff menu option in Configuration have access to the new Documents tab.
  • The Document Category permissions still apply just as they do in Client or Family Documents.
  • New staff documents can be uploaded, or existing ones may be edited, deleted, or downloaded.
  • Just like Documents in Placements, there is no option to set a profile picture.

Improvements

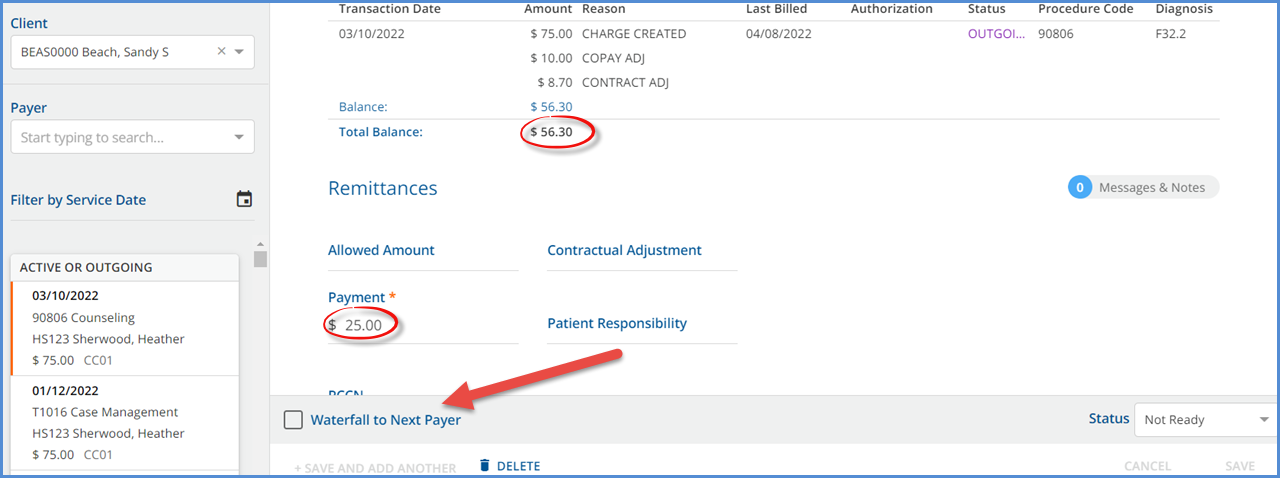
Remittances with Waterfall to Next Payer Set to False

Processing Remittances with the Waterfall to Next Payer set to false (unchecked) no longer sets the Charge back to Active after the transactions are finalized. A new Charge status, Working, is assigned which allows the billing users control over when those Charge balances are rebilled to the same Payer or Waterfalled to a subsequent Payer. For example, a Client has three Charges with a Status of Outgoing.

Outgoing Charge Status

Payer CC01 remits a total of $200.00 for all three Charges. The Remittances are entered and the Waterfall to Next Payer checkbox is NOT selected.

Waterfall to Next Payer Not Selected

The Remittances are processed AND finalized. The Payer Balance is updated, and the Status for each Charge is now Working.

Working Charge Status

When it is time to bill or enter a Payment against the Charge in Working status, include it in a Rebill Outgoing, Working, and Denied Charges reprocessing job to update the status to Active. Unlike denied Charges, a Remittance must be taken out of Working status before a payment can be entered.

Rebill Working Charge Status

After the Rebill job is confirmed and completed, the Charge Status is updated to Active, making it eligible for inclusion in a new Unbilled Charges > Create Bills job or for selection in Remittance processing.

Working to Active Status

The new Working status is searchable in Claims Management and is an available selection in the Outstanding Charges report.

New Charge Status Tip for Custom Alerts and Reports

Grouping Results by Lab Order

Imported Lab Results are now grouped by Lab Order, condensing multiple results for tests ordered at the same time into a single row on the ORDERS & RESULTS or UNSOLICITED pages. A new database table, CommonLabOrders, was added to store the top-level grouping from the ORC segment in the hl7, allowing all the results with the same order number to be treated as a group.

Existing lab orders and results are grouped by the upgrade process.

  • If multiple comments exist for the same order, the comments are concatenated during the upgrade process.
  • If any single result associated with an order is acknowledged, then all results in the group are considered acknowledged after the upgrade is complete.
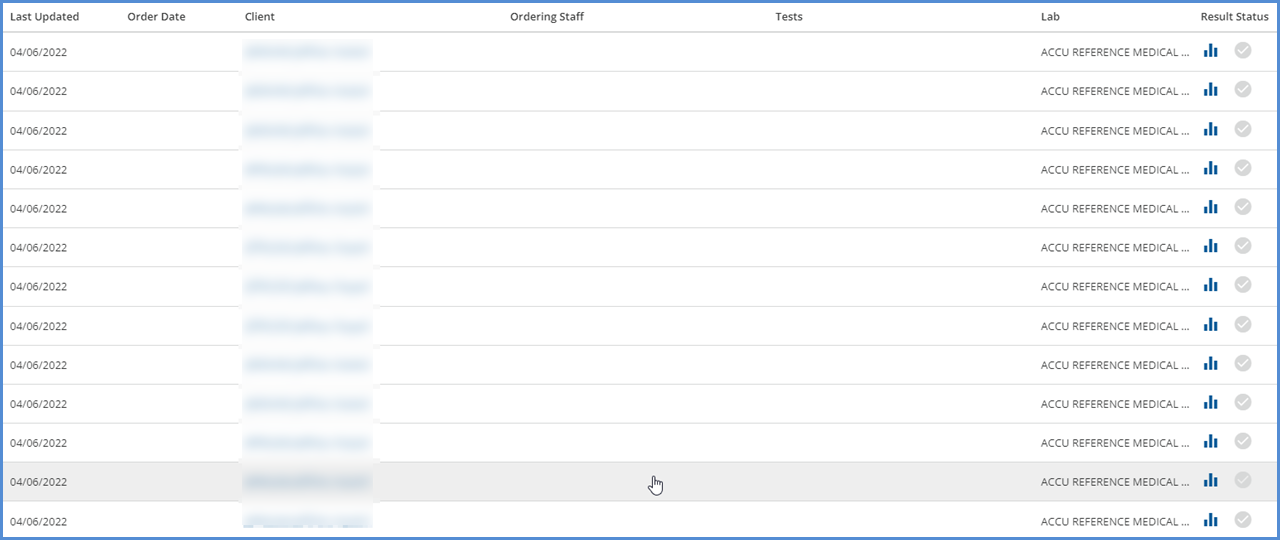
  • If during the upgrade there are multiple Unsolicited results for different orders but the same Client, a row for each displays on the ORDERS & RESULTS screen, if successfully matched by the application.
    • Order Date, Ordering Staff, and Tests are not displayed on this screen because they were unsolicited results.
    • These may look like duplicates because the Last Update date and Client codes are the same but viewing the detail in each row shows that each row is for a test ordered on different days/orders.
Matched Unsolicited Results
  • No changes to how the results display on the Timeline were made – each result still displays individually. Multiple results on the same day/order display the count.
Labs on Timeline

 New appUserId Available from Form DesignEHR Form Connection

The appUserId is now an accessible value for Form DesignEHR validation and from a stored procedure called from a form.

  • Use SESSION_CONTEXT(N'appUserId') inside an SQL Query or View as criteria for Form DesignEHR validation.
  • Add this same sql to a select statement to use a stored procedure called from a form to access the appUserId - SELECT * from MyTable WHERE appUser = SESSION_CONTEXT(N’appUserId’)

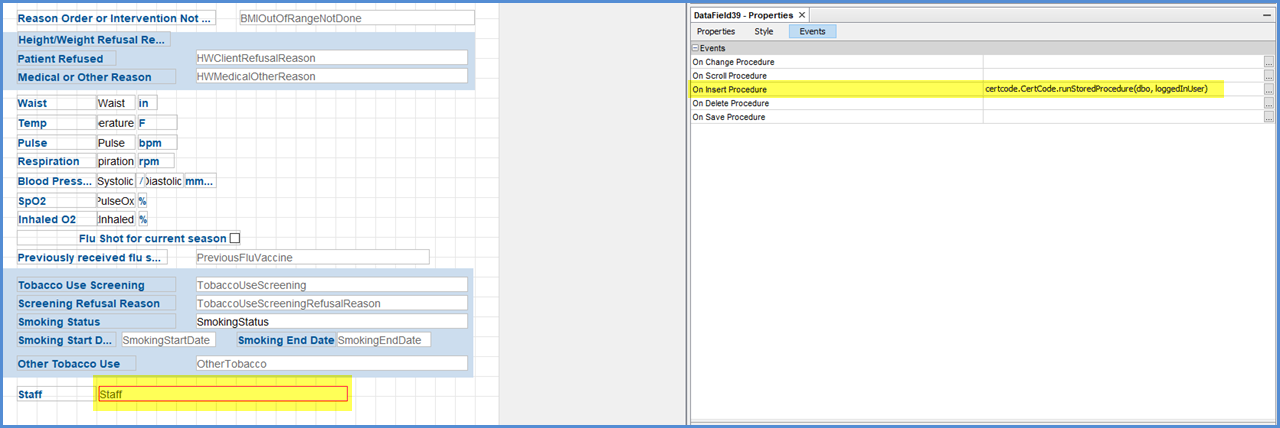
For example, the following Stored Procedure was created to populate the Staff column with the ‘id’ of the currently logged-in user.

create procedure [dbo].[loggedInUser] (

       @Staff char(36) OUT

) as

BEGIN

   set @Staff = (select s.id from staff s where s.AppUser = SESSION_CONTEXT(N'appUserId'));

END

The form was configured to call this stored procedure from an On Insert Procedure Event for the Staff field.

On Insert Event

 When the form is opened within EchoVantage, the Staff field is auto-populated with the current user.


Reports

The following Fiscal report was added.

Client Account Inquiry – Provides a full inquiry on all or open Claims with an option to include or exclude Client Payments/Unapplied. Charge information is listed in the Service Transactions section which displays first. Client Payments and Unapplied Transactions follow on a new page.

The following reports were updated.

Billing Reports

_837Audit – Updated the 837 report to include send the void requests, CLM05-3 and REF*F8.

Fiscal Reports

Aging Detail By Payer for Export – Updated the report to display the correct descriptions in the ‘Aging Bucket’ column.

AR Status Report for Export – Updated to include the new Charge Status, Working.

Billed vs Received – Updated to include the new Charge Status, Working.

_Billed vs Received for Export – Updated to include the new Charge Status – Working.

Claims Report – Updated to include the new Charge Status, Working.

_Claims Report for Export – Updated to include the new Charge Status, Working.

Remittances Report – Updated to include the new Remittance statuses, Void Requested and Void Sent.


Other Information

A reminder for users responsible for creating custom content, especially custom Client Tabs and Forms, that the webhelp provides some useful information on Custom Form Standards and Database Standards. This information helps to avoid potential upgrade issues or conflicts, particularly when Echo updates a core form or tab. For example, the use of a child table linked by Client or id is recommended for collecting additional information needed for a core table. 

There are also some quick reference guides available for creating report links and applying Client List Filters to reports.


Updates

Ticket #

Description

EV-2981

The Scheduler was updated to improve its ability to scroll to the current time, indicated by the red line in Day or Week view, when opened from Vantage Point > Clinical Home or Clients > Schedule.

EV-3134

The descriptions on the following Alerts were updated for more clarity: Events With No Services, Progress Notes Missing Signature, Service Missing Progress Note, and Wait List Opening.

EV-3135

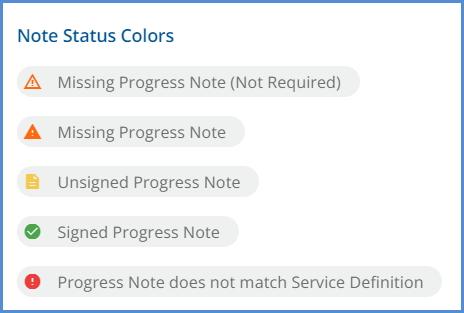
The Progress Note Status icons, colors, and messages were updated to display consistently across the following locations.

  • Services List
  • Individual Service Progress Note Status
  • Scheduler Events, including the Quick Info Windows
  • Scheduler Configuration – Note Status Colors


Note Status Colors


EV-3141

Work on general performance improvements continued in this release with a focus on the loading speed of the Document Categories screen in Configuration > Staff/Users > Permissions. Before this change, loading the page with 30+ User Groups and more than 335 Categories took more than 40 seconds. After applying the changes, the loading time for the same page was less than 2 seconds.

EV-3205

The Defined Filter is now visible on the Client Diagnosis card when it is defined.

Defined Filter Displayed on Diagnosis Cards

The ‘Diagnosis Matching on Service Entry’ selection in Configuration > Setup > Diagnosis determines whether Program or Defined Filter is displayed on the Diagnosis card.

EV-3246

Bug Fixes

Ticket #

Case #

Description

EV-2167

76751

An issue was reported where the Job History search in Fiscal Overview > Unprocessed Services  did not return results if the search was requested before the initial page loaded. The search failed and the button was non-responsive even after the initial page request completed. This issue was addressed in the Fiscal Overview Functions by disabling the search button and displaying the loading spinner until the page request is complete.

EV-3010


In Configuration > Setup > Alerts, the displayed list of Responsible Staff changed order when toggling between enabled and disabled and then saving. Updates were made to prevent the list from changing order when changing the status and saving. In addition, the names displayed in the Responsible Staff field and the values in the drop-down listing are now listed in alphabetical order.

EV-3065


An issue was discovered where a Fiscal Overview > Create Charges job failed IF a Service had an Add-on Service associated with it and the Add-on Service Definition did not have a rate configured. The issue was addressed, and this type of job no longer fails. Now if a Create Charges job includes and Add-on Service that does not have a rate configured, the job completes and the No matching charge strategy Error is triggered.

EV-3067


An issue was discovered on the Labs > Unsolicited page where the Client Card did not display after assigning an unsolicited result to a Client unless the page was manually refreshed. This issue has been addressed and now the card displays automatically after selecting ASSIGN in the Assign Client confirmation modal.

EV-3163

STHLT

An issue was reported where the Self-Pay billing job in Fiscal Overview > Unbilled Charges > Create was including Reversed jobs as having been billed when evaluating the Minimum Days Elapsed. (The Minimum Days Elapsed value is defined in Configuration > Services/Payers > Payers > Billing Method for the Self-Pay payer.)  If a Self-Pay job was created and then reversed, the Charges included in that job could not be immediately reselected for inclusion in a new job. The issue has been addressed and Reversed jobs are no longer considered billed when evaluating Minimum Days Elapsed.

EV-3197

11525

An issue was reported where a medication prescribed in DrFirst with a future stop date displayed as Completed in the CCD export, even when the CCD job date parameters were within the active medication dates. The issue has been addressed, and now a medication with a stop date in the future displays as Active on the CCD Export.

EV-3254


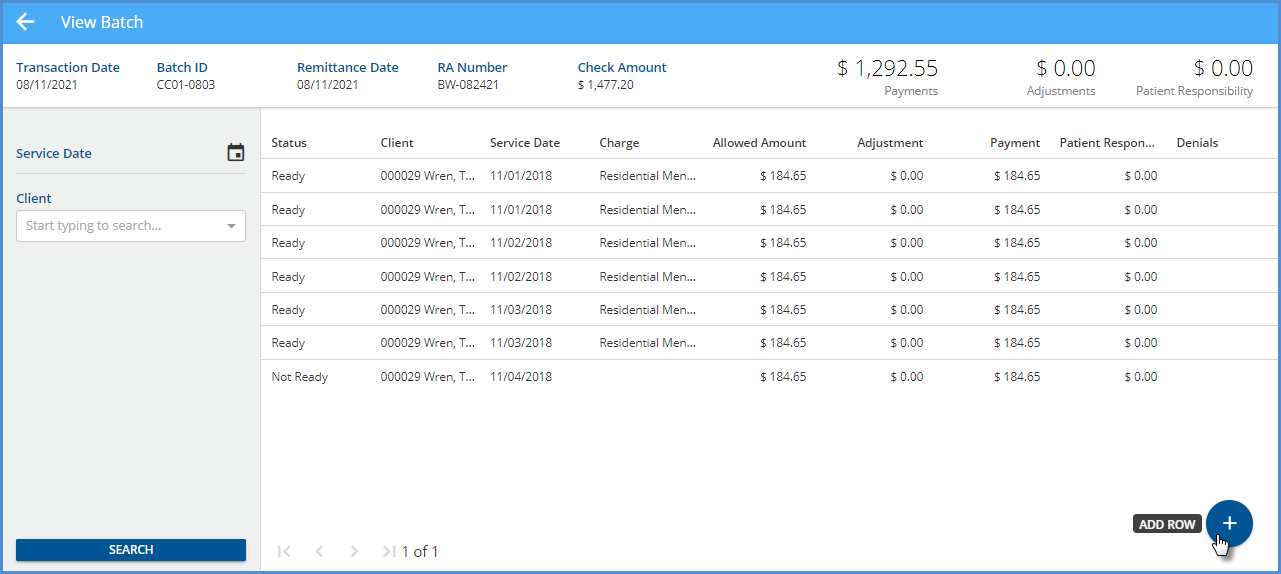
An issue was discovered where the Bulk Actions on the Batches > View Batch screen failed when there were reprocessed Remittances associated with the Batch. The Bulk action button has been updated and now marks all eligible records as Ready.

EV-3255


An issue was discovered where using the Mark as Ready button on the Batches screen for a Batch with associated Reprocessed Remittances generated both success and failure toasts. The issue was addressed by excluding any transaction associated with the Batch that has a status of Done, Void Requested, or Void Sent.

EV-3256


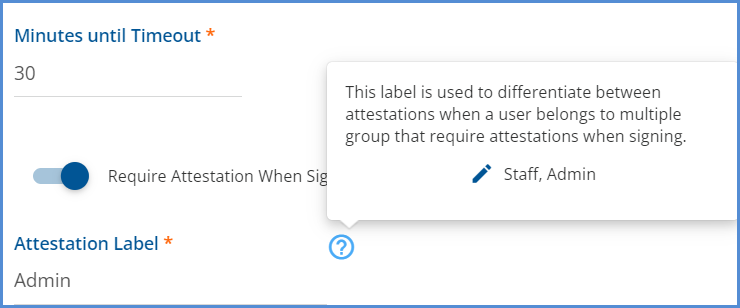
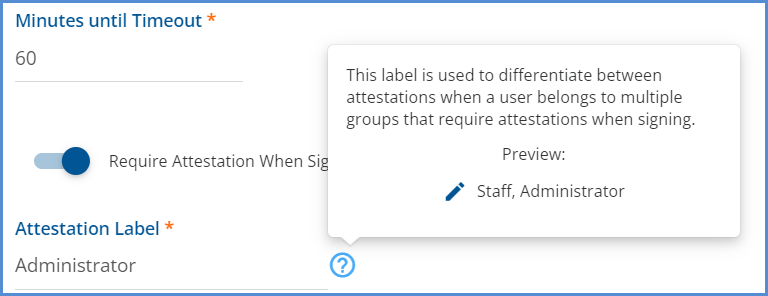
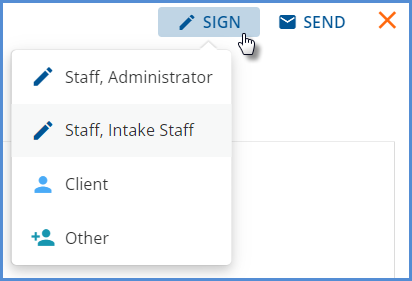
The word ‘group’ was updated to ‘groups’ in the Attestation Label help button text found in Configuration > Staff/Users > User Groups > Profile. In addition, the word ‘Preview:’ was added to indicate that this is how the label appears in the list when selecting the person (Staff, Client, Other) responsible for signing.

Before

Attestation Before

After

Attestation After


The label is helpful for Staff who are members of more than one User Group with an Attestation enabled.


Attestation Label


EV-3288


An issue was discovered where the job filter used to evaluate the Minimum Days Elapsed for Self-Pay Payers in Fiscal Overview > Unbilled Charges > Create was not considering finalized jobs. If a Self-Pay Create Bills job was created and finalized, those same charges could immediately be included in another Self-Pay Create Bills job. If the job remained in PREVIEW status, the charges were not available. This issue has been addressed, and now the filter considers both billed (PREVIEW Status) and Finalized Self-Pay Create Bills jobs when evaluating the Minimum Days Elapsed.

EV-3290

COOS

An issue was reported where archiving all messages in the MESSAGES section of the Inbox resulted in a fatal error. This issue has been addressed and now all messages can be archived at the same time without receiving and error.

EV-3291


An issue was identified where the clicking the icon (Notice, Warning, Critical) for the Tasks Due Alert opened the legacy Remittance page in error. The issue was corrected and now clicking on a Tasks Due Alert icon correctly opens the Claim Details page where the Task was assigned (Claims Management or Batches > View Batch > Edit Row).

DrFirst ID Constraint

V-3328


The hint text for the columns in Clients > Documents, Families > Documents, and Placements > Documents were updated to display the correct text.

Before

Documents Column Before

After

Documents Column After


EV-3345

11709

An issue was reported where the Aging Bucket column descriptions were not correct in the CSV friendly version of the Aging Detail by Payer Report. The cause was found to be an incorrect parameter passed to the subreport. This parameter was updated, and now the descriptions in the Aging Bucket column is the same in each report.

EV-3358

12029

An issue was reported where the Medication Route Field in DrFirst (varchar, 30) exceeded the maximum amount allowed in dbo.ClientMedications.Route (varchar, 20) table. When the route text exceeded the column limit, the Client medication failed to update but no error was captured. The issue was addressed by increasing the Route column in the database to match that in DrFirst, and the error logging was updated to capture this type of unexpected error in Graylog and the logging table.

EV-3371

12088

An issue was reported where Form DesignEHR was opening a blank form after signing a new form record. The issue has been addressed and now the signed form displays after signing a new record.

EV-3390

Coos

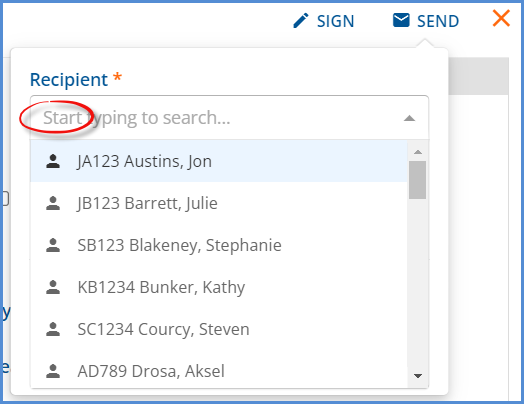
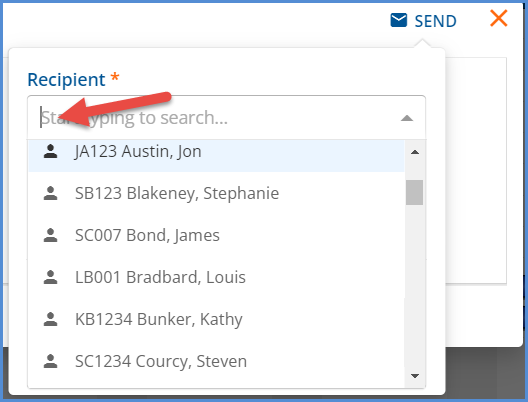
An issue was reported where the cursor was not in focus in a Send popover inside of a Modal (i.e., selecting Send from a form) unless the user clicked in the Recipients field twice. The issue was addressed, and now clicking in the Recipients drop-down listing correctly focuses the cursor.

Before

Send Modal Before Fix

After

Send Modal After Fix


EV-3422


An issue was discovered where changing the Time Per Row selection in the Vantage Point > Clinical Home > Scheduler > Configuration Settings also cleared the current Week View Days selection. The issue has been addressed and the Time Per Row selection can be edited without affecting the selected Week View Days.

EV-3462

EV-3627


In Fiscal Overview > Unbilled Charges > Create Bills, the filter sidebar is now a fixed size for all screen sizes. The table and message grid to the right now has a minimum width and scrolls horizontally when there is not enough room. Before these changes were applied, the filters could become inaccessible in a small screen.

EV-3591


A display issue was addressed in the Families > Document upload when the document category filters were set to filter by individual permissions in Configuration > Staff/Users > Permissions > Documents. The document was not visible in the list after selecting a category and uploading it. Now the documents display when uploaded as expected.

EV-3638 12457

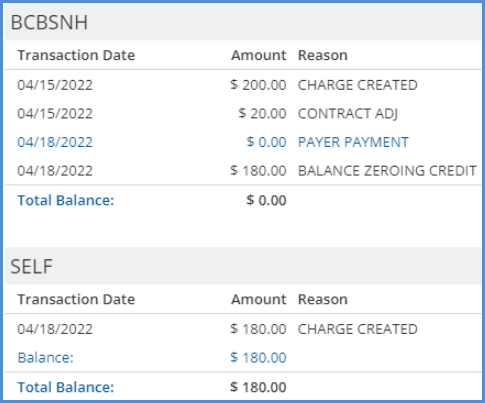
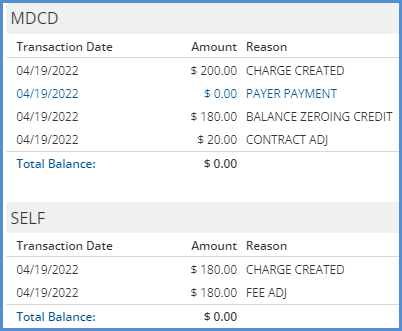
An issue was reported with the waterfall job to self-pay where any Client Fee of ‘0’ was not respected, regardless of the type (Flat Fee, Percent, Sliding Fee, or Monthly Maximum). Instead, the full balance was passed on to the self-pay payer - the Before image below.

This issue was addressed, and now when a balance waterfalls to self-pay AND the Client Fee is ‘0’ or is ‘0’ for that specific service due to Defined Filter, the self-pay charge is created for the waterfall amount AND a client fee adjustment is created to adjust it to zero – the After image below.

Before After
Before Client Fee Fix
After Client Fee Fix
Changed
Wed, 05/11/2022 - 10:33

Progress Notes

A Progress Note can be required for a specific Service Definition. This allows the same Progress Note to be made available for the Service Definition, during Service Entry, system wide for all users granted permissions to the client and the Services menu option.

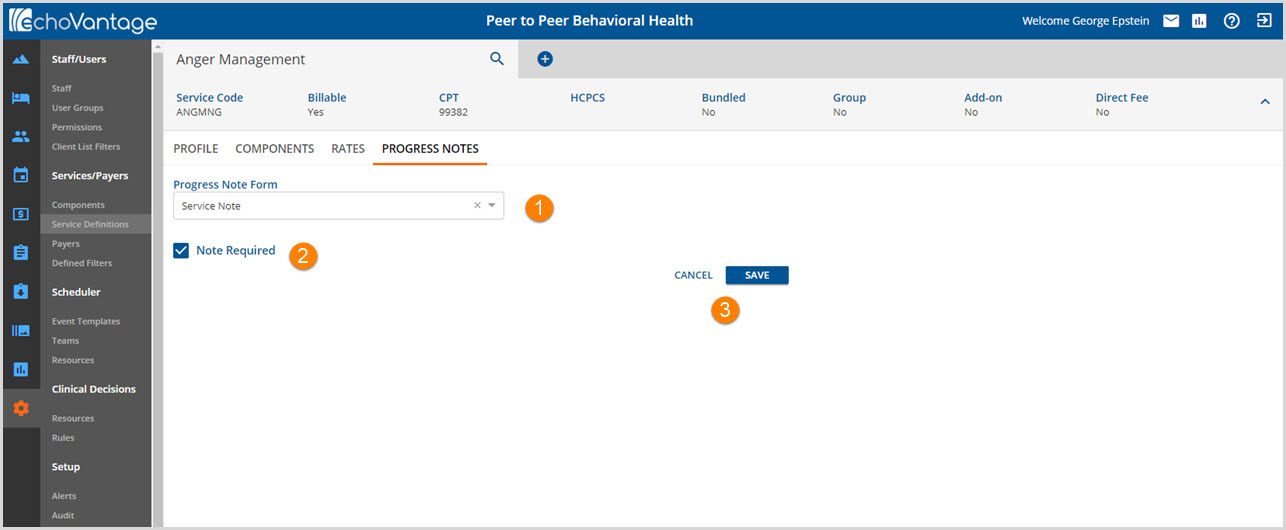
Service Definitions Progress Notes

1. Progress Note Form - Select the Progress Form that will be displayed in Service Entry for this Service Definition. If a progress note form for your organization was created in Form Designer but is not showing, check to make sure it is set up as a progress note in Form Designer.

2. Note Required - Select the check box if a progress note is required to mark a Service Ready that is for this Service Definition. 

  • This does not prevent the Service from being created or from being marked Ready.
  • It will change the Progress Note icon on the Services screen from blue to orange.
  • An Alert will also be triggered for the Service staff and supervisor (if entered) when the Service Missing Progress Note Alert has been configured. (Configurations>Setup>Alerts>Service Missing Progress Note)+

3. CANCEL/SAVE - Select SAVE to record changes or choose CANCEL to exit without saving.

Changed
Fri, 06/21/2019 - 16:10

Screen Navigation and Data Entry Index

Active / Inactive field Inactive field - Field is blank
Inactive Field
Active field - Cursor is present
Active Field
Keyboard entry
Start Date
Start Date Typed Entry
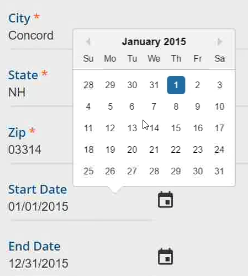
Date Entry Clicking into a date field will allow direct data entry. *Note that in Form DesignEHR fields, the grid row must be active first.
Start and End Date Fields
Date picker / calendar
Date Selector

This icon denotes a date picker or calendar function. Click the icon and a calendar box will open. Use the pointer to pick the desired date and click to populate the date field. 

Pointer entry
Pointer Entry
Add (Client, Staff, Payer and so forth) Click the blue +  (Client, Payer etc) to Add new entries.
Add Client
Add Payer
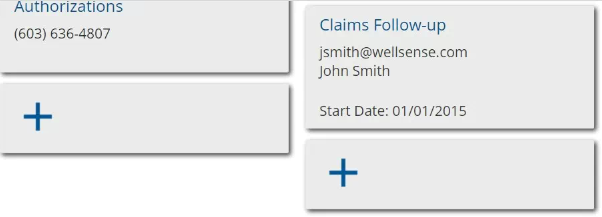
Card (s) Open a blank card Click on the blue + to open a card for new data entry. Double click on an existing card to view and edit current card information.
Open Blank Card
Delete / Cancel / Save Save / Cancel  Click on the desired option.
Delete, Cancel, Save
Save, Cancel
Error Messages (Red)  
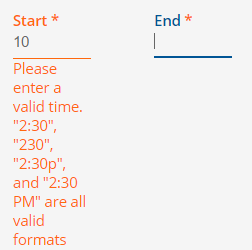
Error Message
Form DesignEHR Navigation buttons Form DesignEHR forms are found in the Profile, Communications, Episodes, and Enrollments tab of the Client menu.
Form DesignEhr Navigation Buttons
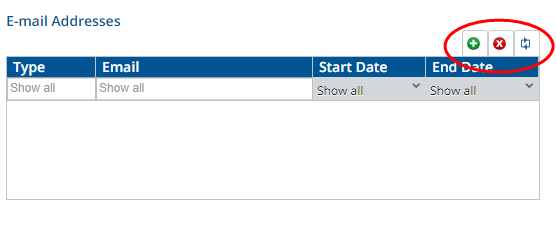
 Add (+) Clicking (+) Activates the data entry grid
Active_Grid_Entry
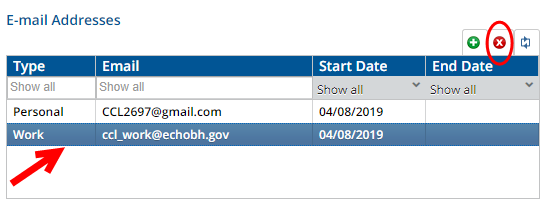
Delete (x) Clicking (x) Deletes the highlighted row in the data entry grid
Form DesignEhr Delete
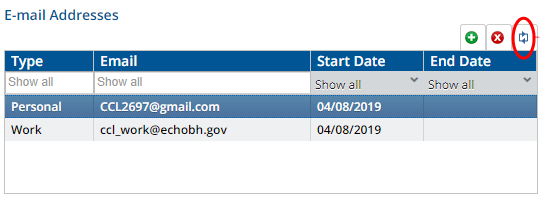
Refresh Clicking icon refreshes grid display
Form DesignEhr Refresh
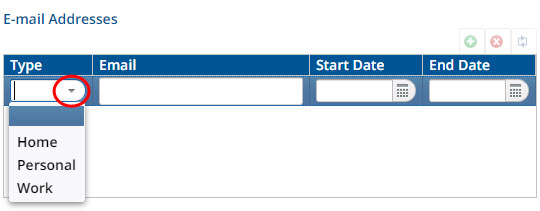
Down Arrow Click the down arrow to display drop-down list
Down_Arrow_Dropdown_List
Hint text messages  
Hint text messages
Icon: Dialog Box Launcher  
Icon: Dialog Box Launcher
Open / Collapse View ^

Opened

Open / Collapse View

Collapsed

Collapse view
Action on-screen pop-up examples (Flash momentarily)  
Popup Record Saved
Popup Configuration Saved
Popup New Service Created
Popup Items Updated
Popup Unable to Create New Service
Required Actions *

An asterisk indicates that an action is required.

Required Action
Search field

Any Search box, Clients, Staff, Alerts, Diagnoses, ICD Codes etc, drop-downs have been updated to provide faster searching.

The search looks for matches in Code, Last Name, and First Name.

Birth Date searching is no longer supported.


Add/Search Client
Payer Search Bar
Selection Lines The orange line indicates the current selection.


Selection Lines, Vertical
Selection Lines, Horizontal
Time  
Time Entry


Changed
Wed, 11/13/2019 - 16:08

Viewing and Signing Forms in the Inbox

The ability to view and sign forms from the Inbox, both Personal and Group Mailboxes, was introduced and enhanced over several versions. The process of viewing and signing forms is the same whether working in an individual or a group mailbox.

  • The release of EchoVantage version 3.07 introduces the ability to view and sign VHR Timeline forms within the inbox message. Users with access to the forms can select the recipient and then select either Request Review or Signature Requested.
  • The release of version 3.08 adds the ability to send a VHR Timeline form and Progress Notes to a group mailbox for review or signature. 
  • The release of version 3.09 introduced PIN signatures, see link in the Signing Forms section below.
  • The release of version 3.12 introduced the ability to expand the signature box to full screen.

Sending Forms

Sending forms starts the process. A form can be sent to any application user by selecting the name from the drop-down recipient list. The ability to send to a group mailbox is permissable. A user must have SEND permissions to a group mailbox to be able to send a form or progress note. Click HERE for detailed information on configuring group mailbox permissions. The examples below walk through sending a Progress Note to a group mailbox, viewing, and then signing the note.

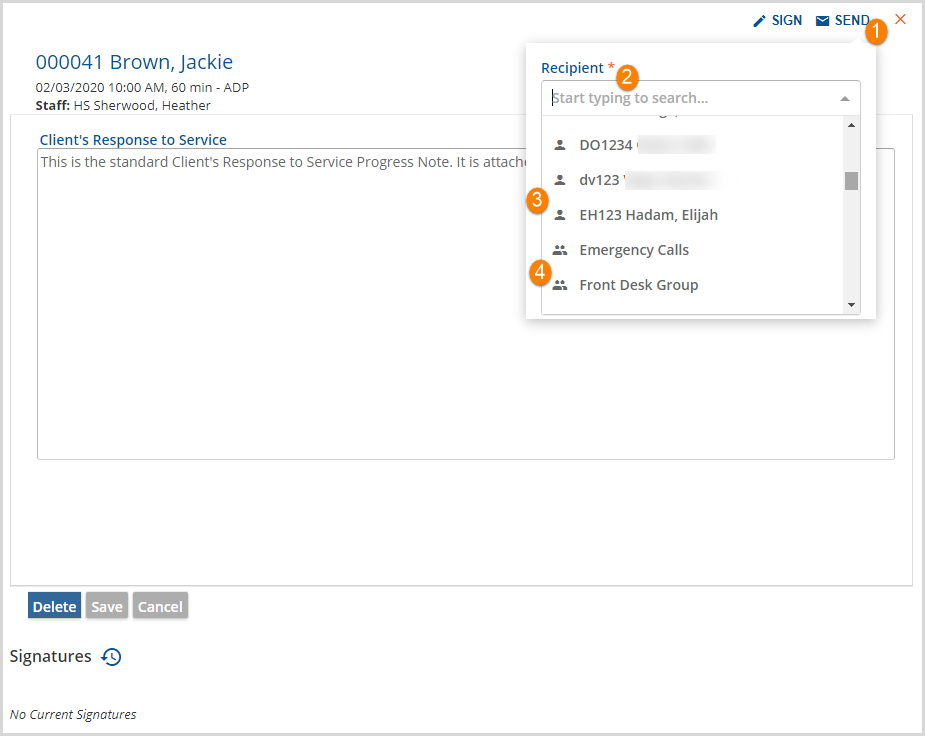
Send Select Recipient

1. Select the blue SEND button to open the send modal.

2. Select a Recipient.

3. Individual recipients have a single person icon.

4. Group recipients have the multi-person icon.

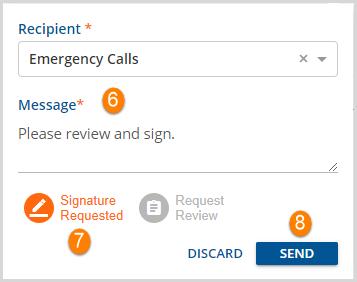
Send Progress Note Complete

6. Once the Recipient is selected a Message is required. 

7. Select an action button. 

  • Request Review sends a read-only version of the form to the selected recipient.
  • Signature Requested sends a read-only version of the form to the selected recipient AND a signature box is available at the bottom of the form.

8. Once the required fields have been populated, the blue SEND is enabled.

Viewing Forms

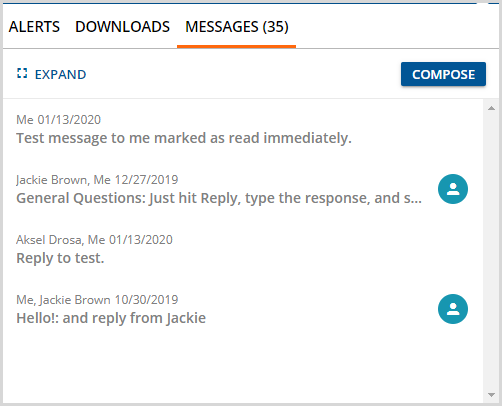
Navigate to the Inbox by:

  • Selecting the envelope icon from the main application information bar  OR
  • Navigating to the Messages and Alerts section of the Clinical Home Page  OR
  • Using the Inbox shortcut keystrokes CTRL + i
Inbox

Then click on the blue EXPAND to open the Messages screen.

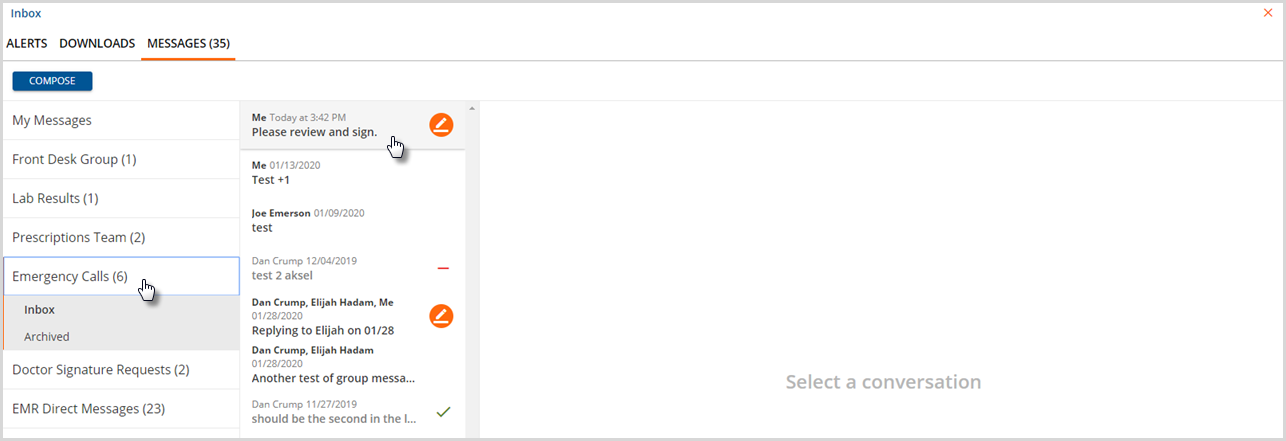
Emergency Calls Inbox

Navigate to the desired mailbox, Emergency Calls in this example, and select a conversation to load the message and form. 

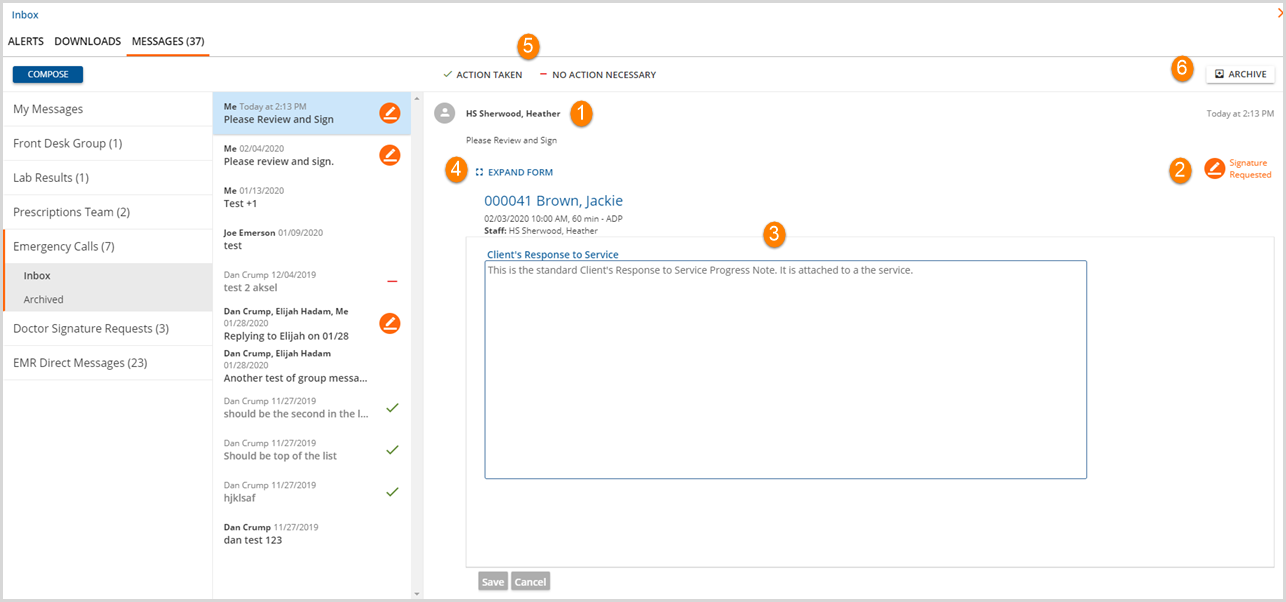
Viewing a Form

1. The Sender's name is in bold and the message text is just below it.

2. The Signature Requested link is still available to return to the progress note on the parent Service.

3. The progress note is displayed within the message pane. 

4. A blue EXPAND FORM button is available. This expands the form into the conversation area allowing more of it to be viewed at one time.

5. The Action buttons are available to communicate to all member of the group what status of this particular message.

  • These are defined in the group mailbox configuration.
  • A group mailbox does not require that actions be defined.
  • Once an action has been selected, the message is no longer bold and is not considered in the new count.

6. An ARCHIVE button is available to move a message to the Archived folder. The message will no longer be visible in the Conversations or Inbox list but can be accessed from the Archived folder.

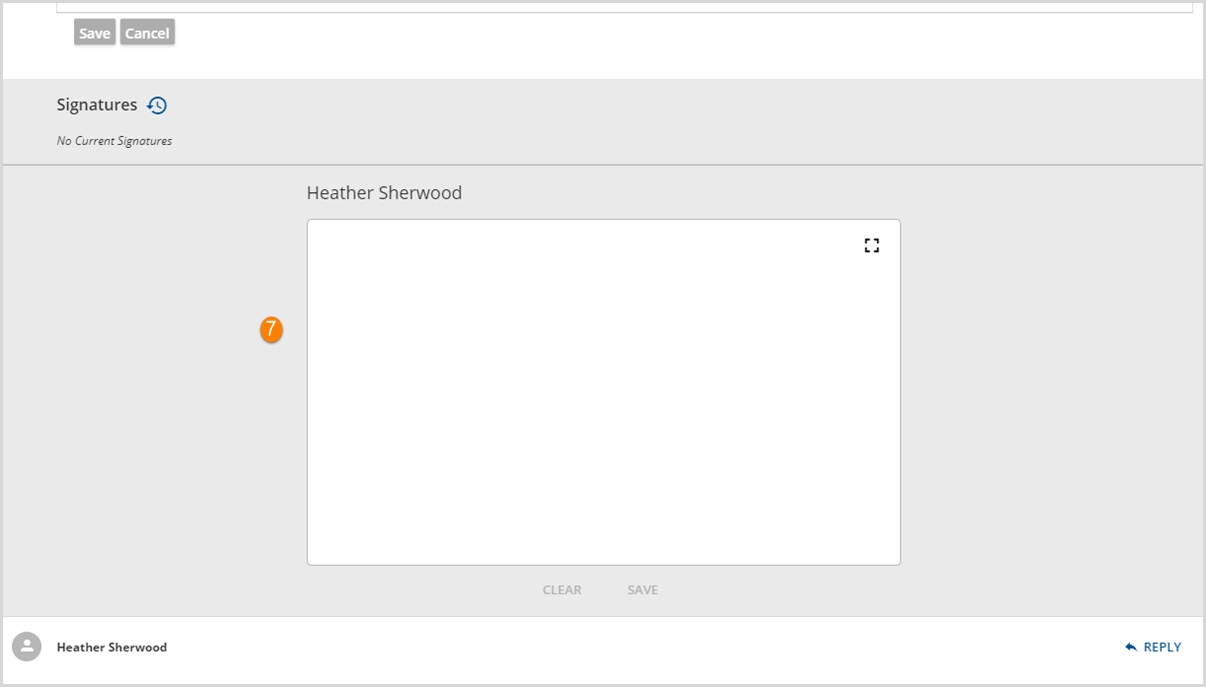
Form Signature Box

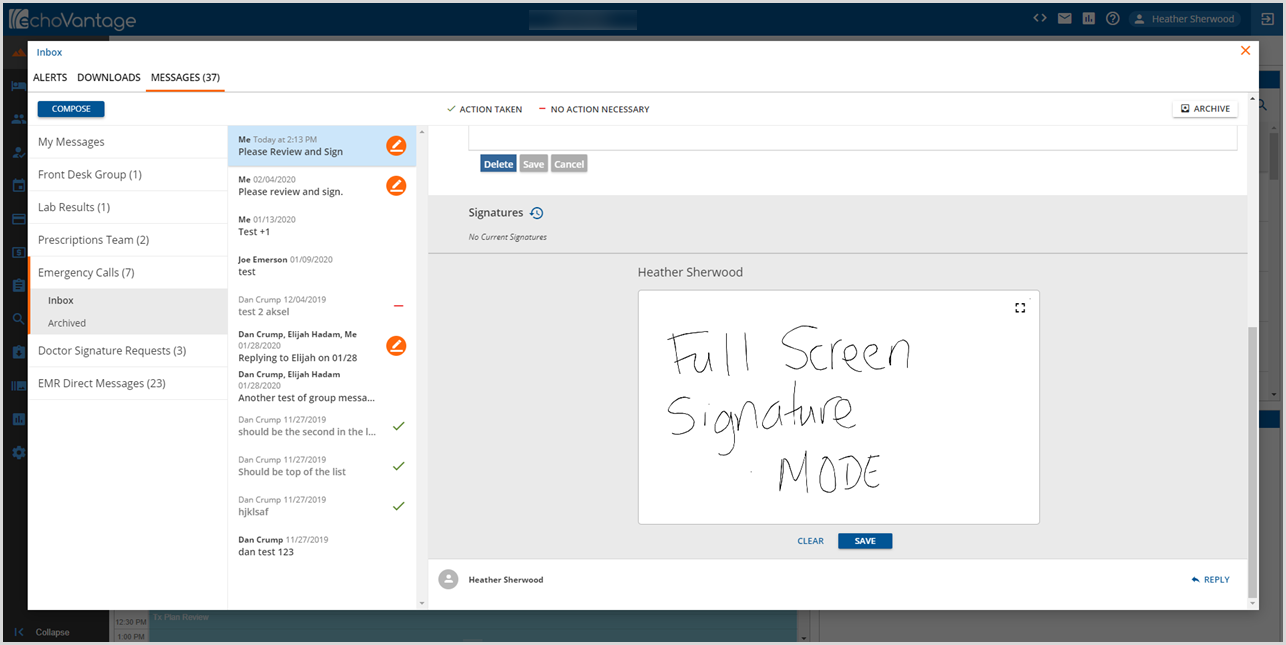
7. Signatures - When a signable form is sent with the Signature Requested, a Signature box is displayed at the bottom of the form. 

Signing Forms

With the release of version 3.09, a 4 to 6 digit PIN may be used to sign forms. This PIN may be configured in User Preferences, Click HERE for more information.

Signing Forms

The signature box functions just as it does on the Timeline or Progress Notes screens. Once signed, the blue SAVE button is enabled.

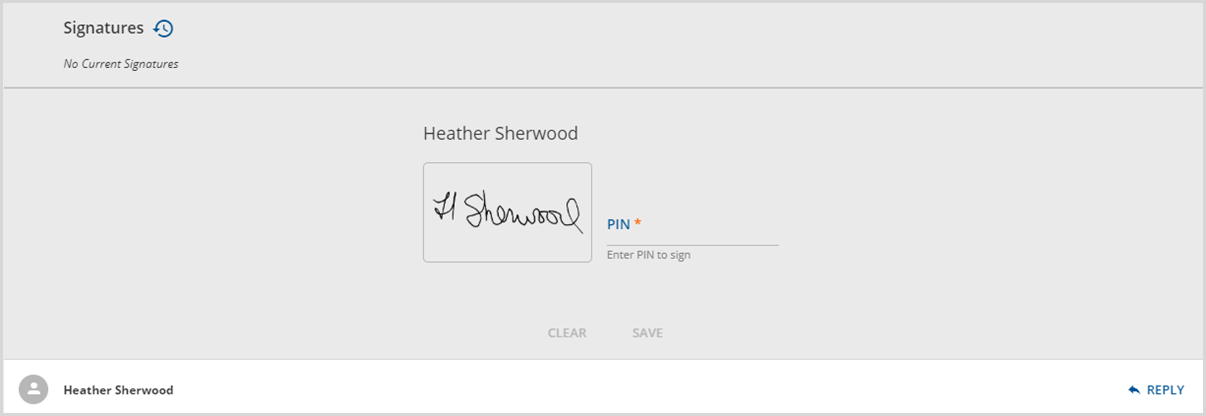
Signing with a PIN Signature

If using version 3.09+ and the PIN has been configured in User Preferences, the Signature Box will already display the signature and prompt for the 4 to 6 digit PIN to be entered.

Signing Locks the Form

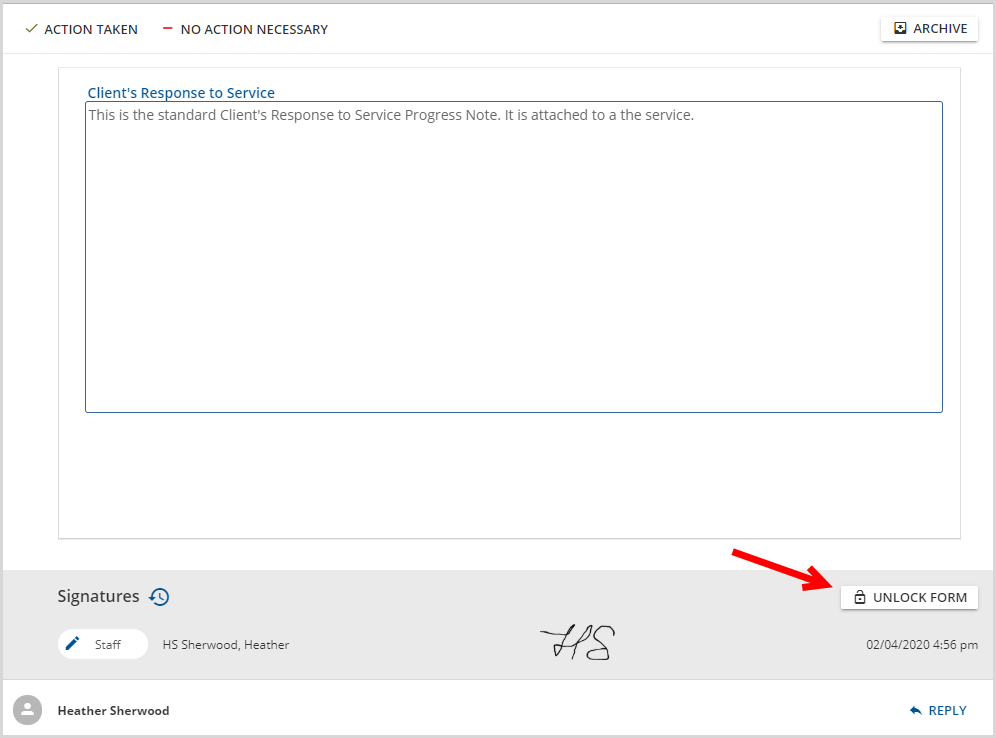
Saving the signature locks the forms. If the currently logged in user has the Unlock Form permission, the form can be unlocked, a reason given, and the signatures cleared making the form ready to be signed again.

A user with both View and Send permission to the group mailbox will have the option to REPLY when viewing a group message. This Reply will be visible to all members of the group mailbox but will not be seen by the original sender unless he/she is also a member of the group mailbox.

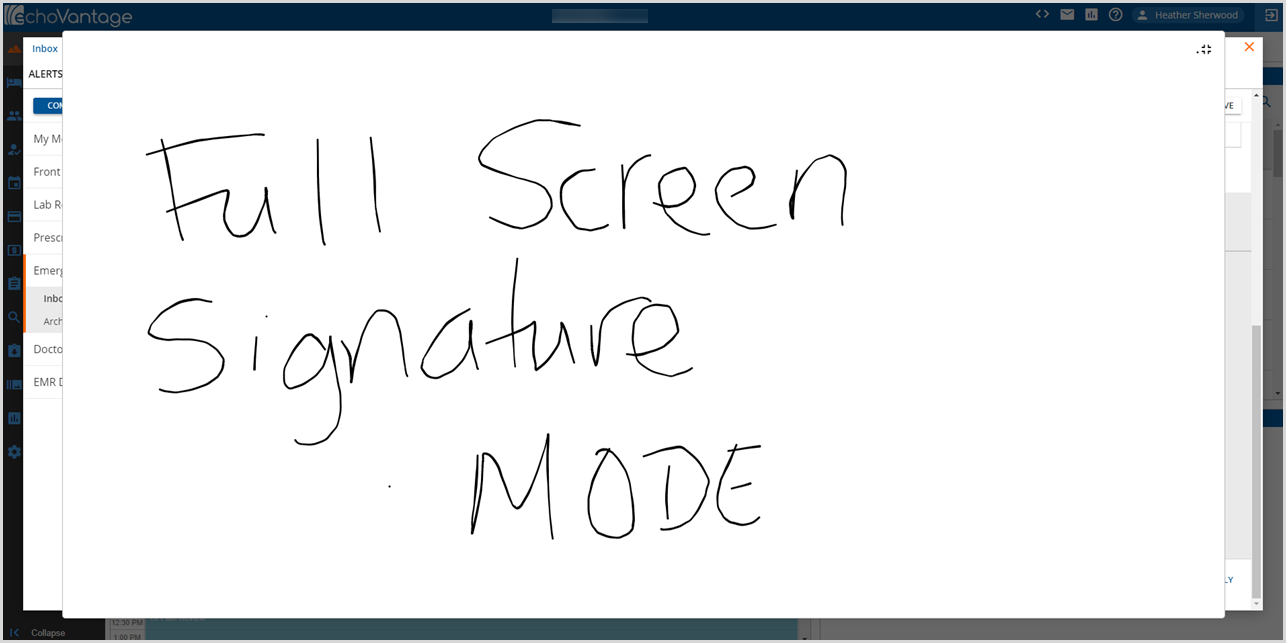
Expanding the Signature Box to Full Screen

With the release of version 3.12 the signature pad when collecting a non-PIN signature can be expanded to full screen. This is especially helpful when using a device with a smaller screen or a capture pad to collect the signature. 

Expand Signature Pad Icon

To expand the signature area, click on the expand icon as shown above.

Expanded Signature Pad

The signature pad expands and is much easier to sign on smaller devices.

Signature Pad Collapsed to Normal

When the signature is complete, tap the expand icon again to return the signature pad to normal size. 

Changed
Tue, 05/19/2020 - 08:31

EchoVantage v3.37

EV Release Notes Header

Version 3.37, Released May 19, 2022    ** Updated May 27, 2022**                                                                                           Previous Release Notes

v3.37-Hotfix 1 Release Notes

v3.37-Hotfix 2 Release Notes

New Features

Unmatched Payments

Unmatched payments is the term used by Echo for non-specific payer payments that do not have a matching charge but are specific to a client and date of service. These payments may be in error, possibly due to a billing mistake, and this feature allows the agency to account for the payment while keeping track of the associated client and service date until the details of how it will be handled are sorted.

The upgrade creates a new user-defined payment transaction definition, Unmatched Payment, with the value of NON in the UserTransactionDefinition column of the TransactionDefinitions table. Like custom denial types, your agency can create additional non-specific payer transaction definitions to further track these types of payments provided that the UserTransactionDefinition value is NON. Click HERE for more information on Remittance Transaction Types. 

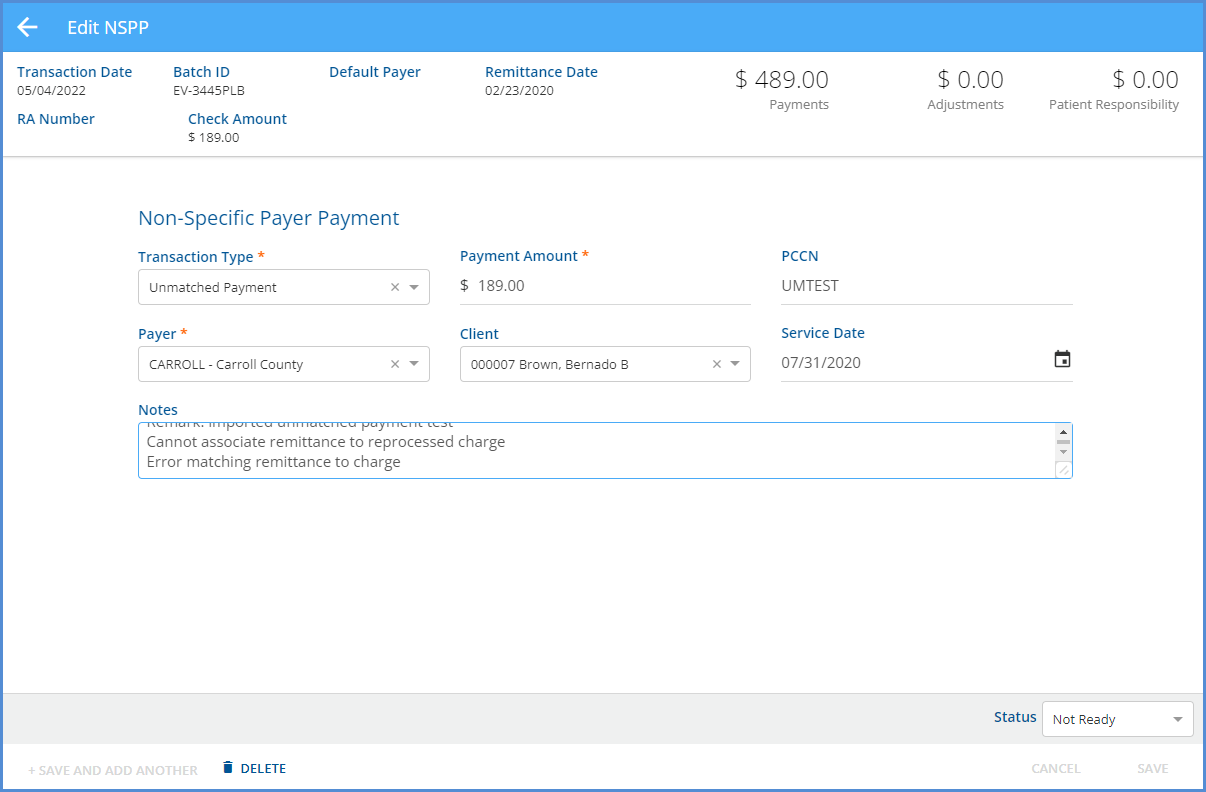
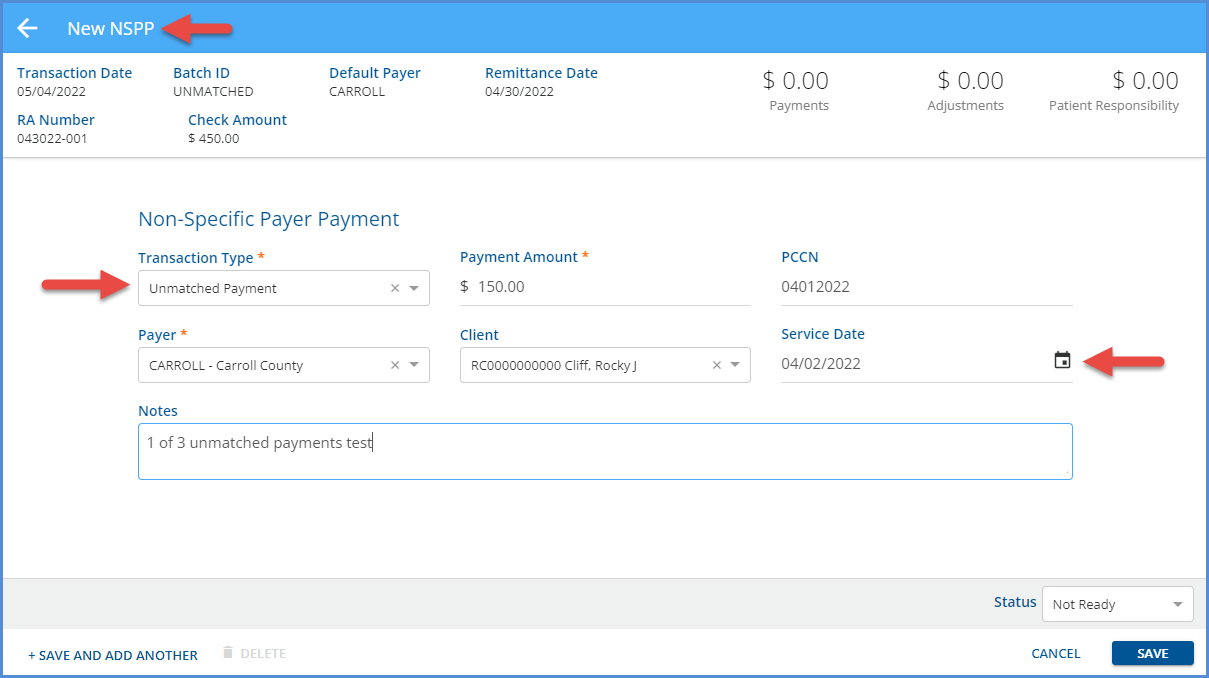
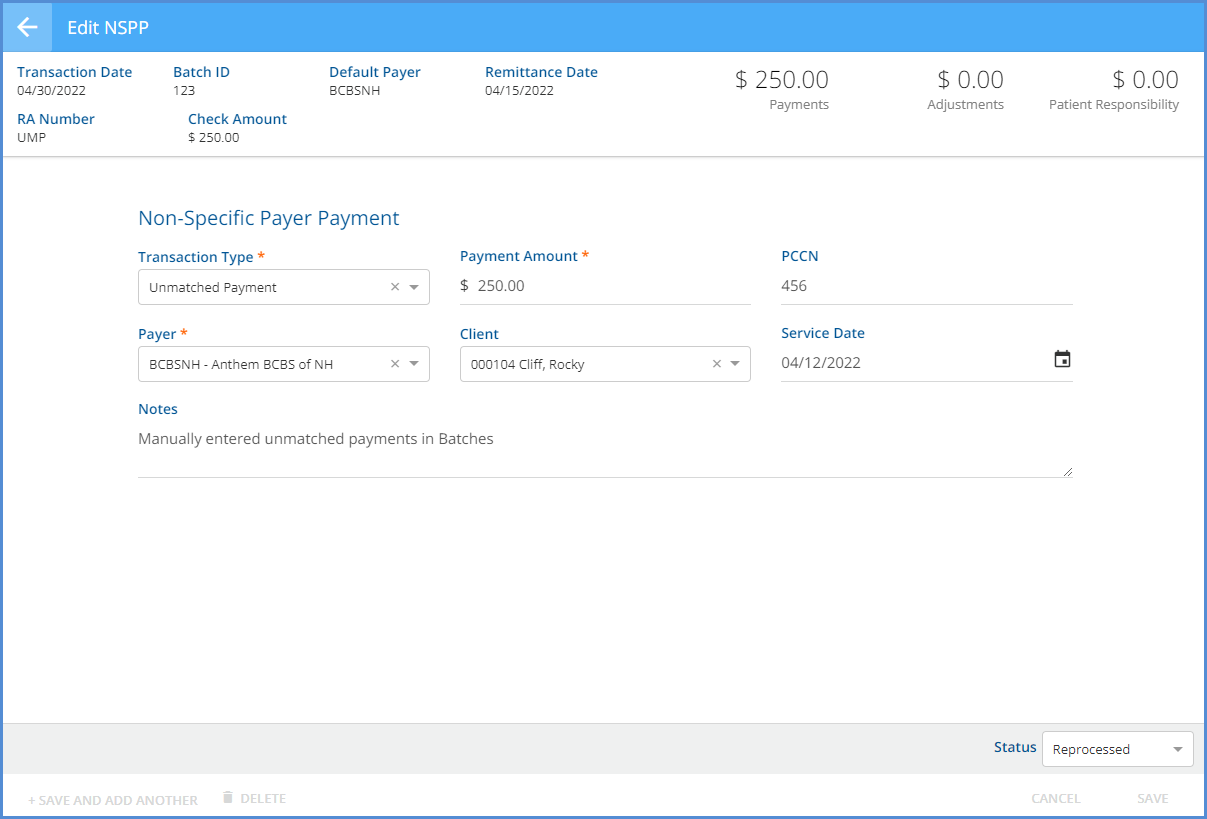
When importing a payment from an 835, an unmatched payment is created in Not Ready status when the payment is for a VOID charge (not a VOID REQUEST) and no new charge exists for the same client and date of service. The 835 may contain an Id837 from one of the void charges or a non-matching Id837. These Not Ready payments include Payment Amount, PCCN, Payer, Client, and Service Date, as shown below.

Imported Unmatched Payment

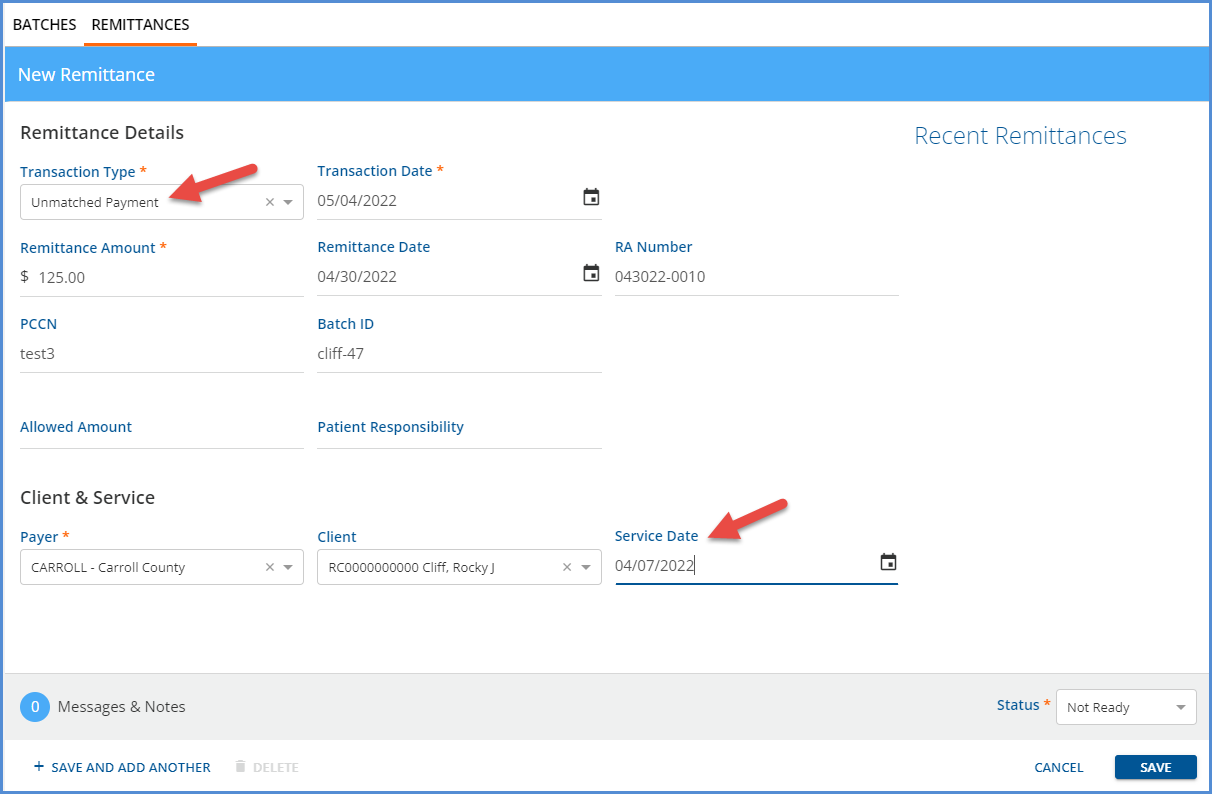
If manually entering an NSPP (Non-Specific Payer Payment) in Remittances > Batches or original Remittances, the new Unmatched Payment option is available in the Type drop-down list. When the transaction type is NON SPECIFIC PAYER PAYMENT or Unmatched Payment, the PCCN, Client, and Service Date can be recorded but no cards display to associate a charge.

Remittances > Batches

Unmatched Payment in Batches


Remittances > Remittances

Unmatched Payment in Legacy Remittances

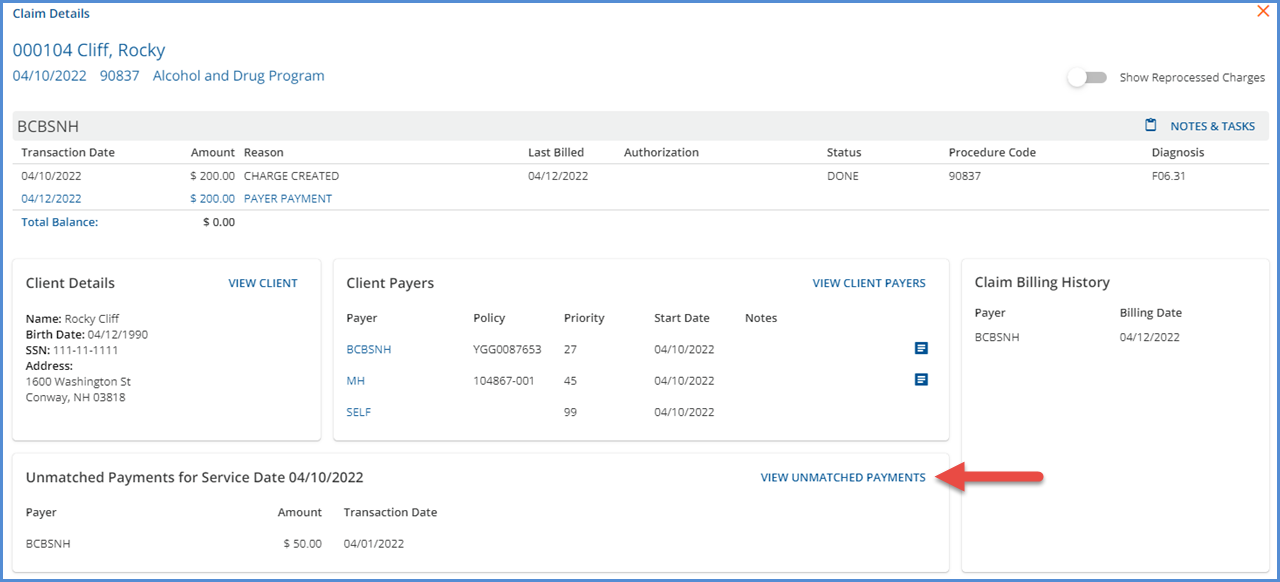
When an Unmatched Payment type Remittance is associated with a Client and Service Date AND finalized in a Fiscal Overview > Unprocessed Remittances > Process Transactions job, it is displayed in the Unmatched Payment section of the newly restyled Claim Details modal. The same unmatched payment displays for each claim that matches both the Client and Service Date.

Unmatched Payment in Claim Details

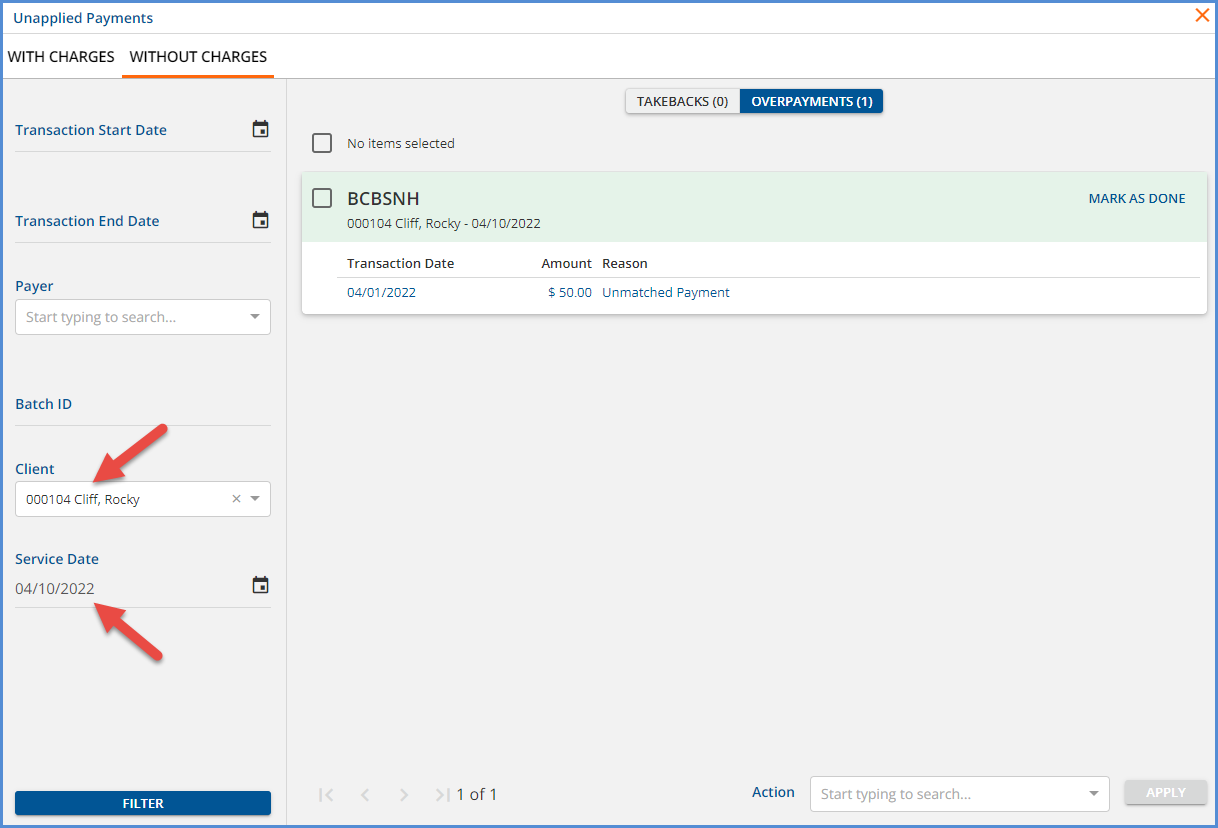
The payment becomes a Without Charges type of Unapplied Payment, as either an Overpayment or a Takeback, in Fiscal Overview > Unapplied Charges. Clicking on the blue VIEW UNMATCHED PAYMENTS button in Claim Details opens the Unapplied Payments > Without Charges > Takeback or Overpayment page with filters for the associated Client and Date of Service applied.

Unmatched Payment in Unapplied Charges

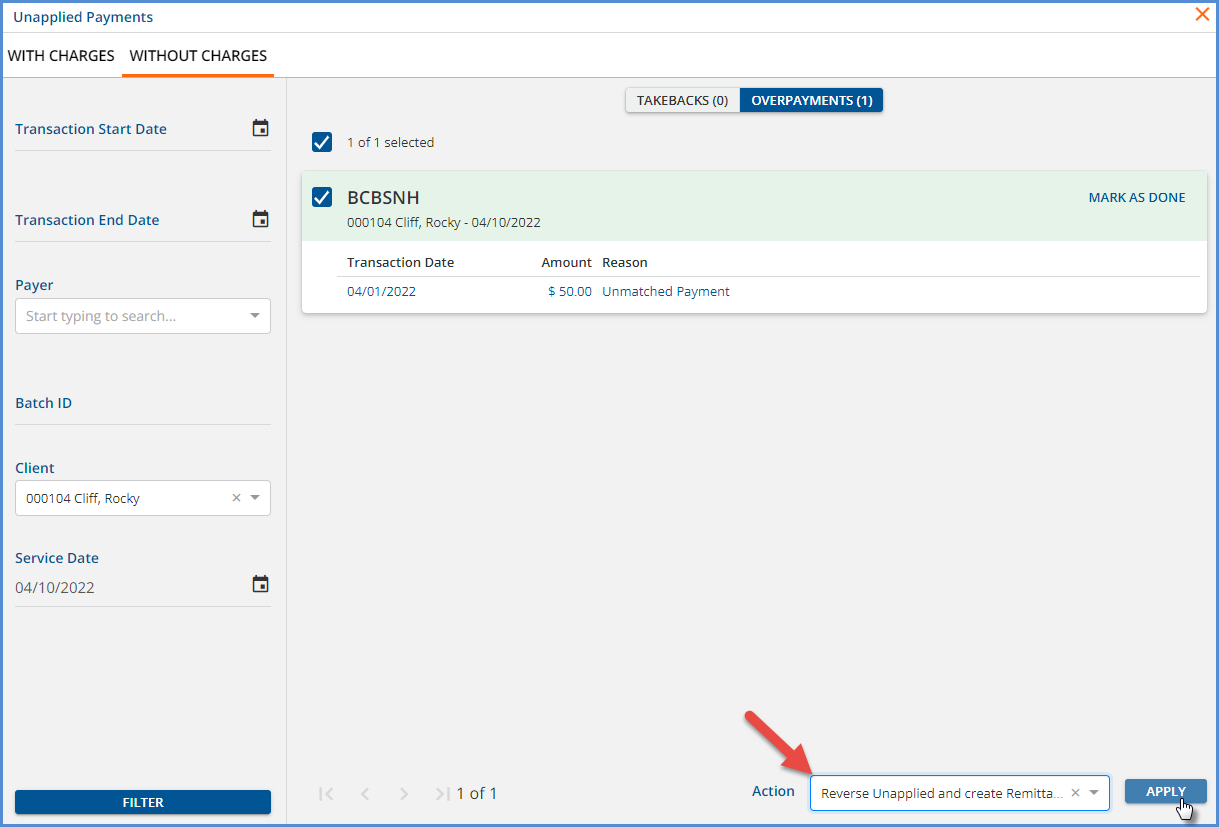
In Fiscal Overview > Unapplied Payments > Without Charges, the payment can be marked as DONE or REFUNDED just as before OR REVERSED which removes the payment from the Unapplied Default GL accounts.

Reverse Unapplied Payment

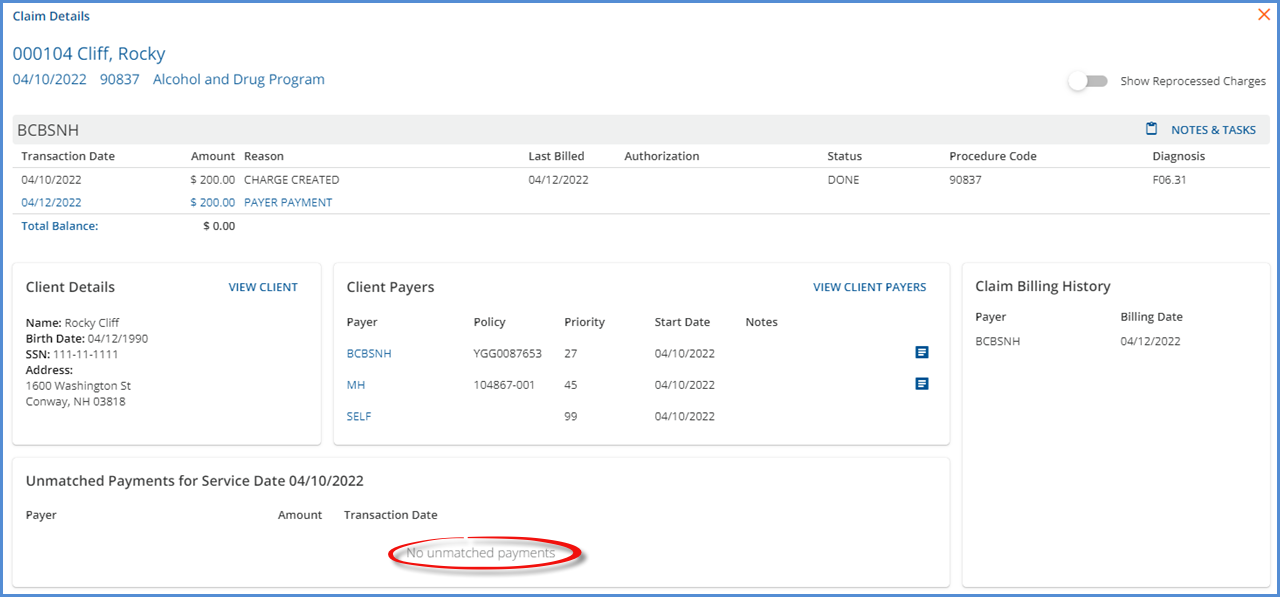
Reversing the unmatched payment clears it from the Unmatched Payments section of the Claim Details screen.

Unmatched Payment Cleared

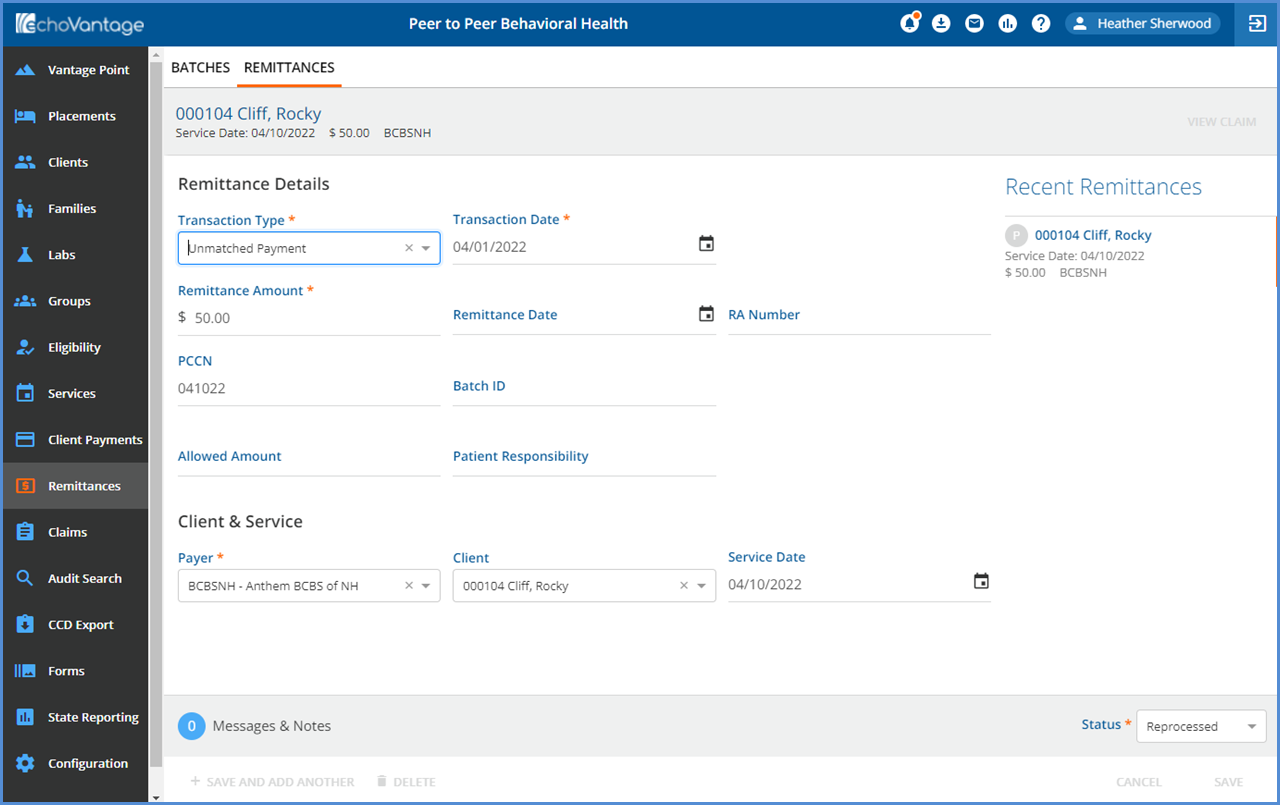
Reversing the unmatched payment also creates a copy remittance with a status of Reprocessed.

Copy Remittances

The following two sections document the workflow for using the Reprocessed remittance to create a Payer Payment.

Applying the Reversed Unmatched Payment in Remittances > (Legacy) Remittances

A second, separate copy remittance with a status of Reprocessed is created by the reversing action. If the original unmatched payment was entered via the legacy Remittances page, the copy remittance may be located by searching for remittances with a Status of Reprocessed for the associated Client and Service Date. Then select the reprocessed remittance to open the Edit Remittance screen.

Legacy Reprocessed Remittance
  1. Change the Status to Not Ready and select SAVE.

  2. Change the Transaction Type to Payer Payment.

  3. Then locate the appropriate Charge on the now visible cards, and select the radio button to associate the payment.

  4. Change the Status to Ready and select SAVE again or leave Not Ready if marking items in bulk.

The payment is now ready for the next Process Transactions job in Fiscal Overview > Unprocessed Remittances.

Applying the Reversed Unmatched Payment in Remittances > Batches

When the original Unmatched Payment is entered via Batches, the copy remittance is added to that same batch. If the associated batch information is not already known, locate the Reprocessed remittance in the legacy screen and select the row.

Batched Remittance Viewed in Legacy Screen

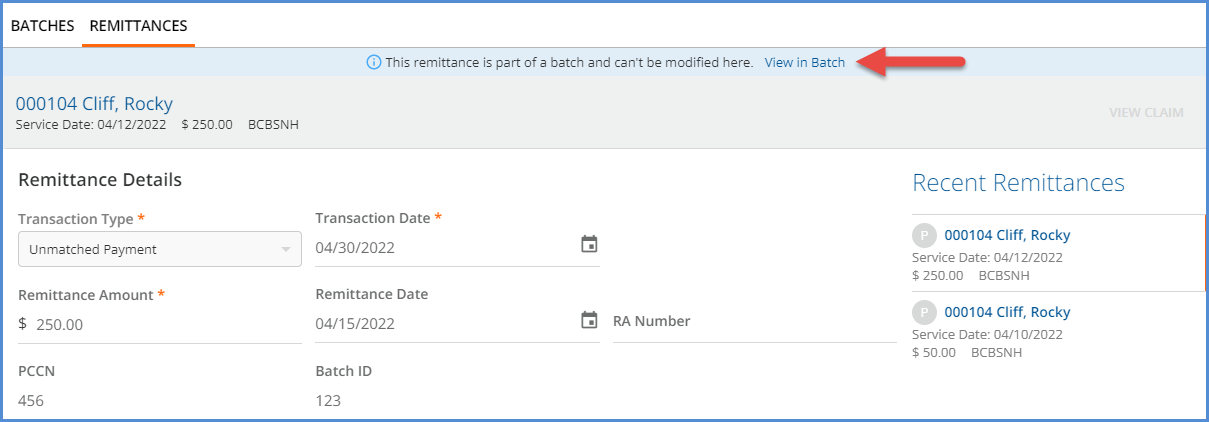
Then select the blue View in Batch button to view the selected reprocessed remittance in the batch. Note that batches do not display Done or Voided transactions so the original Unmatched Payment transaction does not show.

Reprocessed Remittance in Batches

1. The reprocessed (copy) remittance can remain untouched for now.

  • Batches use a separate form for NSPP type payments so the reprocessed remittance cannot be converted to a Payer Payment as on the legacy Remittances page.
  • The ability to delete a remittance with the Reprocessed status will be available with the release of v3.38.

2. Add a new row to the batch for a payer payment transaction type for the same amount as the original Unmatched Payment.

3. The newly added Payer Payment is now ready for the next Process Transactions job in Fiscal Overview > Unprocessed Remittances. The reprocessed remittance can be deleted in a future release.

Family Ability to Pay

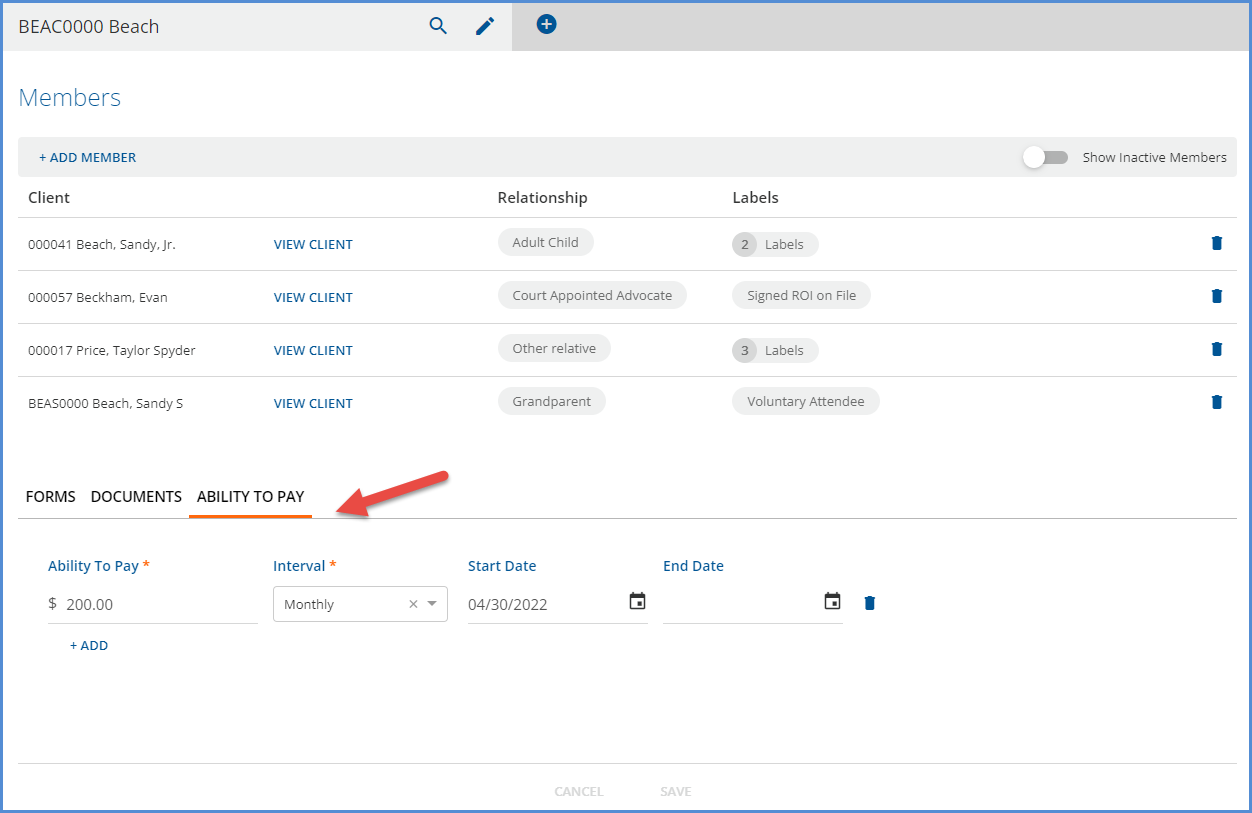
The new Family Ability to Pay feature allows the agency to define the maximum amount a family should pay, the interval to which this amount applies (monthly or yearly), and the active date range for the amount in the Families main menu option under ABILITY TO PAY.

Family Ability to Pay

In the Families > ABILITY TO PAY tab,

  • Multiple rows may be added as long as the active date range, defined by the Start and End Dates, does not overlap.

  • The rows are sorted by Start Date, descending.

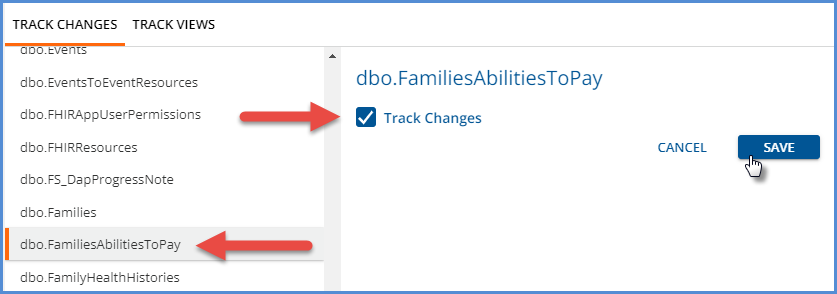
  • Audit views are available for this tab in Configuration > Setup > Audit.

    • Track Changes

      FATP Track Changes
    • Track Views

      FATP Track Views

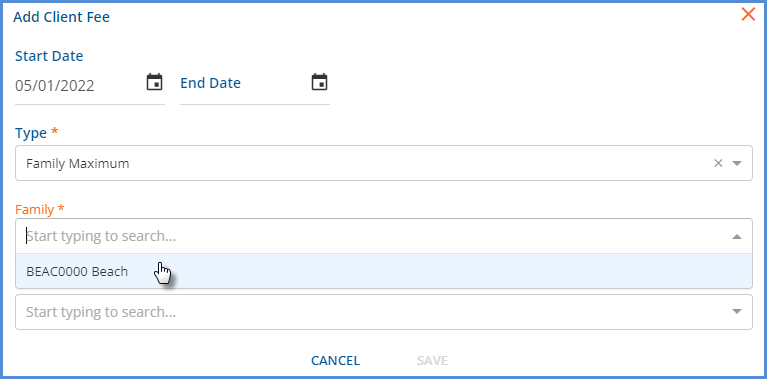
In addition, for a family member's charges to be included in the calculation, the Family Maximum Client Fee type must be configured in the Clients > Payers screen for the self-pay payer. A Defined Filter can be used to limit which Services/Charges count toward the maximum.

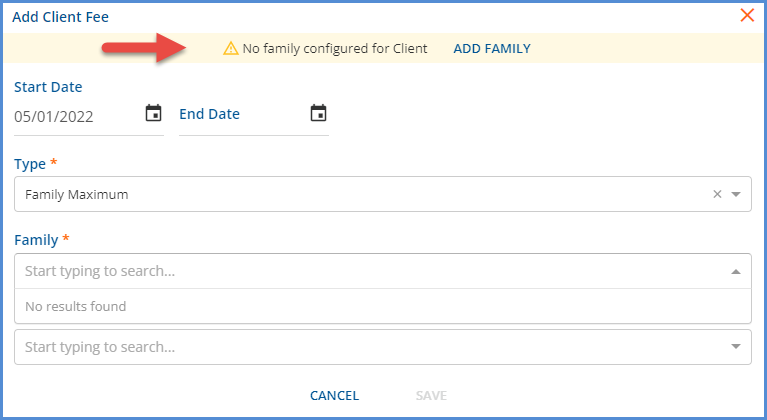
  • If Family Maximum is selected for the Client Fee Type, and the Client is NOT a member of a Family.

    • A No Family Configured for the Client warning banner displays.

    • No Family Configured for Client
    • The banner has an Add Family button that takes you to the client’s Family tab when selected.

  • If Family Maximum is selected for the Client Fee Type, and the Client IS a member of a Family,

    • A Family drop-down list is available, populated with the Families of which the Client is a member.

    • Add Family Maximum for Client with a Family
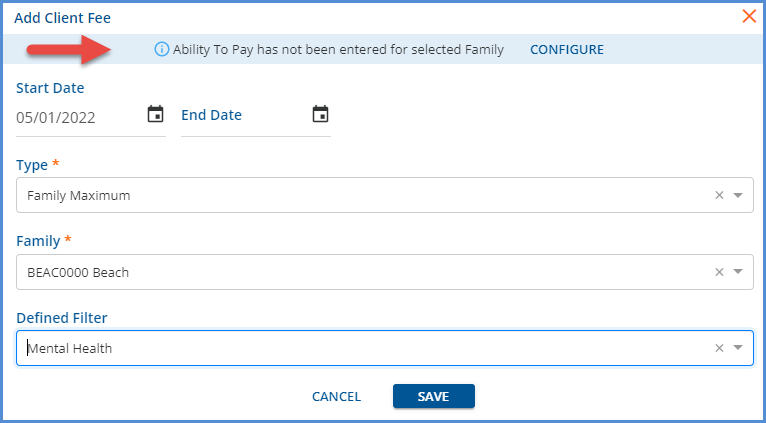
    • If the selected family does not have an Ability to Pay record configured, an Ability to Pay for this Family has not been Configured notice banner displays.

    • No Ability to Pay Configured for Selected Family
    • This info banner also has a CONFIGURE button that takes you to the selected Family with the Ability to Pay tab in focus.

  • Remember, once a Client Fee is configured for a Client, it can be end-dated but not deleted.

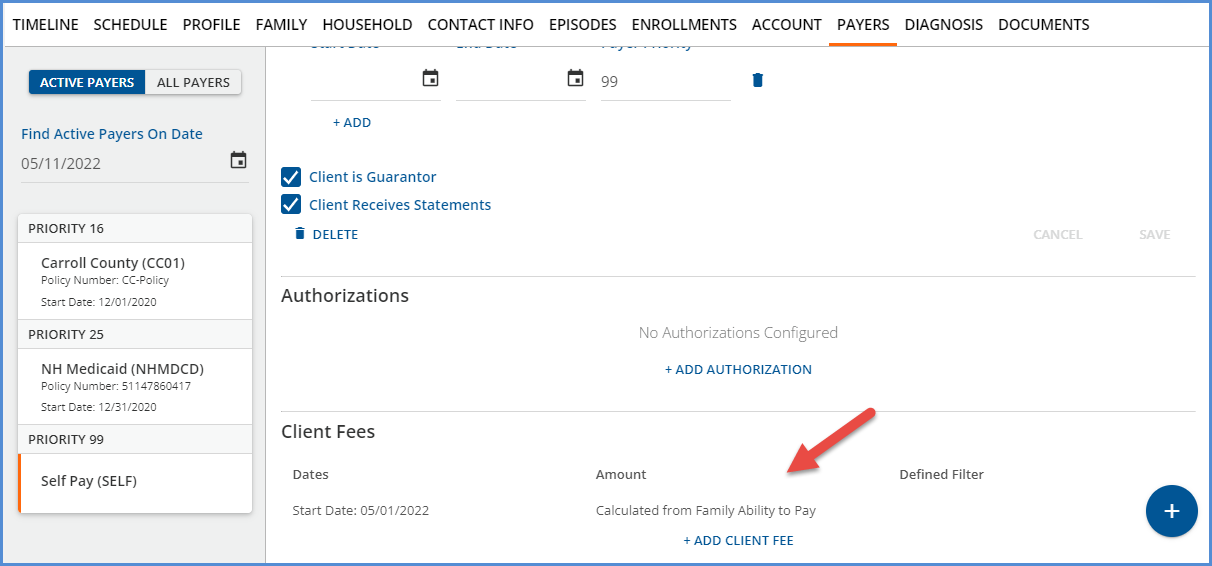
After the Add Client Fee entry is saved for a Family Maximum fee Type, a row displays in the Client Fees section of the self-pay Payer. The following text displays in the Amount field in place of a dollar value -Calculated from Family Ability to Pay.

Family Maximum Client Fee Type
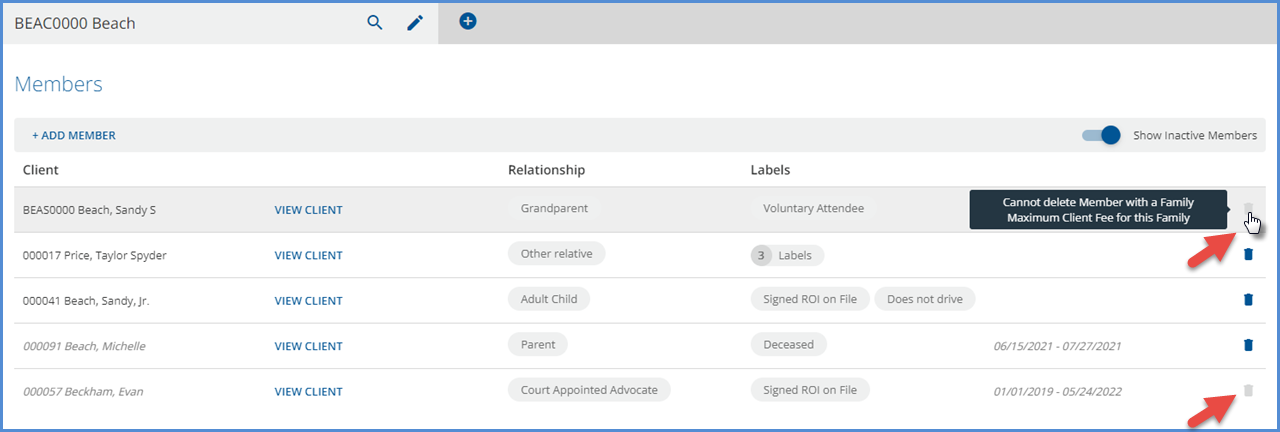
  • Use care when assigning the Family Maximum Client Fee Type, as the delete icon is disabled for Family Members with this fee type assigned.

Family Member Delete Disabled
  • Hovering over the disabled icon displays the following message ‘Cannot delete Member with a Family Maximum Client Fee for this Family’.

  • In place of deleting, a Family Member can be hidden from the list of Clients if they are made inactive.

    • Select the Client row to open the Edit Family Member screen.

    • Enter a value for the End Date.

    • Slide the Show Inactive Members toggle to the left to hide the end-dated Clients.

Hide Inactive Family Members
  • When these two pieces of information are configured, the create charges process takes into account the value of existing self-pay charges, including the current charge and the defined filter if any, for the family members, and writes off any balance that exceeds the family’s Ability to Pay amount.

  • The job processor, oak, throws an error if

    • The Client is configured with a Family Maximum but is not a member of a Family.

    • Or the Client is a member of a Family but the defined Ability to Pay amount for that Family is not active as of the Service Date being processed.

FATP Important Message

Improvements

Excluding Self-Pay Charges When Setting Status to Working

The process for halting the waterfall and setting a charge status to Working was updated to exclude all self-pay charges, as these charges do not waterfall and are always held open until the final payment or adjustment is made. This change also updates any self-pay charge status to Active if it currently has a Working status since the Rebill action in Claims Management does not apply to self-pay charges. The Minimum Days Elapsed setting in Configuration > Services/Payers > Self-Pay Payer > Billing Methods determines the frequency for which client statements are available to print, controlling how often a self-pay balance is billed.

Preventing the Individual Reprocessing of Previously Bundled Services

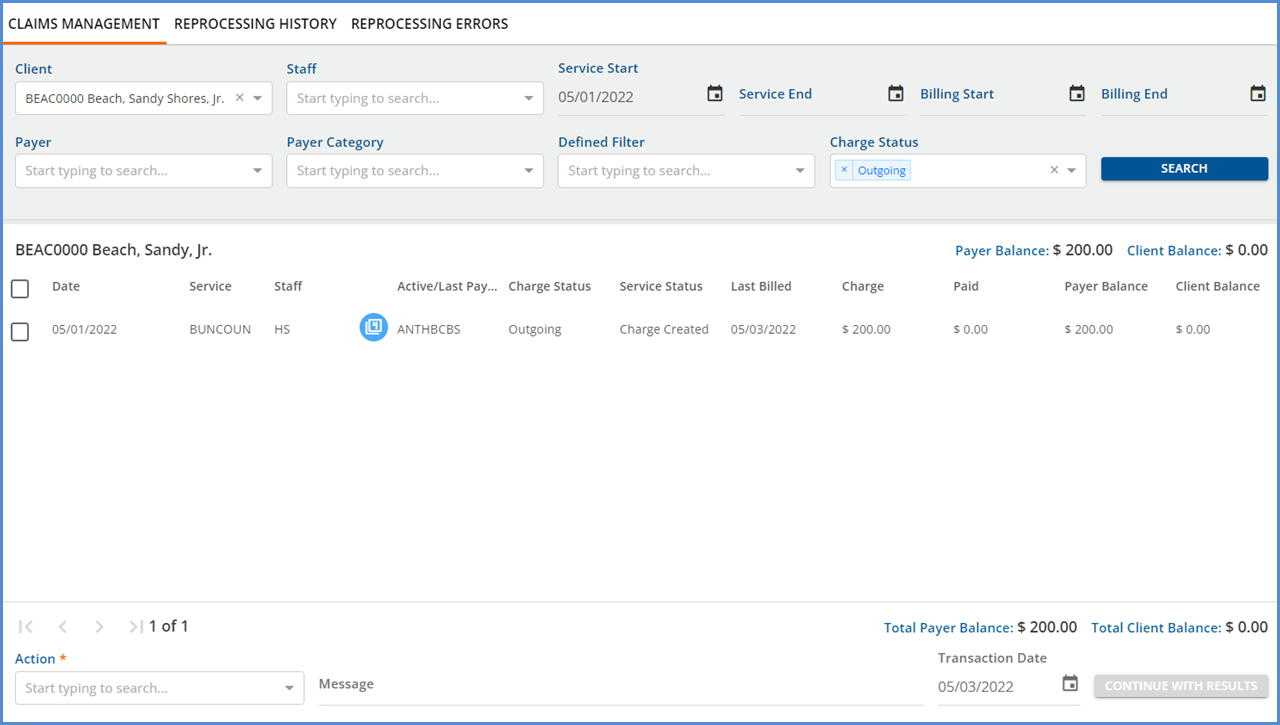
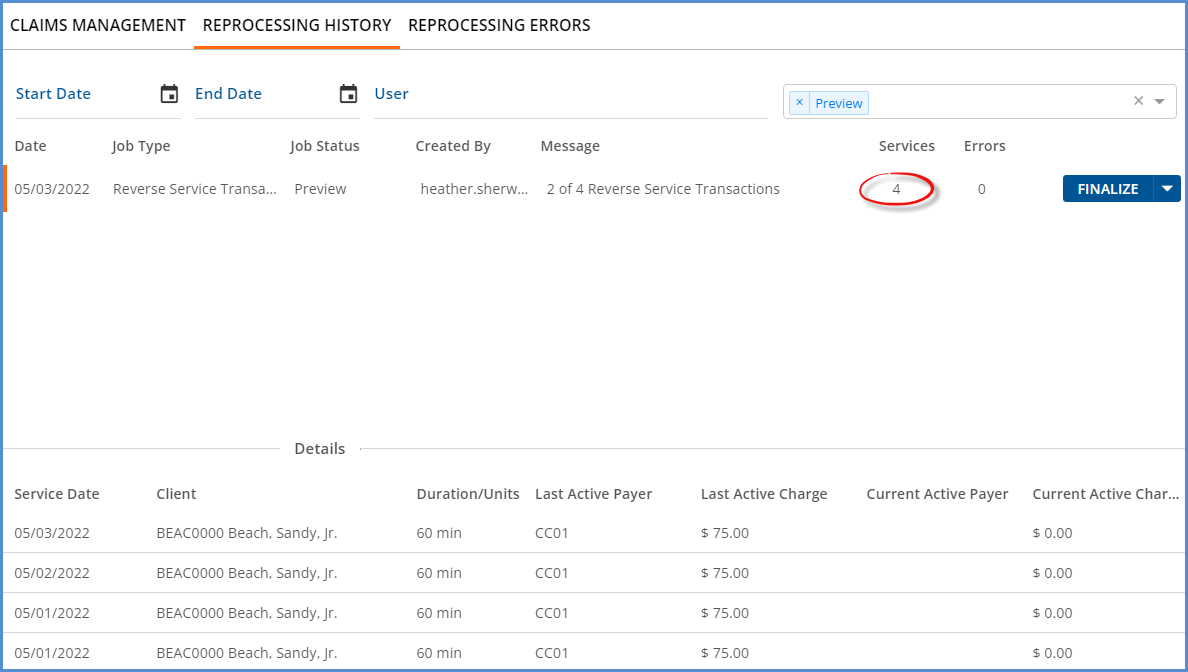
An additional check was added to determine if selected service(s) were part of a bundle for a prior Payer when attempting to Reverse Service Transactions or Reprocess All Payers in the Claims menu. If any of the selected services were part of a bundle, but all the services associated with that bundle are not included in the reprocessing job, an additional message now displays in a secondary modal after confirming the reversing or reprocessing job. The example below details how this additional check works.

A Client has Payer 1 (ANTHBCBS) which accepts bundling and Payer 2 (CC01) which does NOT accept bundling. The Client receives four services that are billed in a monthly bundle to Payer 1 on May 3, 2022.

Bundle Billed to Payer 1

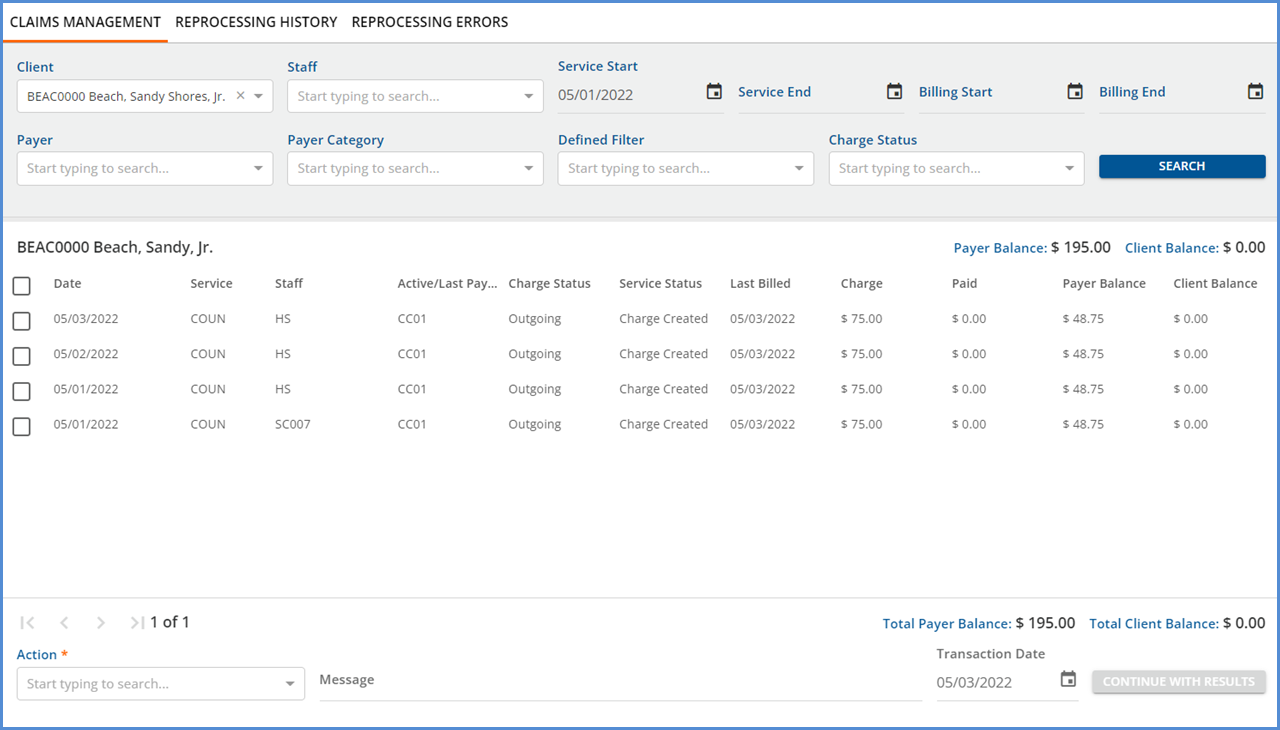
Payer 1 responds with a partial payment of $75.00. When the remittance transaction is processed and finalized, the remaining balance waterfalls to Payer 2. Once the waterfall Create Charges job is finalized, the services are “unbundled” and charges for Payer 2 are created for each of the services.

Unbundled Waterfall Charges

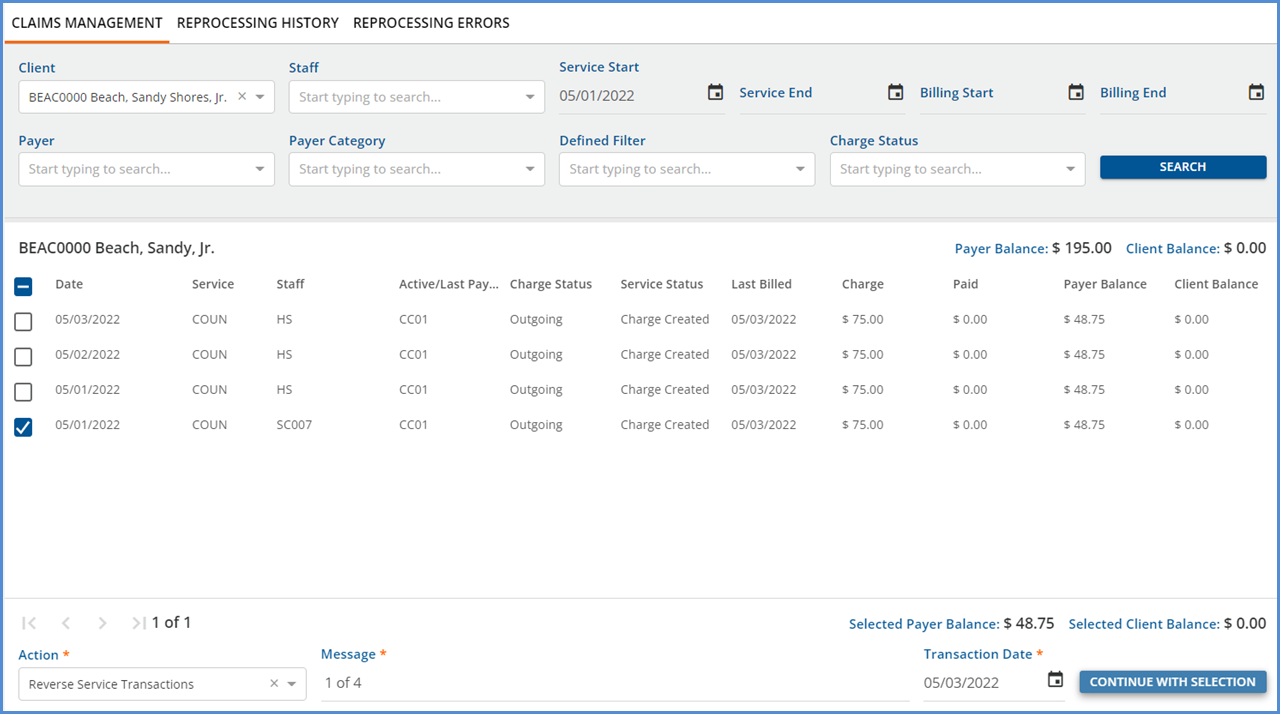
As shown in the image above, there is no indication that these four services were previously bundled. Now suppose that just one of the four services is selected for a Reverse Service Transactions (or Reprocess All Payers) job as shown below.

Reverse to Service Transactions Job

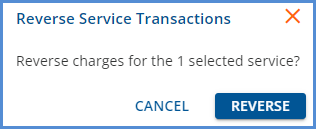
After the CONTINUE WITH SELECTION button is selected, a Reverse Service Transactions job modal displays.

Reverse Service Transactions Confirmation

The additional check is performed after the REVERSE button is selected. Since the selected service in the job above was previously part of a bundle, the check finds the other three services that were not included in the job and displays this information in a second, separate Extra Services modal.

Extra Services Modal

The message indicates that Some of the selected Services have been or are currently bundled. In order to reverse, an additional 3 Service(s) will be reversed. Click CONTINUE to proceed with the reversing /reprocessing job or select CANCEL to return to the Claims menu without making any changes. If CONTINUE is selected, all four services show in the reversing job on the Claims > History tab.

Reversed Services in Reprocessing History

Additional Report Date for Service Bundling Options

In Configuration > Services/Payers > Service Definitions, two new Report Date for Service options are available for bundled Service Definitions that have a Frequency of Monthly or Weekly which allow a date range to be reported when the following Billing Methods are used.

  • 837P (Loop 2400 DTP*472)

  • 837I (Loop 2300 DTP*434, Loop 2400 DTP*472)

  • CMS1500

  • UB04

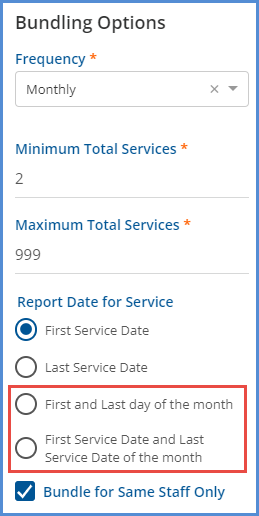
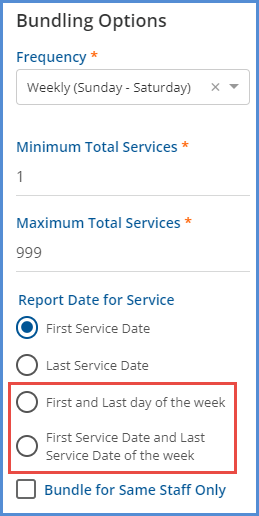
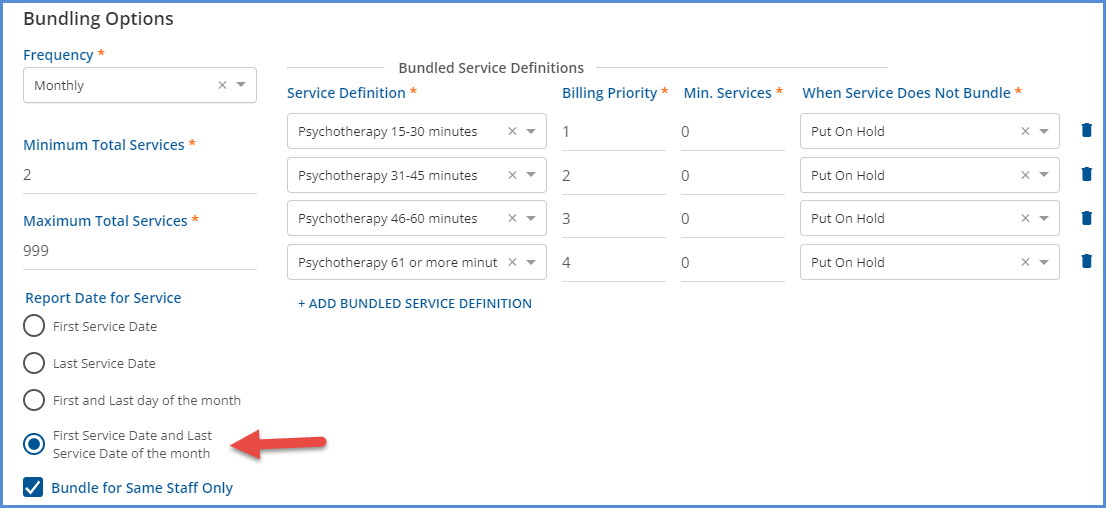
These new options are: First and Last day of the month (week), and First Service Date and Last Service Date of the month (week).

Monthly

Weekly


Monthly Bundling Options


Weekly Bundling Options

For example, suppose a Client receives the following Services for the month of April.

Services for Monthly Bundle Example

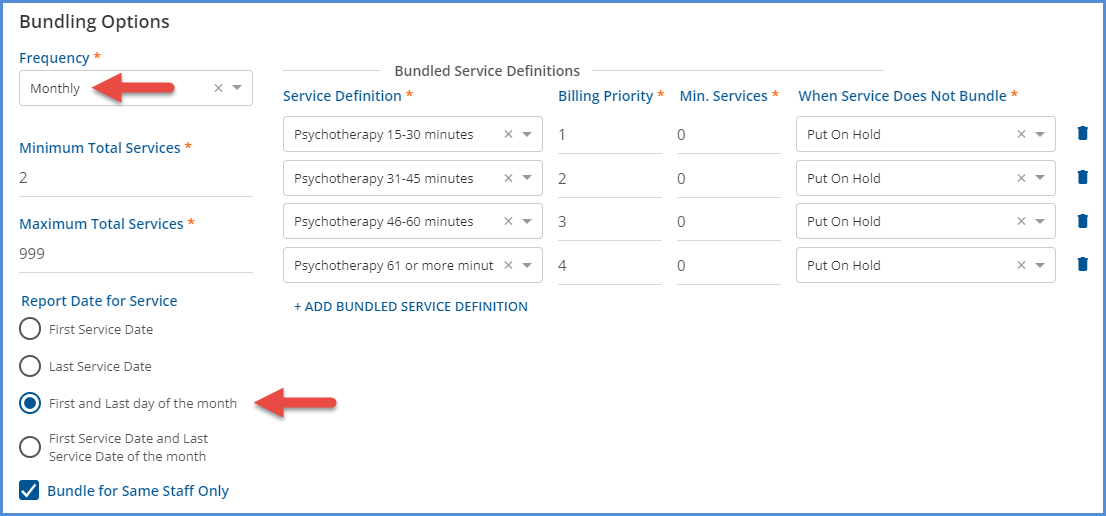
These services meet the bundling requirements of the following Service Definition that has a Monthly Frequency and the First and Last day of the month for the Report Date for Service option.

Monthly Bundled Service Definition

When a bill is created for the bundled charge, the date range reported is 04/01/2022 - 04/30/2022. Excerpts of the date segments from the 837P and 837I bills are shown below.

837P

[L.2000C!L.2300!L.2400]DTP*472*RD8*20220401-20220430

837I

[L.2000C!L.2300]DTP*434*RD8*20220401-20220430

[L.2000C!L.2300!L.2400]DTP*472*RD8*20220401-20220430

Now suppose that the Service Definition was updated to use the First Service Date and Last Service Date of the month option for this same monthly bundle.

Updated Monthly Service Definition

If the same Client and Services are billed, the date range now reported is 04/03/2022 to 04/25/2022.

837P

[L.2000C!L.2300!L.2400]DTP*472*RD8*20220403-20220425

837I

[L.2000C!L.2300]DTP*434*RD8*20220403-20220425

[L.2000C!L.2300!L.2400]DTP*472*RD8*20220403-20220425

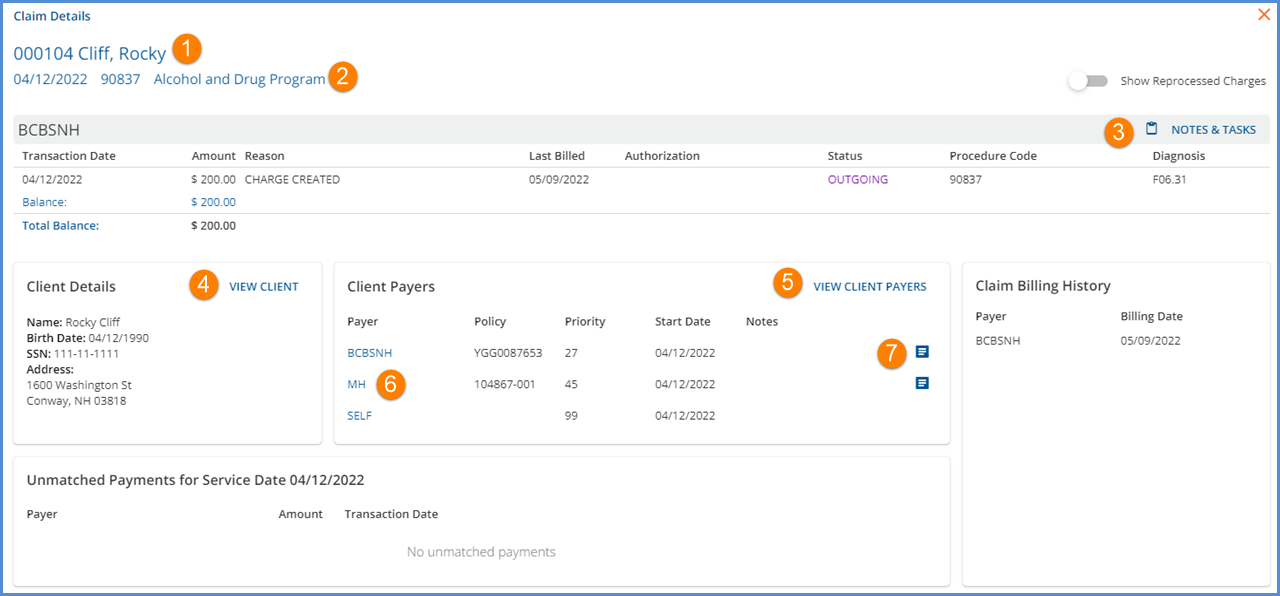
Restyled Claim Details Modal

In addition to adding the Unmatched Payment section, the Claim Details modal was restyled and includes additional links for quick access to other parts of the application. The updated modal and links are listed below.

Restyled Claim Details Modal
  1. The Client Code and Name is a clickable link to the Clients main menu option. The user is taken to the first tab to which they have access.

  2. The date of Service, billing code, and Service Name information are listed just below the Client Code and Name and link directly to the associated Service.

  3. Click the NOTES & TASKS button to access the related Claim note and task information.

  4. A VIEW CLIENT button was added. Selecting this brings the user to the first Client tab to which they have access.

  5. A VIEW CLIENT PAYERS button was added. Selecting this brings the user to the Payers page of the Client in focus with the highest priority Payer in focus.

  6. Links to specific Client Payers were added. Selecting a Payer’s name brings the user to that specific Client Payer in the Clients menu.

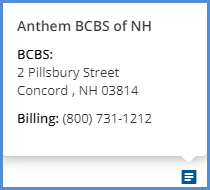
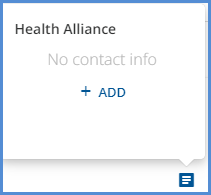
  7. Use the new blue note icon to view that specific Payer’s address and phone number information as found in Configuration > Services/Payers > Payers > Communication.

  • If the Payer’s Communication tab has information, the most recent, active address and telephone information is displayed.
  • View Payer Contact Information
  • If the Payer’s Communication tab is not populated, a blue +ADD button is available to optionally enter the missing information.
  • Add Payer Contact Information

Payment Field Validation Increased in Remittances

The Payment field validation in Remittances > Batches > View Batch > Add/Edit Row and Remittances > Remittances > New/Edit Remittance were updated to allow amounts up to 999,999,999.99 before triggering an error. This new validation amount is consistent with the maximum allowed while importing the payment amount in the SVC segment of the 835-file.

Before

After


Remittances Payment with Incorrect Validation


Remittances Payment with Correct Validation

Reports

The following Fiscal Reports were updated.


Cash Receipts Journal - This report was displaying an incorrect received amount, particularly when a Client Payment was applied to multiple charges. The query was updated and the received amount now displays correctly.

_Cash Receipts Journal For Export - The same updates were applied to this csv friendly version of the report above.


Updates

Ticket Number

Description

EV-1428

An issue was found when working on a smaller screen (laptop) where the Payer drop-down in the Remittances > Batches > View Batch > Add/Edit Row screen opened behind the Client drop-down. This behavior made it difficult to scroll the Payer list and make a selection. The issue was addressed and now the Payer drop-down list is scrollable and making a selection is not impeded regardless of screen size.

EV-1599

In the Members section of the Families main menu option, the method used to display the information in the Labels column was updated. Now multiple labels are always visible when there is sufficient space for the full label text to display. When there is not sufficient space, the labels are collapsed into a chip showing the count of the labels. Clicking on the chip displays the list of labels in a popover.

Families Labels Chip

EV-3498

Validation was added to prevent the entry of alpha characters in the Minimum Minutes and Maximum Minutes Service Duration fields when copying a Charge Calculation in Configuration > Services/Payers > Service Definitions or Payers > Rates. The field does not accept the entry of non-numeric values and remains blank.

EV-3499

On the Create User screen in Configuration > Staff/Users > Supplemental Users, the Email Address field is now validated for a valid email address format and a maximum length of 50 characters. The following error displays until the email address is properly formatted - The email format is invalid. Text entry is prohibited after the maximum characters are entered.

EV-3519

The REQUEST VOID button and associated help icon are now hidden from view for all self-pay/client payments.

EV-3560

Updates were made to how the Payer and Client addresses are chosen when CMS-1500 or UB-04 bills are created.

  • The most recent active payer address is reported on the CMS-1500.

  • The client address where Billing = 'Y' is reported for all claims on both the CMS-1500 and UB-04.

  • The most recent active client phone number is reported for all claims on the CMS-1500.

EV-3575

The void status, if requested or sent, is now visible for unapplied payments in the Claim Details screen.

  • “Unapplied” Unapplied Payment 

"Unapplied" Unapplied Payment


  • Void Requested Unapplied Payment

Void Requested Unapplied Payment


  • Void Sent Unapplied Payment

Void Sent Unapplied Payment

EV-3634

Updates were made to the grid displayed on the Eligibilty > Requests screen to prevent the table from being misaligned due to a long Rejection Reason. Now when the rejection reason exceeds 30 characters, the message is truncated and an ellipsis (three dots) displays, allowing the grid to stay aligned. Hover the cursor over the reason to display the full message in a box view.

  • After Update

Eligibility Grid After Update
  • Before Update

Eligibility Grid Before Update

Bug Fixes

Ticket Number

Case Number

Description

EV-3497


An issue was found where the message field blue line overlapped the recipient drop-down list values when composing a message for a form. The issue was addressed and there is no longer a line through the drop-down list values.

EV-3582


The 270 download toast was updated to say File will be available in Downloads when the job completes. Previously the toast directed users to the Downloads tab of the Message Center.

EV-3630


The item count on the Select All checkbox was updated in the Unapplied Payments > Without Charges section to only include the count of items for the currently selected tab, either Takeback or Overpayment. Previously the Select All count combined the values from both tabs.

EV-3679

12410

12683

An issue was reported where the Message notification dot would sometimes require a refresh, or logging out and back into the application, before displaying. The cause was due to not reconnecting to the push notification service, beech after it was restarted before the retry interval expired. The issue was addressed by increasing the interval for the retry attempts.

EV-3717


An issue was found where marking an item in Unapplied Payments as Refunded resulted in two jobs in the database and two toast messages - one successful and one failed. The query was updated and now marking an Unapplied Payment item as Refunded only results in one job.

EV-3728

12473

An issue was reported where alerts could fail to load and the manual refresh remained disabled when multiple alerts were opened in separate tabs. While researching it was discovered that the failures were due to expensive custom alert queries. While custom queries are outside the control of the application, the alerts fetching process was updated so that if a failure occurs, the manual refresh button is enabled and can be used to update the list.

EV-3782


An issue was reported where the POS Mappings in Configuration > Services/Payers persisted across Payers when moving from a Payer that had mappings to one that did not. The issue was addressed by ensuring the POS Mappings page refreshes before being displayed for the newly selected Payer.

EV-3783


An issue was reported where Batches that contained a Non-Specific Payer Payments or Unmatched Payments could not be marked as READY from the Batches screen, even though all transactions within the batch could successfully be marked READY from the View Batch or Edit Row screens. The issue was addressed and now marking Remittances as READY is successfully for batches that contain NSPPs or Unmatched Payments.

EV-3792

11908

12938

An issue was reported where the recurring time slot on a staff’s schedule in Configuration > Staff/Users > Staff Schedules could not be completely cleared - SAVE was disabled if more than four days were cleared. This issue was addressed with the following updates.

  • If a recurring schedule is already set, all days can be removed and the SAVE button is enabled.

  • If a Staff member is scheduled on weekdays during the next month and Set Schedule is selected for that staff with valid Start and End dates for the second week of the next month, then the SAVE button is enabled. When SAVE is selected, the modal closes, and the schedule is cleared for the date range (Start and End dates) entered.
     

EV-3829


An issue was reported where the toggle between Locations and Defined Filters was not functioning in Configuration > Services/Payers > Payers > POS Mappings when no mappings exist. The issue was corrected and now the toggle works whether mappings are or are not present.

EV-3883 13179

An issue was reported where client Copay Charges were not calculated correctly when the Client had a single commercial payer and the self-pay payer. The issue was addressed and now the balance of the self-pay charge is equal to the defined copay in Clients > Payers when there are no other commercial Payers.

Changed
Fri, 06/17/2022 - 10:33

EchoVantage v3.28

EV Release Notes Header


Version 3.28, Released August 31, 2021                                                                                                                                     Previous Release Notes

A hotfix for version 3.28 was released on 9/3/2021, click HERE for more information.

New Features

Introducing Batches

A new feature in the Remittances main menu, Batches, streamlines and reorganizes the payment entry and reconciliation processes. In EchoVantage, a Batch is like a check, whether paper or electronic funds transfer and the new Batches screen lists summary information for each of these "checks." The new Batches feature is turned on by default in version 3.28, and access to the original Remittances screens remains after upgrading. The original screens retain their existing functionality with one important difference - the 835 import is only via Batches unless this new feature is disabled. The following sections cover the new Batches feature in detail.

Batches in Remittances

The grid on the Batches screen is populated as batches are created. Not Ready Batches are grouped and listed first, sorted by Transaction Date, newest to oldest. A Not Ready batch is when any of the associated remittances within the Batch have a Not Ready status. The remaining batches are sorted by Transaction Date, newest to oldest. Due to the sort criteria, new batches that do not have a payment associated with them yet are displayed in the second grouping.

  • Click on the blue plus "+" to manually add a batch. This opens the New Batch screen.
  • New Batch Screen
  • After saving, the View Batch screen for the new batch is displayed.
  • Hover the mouse over the blue plus "+" to display the orange Import 835 icon.
  • Select Import 835 to select the file and display the familiar Import 835 popup screen.
  • Import 835
  • The 835 Import process automatically creates a batch using the value from the TRN02 segment as the Batch ID.
  • RA Number is not populated by the import process but can be added after the import is complete.
  • Just like the original Remittances screen, the 835 import chip in the upper right-hand corner indicates the import status; selecting this chip displays a list of recent imports.

While the sort order helps keep the Not Ready batches at the top of the grid, filters are provided to make searching and finding a specific batch fast and easy. Use any combination of filters to help drill down the results listed in the grid.

Batch Filters

If the batch summary information needs updating, use the blue pencil icon on the far-right of a batch row to edit that Batch's summary information. The Edit Batch screen opens and requires the same two fields, Transaction Date and Check Amount, as the New Batch screen. Editing a batch is the only way to populate the RA Number field after an 835 Remittance is imported.

Edit Batch

 Note that Payment is not listed on the Edit Batch screen because the Payment amount is a system-calculated value.


Use the MARK AS READY button to mark all eligible records in a Batch as Ready, like the Bulk actions in the original Remittances screen.

  • Select CONTINUE when the confirmation box appears.
Mark batch as ready
  • A confirmation toast displays with a count of the Remittances successfully marked as ready.
  • The MARK AS READY button is disabled if all payments in the Batch are in READY, DONE, or BATCHED status.
Batch Marked as Ready

Once batches are added, either manually or via the 835-import process, selecting any batch row opens the View Batch screen.

View Batch

The View Batch screen lists all payment records associated with the Batch. A new table, dbo.TransactionGroups and a new column in dbo.Remittances, TransactionGroup, were added to establish the relationship between Batches and Remittances. An example of the View Batch screen is shown below.

View Batch Screen
  • A Service Date and Client filter are available to help refine the search results to expedite finding a specific Client.
  • In the header area starting from the left, the information for the five Batch Summary fields is displayed.
  • This information was entered on the New Batch or updated and saved on the Edit Batch screens (Transaction Date, Batch ID, Remittance Date, RA Number, and Check Amount).
  • Payments, Adjustments, and Patient Responsibility are system-calculated values and are updated each time new payments are added, or existing payments are edited.
  • If the Client or Charge does not match when importing an 835 file, the payment row is created in Not Ready status and no value displays in Client or Charge or both.
  • If a $0.00 Payment is received, the Denial Reason is displayed.
  • Select any row to open the Edit Row screen and view/edit the payment information.
  • Select the blue plus "+" icon to add a row to the current Batch, opening the Edit Row screen also.

Edit Row

The Edit Row screen has the most in common with the existing Add Remittance or Edit Remittance screens. Edit Row is where payments and adjustments are entered and matched with their associated Charges. This new screen has some notable improvements over the original Remittance screens.

Edit Row Screen

Add or Edit Remittance Screen

The header lists the Batch Summary information and updates the Payment, Adjustment, and Patient Responsibility amounts as each row is added or updated. These constantly updated totals make it easy to see at-a-glance if the Batch reconciles with the total amount received.

A list of recently entered Remittances only is displayed. The total of Payments and Adjustments entered must be calculated manually.

The amount of data entry required is limited because the Transaction Date, Batch ID, Remittance Date, and RA Number are provided by the Batch.

These values must be populated for each transaction.

A single transaction (row) accommodates the Payment amount, Contractual Adjustment, and even additional Transaction Types.

Each Transaction Type requires a separate transaction. A Payment, Contractual Adjustment, and other adjustments (Psychiatric Reduction, i.e.) for one Claim requires entry of three distinct Remittances.

Adding a Row

Select the blue plus "+" on the bottom right of the View Batch screen to add a new row—the following screen displays.

Add New Payment Row

The header has the same information as the View Batch screen. Note the values for Payments, Adjustments, and Patient Responsibility for comparison later. Next, select a Client from the drop-down list to display the list of Charges.

Add Row - Select Client and Charge

The Charges list is grouped by Active or Outgoing first, then sorted by Service Date, newest to oldest, followed by the Done Charges. Further, refine the list by selecting a Payer and filtering by Service Date if desired.

(a) The orange vertical line indicates the currently selected Charge.

(b) Current Payer Claim information is displayed with links to the Claim Details – Notes & Tasks and View Claim

(c) Remittances

  • There is clickable access to view any imported Messages & Notes.
  • Payment is the only required field, and Transaction Types are assigned based on the value of the Payment amount.
    • Positive Amount = Payer Payment
    • Zero Amount = Denial
      • If a $0.00 Payment is entered, a Denial Reason field displays.
      • Denial Reason
      • The Denials column on the View Batch screen is also updated with the selected reason.
      • Denial Reason Displayed on View Batch Screen
    • Negative Amount = Revesrsal of Prior Payment Amount
      • Reversal of Prior Payment Example
      • The record in dbo.Remittances for this transactions shows the following Transaction Definition assigned.
      • System Assigned Transaction Definition
  • The following fields may be optionally populated: Allowed Amount, Contractual Adjustment, Patient Responsibility, and PCCN.
  • The Batch supplies the Transaction Date, Remittance Date, Batch ID, and RA Number, so these values are not repeatedly entered.
  • Use the +ADD TRANSACTION button to enter other Transaction Types related to this Payment and Charge combination.
  • The Transaction Type list uses the same Transaction Types as the original Remittances screen apart from the excluded Non-Specific Payer Payment type.
  • A Denial, Contractual Adj, and a Psychiatric Reduction are all captured in a single row entry in the example below.
Add Transaction Type to Payment Row
  • The Adjustments balance in the header was updated from $50.00 to $75.00 after the row was saved.
  • If an additional Transaction Type is added in error, use the delete icon (blue trash can) to remove it.
  • If the Waterfall to Next Payer checkbox is selected, all Transactions in the row (Payment and Adjustments) will have that setting applied.
  • Selecting the blue +SAVE AND ADD ANOTHER saves the new row and clears the screen so the next Client and Charge can be selected for a new row.
  • Selecting the blue SAVE records the new entry and remains on the Edit Row screen for that new entry.

Editing a Row

Select an existing row on the View Batches screen to view and update that transaction group. The example below is an imported 835 batch that has some Not Ready payment rows.

Not Ready Imported 835 Payments

Selecting the first Not Ready row displays the following Edit Row screen.

No Matching Client or Charge

The payment information was imported, but a Charge needs to be attached. Find the Client in the drop-down list on the left to display a list of Charges. Then enter a Payer and Service Date to refine the results further.

Associated Client and Charge

After selecting a Charge, Claim information displays for that Payer, and +SAVE AND ADD ANOTHER and SAVE buttons are enabled.

Viewing and Editing Imported 835 Payment Transactions

While the 835-import process remains largely untouched, the handling of one transaction type merits additional explanation, Non-Specific Payer Payments. If an imported 835 file contains a PLB segment or Non-Specific Payer Payment,

  • The transaction is imported but it is NOT included in the batch. When this happens, the batch Check Amount and the total of the row Payments are off by the PLB amount exactly.
Batch for 835 Import with a PLB Segment
  • The PLB transaction record is editable in the original Remittances screen because it was not associated with the batch. The image below is from the original Remittances screen. The PLB transaction has a checkbox; the batch payment record does not.
Imported PLB Transaction

All other imported 835 transactions are available to view and edit in the View Batch and the Edit Row screens. The same Transaction Definitions are assigned based on the payment value – positive payments are Payer Payments, zero payments are Denials, and negative payments are Reversal of Prior Payment transaction types.

Auditing Batches

Navigate to Configuration > Setup > Audit to enable auditing for Batches. Locate the dbo.RemittanceBatches table and select the checkbox to enable Track Changes.  Tracking changes in dbo.RemittanceBatches captures the Insert, Update, View, and Delete events related to batches.

Auditing Batches

 It is important to note that enabling Track Changes for dbo.RemittanceBatches captures the batch information only. Any Update, Insert, or Delete events for a row (payment, adjustment, other) within the batch affects the dbo.Remittances table. Enabling Track Changes for the dbo.Remittances table includes row activity in the audit results.

Additional Notes About Batches

Although both the new Batches and the original Remittances functionality are available, they are not interchangeable. Existing Remittances records are only available from the original Remittances screens. Transactions associated with a payment row entered or imported using Batches are viewable in the original Remittances screen but updates can be made in the Edit Row screen only. A "batched" Remittance row does not have a checkbox on the Remittances home screen.

Batched Remittances in Original Remittances Screen

If a batched row is selected from Remittances, a banner displays at the top of the screen and includes a link to View in Batch.

Link to View in Batch

Why is the old Remittance screen retained? Until the final round of polish is added to the Batches feature, some workflows require or are more manageable in the original Remittances screen.

  • The Mark Ready, Mark Not Ready, and Delete bulk actions are only available here and offer a way to update transactions across batches. A batch MARK AS READY action is available but is limited to the single batch.
  • Imported 835 PLB sections can only be edited and marked as Ready on the original Remittances screen. It is not included in the batch.
  • Searching for Denials or Reprocessed Remittance records is easier due to the Status filter. For example, if a Remittance associated with a Batch is reprocessed, the copy (Reprocessed) Remittance created by reprocessing is associated with that Batch. Nothing on the Batch screen indicates that it contains a Reprocessed Remittance, and the filters available are Batch specific, not row (remittance) specific. In this case, it is more expedient to search for the Reprocessed Remittance on the original screen, select the row, and then select the link to View in Batch than to click through the Batches looking for the Reprocessed row(s) not associated with a Charge.

Reports

The following reports were updated.

Administration Reports

Schedule Report– This report was updated to include Ancillary Staff. Previously on the Primary Service Staff was reported.

Billing Reports

_SelfPayStatementSubReport - The alignment of the Self Pay Statement was updated to align the Return and To addresses with the windows of a #9 double window envelope when folded in thirds.

Client Reports

Services Without Progress Notes – The report was updated to now include Services with a NULL TargetId (no progress note) AND Services that have an invalid TargetId (one that points to an invalid progress note record).


Updates

Ticket #

Description

EV-810

The alignment of the Self Pay Statement was updated to align the Return and To addresses with the windows of a #9 double window envelope when folded in thirds.

EV-955

Updates were made to prevent Alerts from being sent to Staff who have been end-dated on the Client's Episode.

EV-1081

Updates were made to the display order of Authorizations on the Clients > Payers screen. Now, when a Client has multiple authorizations, they are sorted with active authorizations on top (future authorizations then Active authorizations with blank Start Dates) followed by inactive authorizations sorted by Start Date descending.

EV-1134

An update was made to pull the most recent PCCN for all billing methods: 837P, CMS 1500, 837I, and UB04 and the associated reports to ensure that the correct number is submitted even after multiple denials.

EV-1213

Error messages were added to alert users when a Mend session does not create when opening the Event or Service. These Error Messages include

  • Telemed session cannot be created due to invalid credentials
  • No telemedicine session
  • Telemedicine only available for Staff or Supervisor
  • Telemedicine session is only available within 30 minutes of the scheduled service
  • Cannot join telemed sessions in the past
  • Preparing telemedicine session
  • Retrying…

EV-1276

In Configuration > Setup > Client Engagement, the text next to the toggle to enable the InForms Email Links is now Enable Email Links instead of Enable Single Use Links.

Bug Fixes


Ticket #

Case #

Description

EV-1004  EV-1162

1200

A bug was reported regarding the UB04 billing report splitting claims for the same client across pages. The cause was due to the dbo.UB04Masters table not correctly handling the Retry and Reverse billing job actions. Now when a job is Retried, the job record is not duplicated; when the job is Reversed, the record associated with that job is removed.

EV-1143


A bug was fixed where the Bulk Mark as Ready option in Services marked a Service as Ready when only an Other Diagnosis was entered without the "Principal" radio button selected. The issue was addressed by selecting the Principal radio button of an Other Diagnosis by default when no Client Diagnoses are entered for the Client.

EV-1144

2680

A bug was reported where two days were returned in the results when searching for a single day in the Scheduler Search For Next Available. Now when searching for a single day using Search For next Available, only one day is returned in the results as expected.

EV-1215


A bug was addressed where the Sliding Fee Style displayed in the UI changed when the New Style sliding fee label was edited and saved. A manual refresh was required to correct the display issue. Now when the label is edited, the type displayed remains unaffected.

EV-1235


An issue was reported where the quick information for an Event with a zero-minute duration displayed incorrect information. Updates were made to ensure that the Start and End times are always pulled from the Event. Additionally, for consistency, Events with a zero-minute duration display in one whole row, no matter the minutes per row setting, in the same manner as one-minute Events display.

EV-1262

401

A bug was reported that not all Families were being searched when adding a Client to a Family. Now the entire list of Families is searched when adding a Client in the Add Client to Family screen. The available Families are no longer limited to the small list displayed in the drop-down box.

EV-1447


An issue was reported where the Search Time was prolonged if Searching without a Staff person selected on the Scheduler. Updates were made and now Searches without a staff process almost instantaneously.

EV-1465


An issue was reported indicating that the Bulk Service processing could be slow when creating a job for many items. Processing time for jobs with 50+ pages of results now typically complete is less than a second except when Defined Filters are used. Future improvements are planned for the Defined Filter view to address the speed of Bulk Service processing when a Defined Filter is in use.


EV-1486

5034

A billing bug was reported where a Waterfall Charge to Self Pay was created in error when a denial was entered against a secondary Payer (a Primary Payer denial processed correctly), even though the Waterfall to the next payer checkbox was not selected in the Remittances screen.

Incorrect Self Pay Waterfall

This bug was addressed and now a secondary Payer’s denial does not waterfall when the Waterfall to the next payer checkbox is not selected. After processing the Charge is correctly updated to Denied.

Correct Denial Behavior of Secondary Payer


EV-1495   A bug was reported where signatures were not displayed when viewing some signed Form DesignEHR forms from the Timeline or Inbox. The issue was restricted to forms using multiple data containers, and the cause was Form DesignEHR incorrectly using the child container record id as the target id when initializing the form. The issue was addressed and now signatures display correctly for signed forms anywhere a form is viewed – Timeline, Inbox, InForms, Client Forms, Progress Notes, etc.
EV-1515 5050 A bug was addressed where Form DesignEHR forms flash and load infinitely when accessed from a History form. Now forms load properly when opened from a History form.
Changed
Thu, 09/30/2021 - 08:29