
Version 3.28, Released August 31, 2021 Previous Release Notes
A hotfix for version 3.28 was released on 9/3/2021, click HERE for more information.
New Features
Introducing Batches
A new feature in the Remittances main menu, Batches, streamlines and reorganizes the payment entry and reconciliation processes. In EchoVantage, a Batch is like a check, whether paper or electronic funds transfer and the new Batches screen lists summary information for each of these "checks." The new Batches feature is turned on by default in version 3.28, and access to the original Remittances screens remains after upgrading. The original screens retain their existing functionality with one important difference - the 835 import is only via Batches unless this new feature is disabled. The following sections cover the new Batches feature in detail.
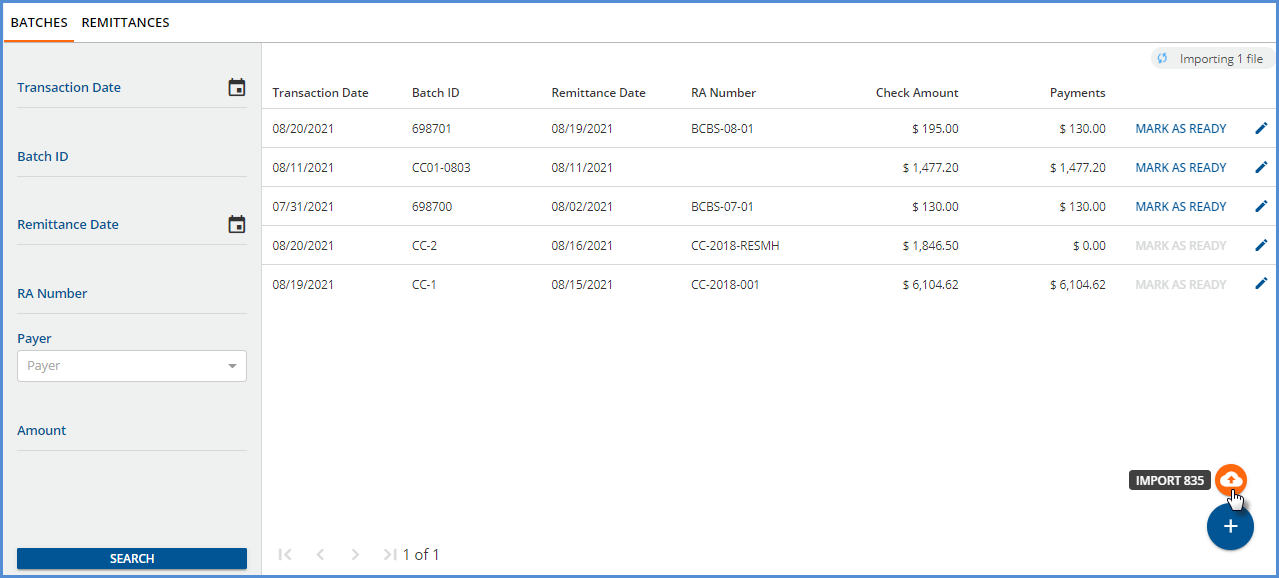
The grid on the Batches screen is populated as batches are created. Not Ready Batches are grouped and listed first, sorted by Transaction Date, newest to oldest. A Not Ready batch is when any of the associated remittances within the Batch have a Not Ready status. The remaining batches are sorted by Transaction Date, newest to oldest. Due to the sort criteria, new batches that do not have a payment associated with them yet are displayed in the second grouping.
- Click on the blue plus "+" to manually add a batch. This opens the New Batch screen.
-
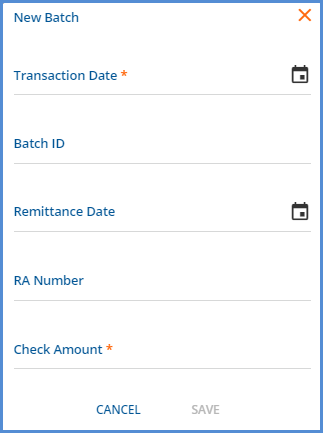
- After saving, the View Batch screen for the new batch is displayed.
- Hover the mouse over the blue plus "+" to display the orange Import 835 icon.
- Select Import 835 to select the file and display the familiar Import 835 popup screen.
-
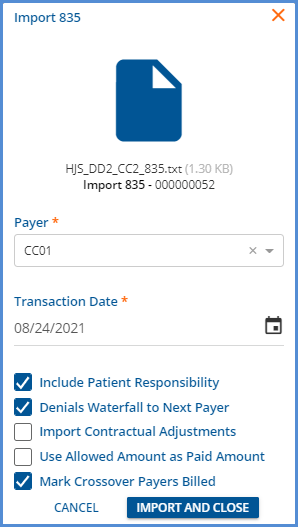
- The 835 Import process automatically creates a batch using the value from the TRN02 segment as the Batch ID.
- RA Number is not populated by the import process but can be added after the import is complete.
- Just like the original Remittances screen, the 835 import chip in the upper right-hand corner indicates the import status; selecting this chip displays a list of recent imports.
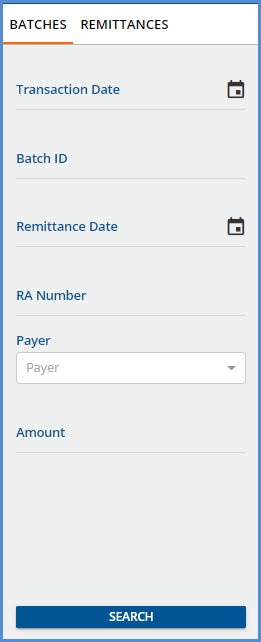
While the sort order helps keep the Not Ready batches at the top of the grid, filters are provided to make searching and finding a specific batch fast and easy. Use any combination of filters to help drill down the results listed in the grid.
If the batch summary information needs updating, use the blue pencil icon on the far-right of a batch row to edit that Batch's summary information. The Edit Batch screen opens and requires the same two fields, Transaction Date and Check Amount, as the New Batch screen. Editing a batch is the only way to populate the RA Number field after an 835 Remittance is imported.
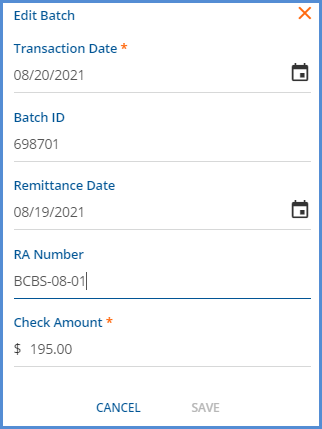
Note that Payment is not listed on the Edit Batch screen because the Payment amount is a system-calculated value.
Use the MARK AS READY button to mark all eligible records in a Batch as Ready, like the Bulk actions in the original Remittances screen.
- Select CONTINUE when the confirmation box appears.

- A confirmation toast displays with a count of the Remittances successfully marked as ready.
- The MARK AS READY button is disabled if all payments in the Batch are in READY, DONE, or BATCHED status.

Once batches are added, either manually or via the 835-import process, selecting any batch row opens the View Batch screen.
View Batch
The View Batch screen lists all payment records associated with the Batch. A new table, dbo.TransactionGroups and a new column in dbo.Remittances, TransactionGroup, were added to establish the relationship between Batches and Remittances. An example of the View Batch screen is shown below.
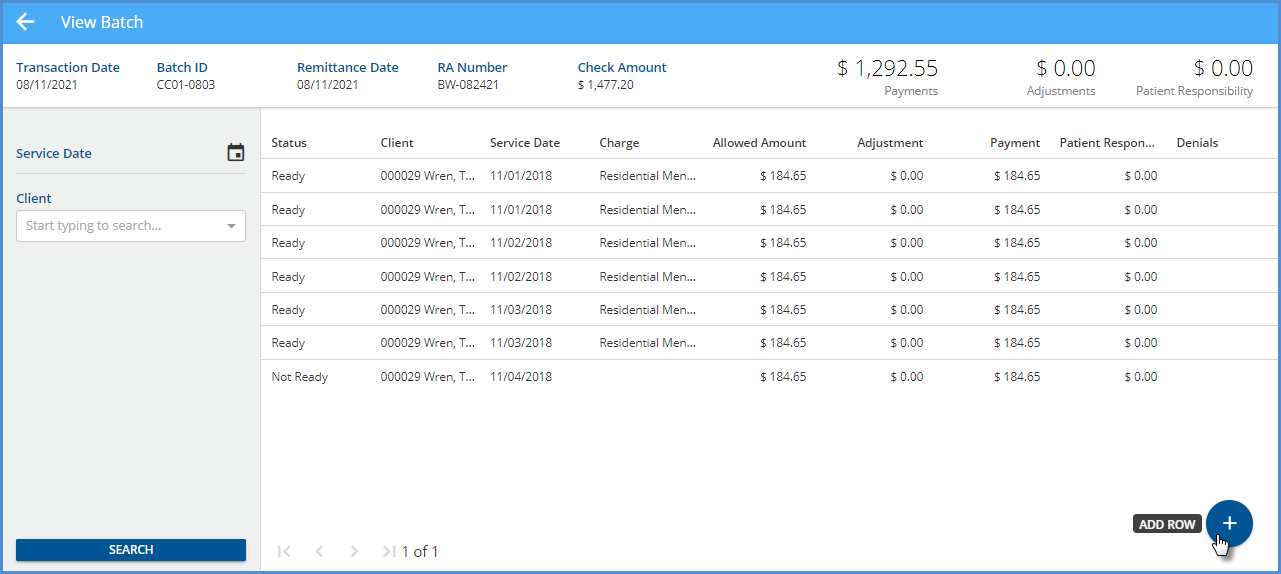
- A Service Date and Client filter are available to help refine the search results to expedite finding a specific Client.
- In the header area starting from the left, the information for the five Batch Summary fields is displayed.
- This information was entered on the New Batch or updated and saved on the Edit Batch screens (Transaction Date, Batch ID, Remittance Date, RA Number, and Check Amount).
- Payments, Adjustments, and Patient Responsibility are system-calculated values and are updated each time new payments are added, or existing payments are edited.
- If the Client or Charge does not match when importing an 835 file, the payment row is created in Not Ready status and no value displays in Client or Charge or both.
- If a $0.00 Payment is received, the Denial Reason is displayed.
- Select any row to open the Edit Row screen and view/edit the payment information.
- Select the blue plus "+" icon to add a row to the current Batch, opening the Edit Row screen also.
Edit Row
The Edit Row screen has the most in common with the existing Add Remittance or Edit Remittance screens. Edit Row is where payments and adjustments are entered and matched with their associated Charges. This new screen has some notable improvements over the original Remittance screens.
|
Edit Row Screen |
Add or Edit Remittance Screen |
|
The header lists the Batch Summary information and updates the Payment, Adjustment, and Patient Responsibility amounts as each row is added or updated. These constantly updated totals make it easy to see at-a-glance if the Batch reconciles with the total amount received. |
A list of recently entered Remittances only is displayed. The total of Payments and Adjustments entered must be calculated manually. |
|
The amount of data entry required is limited because the Transaction Date, Batch ID, Remittance Date, and RA Number are provided by the Batch. |
These values must be populated for each transaction. |
|
A single transaction (row) accommodates the Payment amount, Contractual Adjustment, and even additional Transaction Types. |
Each Transaction Type requires a separate transaction. A Payment, Contractual Adjustment, and other adjustments (Psychiatric Reduction, i.e.) for one Claim requires entry of three distinct Remittances. |
Adding a Row
Select the blue plus "+" on the bottom right of the View Batch screen to add a new row—the following screen displays.
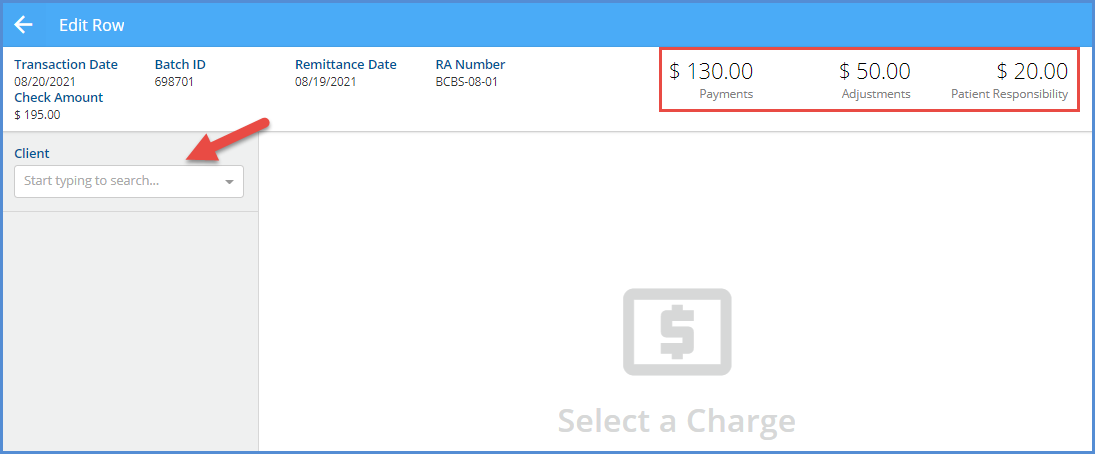
The header has the same information as the View Batch screen. Note the values for Payments, Adjustments, and Patient Responsibility for comparison later. Next, select a Client from the drop-down list to display the list of Charges.
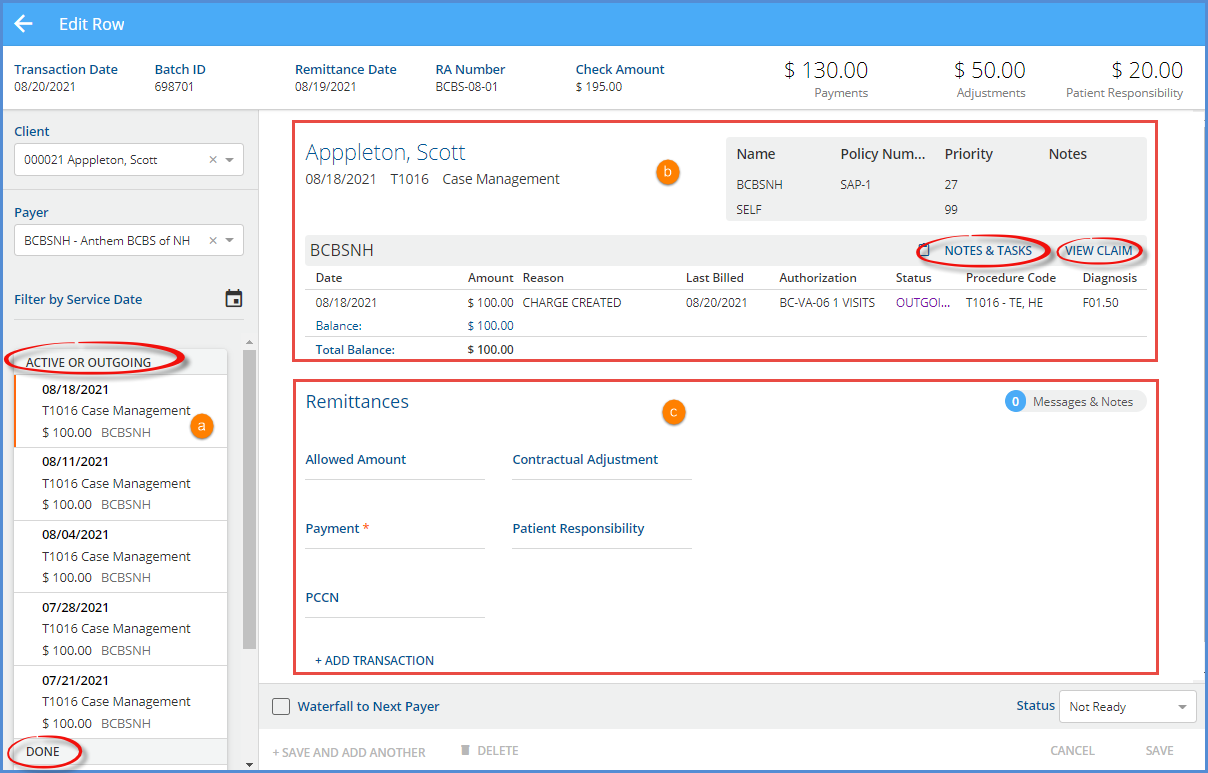
The Charges list is grouped by Active or Outgoing first, then sorted by Service Date, newest to oldest, followed by the Done Charges. Further, refine the list by selecting a Payer and filtering by Service Date if desired.
(a) The orange vertical line indicates the currently selected Charge.
(b) Current Payer Claim information is displayed with links to the Claim Details – Notes & Tasks and View Claim
(c) Remittances
- There is clickable access to view any imported Messages & Notes.
- Payment is the only required field, and Transaction Types are assigned based on the value of the Payment amount.
- Positive Amount = Payer Payment
- Zero Amount = Denial
- If a $0.00 Payment is entered, a Denial Reason field displays.
-
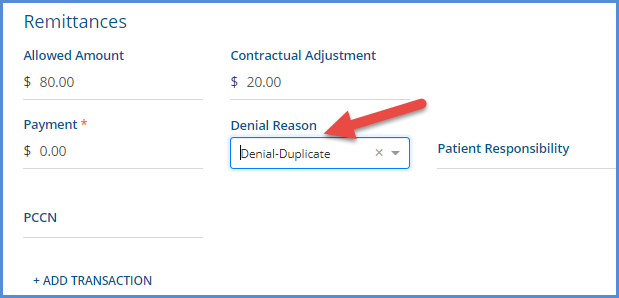
- The Denials column on the View Batch screen is also updated with the selected reason.
-

- Negative Amount = Revesrsal of Prior Payment Amount
-
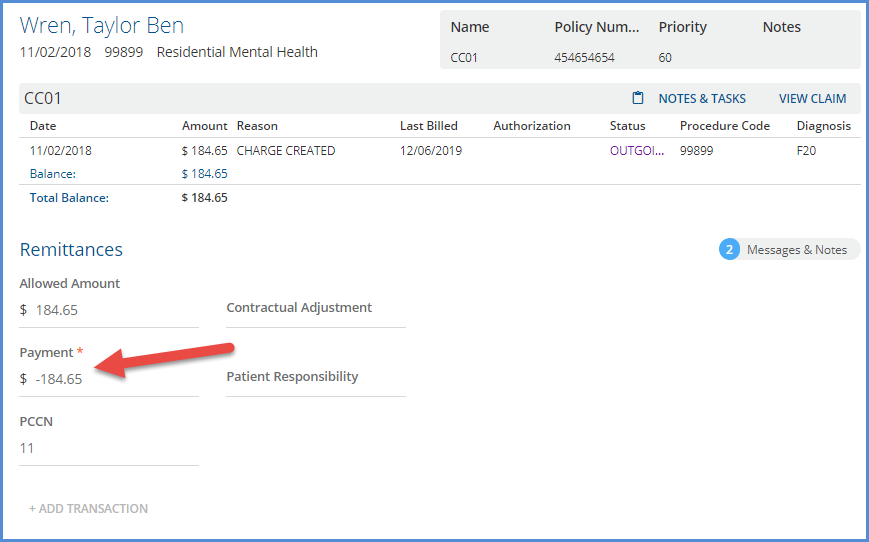
- The record in dbo.Remittances for this transactions shows the following Transaction Definition assigned.
-

-
- The following fields may be optionally populated: Allowed Amount, Contractual Adjustment, Patient Responsibility, and PCCN.
- The Batch supplies the Transaction Date, Remittance Date, Batch ID, and RA Number, so these values are not repeatedly entered.
- Use the +ADD TRANSACTION button to enter other Transaction Types related to this Payment and Charge combination.
- The Transaction Type list uses the same Transaction Types as the original Remittances screen apart from the excluded Non-Specific Payer Payment type.
- A Denial, Contractual Adj, and a Psychiatric Reduction are all captured in a single row entry in the example below.
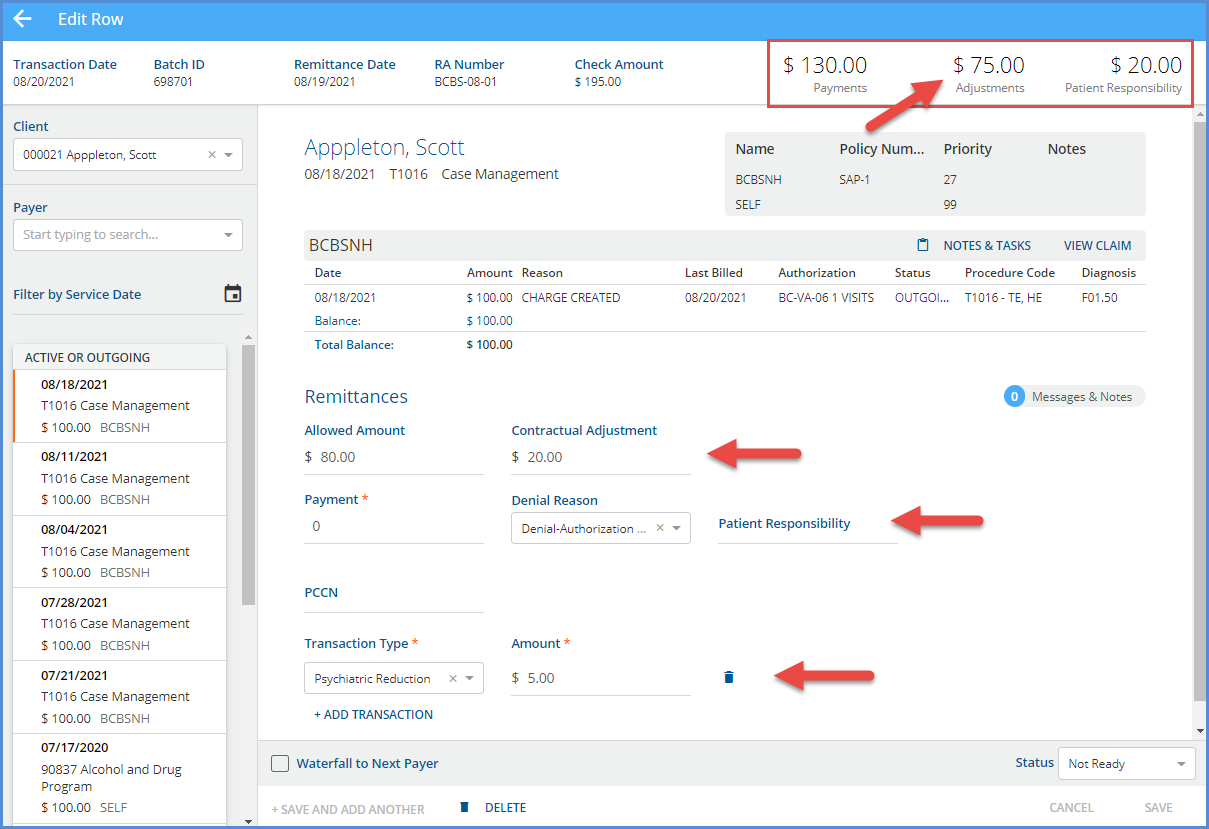
- The Adjustments balance in the header was updated from $50.00 to $75.00 after the row was saved.
- If an additional Transaction Type is added in error, use the delete icon (blue trash can) to remove it.
- If the Waterfall to Next Payer checkbox is selected, all Transactions in the row (Payment and Adjustments) will have that setting applied.
- Selecting the blue +SAVE AND ADD ANOTHER saves the new row and clears the screen so the next Client and Charge can be selected for a new row.
- Selecting the blue SAVE records the new entry and remains on the Edit Row screen for that new entry.
Editing a Row
Select an existing row on the View Batches screen to view and update that transaction group. The example below is an imported 835 batch that has some Not Ready payment rows.

Selecting the first Not Ready row displays the following Edit Row screen.
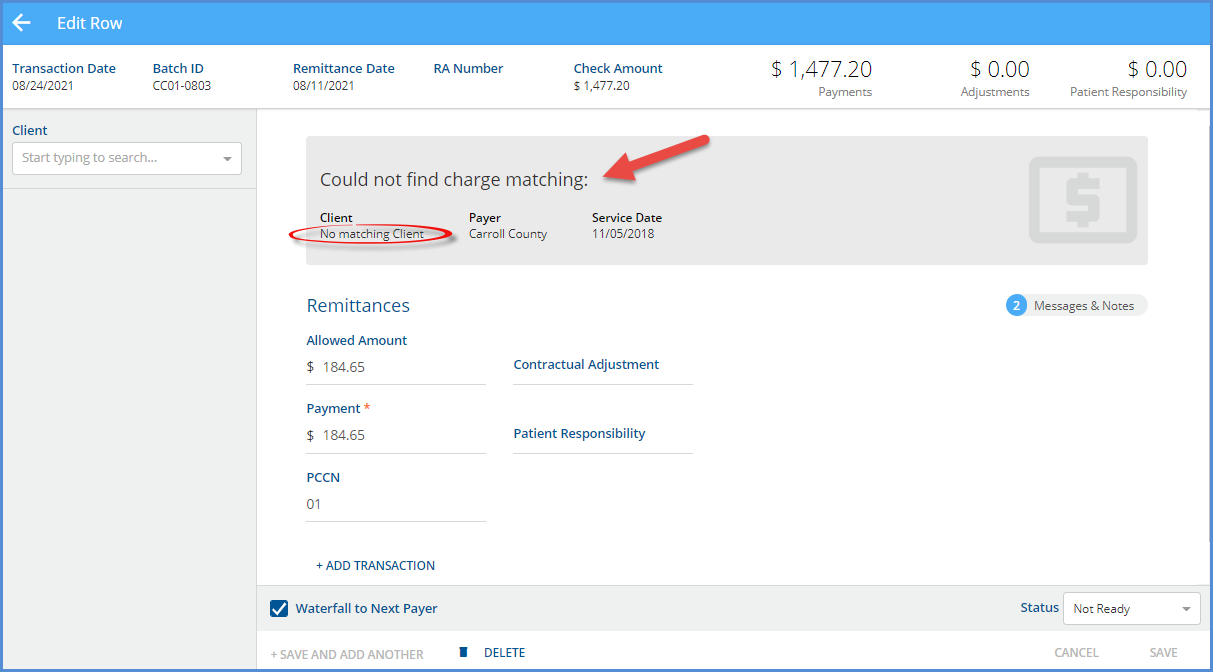
The payment information was imported, but a Charge needs to be attached. Find the Client in the drop-down list on the left to display a list of Charges. Then enter a Payer and Service Date to refine the results further.
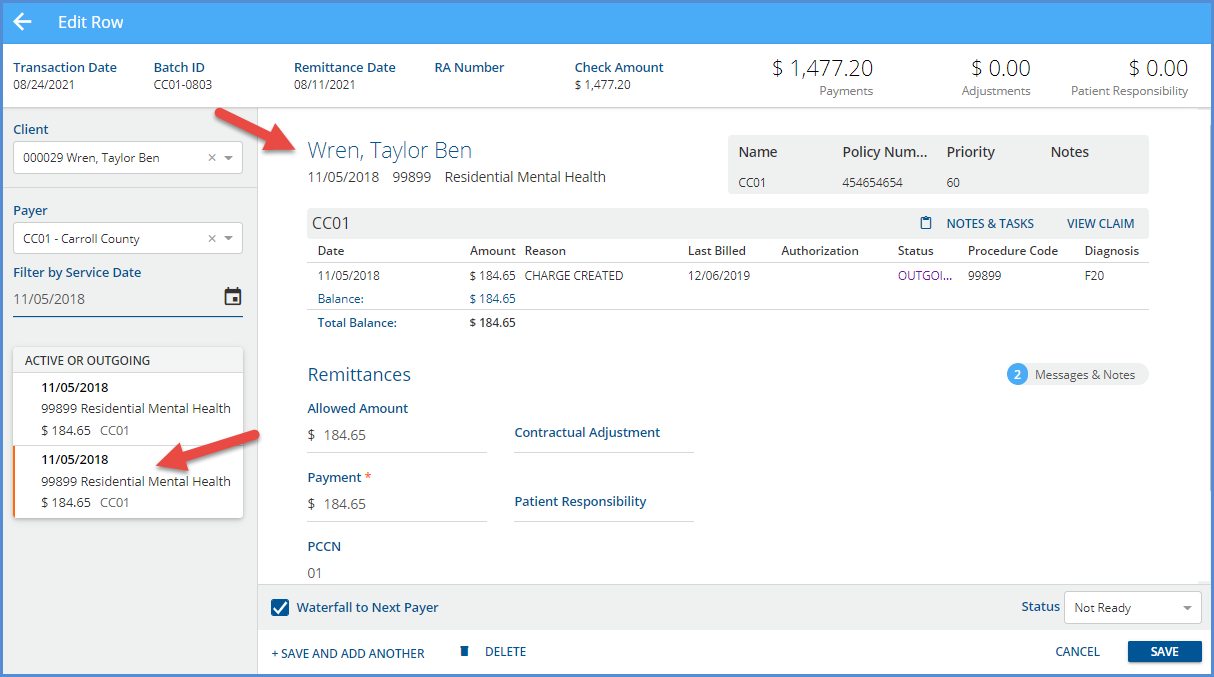
After selecting a Charge, Claim information displays for that Payer, and +SAVE AND ADD ANOTHER and SAVE buttons are enabled.
Viewing and Editing Imported 835 Payment Transactions
While the 835-import process remains largely untouched, the handling of one transaction type merits additional explanation, Non-Specific Payer Payments. If an imported 835 file contains a PLB segment or Non-Specific Payer Payment,
- The transaction is imported but it is NOT included in the batch. When this happens, the batch Check Amount and the total of the row Payments are off by the PLB amount exactly.

- The PLB transaction record is editable in the original Remittances screen because it was not associated with the batch. The image below is from the original Remittances screen. The PLB transaction has a checkbox; the batch payment record does not.

All other imported 835 transactions are available to view and edit in the View Batch and the Edit Row screens. The same Transaction Definitions are assigned based on the payment value – positive payments are Payer Payments, zero payments are Denials, and negative payments are Reversal of Prior Payment transaction types.
Auditing Batches
Navigate to Configuration > Setup > Audit to enable auditing for Batches. Locate the dbo.RemittanceBatches table and select the checkbox to enable Track Changes. Tracking changes in dbo.RemittanceBatches captures the Insert, Update, View, and Delete events related to batches.

It is important to note that enabling Track Changes for dbo.RemittanceBatches captures the batch information only. Any Update, Insert, or Delete events for a row (payment, adjustment, other) within the batch affects the dbo.Remittances table. Enabling Track Changes for the dbo.Remittances table includes row activity in the audit results.
Additional Notes About Batches
Although both the new Batches and the original Remittances functionality are available, they are not interchangeable. Existing Remittances records are only available from the original Remittances screens. Transactions associated with a payment row entered or imported using Batches are viewable in the original Remittances screen but updates can be made in the Edit Row screen only. A "batched" Remittance row does not have a checkbox on the Remittances home screen.

If a batched row is selected from Remittances, a banner displays at the top of the screen and includes a link to View in Batch.

Why is the old Remittance screen retained? Until the final round of polish is added to the Batches feature, some workflows require or are more manageable in the original Remittances screen.
- The Mark Ready, Mark Not Ready, and Delete bulk actions are only available here and offer a way to update transactions across batches. A batch MARK AS READY action is available but is limited to the single batch.
- Imported 835 PLB sections can only be edited and marked as Ready on the original Remittances screen. It is not included in the batch.
- Searching for Denials or Reprocessed Remittance records is easier due to the Status filter. For example, if a Remittance associated with a Batch is reprocessed, the copy (Reprocessed) Remittance created by reprocessing is associated with that Batch. Nothing on the Batch screen indicates that it contains a Reprocessed Remittance, and the filters available are Batch specific, not row (remittance) specific. In this case, it is more expedient to search for the Reprocessed Remittance on the original screen, select the row, and then select the link to View in Batch than to click through the Batches looking for the Reprocessed row(s) not associated with a Charge.
Reports
The following reports were updated.
Administration Reports
Schedule Report– This report was updated to include Ancillary Staff. Previously on the Primary Service Staff was reported.
Billing Reports
_SelfPayStatementSubReport - The alignment of the Self Pay Statement was updated to align the Return and To addresses with the windows of a #9 double window envelope when folded in thirds.
Client Reports
Services Without Progress Notes – The report was updated to now include Services with a NULL TargetId (no progress note) AND Services that have an invalid TargetId (one that points to an invalid progress note record).
Updates
|
Ticket # |
Description |
|
EV-810 |
The alignment of the Self Pay Statement was updated to align the Return and To addresses with the windows of a #9 double window envelope when folded in thirds. |
|
EV-955 |
Updates were made to prevent Alerts from being sent to Staff who have been end-dated on the Client's Episode. |
|
EV-1081 |
Updates were made to the display order of Authorizations on the Clients > Payers screen. Now, when a Client has multiple authorizations, they are sorted with active authorizations on top (future authorizations then Active authorizations with blank Start Dates) followed by inactive authorizations sorted by Start Date descending. |
|
EV-1134 |
An update was made to pull the most recent PCCN for all billing methods: 837P, CMS 1500, 837I, and UB04 and the associated reports to ensure that the correct number is submitted even after multiple denials. |
|
EV-1213 |
Error messages were added to alert users when a Mend session does not create when opening the Event or Service. These Error Messages include
|
|
EV-1276 |
In Configuration > Setup > Client Engagement, the text next to the toggle to enable the InForms Email Links is now Enable Email Links instead of Enable Single Use Links. |
Bug Fixes
|
Ticket # |
Case # |
Description |
|
EV-1004 EV-1162 |
1200 |
A bug was reported regarding the UB04 billing report splitting claims for the same client across pages. The cause was due to the dbo.UB04Masters table not correctly handling the Retry and Reverse billing job actions. Now when a job is Retried, the job record is not duplicated; when the job is Reversed, the record associated with that job is removed. |
|
EV-1143 |
|
A bug was fixed where the Bulk Mark as Ready option in Services marked a Service as Ready when only an Other Diagnosis was entered without the "Principal" radio button selected. The issue was addressed by selecting the Principal radio button of an Other Diagnosis by default when no Client Diagnoses are entered for the Client. |
|
EV-1144 |
2680 |
A bug was reported where two days were returned in the results when searching for a single day in the Scheduler Search For Next Available. Now when searching for a single day using Search For next Available, only one day is returned in the results as expected. |
|
EV-1215 |
|
A bug was addressed where the Sliding Fee Style displayed in the UI changed when the New Style sliding fee label was edited and saved. A manual refresh was required to correct the display issue. Now when the label is edited, the type displayed remains unaffected. |
|
EV-1235 |
|
An issue was reported where the quick information for an Event with a zero-minute duration displayed incorrect information. Updates were made to ensure that the Start and End times are always pulled from the Event. Additionally, for consistency, Events with a zero-minute duration display in one whole row, no matter the minutes per row setting, in the same manner as one-minute Events display. |
|
EV-1262 |
401 |
A bug was reported that not all Families were being searched when adding a Client to a Family. Now the entire list of Families is searched when adding a Client in the Add Client to Family screen. The available Families are no longer limited to the small list displayed in the drop-down box. |
|
EV-1447 |
|
An issue was reported where the Search Time was prolonged if Searching without a Staff person selected on the Scheduler. Updates were made and now Searches without a staff process almost instantaneously. |
|
EV-1465 |
|
An issue was reported indicating that the Bulk Service processing could be slow when creating a job for many items. Processing time for jobs with 50+ pages of results now typically complete is less than a second except when Defined Filters are used. Future improvements are planned for the Defined Filter view to address the speed of Bulk Service processing when a Defined Filter is in use. |
|
EV-1486 |
5034 |
A billing bug was reported where a Waterfall Charge to Self Pay was created in error when a denial was entered against a secondary Payer (a Primary Payer denial processed correctly), even though the Waterfall to the next payer checkbox was not selected in the Remittances screen. 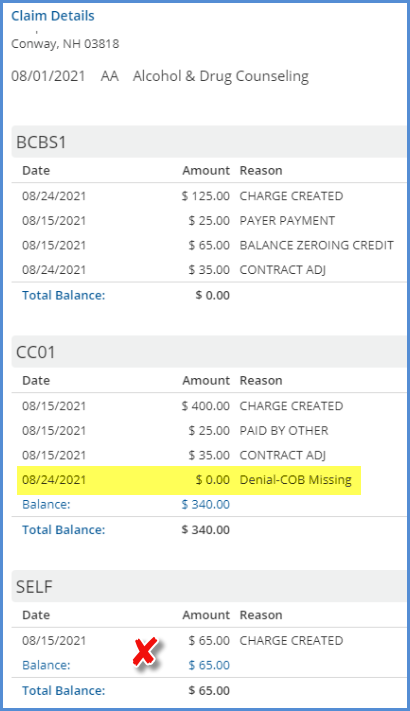
This bug was addressed and now a secondary Payer’s denial does not waterfall when the Waterfall to the next payer checkbox is not selected. After processing the Charge is correctly updated to Denied. 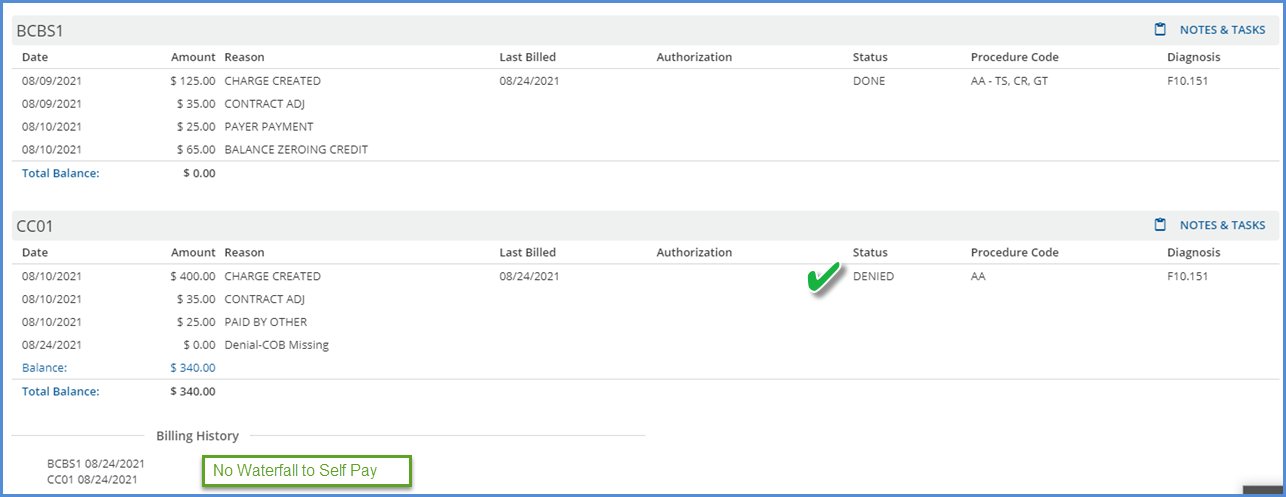
|
| EV-1495 | A bug was reported where signatures were not displayed when viewing some signed Form DesignEHR forms from the Timeline or Inbox. The issue was restricted to forms using multiple data containers, and the cause was Form DesignEHR incorrectly using the child container record id as the target id when initializing the form. The issue was addressed and now signatures display correctly for signed forms anywhere a form is viewed – Timeline, Inbox, InForms, Client Forms, Progress Notes, etc. | |
| EV-1515 | 5050 | A bug was addressed where Form DesignEHR forms flash and load infinitely when accessed from a History form. Now forms load properly when opened from a History form. |
