
Version 3.26, Released July 1, 2021 Previous Release Notes
Click HERE for v3.26-Hotfix 1 Release Notes
New Features
Introducing Chartless Clients
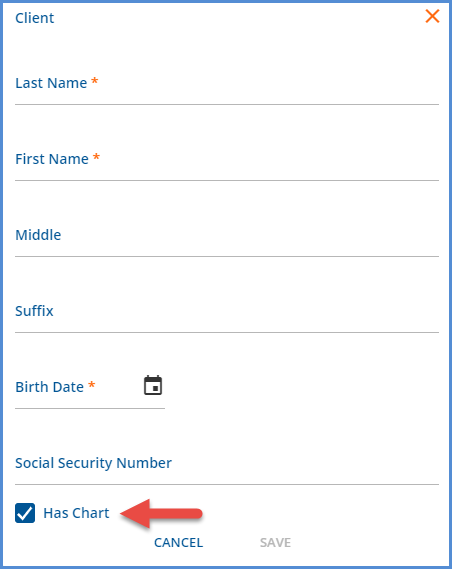
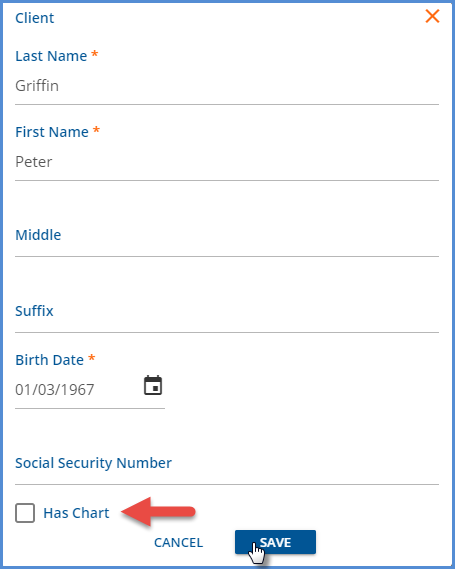
The Chartless Clients feature allows users to add individuals not receiving Services, a parent, legal guardian, or caregiver for example. Chartless Clients have a limited set of core tabs and are excluded from all Client drop-down lists by default, except when working in the Families feature. The “Chartless Clients: Create” permission in Configuration > Staff/Users > Permissions > Feature is required to add a Chartless Client. When a user is a member of a User Group with this permission enabled, the Has Chart checkbox is displayed on the Add Client screen. This checkbox is selected by default.
|
|
Unchecking the Has Chart checkbox and selecting SAVE creates a Chartless Client with the Profile, Contact Info, and Documents core tabs. Maintenance of Chartless Clients is through the Families menu or the Family tab once associated with a Family.

A new column, HasChart, was added to the dbo.Clients table to differentiate between charted and chartless Clients. Chartless Clients are assigned N and charted Clients are assigned Y for the HasChart value. If upgrading from v3.25 to v3.26, the value in the HasChart column is set to ‘Y’ for all existing Clients.
If an existing custom form or report should not include both types of Clients (charted and uncharted), update the report to filter to a specific type, for example, HasChart=’Y’.
Introducing Families
The new Families feature, located between Clients and Groups on the main menu, allows associations to be made between Clients, charted and chartless, via a Family or Families. Once a Family is created, users can add Members and Documents, and complete and attach Forms. Members include charted and chartless Clients, and member participation is managed through Start and End Dates which define the Client’s active membership period within the Family. Agency defined Roles and Labels are used to clarify the connection between members and provide additional member details.
Configuring User Access to Families
The Families feature is configurable for access from the Families main menu option, the new Family Client tab, or both. Menu access is determined by User Group in Configuration > Staff/Users > User Groups > Menu Options. For the Clients Family tab, User Groups may be granted Read Only or Edit access; by default, the tab is Disabled. A Families:Add feature permission must be selected for the User Groups responsible for Adding Families. Without the add permission, users with access to the Families main menu option or edit access to the Family tab in the Clients menu can add and remove Clients to/from existing Families; they are not able to create new Families.
Defining Family Member Roles and Labels
The Family Member Roles and Family Member Labels values must be created in Configuration > Setup > Defined Lists. The Family Member Role is a required field when adding members to a Family and can have only one value selected, while the Family Member Label is optional and can have multiple values selected. The Role is intended to define the Members relationship within the Family while the Label is intended to provide additional Member detail.
Defining Forms for the Available Forms List
The use of custom forms is supported in the Family screens - main menu option or Client tab. The application passes the Family id to the form which allows it to be pinned or Attached to the family once saved. Users do not need the Families:Add permission to view and complete forms. If a user accesses the Families feature via the Family tab in the Clients menu, they need edit permission if they are responsible for completing and attaching forms to a Family. If a form is used to create multiple records per Family, a form with a navigation grid should be created to make those records accessible.
For forms to appear in the Available Forms list AND be successfully Attached to a Family,
- The form must be tagged with the Form Location of FAMILY.
- The table for the custom form must have a FAMILY column.
- A field on the form must be mapped to the FAMILY column.
If any forms/tables do not have the FAMILY column, the validation will fail when attempting to Delete a Family.
Adding and Managing Families
Once menu access and the Families:Add permission are granted to the appropriate groups, users can add and manage Families. The Families feature is accessible from the Families main menu option and from a new Family tab in the Clients menu. Either location offers the same functionality, however, the Family tab in the Clients menu lists all Families to which the current Client is a member. The examples below work through the Families main menu option screens. The end of this section highlights the differences in the Clients Family tab.
Adding a Family
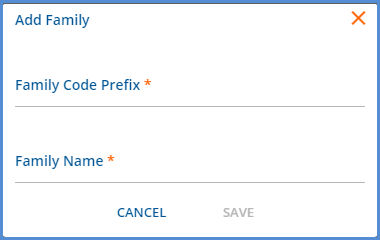
Navigate to the Families main menu options and select the blue +ADD FAMILY button to display the Add Family screen.

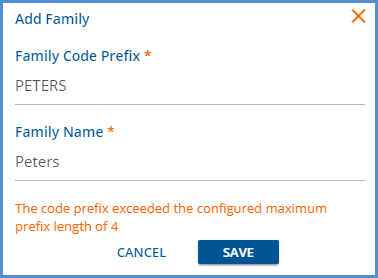
The Add Family screen prompts for two required fields, Family Code Prefix and Family Name.
|
|
- Family Code Prefix – The prefix is limited to 4 characters by default. An error displays on Save if more than 4 characters were entered.
- A 4-digit suffix, beginning with ‘0000,’ is appended to the Prefix to create the Family Code (dbo.Families.Code). These digits are incremented by 1 for each Family added with the same Prefix.
- The addition of a configuration screen, like the one used for Client Code generation, is planned for a future release.
- If needed, the default Max Prefix Characters or Max Suffix Digits can be updated in dbo.ConfigCodeGeneration.
- Family Name – The name can be up to 200 characters.
After a Family is successfully added, a card is added to the Family search list.
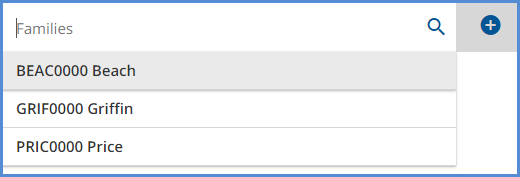
|

|
- The Families list is sorted by Family Name.
- When a card is selected, the Family Name displays in the search bar.
- Delete a Family by selecting the delete icon (blue trash can) to the right of the search bar.
- The delete icon is not present when there are existing relationships with the Family – Members, Forms, or Documents.
Adding Members to a Family
Select the blue +ADD MEMBER button to add Members to a Family.

The Add Family Member screen displays.
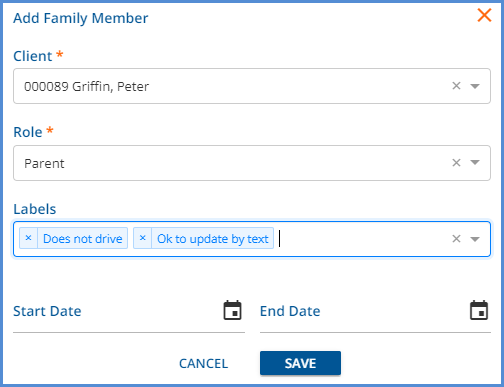
- Client and Role are required.
- Labels are optional; more than one value may be selected.
- Start Date and End Date are optional. Use to define the Client’s period of active participation.
- Use of these dates in place of End-Dating is recommended for historical purposes.
- Adding a Client that was previously a Member of the Family is allowed as long as the Start and End Dates do not overlap the existing record.
- Click the blue SAVE button to add the Family Member.
- As Members are added the Client list is populated.
Managing Family Members
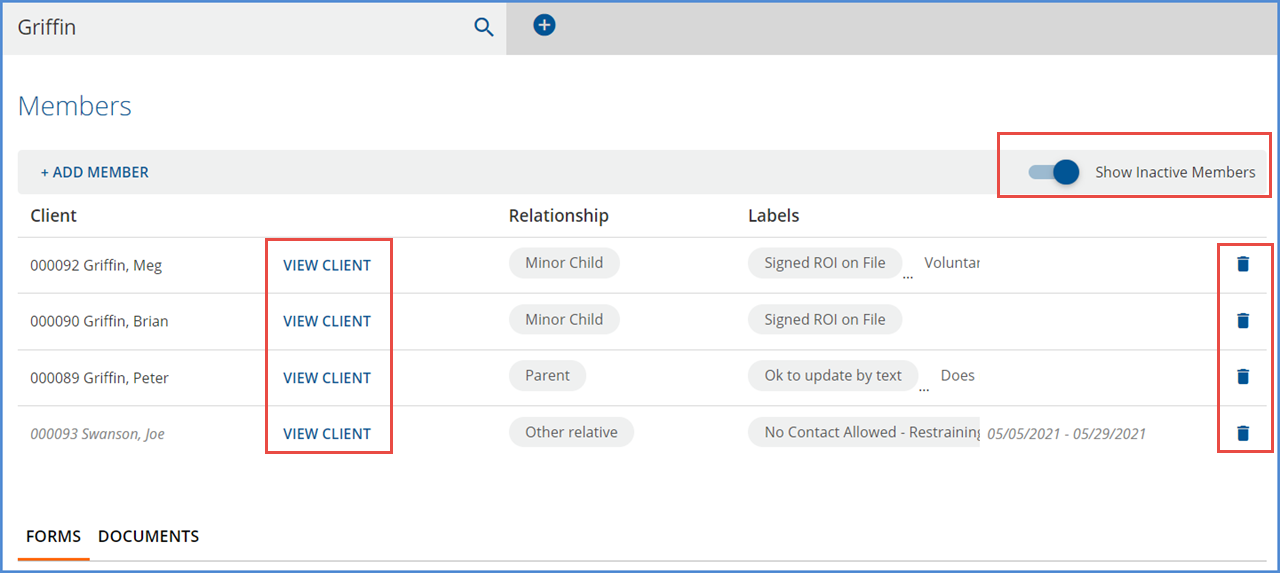
- Select the blue VIEW CLIENT button for quick access to the Clients menu for that Client.
- Toggle the Show Inactive Members slide to enable (blue) or disable (grey).
- Inactive Members Code, Name, and Participation Periods are italicized.
- Use the delete icon (blue trash can) to remove a Client Member from a Family.
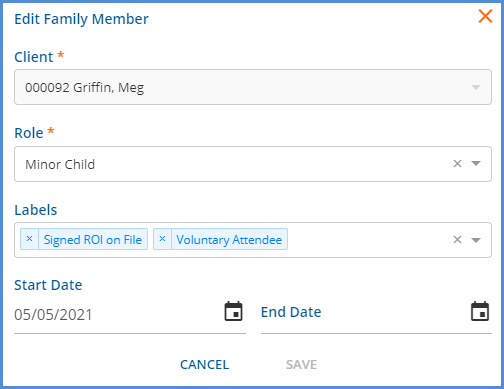
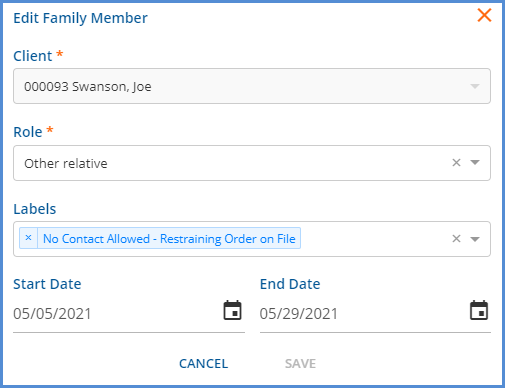
- Click anywhere on the row to Edit a Family member.
|
|
The Client Code is locked but Role, Labels, Start Date and End Date may be updated.
Forms with Families
Custom forms can be used with Families. As outlined above, the form must have a Form Location of FAMILY, the table must have a FAMILY column, and a field on the form must be mapped to the FAMILY column. Family Forms function like forms in Placements as they are attached to the Family and removed from the Available Forms list on save. Forms in the Families feature support the usual form options and actions like grids, popups, and the unsaved changes notices.
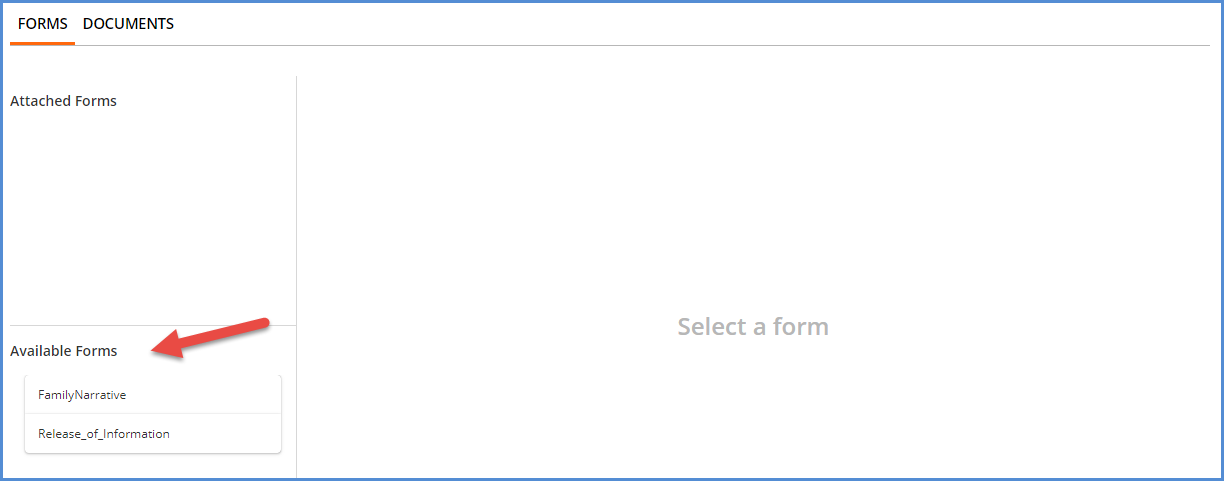
If Forms are configured for use with the Families feature (see configuration section above), they are listed in the Available Forms list.
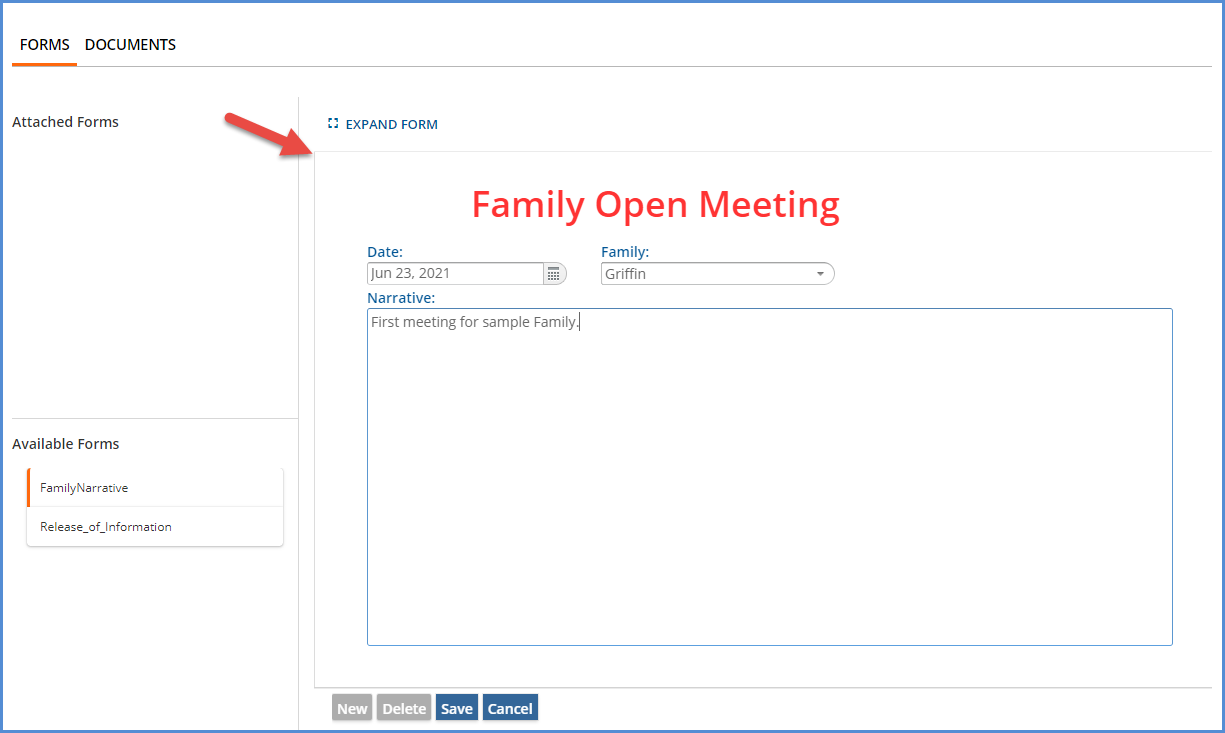
Select a form to open it in the right-hand editor window. Click Save when finished to Attach the form to the Family.
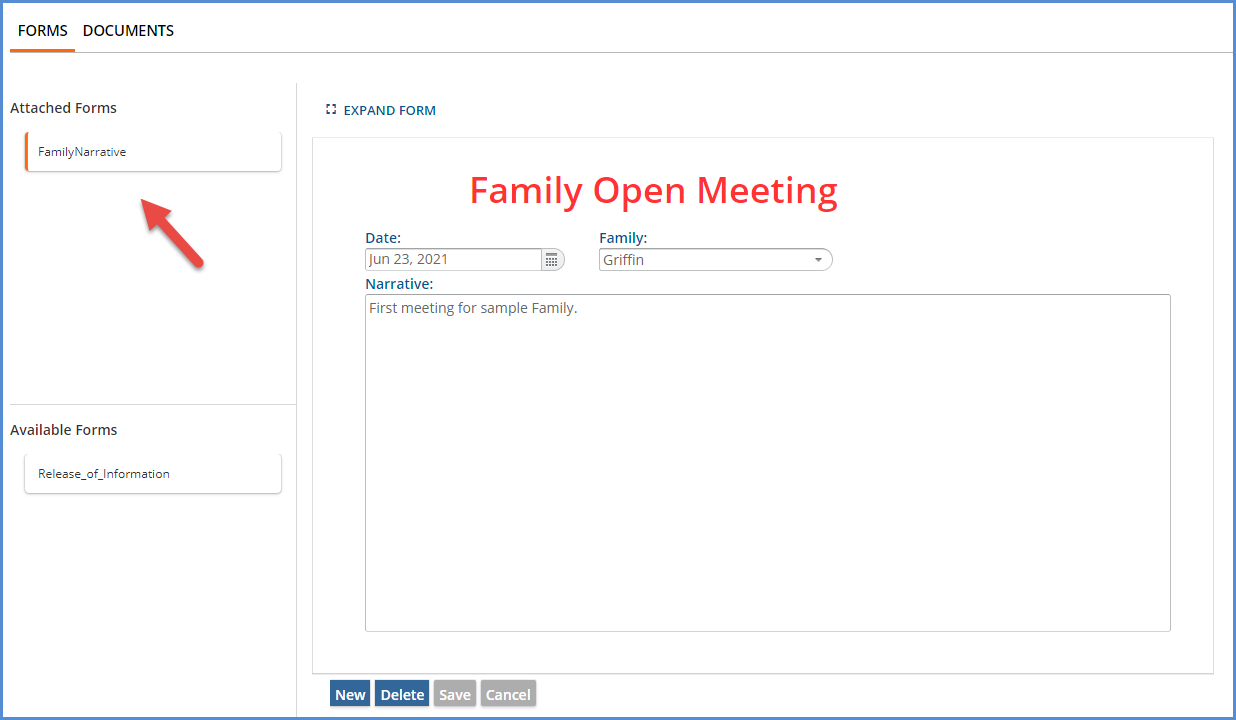
Review attached Forms by selecting the card in the Attached Forms list.
Documents with Families
Managing Family Documents works like Documents in the Clients tab and the same document permissions apply. These permissions are defined in Configuration > Staff/Users > Permissions > Document Categories. Note that if a user does not have access to the Families main menu option AND just has READ ONLY access to the Family tab in the Clients menu, the blue UPLOAD button is not available, and that user is not able to upload documents. They can simply view documents uploaded by other users.
Users with access to the Families main menu option or Edit access to the Clients Family tab do see the blue UPLOAD button in the Families Documents screen.

When UPLOAD is selected, a files window is opened. Select the file to upload and then click on Open. The following Upload file confirmation screen displays.
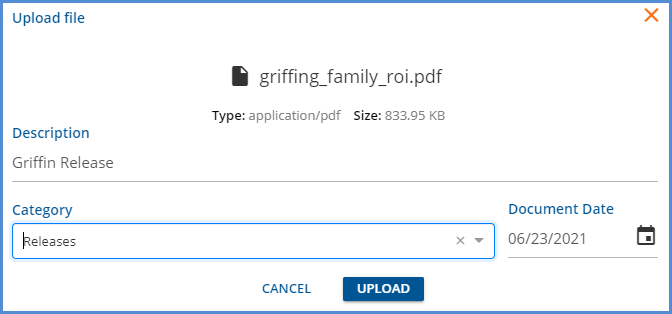
The uploaded documents are stored in the document management application, Alfresco, in a folder type of Family.

Uploaded documents are listed by File Name. Click on the blue Filter Documents to enter text for filtering a long document list. The list can also be sorted by Document Date, ascending or descending, by clicking the down or up arrow just to the right.

Hover over Category to display a column filter which allows filtering to one specific Category.

Select any row to preview, delete, or download the document or Edit the document’s properties.
Auditing Family Documents and Forms
Auditing of Family Documents is configurable in Configuration > Setup > Audit.

Select cmis.FamilyDocuments, check the Track Changes checkbox, and then select SAVE to enable Family Documents tracking.

Once Track Changes is enabled, View, Insert, Update, and Delete activity is viewable from the Audit Search main menu option.
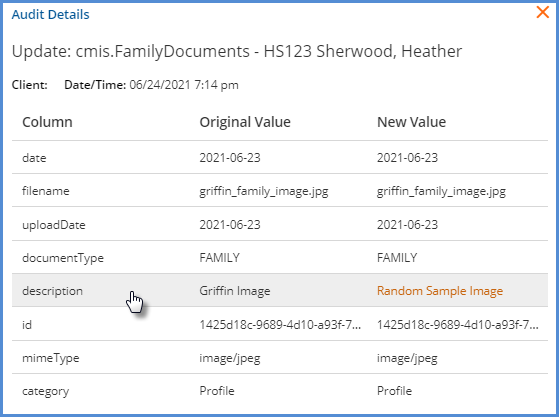
Clicking on any row displays the Audit Details.
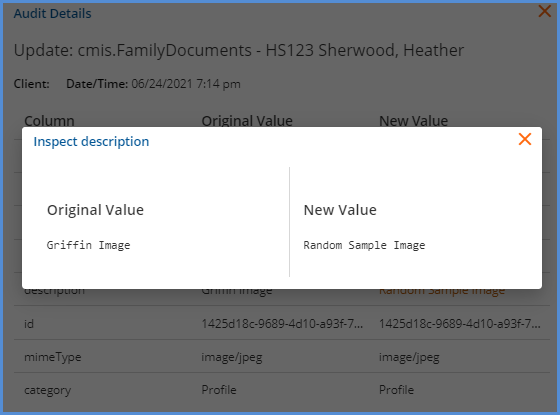
And clicking on any Audit Details row displays the Inspection screen.
Family Tab from the Clients Menu
The Family tab from the Clients menu offers the same functionality as the Families main menu option once the Client is added to a Family. Users must have Edit access and the Families:Add permission to add the Client to a new or existing Family.

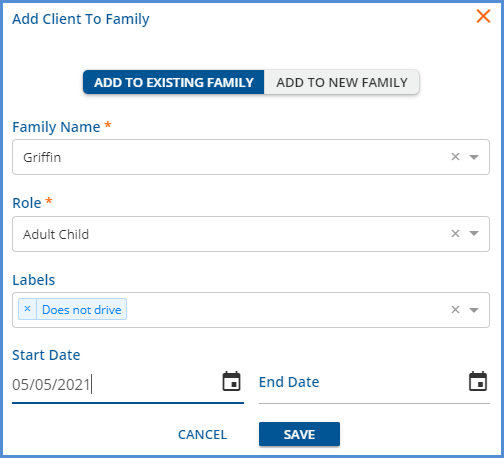
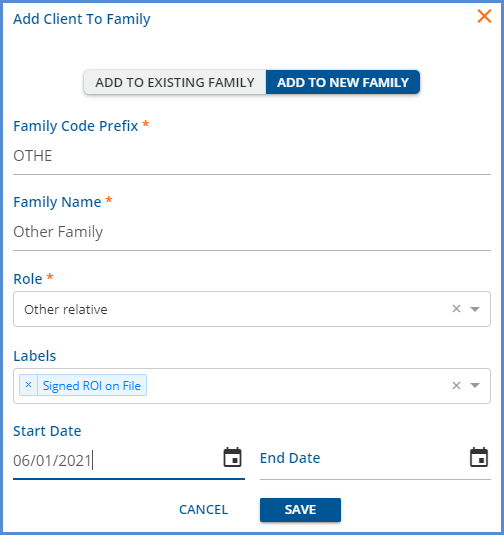
Select the blue +ADD CLIENT TO FAMILY to open the Add Client To Family screen.
|
|
- The Add Client to Family screen defaults to the ADD TO NEW FAMILY option.
- Change this option by clicking on the blue ADD TO EXISTING FAMILY.
- These screens function like the Add Family and Add Family Member screens found in the Families main menu.
- The primary difference is that the Role, Labels, Start Date, and End Date on either option refer to the Client in focus, and that Client is added to the New or Existing Family on SAVE.
- Saving both examples above adds Client Meg Griffin to two Families.
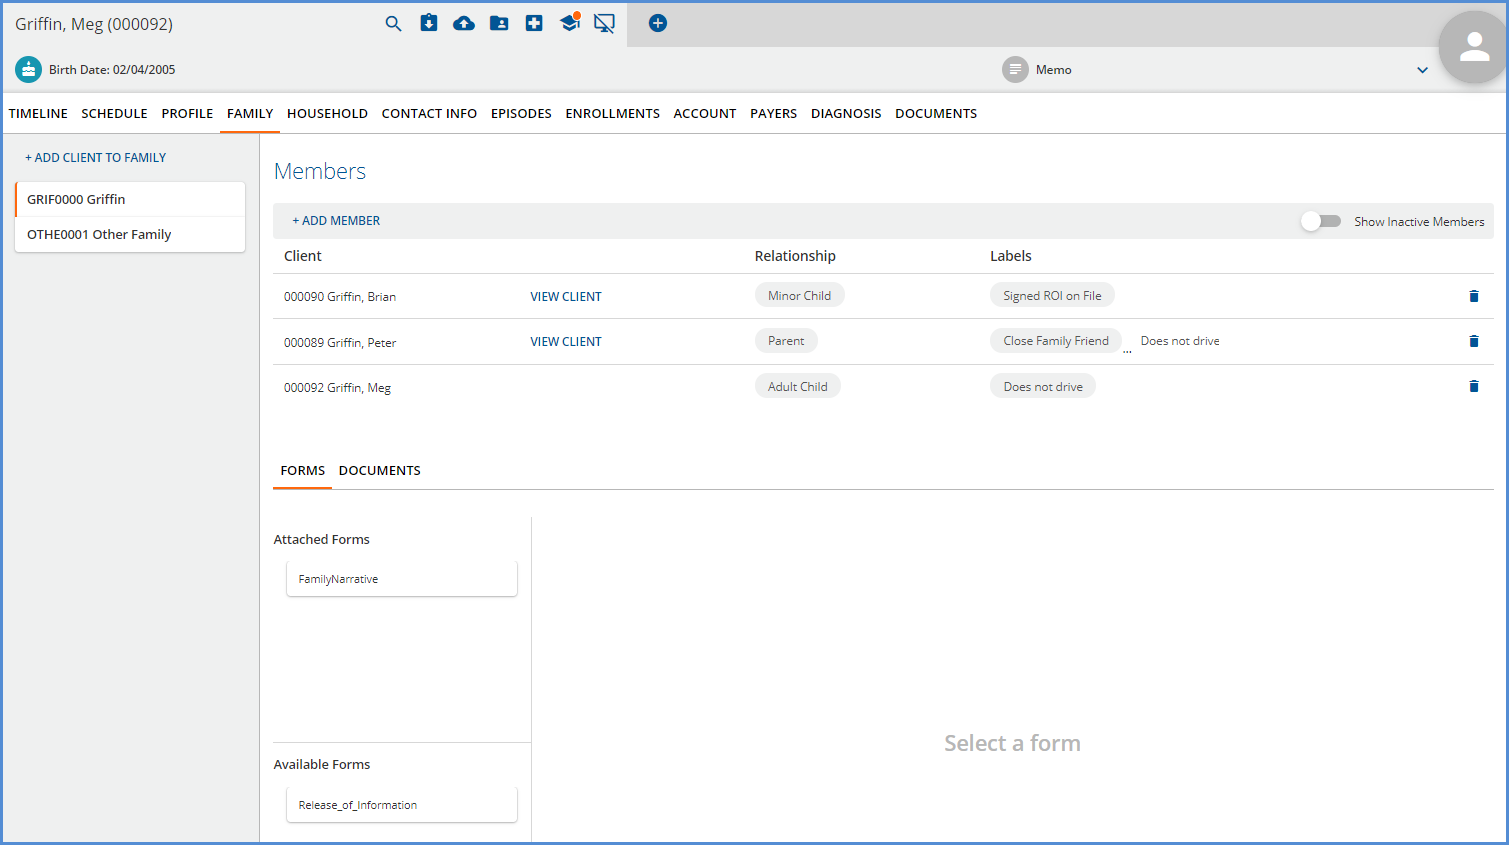
A list of all Families in which the Client is a member displays on the left-hand column of the Family tab. The orange vertical bar indicates the currently selected Family and the Family Members, Forms, and Documents information displays in the right-hand section. This right-hand section has the same functionality as the Families main menu screen.
Single Per Diem Service Entry
A new option was added to the Services main menu that allows the entry of a Single Per Diem Service without the work of using a template. Now hovering over the blue plus displays three additional icons.
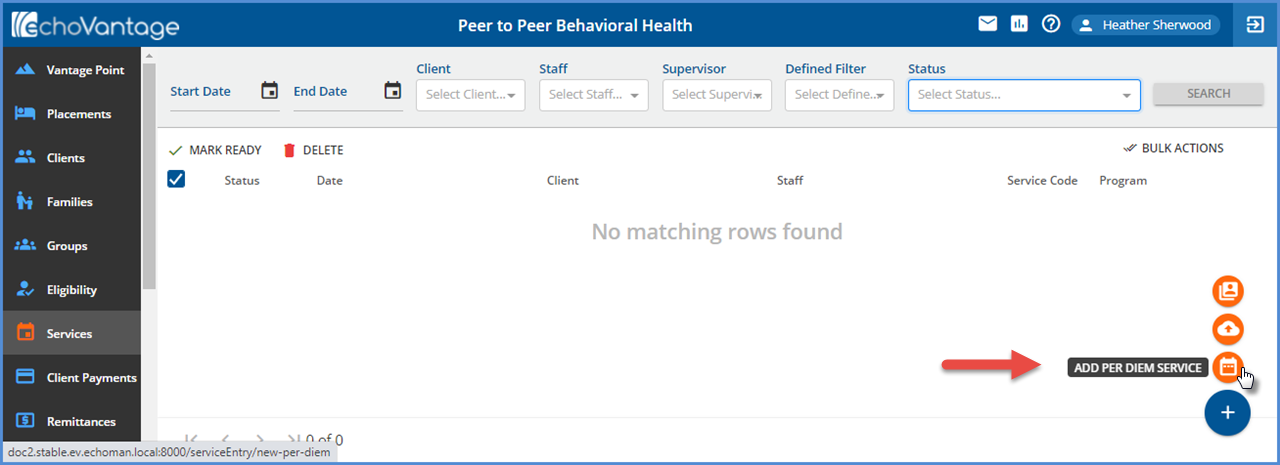
The orange calendar icon is now the ADD PER DIEM SERVICE and CENSUS BILLING is the top-most icon. Select the calendar icon to add a single Per Diem Service. A New Service screen displays.
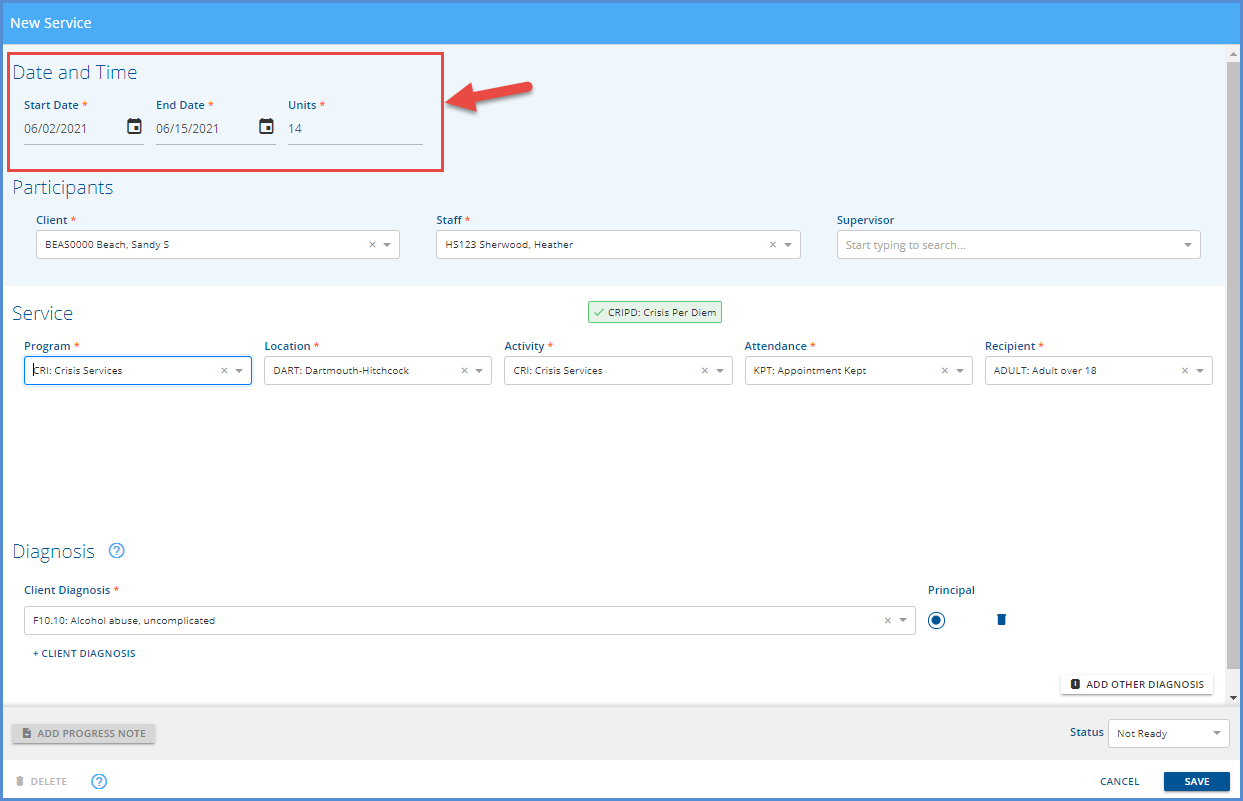
Just like the Per Diem Services created via a template, the Add Per Diem Service uses a date range and defaults to one Unit per day.
- Enter the Start Date and End Date to auto-populate the units. Or enter the Start Date and Units to auto-populate the End Date.
- The Service Components entered must match a Per Diem Service Definition before SAVE is enabled.
If the Service Components entered do not match on a Per Diem Service Definition, the blue No Distinct Service Definition Found information bar remains and the SAVE button remains disabled.
Introducing Alder
A new Document Management service, Alder, is deployed with this release to improve integration with Alfresco and set the stage for more document types in the future. No additional configuration is necessary in EchoVantage but some changes are required in Alfresco. For SaaS hosted customers, the Alfresco changes are completed at the time of the upgrade. After the upgrade, users with access to the Document Management Portal will see a new folder, CLIENT, which contains all existing agency document folders. If the Families feature is enabled in v3.26 and a Family document uploaded, a Family folder is created, and the uploaded document stored in a sub-folder in this Family folder.
The v3.26 Upgrade Notes for self-hosted customers will contain detailed information on the Document Service and the required changes in Alfresco.
Improvements
Applying a Payment to a Denied Charge
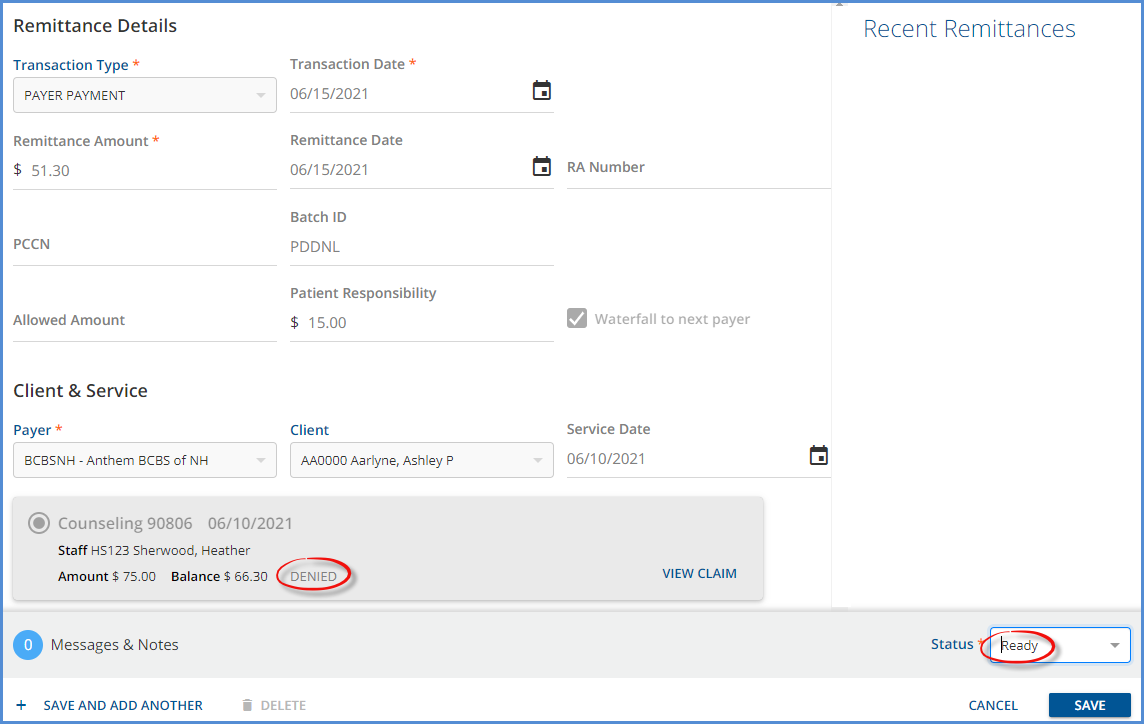
Payments, manually posted or imported in an 835, can now be posted to a Charge with a Denied Status. Once the payment is applied to the Denied Charge, the Charge behaves as if it were set back to Active status, and the billing process continues normally. For example, the following Claim was denied by Payer BCBS.

The Payer subsequently remitted $51.30 and indicated that $15.00 was the Client’s responsibility. This payment was applied to the Denied charge.
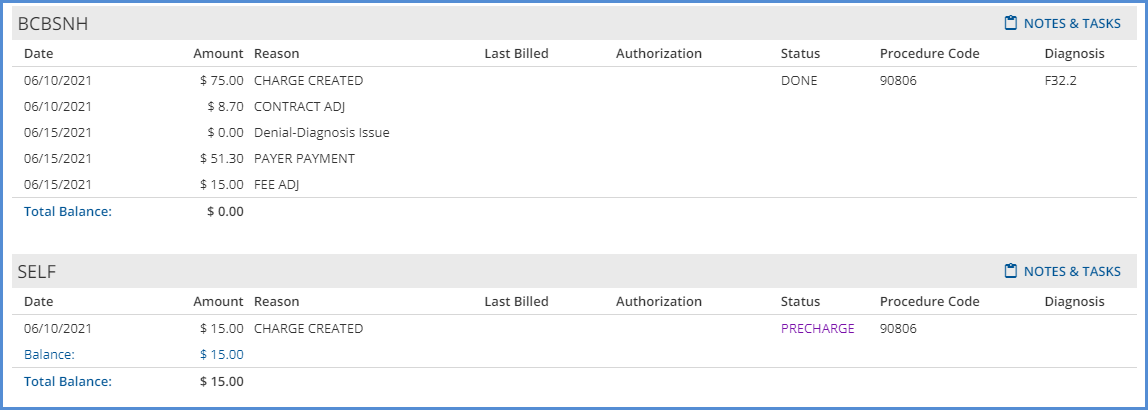
After processing the Remittance, the Claim Details for this charge show balance for Payer BCBS correctly adjusted to $0.00 and the Patient Responsibility amount of $15.00 in PreCharge status for Payer SelfPay.
Diagnosis Default in Service Entry
Changes were made to the diagnosis selection process when auto-populating the Client Diagnosis on the Service Entry screen. Now, if the Program on the Service matches either the Enrollment Program or Program on a Client’s active, billable, primary diagnosis, then that matching diagnosis is used on the Services screen. If there are multiple matches on either Program or Enrollment Program, then the first diagnosis is used. If there is only one active, billable, primary diagnosis, it is the one returned on the Service Entry screen.
Note that when a Client has multiple Enrollments, the Program from one of the Enrollments is selected as the default Program in Service Entry, and the Client Diagnosis field defaults to the appropriate selection for that Program. If the Program component is then changed on the Service Entry screen, the defaulted Diagnosis does NOT update. The user must review the selections on the screen and manually update the Client Diagnosis value to match the newly selected Program if needed.
Enrollment Discharge Time on 837I
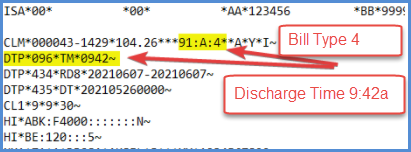
On the 837I, the Discharge Time is now included in the DTP*096*TM*HHMM segment when the Bill Type is ‘1’ (Admit through Discharge) or ‘4’ (Last Claim). The Discharge Time is reported from the associated Enrollment used to calculate the Bill Type and is reported in military time. In the event the Discharge Time is missing, the segment is not reported.
Document Category Required When Uploading
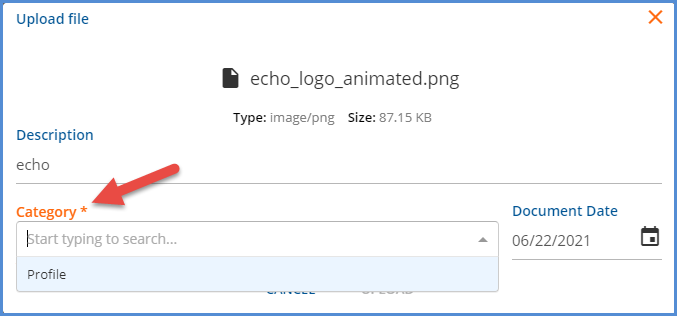
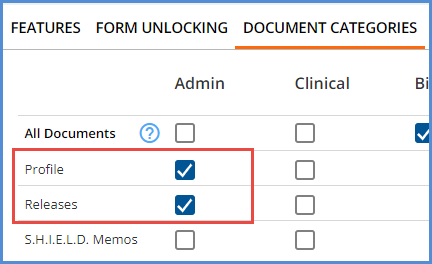
Now when uploading documents in Clients > Documents, Category is a required field for all users that do not have the All Documents checkbox selected in Configuration > Staff/Users > Permissions > Document Categories. The values in the Category drop-down list mirror the Document Category Permissions defined for the currently logged in user’s User Group.
|
|
Password Reset/InForms Link Emails
The Send Password Reset Email from: field on the Configuration > Setup > Client Engagement > Client Portal tab and the Send InForms Link Email from: field on the Client Engagement > Informs tab now display a warning banner with the following message when the email address is not from the echo domain. The default email address used is noreply@echoman.com.

User Group Staff list Sorting
The Staff drop-down lists in EchoVantage were updated to sort alphabetically by Last Name, then First Name. An exception is the Staff drop-down in Services > Per Diem Billing > +Add Client, which currently sorts by Client Code. This drop-down will be updated in the next release.
Updated Reports
The following Reports were updated.
Administration Reports
Schedule Report – The ‘Staff Code’ column header was changed to simply ‘Staff’ and now both the Staff Name and Code are displayed. The ‘Client Code’ and ‘group Name’ columns were combined; the header is now ‘Client or Group.’ The report displays the Client name and Client code in Last, First Code order OR the Group name in the column. And finally, the Service Status column header was changed to Service Created and reports either Yes (Service was created) or No (Service was not created).
Staff Caseload Summary – The Staff Caseload Summary report was updated to only count the Episode if the current date is between the Staff Role Start and End Dates. If the End Date for the Episode Staff is the same as the report run date, the Episode is not counted in the caseload. Just as before, closed Episodes are not counted.
Clients Missing Pay Source – This report was updated to exclude Chartless Clients.
Billing Reports
_SelfPayStatement – The Self Pay Statements report was updated to sort statements by Client Last Name.
Client Reports
Client List – This report was updated to exclude Chartless Clients.
Medical Face Sheet - This report was updated to exclude Chartless Clients.
Updates
|
Ticket # |
Description |
|
EV-854 |
In preparation for future Report improvements, a change was made for the appUserId to be passed as a parameter to all reports for the currently logged in user. |
Bug Fixes
|
Ticket # |
Case # |
Description |
|
EV-191 |
|
The Balance on the Charge Card in the Client & Service section in Remittance Entry is no longer updated on SAVE. Previously, a Charge that was overpaid updated the Balance to a negative amount on SAVE. |
|
EV-568 |
1325 |
An issue was addressed where the number of Services in the job confirmation modal differed from the number of Services in the toast message. Updates were made in the code to use a single endpointand the query was updated to ensure that Service AddOns are not being included in the Service count |
|
EV-576 |
|
A check was added to ensure that an open-ended Service component has not been saved in a Service before allowing a successful swap to a Component that uses codes, in Configuration > Services/Payers > Components. If the open-ended component has been used, the change now fails to save. Previously, it the component was allowed to change after it had been saved in a Service, the application crashed when revisiting the Service. |
|
EV-639 |
|
An issue was addressed where duplicate, active, primary diagnoses with overlapping dates caused the 837I billing job to crash. Now multiple results returned are counted as if the diagnosis was present and the job runs without crashing. |
|
EV-647 |
SUPINC |
Updated views used by the core PHQ9 forms to the latest value set code version after the last update to dbo.codes. |
|
EV-648 |
ALEX |
An issue was addressed where using multiple tabs or users working job screen concurrently could allow bad data conditions. Now once a job is Finalized, it can no longer be retried, reversed, or finalized again on a separate tab or by another user. |
|
EV-778 |
2720 |
Addressed an issue where deleting an Add-on Service caused the calendar view to display the main Service as an Event. Now deleting and Add-on Service does not alter the calendar view on the Scheduler. |
|
EV-779 |
2090 |
An issue was reported where signing a popup form errored on SAVE even though the parent form could be signed successfully. Addressed by increasing the TargetTable column size in the dbo.SignedRecords table. |
|
EV-896 |
SOUTHLT |
Fixed a bug where tabbing to open a popup form caused the popup to open multiple times. Now tabbing to open a popup form, even when a User Validation Field is used, only opens the form once. |
