Client Portal, Echo InForms, Authorized Representatives, and How These Work Together
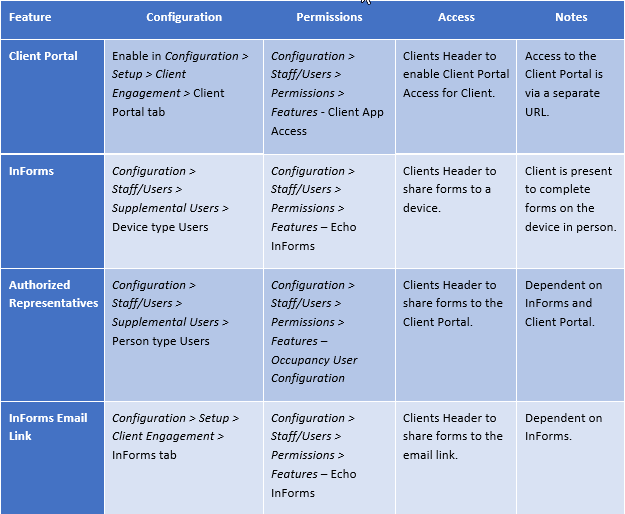
Echo’s Client Portal and InForms features stand-alone. However, when combined, email links are available to complete forms, and other Care Team members (Foster Parents, PCP, Court Advocates, for example) can access Client-Specific forms. The following chart is a quick overview of each feature and includes an indication in the Notes if a dependency exists. More detailed feature configuration sections follow.

Client Portal
The Client Portal provides Clients with an easy and convenient way to access their account information. The agency decides which Components are enabled within the portal. If the Component Access is disabled, it is not displayed in the portal. All except the Forms component operate independently of the Echo InForms feature.
- The Client Portal must be enabled in Configuration > Setup > Client Engagement.

- Grant permission to the Client App Access feature for User Groups responsible for configuring a Client’s portal access in Configuration > Staff/Users > Permissions > Features.
- Client Portal Access must be enabled in Clients > Header > Configure Client Portal Access.

- The password reset email is sent shortly after the Client’s Portal Access is configured.
Echo InForms
InForms can be configured for use without the Client Portal via Device Users. Device users allow forms to be shared to a tablet or designated PC and require an internet connection. The agency user signs in to the device as the device user, Client-specific forms are shared, and then the device is handed off to the Client. When the Client is finished, the device is returned to the agency user who is responsible for clearing the previously shared forms from the device.
- Create Device type Supplemental Users in Configuration > Staff/Users > Supplemental Users.

- Grant permission to Echo InForms feature for user groups responsible for sharing forms in Configuration > Staff/Users > Permissions > Features.

- Forms to share via InForms must have the InForms and Timeline form location assigned, or they do not appear in the list of the available form.
- The user responsible for sharing forms must be a member of a user group granted access to the form in Configuration > Client Chart > VHR Timeline in the Category Header.
- When steps 1-4 are completed, InForms is configured and ready for use. Access the InForms Share Forms screen via the icon in the Clients header.

Authorized Representatives
Authorized Representatives allows non-staff users, such as Foster Care Parents, to access specific information for a single Client or group of Clients. The agency user assigns the Authorized Representatives to a Placement space and provides Authorized Representatives access to the Client Portal. Within the application, Authorized Representatives see the space(s) to which they are assigned and can view the Client names and selected forms for the Clients assigned to that space.
- Slide the toggle to enable the Client Portal feature in Configuration > Setup > Client Portal.
- Add an Authorized Representative within Supplemental Users.

- In Configuration > Staff/Users > Permissions > Features, enable Occupancy User Configuration for the agency user.

- Ensure forms to be accessed from the Client Portal have a form location of OCCUPANCY CLIENT.
- Assign the Authorized Representative(s) to a Space within Placements > Occupancy

- Have the Authorized Representative access the Client Portal.
- The assigned Spaces for the Authorized Representative are available, and Forms can be completed as needed.

InForms Email Link
The InForms email link allows users who do not have Client App Access, to access the application through a link that expires after the agency-defined period. The agency must enable email links before sending. The link is valid for the number of days the agency user defined, after the link expires application access is not allowed.
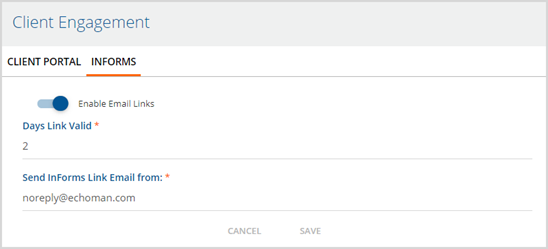
- Navigate to Configuration > Setup > Client Engagement > InForms tab.
- Slide toggle to enable the email link feature.
- Specify the number of days the link is valid.
- Enter the send from email address.
- Send from email address defaults to noreply@echoman.com.
- If the default address is changed, a warning displays.
- Click SAVE to record the configuration.

