Begin by clicking the plus-sign on the bottom right-side of the Remittance Screen.

Remittance Details
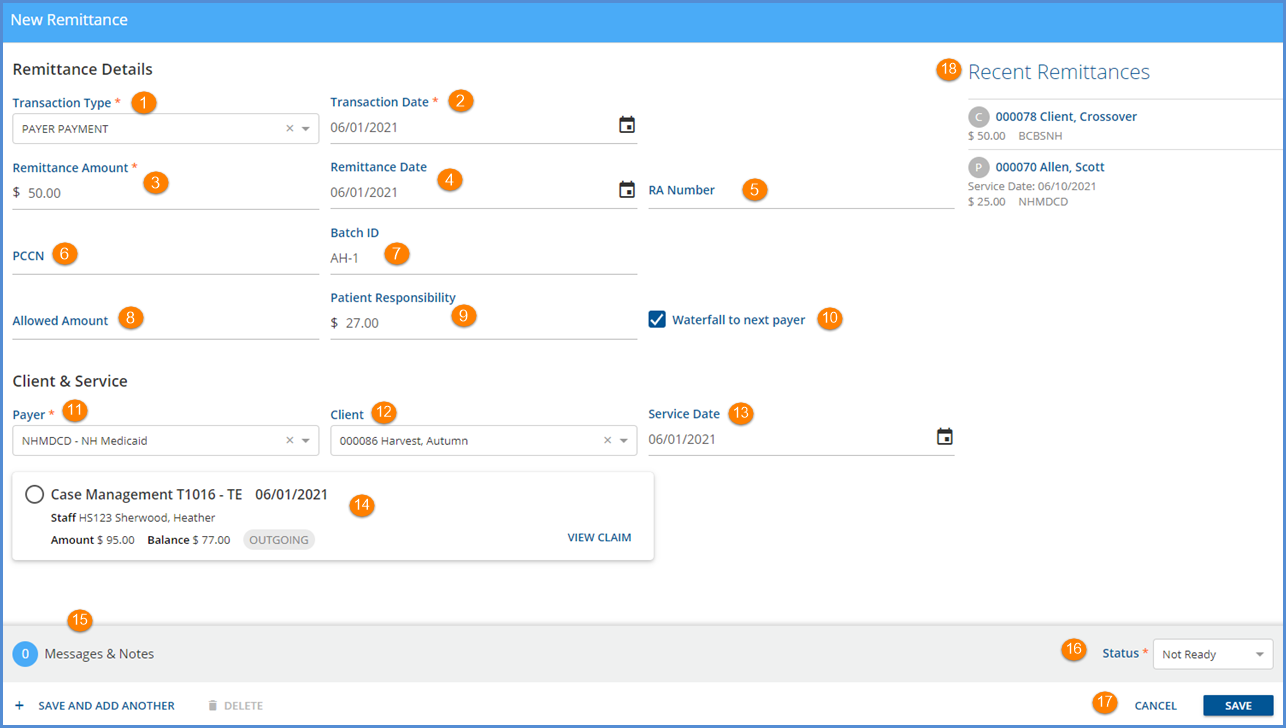
1. Transaction Type - Select the transaction type for the payment being entered. This example is specific to the Payer Payment transaction type.
- The list contains "standard" (All in CAP lettering) types along with Transaction Reimbursement Services activities that occur frequently, including "Denial" reasons.
- The dbo.TransactionDefinitions table stores both the system and any agency-specific Transaction Types.
- The UserTransactionDefinition column is used to define the type for agency-specific options. For example,
- An agency-created denial transaction type must have DNL in the UserTransactionDefintion column for the system to treat the agency-created type as a Denial.
- An agency-created Non Specific Payer Payment transaction type must have NON in the UserTransactionDefinition column for the system to treat the agency-created type as an NSPP. Available in v3.37+
- A script is available to set the TransactionDefinition to DNL for agency-specific denial types and can be modified for NSPP types. Please contact Support or your Account Representative for more information.
2. Transaction Date - Select the date the payment is to enter the system. This date will be used for General Ledger reporting and posting.
3. Remittance Amount - Enter the actual amount of the payment received.
4. Remittance Date - This is often the date on the remittance advice or check or can be used to record the date the payment was received.
5. RA Number - Enter the Remittance Authorization number if available.
6. PCCN - The is the Payer Claim Control Number returned by the payer. Insert to allow payers to track the payment.
7. Batch ID - Enter the Batch ID of remittance advice or this can be user-defined. The Batch ID is a quick way to filter payments on the Unprocessed Remittances screen in Fiscal Overview.
8. Allowed Amount - The allowed amount may be entered if indicated on the remittance advice but is not required.
9. Patient Responsibility - When the agency wants to (or is willing to) accept whatever the Payer says is the Client Fee, the Patient Responsibility amount should be entered. This amount is billed to the Selfpay Payer as outlined below regardless of the Waterfall to Next Payer checkbox selection.
- When a self-pay charge does not already exist, the amount entered for the Patient Responsibility creates an equal self-pay charge, regardless of any other Client Fee, Sliding Fee, or monthly Maximum.
- When a self-pay charge does exist and the amount entered in the Patient Responsibility is greater than the existing self-pay charge,
- The amount entered as Patient Responsibility shows as a FEE ADJ to that Payer.
- And the system calculates and applies a CHARGE INCREASING CREDIT to adjust the self-pay balance to the amount entered as the Patient Responsibility.
- This is the self-pay charge regardless of any other Client Fee, Sliding Fee, or monthly Maximum.
- When a self-pay charge does exist and the amount entered in the Patient Responsibility is less than the existing self-pay charge,
- The amount entered as Patient Responsibility shows as a FEE ADJ to that Payer.
- And the system calculates and applies a FEE ADJ to decrease the self-pay balance to the amount entered as the Patient Responsibility.
- This is the self-pay charge regardless of any other Client Fee, Sliding Fee, or monthly Maximum.
10. Proceed to Next Payer - When this box is checked and there is a next payer in the priority list, the balance due will Waterfall to the next payer. Selecting this checkbox essentially closes out this payer. Leaving it unchecked is a way to pause the Waterfall process. Click HERE for detailed instructions on Waterfall Billing.
Client & Service
11. Payer - Select a Payer to match to an existing charge.
12. Client - Choose the client that received the service charge for which a payment is being made.
13. Service Date - Enter the date of the service the payment is being made against.
14. Charge - Select the charge linked to the client's Service Date. The list of cards may contain multiple charges if several services occurred on the same date.
- Use the paper remittance to identify the Service date and correct charge.
- Enter separate remittances for each charge occurring on the same Service Date.
- A remittance may be saved without being linked to a Charge. However, the option to mark a remittance as “Ready” is not available for processing until a Charge is associated.
15. Messages & Notes - Clicking the text opens a pop-up box where CARC messages (occur with 835 processing) and notes about the current payment or adjustment may be viewed.
16. Status - Select the status for the currently entered payment. Once saved, the results will be transferred to the Remittance table where other remittances display as a result of staff entry organization wide.
- Ready A Ready status is Non-editable once “Marked Ready.” Ready status remittances transfer to the Create page of Unprocessed Remittances in the Vantage Point menu's Fiscal Overview tab.
- Not Ready Not Ready Remittance Entry detail is editable. These are transferred to the remittance entry main screen until Marked 'Ready". Organizational structure and responsibility determines who is responsible for making remittances Ready and determines where in the process this happens.
17. When remittance entry is complete click SAVE to record the transaction. If multiple remittances need to be entered, click on '+ SAVE AND ADD ANOTHER'. If an entry was made in error, click the DELETE button. To exit the New remittance screen without saving, click CANCEL.
18. Recent Remittances - Recent Remittances is a list that populates as remittances are entered. This helps keep track of a user's place when entering from a long list of remittances.
