Click HERE for a pdf version of this Claims Management Reprocessing Help page.
Assumptions
The following information for Claims Management Reprocessing is created for the Billing User. An understanding of the Fiscal Overview functions and the Basic Billing Workflow is assumed for the following examples. Click HERE to review the Fiscal Overview section.
Overview
Claims Management Reprocessing
There are times when the Charge created for the Service is incorrect or must be submitted more than once. In addition, missing Payer-specific modifiers, delayed communication regarding changes in Client coverage, rebilling a claim denied in error, and retroactive Payer rate changes require some flexibility after the Create Charges and Create Bills processes. In EchoVantage, these types of changes are handled by the reprocessing options in the Action drop-down box on the Claims Management screen. These options are listed below.
- Rebilling Outgoing and Denied Charges
- Reprocess Active Payer
- Reprocess All Payers
- Reverse Service Transactions
Which Action Do I Need to Choose?
Understanding which Action to use helps achieve the desired result quickly and without unintended extra work. The following table gives a brief overview of each Action. A detailed description, with examples, is contained in the following sections.
|
Reprocessing Action |
Use When |
|
Rebilling Outgoing and Denied Charges |
Nothing about the Charge needs to change. |
|
Reprocess Active Payer |
Only the Charge information for the Active Payer needs to be modified. Nothing needs to change for a previous Payer. |
|
Reprocess All Payers |
All Charges for all Payers need to be modified, but nothing needs to change about the Service. |
|
Reverse Service Transactions |
Service information needs to be modified. |
Rebill Outgoing and Denied Charges
The Rebill Outgoing and Denied Charges action sets the Charge Status back to Active, so it may be rebilled using the Fiscal Overview > Unbilled Charges > Create Bills screen. The Action only affects the currently active Payer and requires the Charge Status to be either Outgoing or Denied. This is the only job that does not require a job message as it simply resets the Charge Status (dbo.Charges.Status changes from ‘O’ to ‘A’ in the database), making the Charge immediately available to select in a Create Bills job. This Action does not correct or update rate and unit calculations or modifier changes; these are determined during the Charge Creation process.
Example
Client Sandy Beach received an ADP Service on 06/01/2021. The Service was processed, and a bill for $50.00 was created. The Payer initially denied the claim due to an incorrect Policy Number. A quick investigation determined the Policy Number was updated, but not until after the Bill for the Service was created. Rebilling the Charge will fix the Policy Number issue so the Payer will remit payment. The following example allows the Denied Charge to be included in a new Create Bills job.
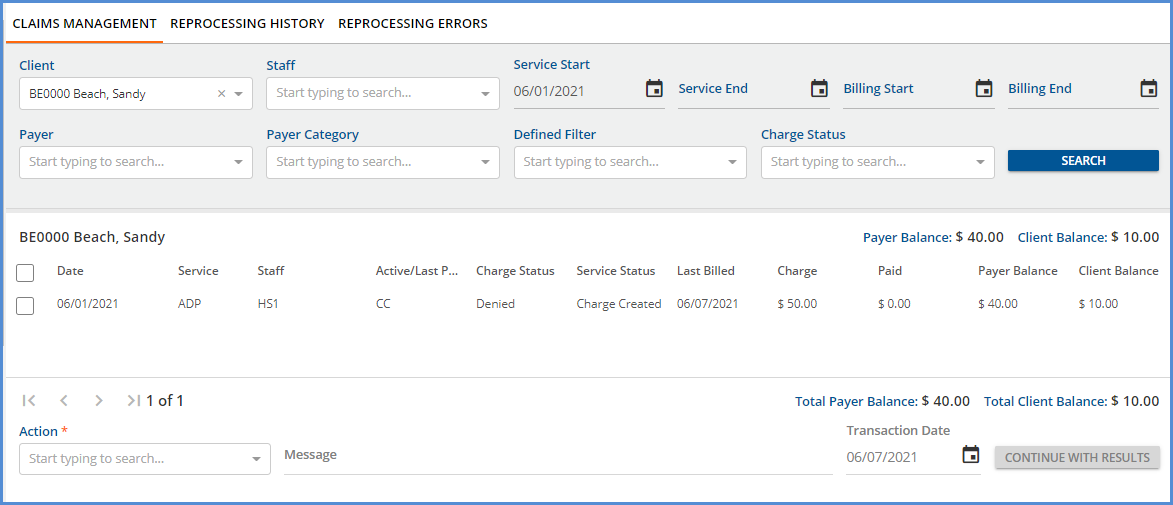
To Rebill the Charge, select the Rebill Outgoing and Denied Charges option in the Action drop-down list.

The Transaction Date defaults to the current date, and both the Message and Transaction Date fields are not editable. Click on the blue CONTINUE WITH RESULTS button to proceed; a confirmation box displays indicating the number of selected Claims that can be set back to Active.

Select the blue REBILL button to complete the process. The Charge is returned to Active Status, as shown below.
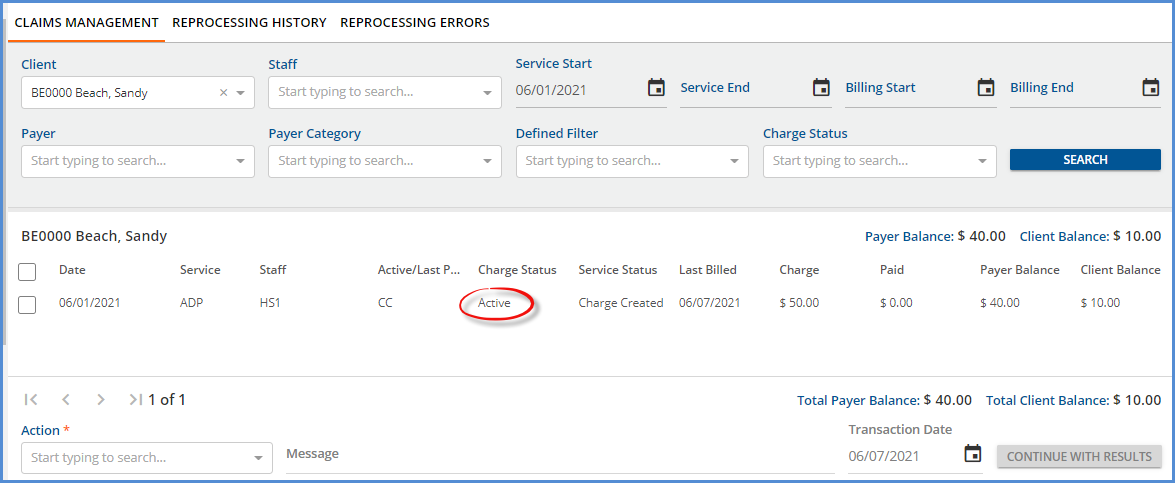
This Charge is now available to select in the Unbilled Charges > Create Bills screen.
Reprocess Active Payer
Select Reprocess Active Payer when a new Create Charges calculation is needed. Only claims with a Charge Status of Active or Outgoing are reprocessed with this Action. Reprocessing Active Payer voids the current Charge, related copay, and associated payments by creating reversing entries. The original Charge and the reversing Charge are marked as void in the database to preserve the transaction history. The reprocessing Action creates a new charge, so changes in charge calculation, unit calculation, and modifiers are picked up. Reprocessing also creates a copy of the original remittance with a Status of Reprocessed to facilitate finding and applying a previous payment. Like the rebill Action above, Reprocess Active Payer sets the Charge Status from Outgoing to Active.
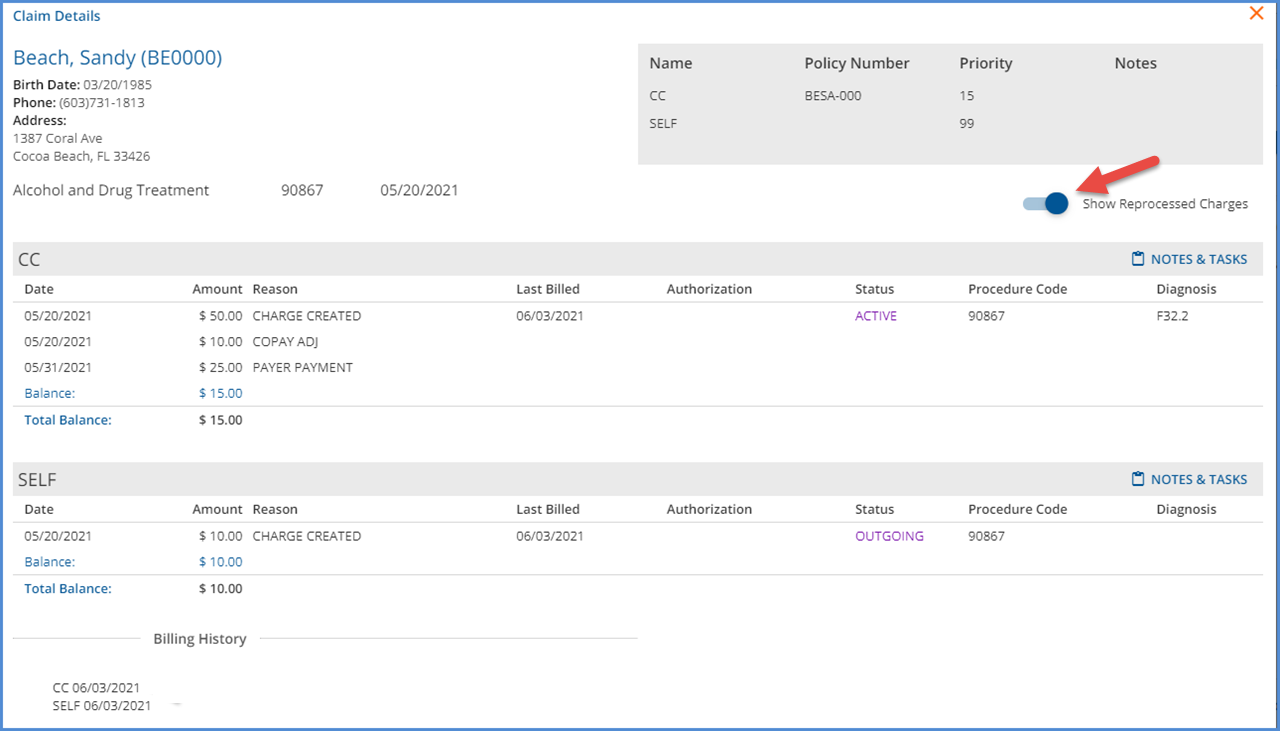
Enabling the Show Reprocessed Charges toggles confirms there are currently no reprocessed charges.

For this example, the current rate is end-dated, and a new rate is entered that encompasses the Service date for the Payer and ADP Service, Configuration > Services/Payers > Payers > Rates. After reprocessing, the new Charge will be $35.00, NOT $50.00.
Create the Reprocessing Job
From the Claims Management screen, filter the results or select the claim to be reprocessed. Then select Rebill Active Payer in the Actions drop-down, enter a job Message, and enter the Transaction Date.
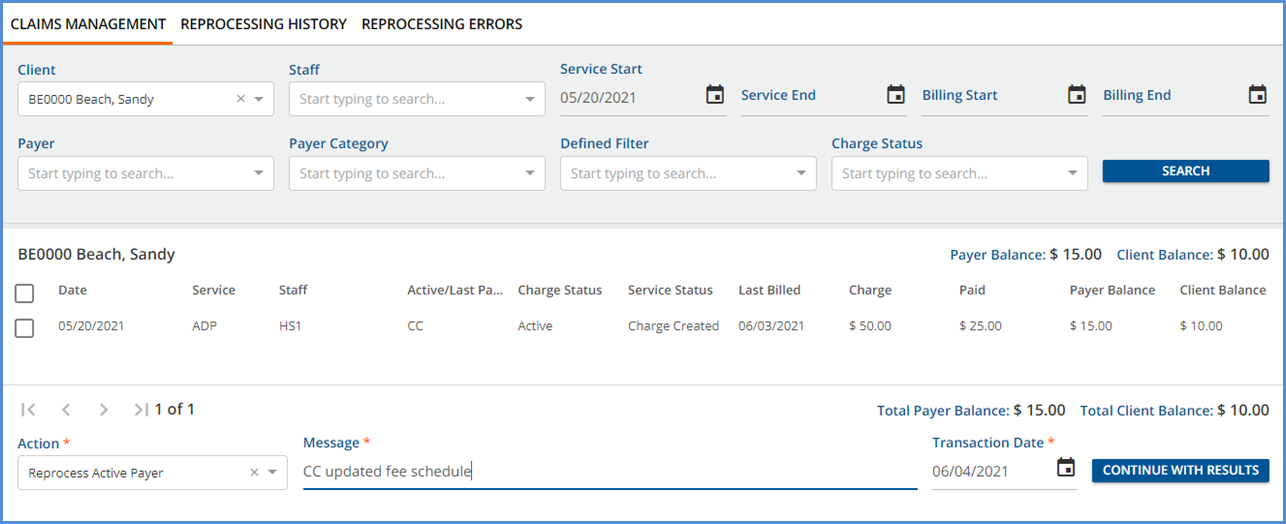
- The Message is used to identify the job on both the Reprocessing History and the Reprocessing Errors screens.
- The Transaction Date is used to determine the GL Posting Period and defaults to the current date but may be edited. The default date was used in the example to make identifying the original and new charges easy.
- Depending on your agency’s fiscal policies, the Transaction Date may be the same as the Service Date of the original Charge, in the same month, or the actual date of reprocessing.
Note that if individual claim checkboxes are selected, the blue button message changes from CONTINUE WITH RESULTS to CONTINUE WITH SELECTION.

Select the blue CONTINUE WITH RESULTS (SELECTION) button.

A confirmation box appears indicating the number of claims that meet the job requirements out of the total claims selected. Select the blue REPROCESS button to create the reprocessing job.

Look for a green success toast to display in the upper right-hand corner, then navigate to the Reprocessing History screen.
Review and Finalize the Reprocessing Job
The Reprocessing History screen displays unfinalized jobs first with a secondary sort by Date from most recent to oldest. Jobs with a Status of Pending, In Progress, Failed, or Preview are considered unfinalized. Jobs with a Done or Reversed status are displayed after unfinalized jobs, sorted by Date from most recent to oldest.
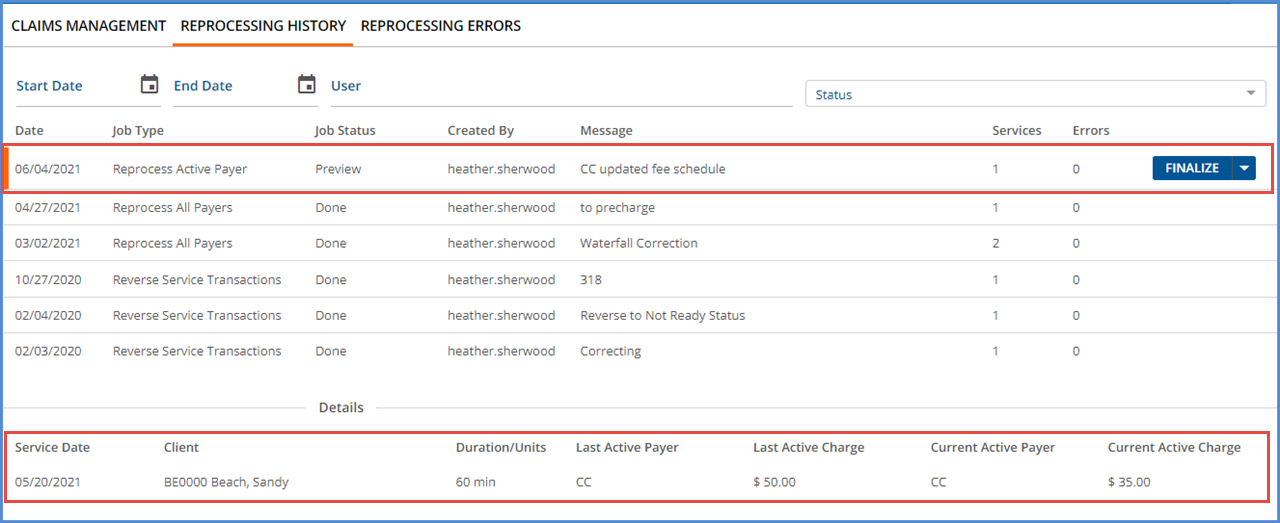
The example Reprocess Active Payer job is at the top of the list in the image above; the row is selected to show the job Details. As expected, the (new) Current Active Charge is $35.00.

In EchoVantage version 3.25+, while the reprocessing job remains unfinalized, the Claims Management screen shows the original Claim as Reversed with a dash for both the Active/Last Payer and the Charge columns. Select the job row to view the Claim Details.
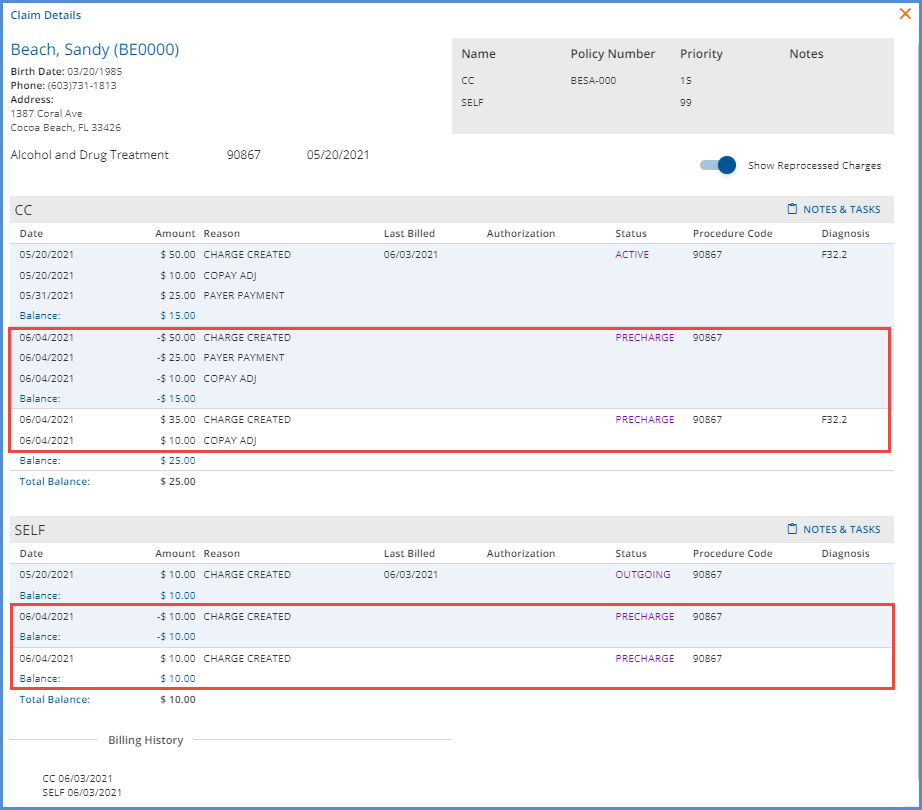
The image above shows the details with the Show Reprocessed Charges toggle enabled. The entries created by reprocessing are outlined in red. Both the reversing entries and the new charge items have PRECHARGE status while the job remains unfinalized. Return to the Claims > Reprocessing History screen, select Finalize to complete the reprocessing job. A green confirmation box should display in the upper right-hand corner.

Returning to the Claims Management screen, the Charge Status is now Active, and the Charge (amount) is $35.00.
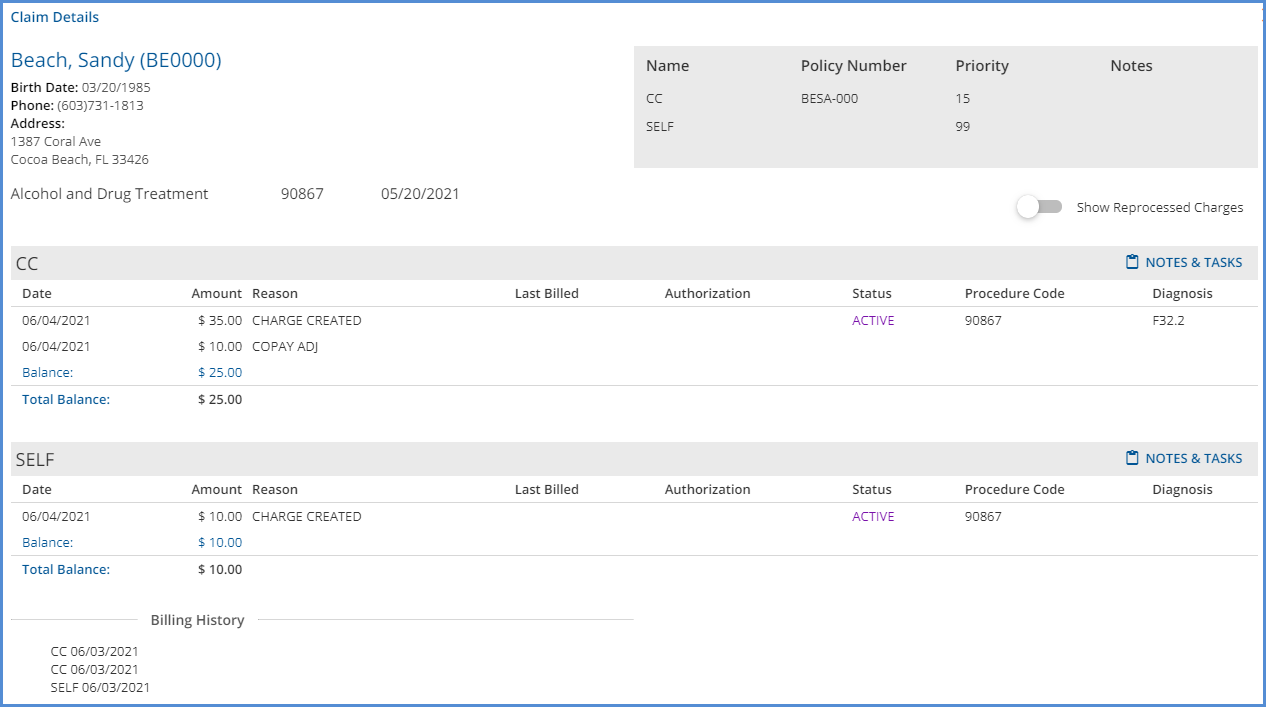
Select the row again to view the Claim Details. Only the current (newly created) charges display when the Show Reprocessed Charges toggle is not enabled
Create Bills for the Reprocessed Charge
These now Active charges (Payers CC and SELF) are available to include in a Fiscal Overview > Unbilled Charges > Create Bills job. Once a Create Bills job is processed and finalized, the Charge Status is updated to Outgoing. This step may not be required depending on your reasons for reprocessing. If there is no need to send a corrected bill to the Payer, it is OK to move on to the Apply the Reprocessed Payment section.
Apply the Reprocessed Payment
After the Active Payer is reprocessed and bills are created (if needed), the copy Remittance can be applied.
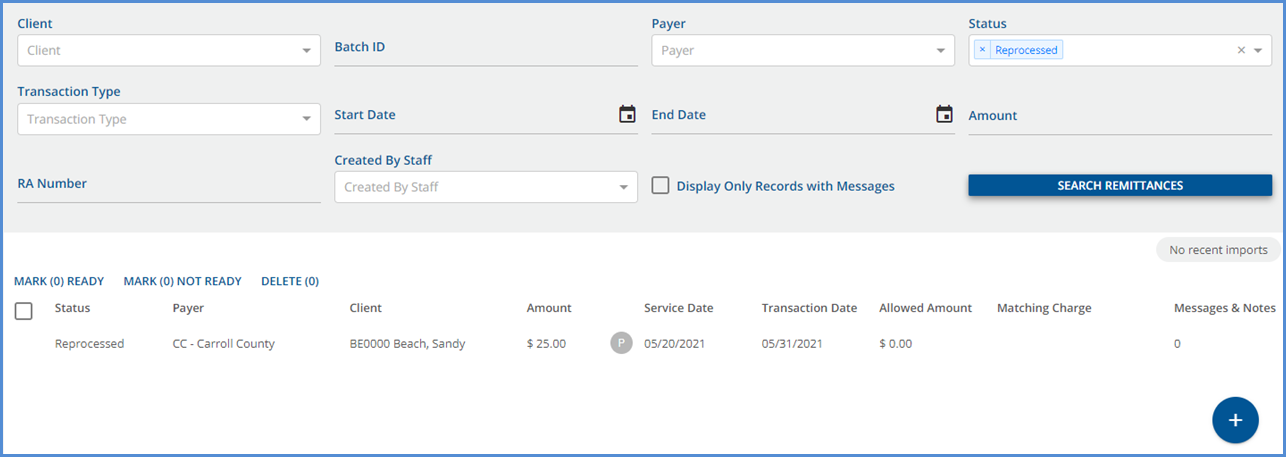
Select the Reprocessed Remittance to view the Remittance Details.
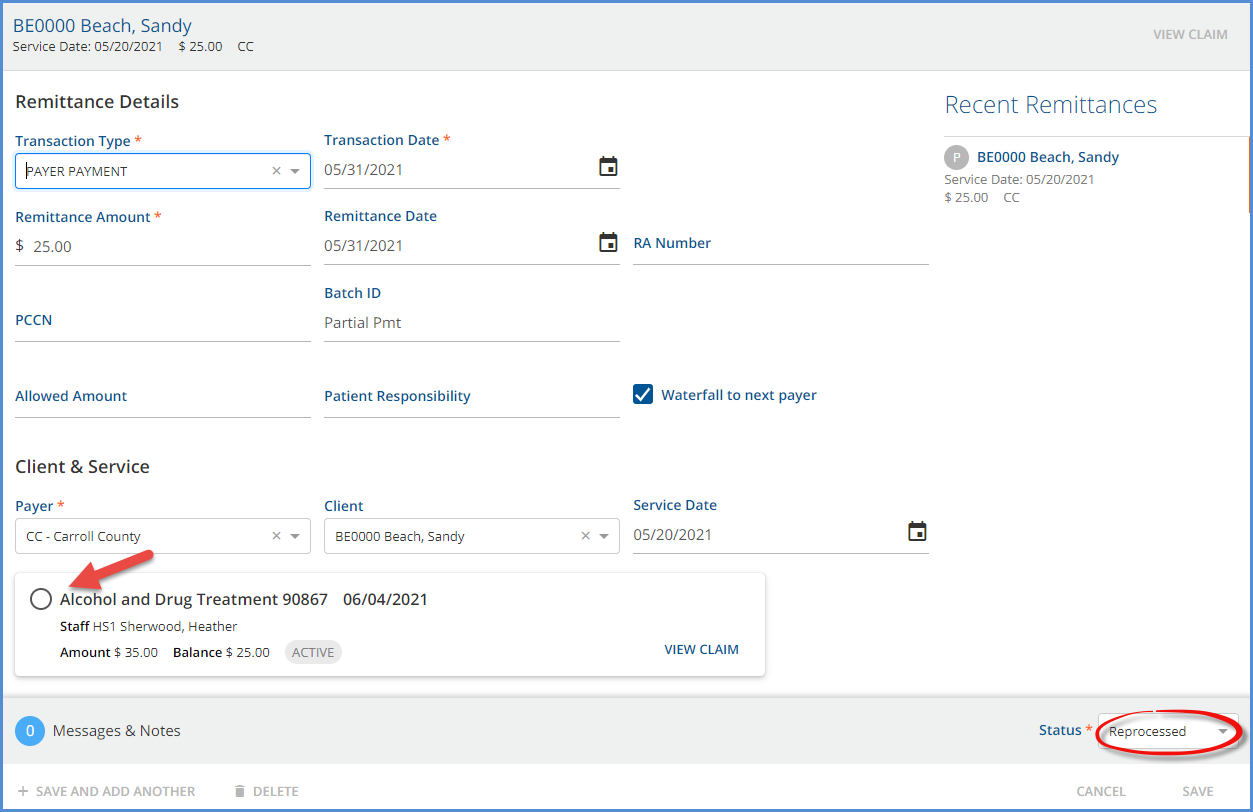
The Status is Reprocessed, and no charge is selected. To apply the Reprocessed Remittance, change the Status to Not Ready and select the appropriate Charge.

Save and mark Ready on the Remittances screen or change the Remittance Status to Ready before saving, depending on your specific workflow. In the example above, the status was changed to Not Ready, the correct Charge was selected, and then the status was updated to Ready before SAVE was selected. Once the remittance is marked Ready, it is available to include in a Fiscal Overview > Unprocessed Remittances job. The image below shows the updated Claims Management record after the remittance is processed and finalized.

The Payer Balance is $0.00, and the Client Balance is $10.00.
Reprocess All Payers
Reprocess All Payers creates reversing entries for the existing charges, copays, and any related payments for ALL PAYERS, not just for the currently active Payer. Reprocessing All Payers follows the same process as outlined in the Reprocess Active Payer section above.
Example
The following claim has Charges and Payments for two Payers. The example works through reprocessing all Payers and reapplying the Remittances.
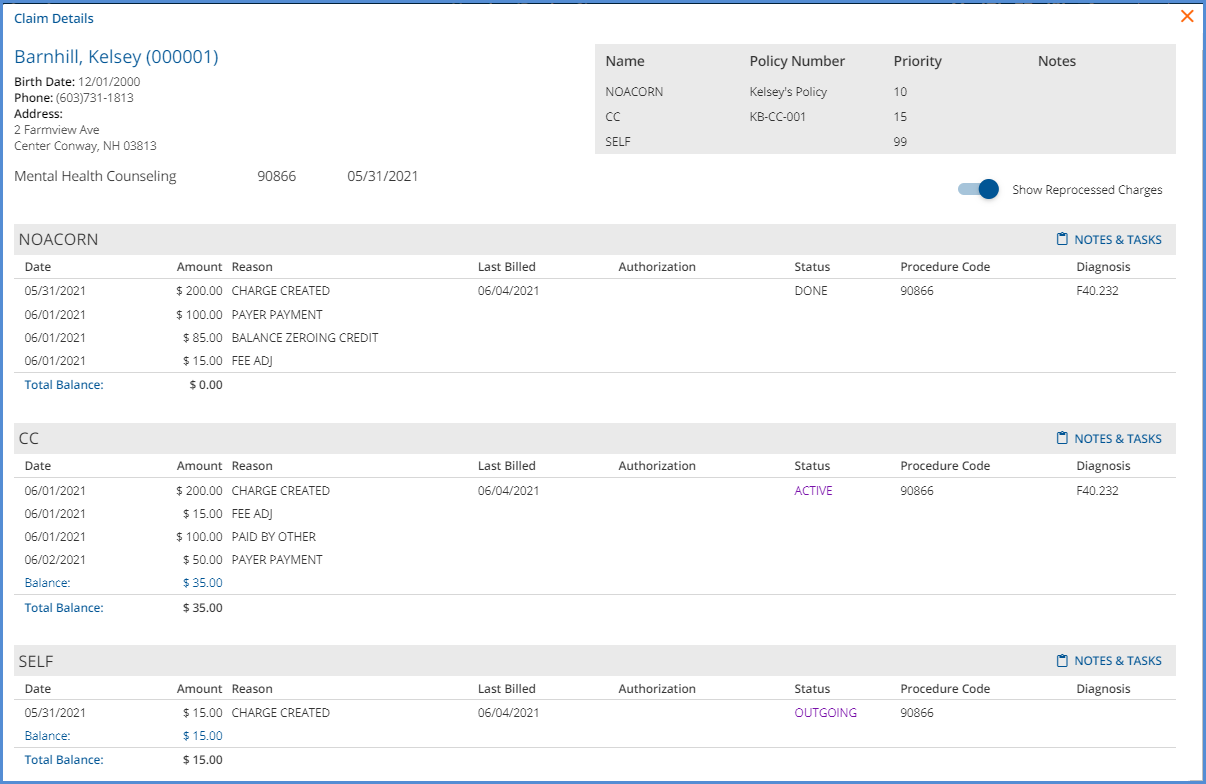
The following modifiers were added to the Service Definition Rates tab to identify the new Charge for Payer 1. Payer 1 uses the Service Definition Default Rate; there are no changes to the rate or unit calculation.

Create the Reprocessing Job
Navigate to the Claims Management screen.
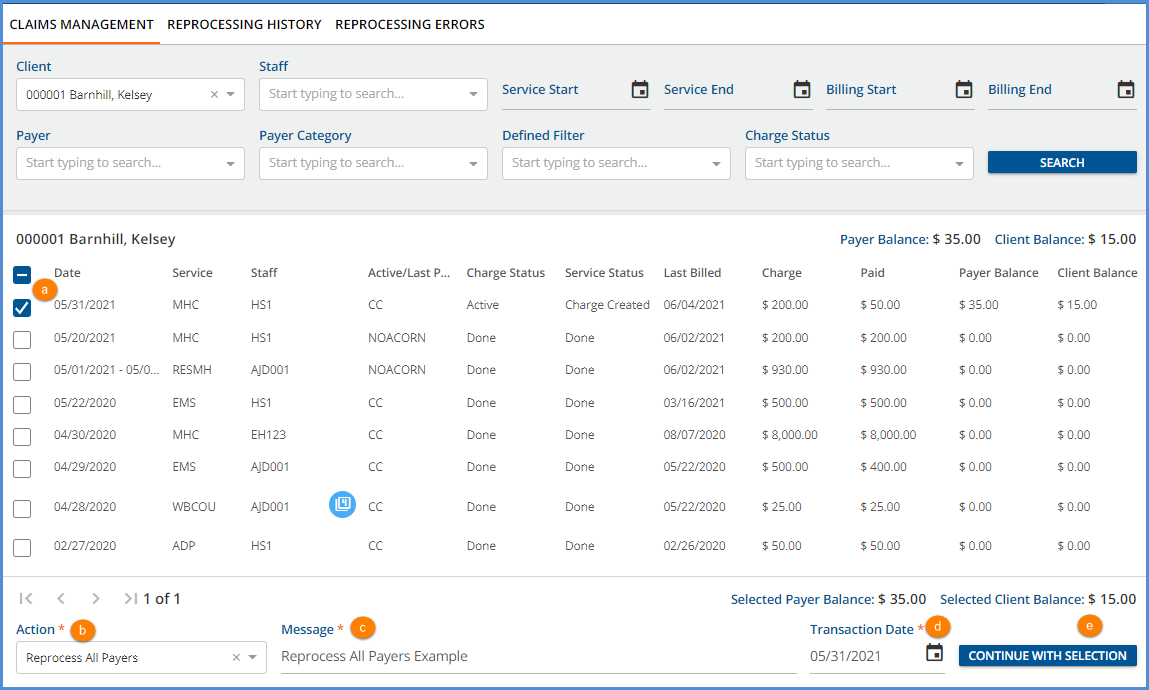
- (a) Select the checkbox for each claim that should be Reprocessed or use Filters to refine the results.
- (b) Click in the Action drop-down and select the Reprocess ALL Payers option.
- (c) Enter a message for the job. The Message makes it easy to identify the job on the Reprocessing History and the Reprocessing Errors tabs.
- (d) The Transaction Date is used to determine the GL Posting Period and defaults to the current date. It may be edited. For the example, the Transaction Date was edited to be the same as the Service Date.
- (e) Select the now enabled blue CONTINUE WITH SELECTION button.
- (f) A Reprocess All Payers confirmation modal displays, select REPROCESS to continue.
-

Review and Finalize the Reprocessing Job
Next, navigate to the Claims Reprocessing History tab.

- Review and correct any errors. Error details are found on the Reprocessing Errors tab.
- (g) When the job is error-free, select FINALIZE to complete the Reprocess All Payers process.
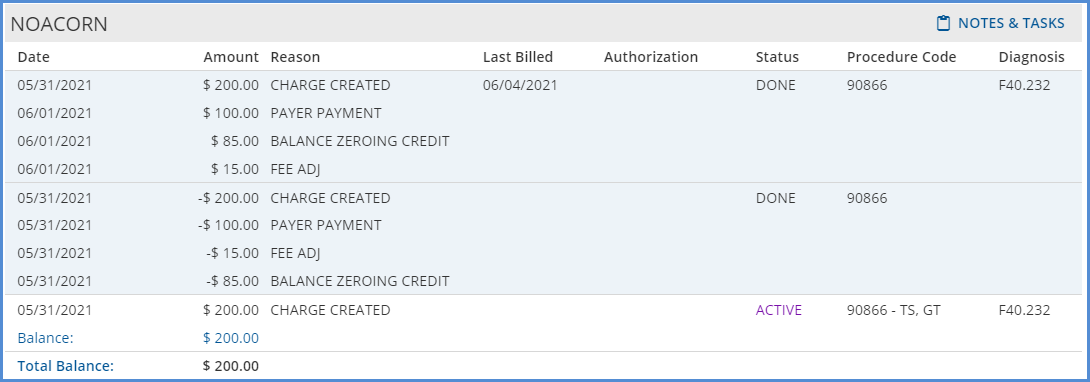
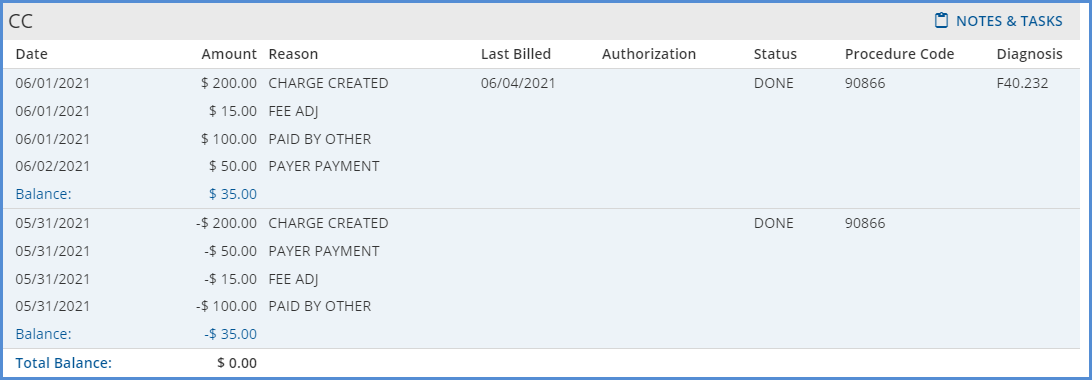
The Claim Details now display the following. Note the additional Modifiers with the now ACTIVE Charge for Payer 1.
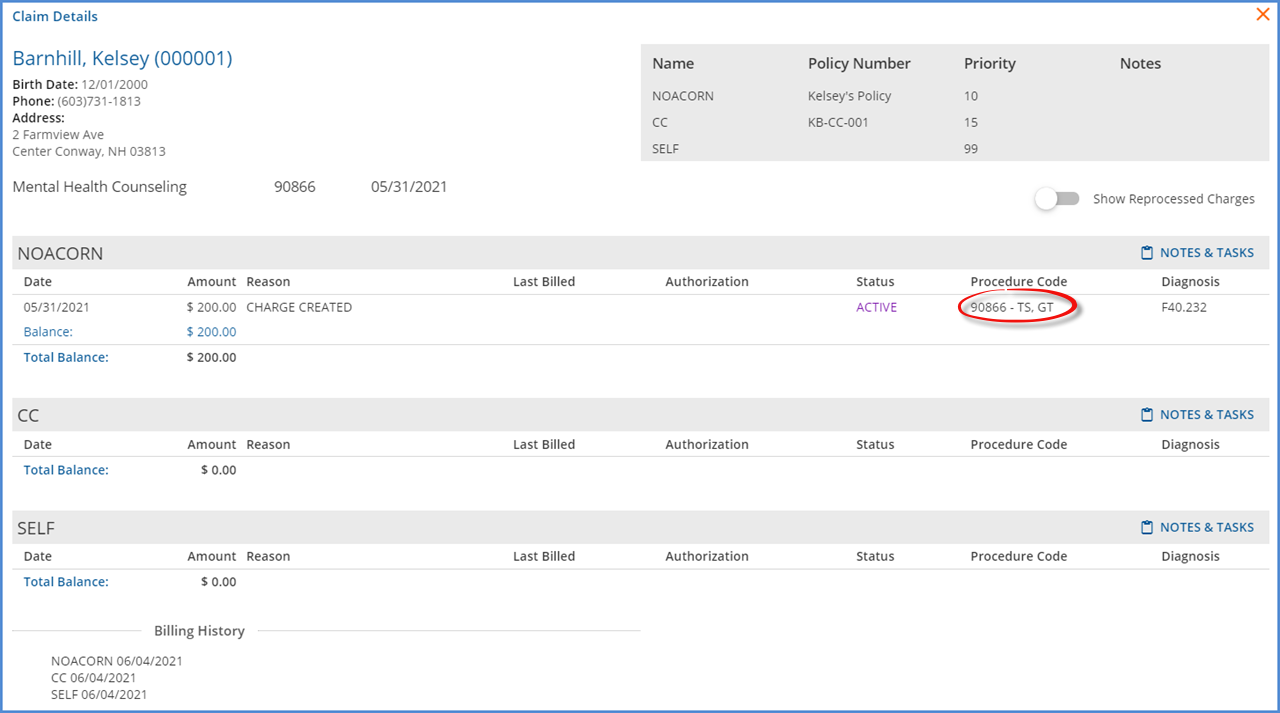
If the Show Reprocessed Charges toggle is enabled, the original and reversing entries for each Payer are displayed.
Payer 1
Payer 2
Payer 3

Create Bills for Payer 1 Reprocessed Charge
The now Active Charge for Payer 1 (NOACORN) can be included in a Fiscal Overview > Unbilled Charges > Create Bills job. Once a Create Bills job is processed and finalized, the Charge Status is updated to Outgoing. This step may not be required depending on your reasons for reprocessing. If there is no need to send a corrected bill to the Payer, skip to the Applying the Reprocessed Remittance section.
Apply the Reprocessed Remittance for Payer 1
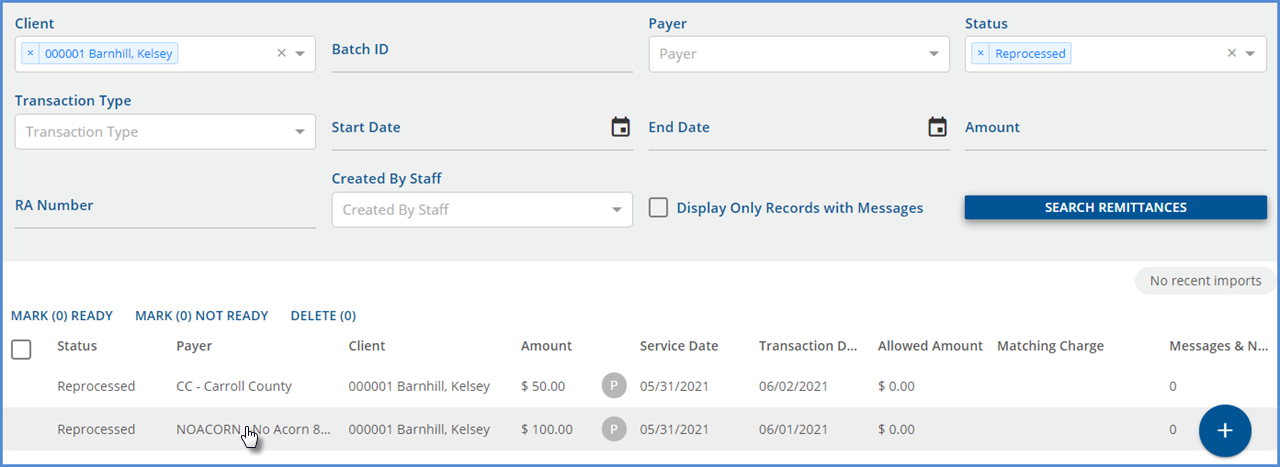
Navigate to Remittances and find the original payment from the first Payer on the Remittances screen. Selecting Reprocessed in the Status filters helps refine the results.
Select the remittance and search for the new Charge that was just created.
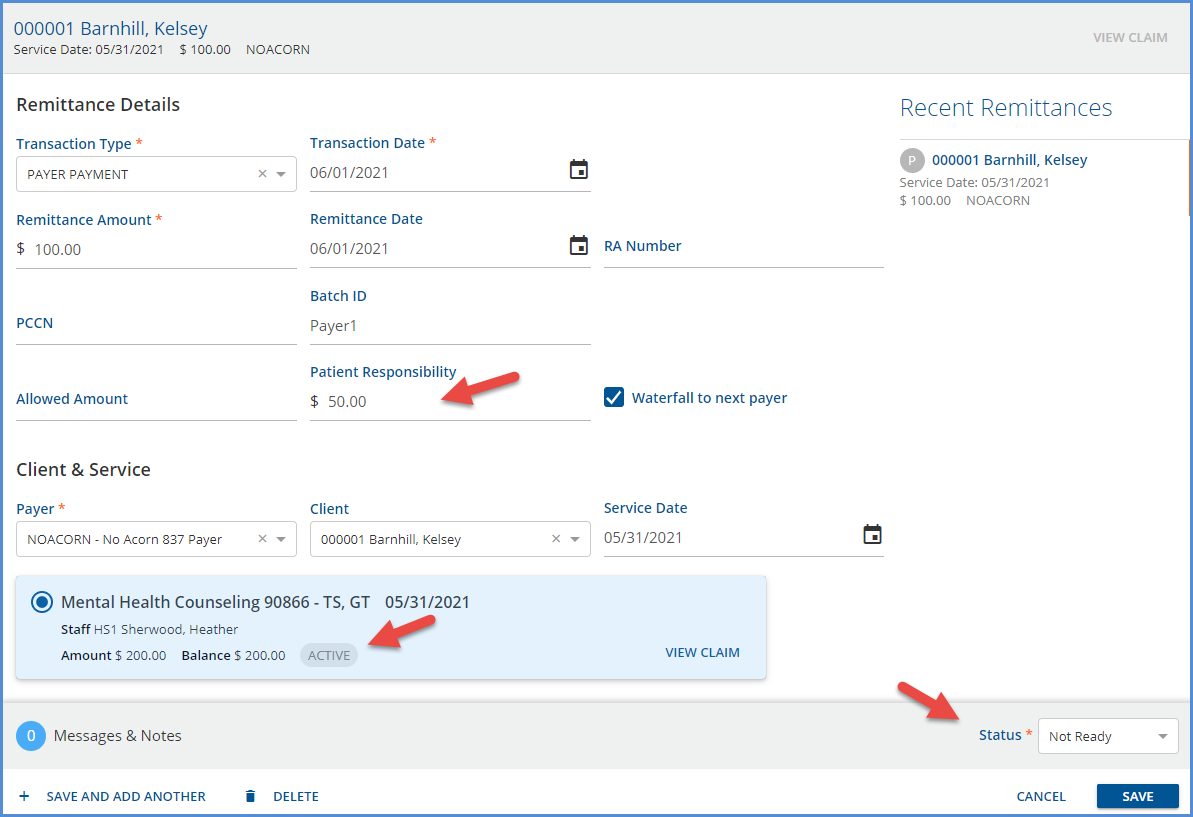
- Change the Remittance Status to Not Ready and, at minimum, select the correct Charge.
- The example reprocessed Charge has ACTIVE status. If Bills were created, the status would be OUTGOING.
- Corrections can be made to the remittance. In this example, the Patient Responsibility Amount is updated to $50.00.

- Mark the Remittance as Ready.
- Select SAVE.
Next, navigate to the Vantage Point and process Remittances.

Navigate to the Unprocessed Remittances > Process Transactions > History tab to review and FINALIZE the job.

When the Remittance job is finalized, the Waterfall Create Charges job is in PREVIEW Status in the Unprocessed Services > Create Charges > History tab for Payer 2 (CC) and Self Pay (SELF).
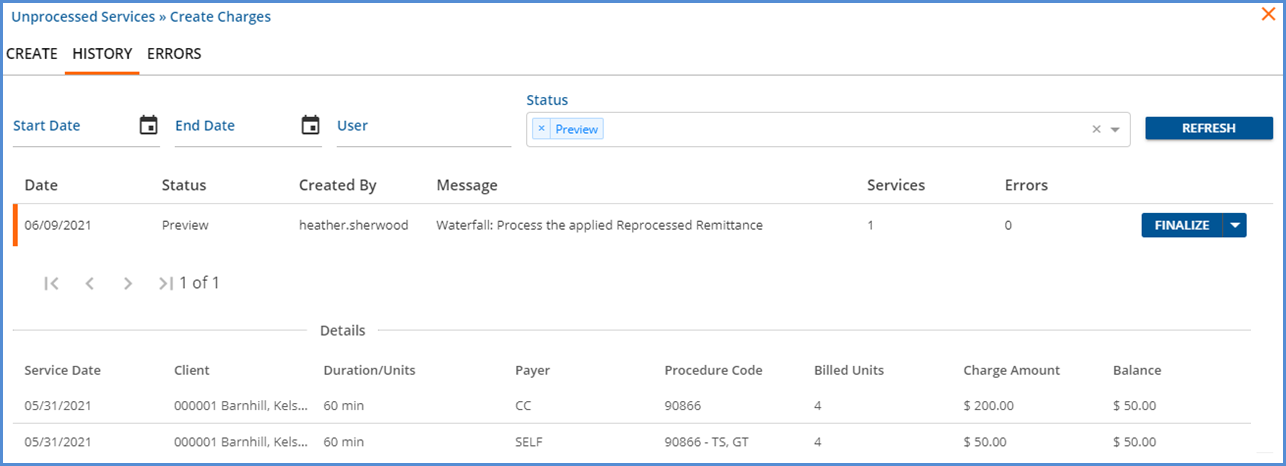
- Review the job details and correct any errors if necessary.
- Then Finalize the Create Charges job.
Create Bills for the Waterfall Charges to Payer 2 and SelfPay
The now ACTIVE Waterfall Charges are available to include in a Fiscal Overview > Unbilled Charges > Create Bills job for Payer 2 (CC) and SELF PAY. For this example, bills were created for both Payers. Returning to the Claims Management screen,

- The Active/Last Payer is now CC.
- The Charge Status is Outgoing.
- The Payer Balance (for Payer CC) is $50.00.
- The Client Balance (for Payer SELF) is $50.00.
Apply the Reprocessed Remittance for Payer 2
Navigate to Remittances and find the copy of the original payment from the second Payer. Again, selecting Reprocessed in the Status filters helps refine the results.

Just as before, the Remittance Status was updated to allow selection of the newly processed Charge; for this payment, no changes were made. The remittance was marked as Ready and processed and finalized in Fiscal Overview > Unprocessed Remittances.
Return to the Claims Management menu.

- The Charge Status is now set to DONE.
- The Payer Balance is now $0.00.
Selecting the row to view the Claim Details displays the following.
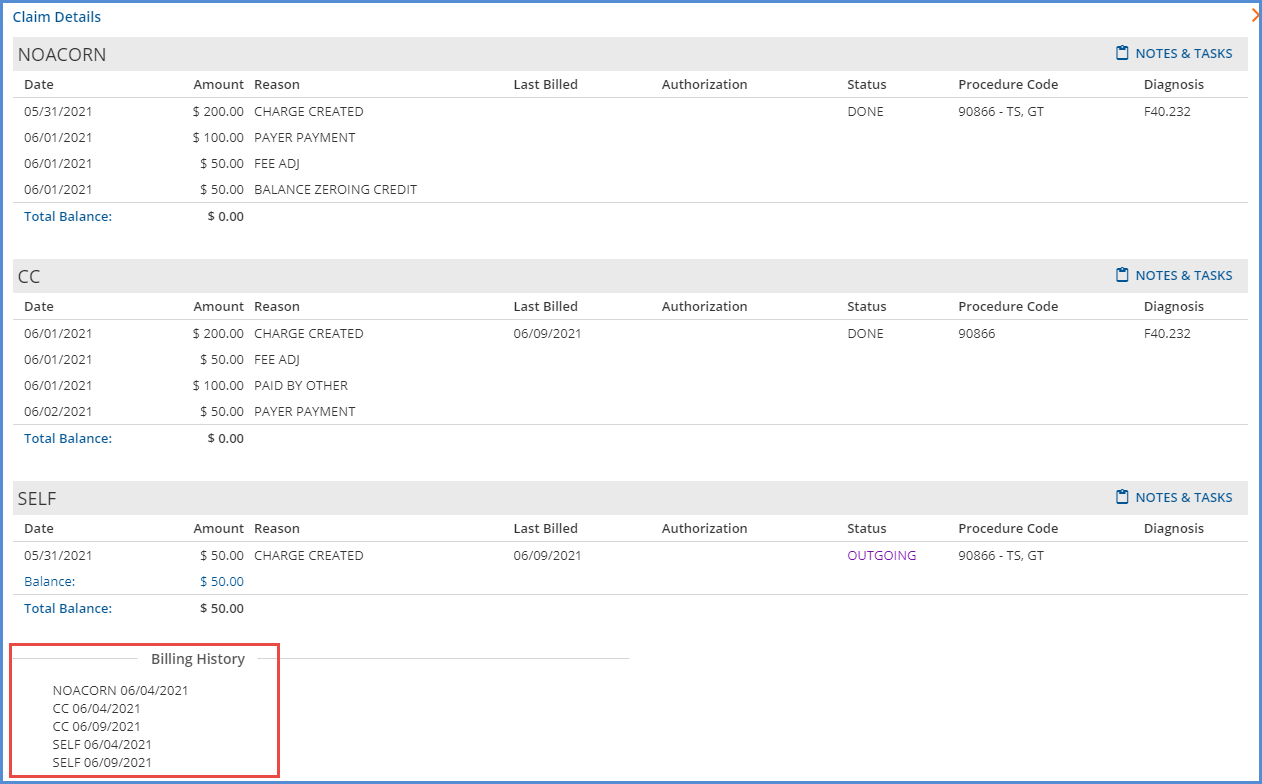
Note in the Billing History,
- Payer 1 – NOACORN only has a single billing entry because a Create Bills job was not processed for Payer 1 after the reprocessing. The copy Remittance was applied to the ACTIVE Charge.
- Payer 2 – CC and Payer 3 – SELF has two entries because a Create Bills job was processed for each after the Waterfall job was reprocessed. The copy Remittance for Payer 2 was applied to the OUTGOING Charge.
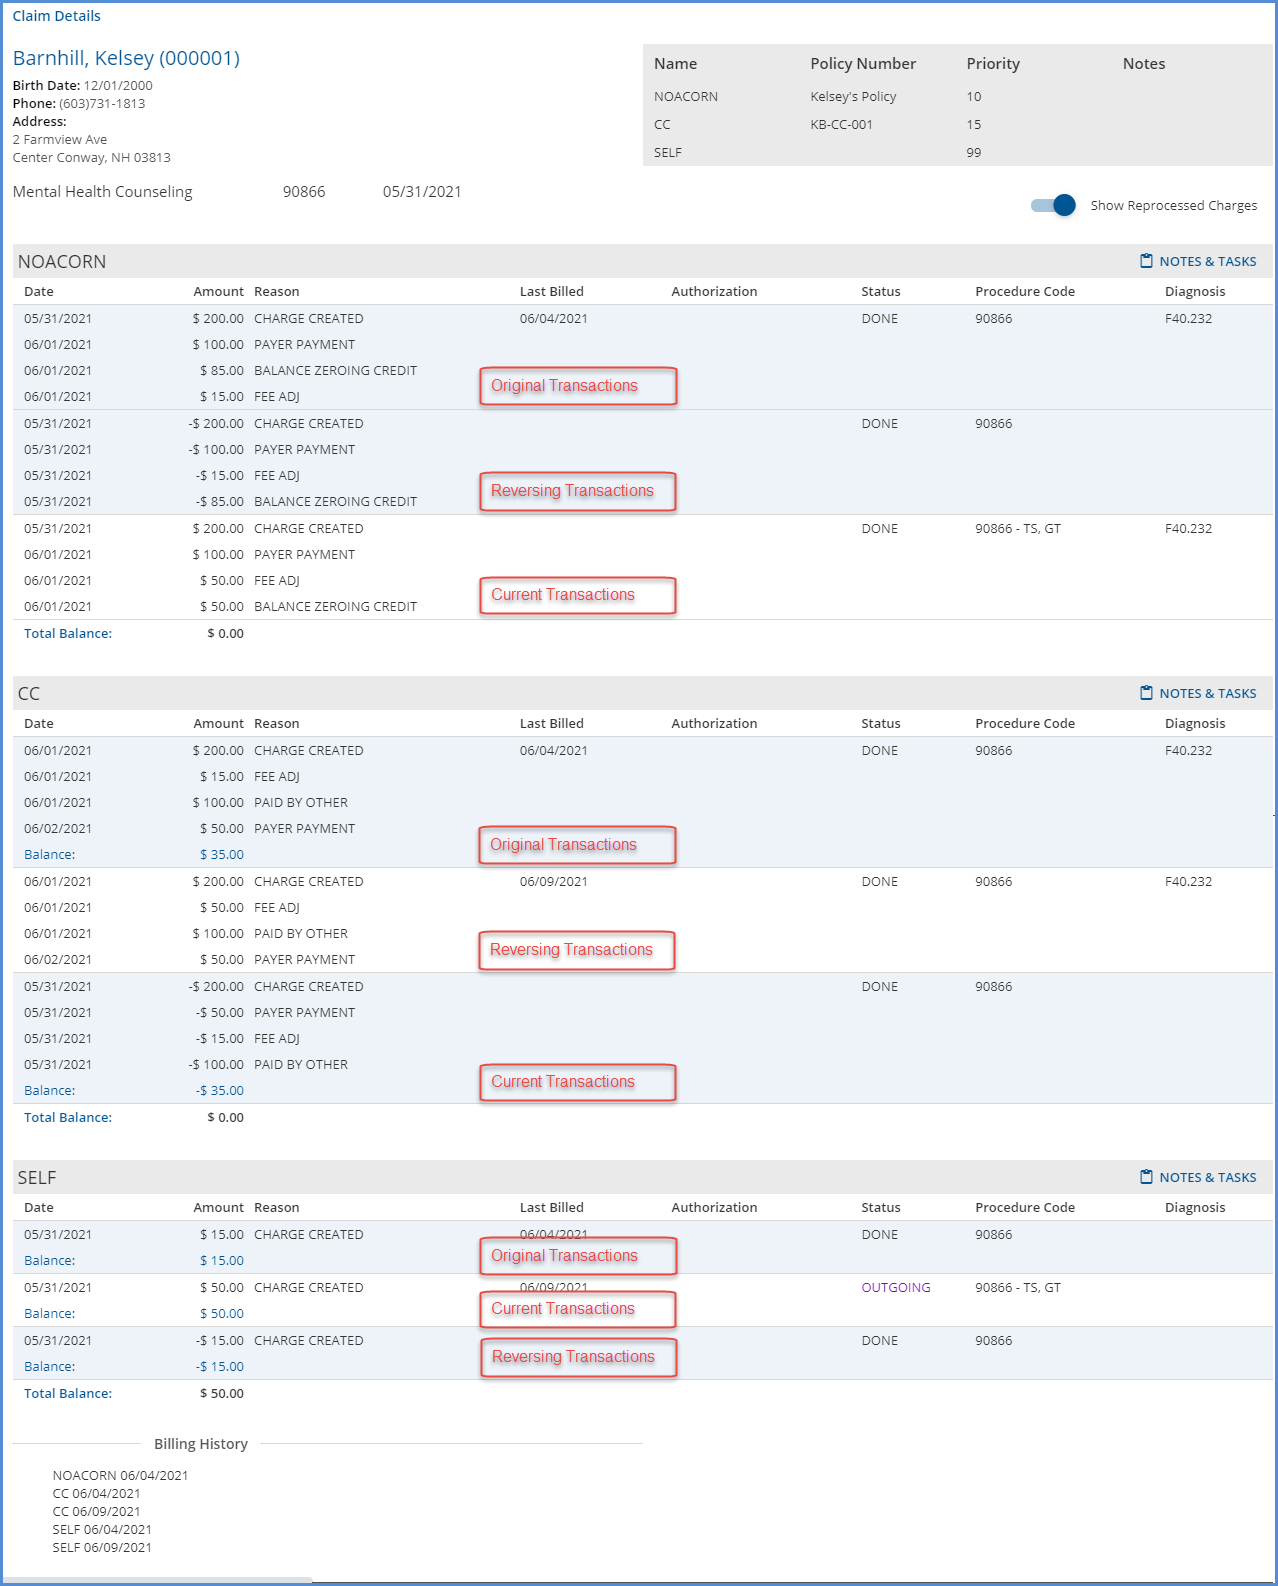
Enabling the Show Reprocessed Transactions toggle displays the original and reversing transaction in addition to the current transactions.
Reverse Service Transactions
This Action voids all charges for the selected claim for all payers, including remittances, and sets the Service Status back to Ready. Use this option when corrections to the Service (like including a Supervisor or correcting the selected diagnosis) are required or reprocessing a bundle to ensure all Services provided during the bundle period are included in the Create Charges job. When this type of reprocessing Action is selected, the user is responsible for including these reprocessed Services in a new Fiscal Overview > Create Charges job. A copy Remittance (Status = Reprocessed) is created for any payments posted to the reprocessed Charge(s).
Example
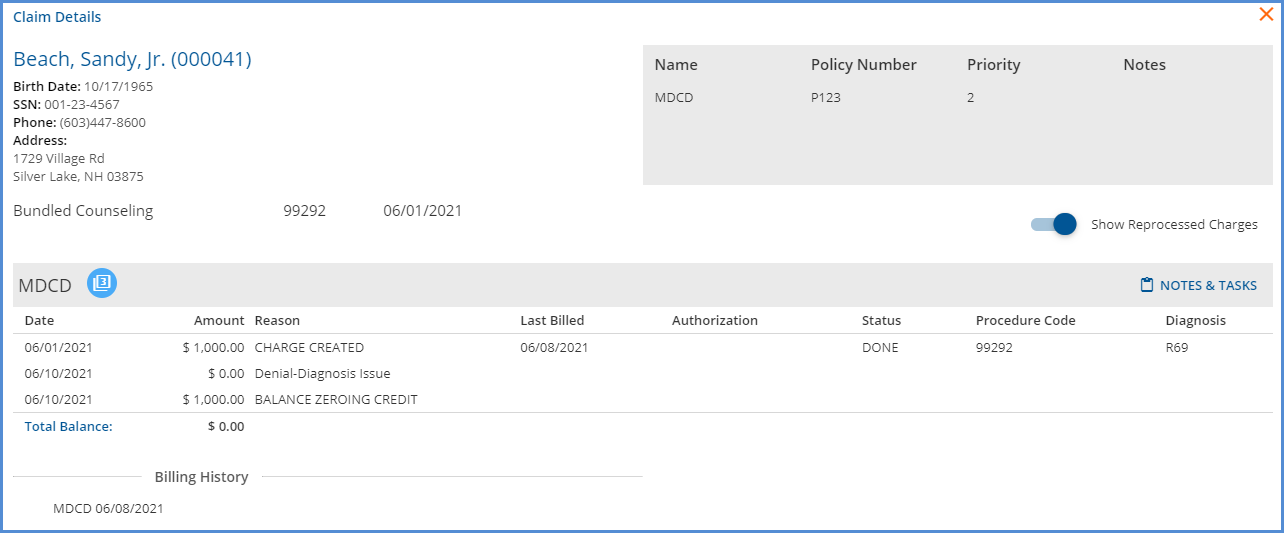
This Bundled Claim was denied due to an invalid diagnosis. The following steps work through reversing the bundled Charge to Ready services so the diagnosis can be corrected, and the services included in a new Create Charges job.
Create the Reprocessing Job
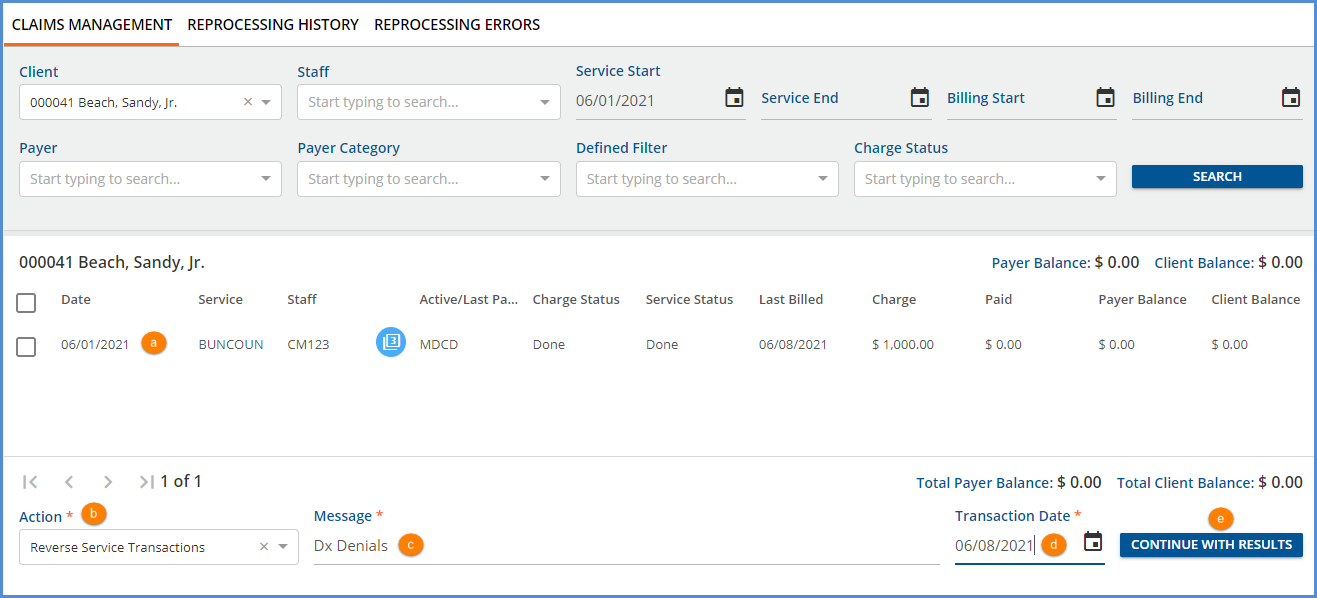
- (a) Select the checkbox for each claim that should be Reversed or use Filters to refine the results.
- (b) Click in the Action drop-down and select the Reverse Service Transactions option.
- (c) Enter a message for the job. The Message makes it easy to identify the job on the Reprocessing History and the Reprocessing Errors tabs.
- (d) The Transaction Date is used to determine the GL Posting Period and defaults to the current date. It may be edited.
- (e) Select the now enabled blue CONTINUE WITH RESULTS button.
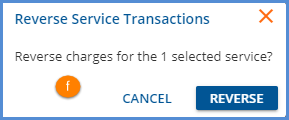
- (f) A Reverse Service Transactions confirmation modal displays; select REVERSE to continue.
-
Review and Finalize the Reprocessing Job
Next, navigate to the Claim Reprocessing History tab.
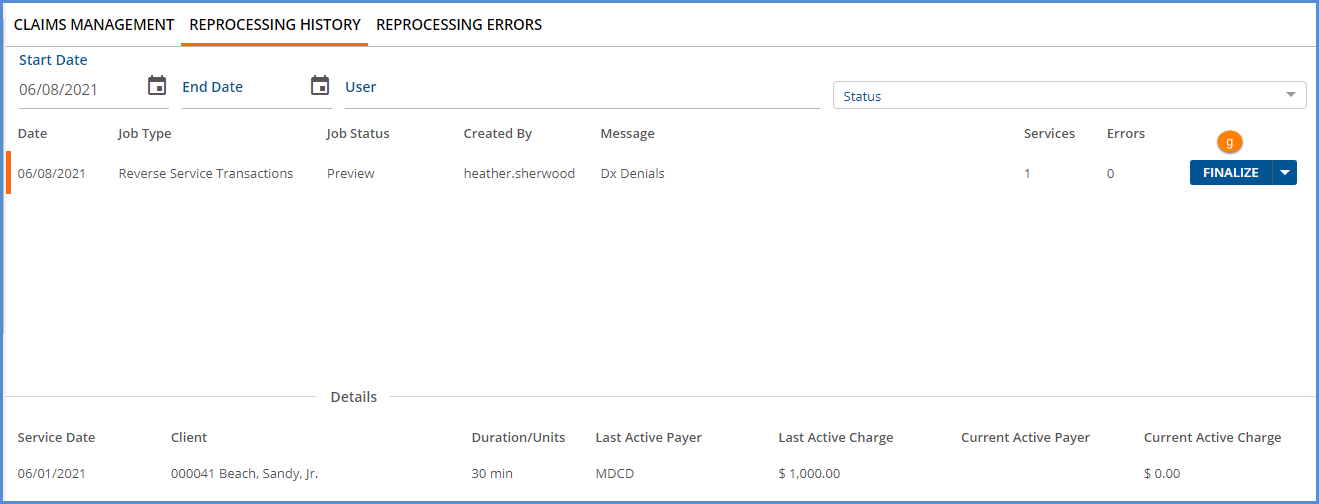
- Review and correct any errors. Error details are found on the Reprocessing Errors tab.
- (g) When the job is error-free, select FINALIZE to complete the Reverse Service Transactions process.
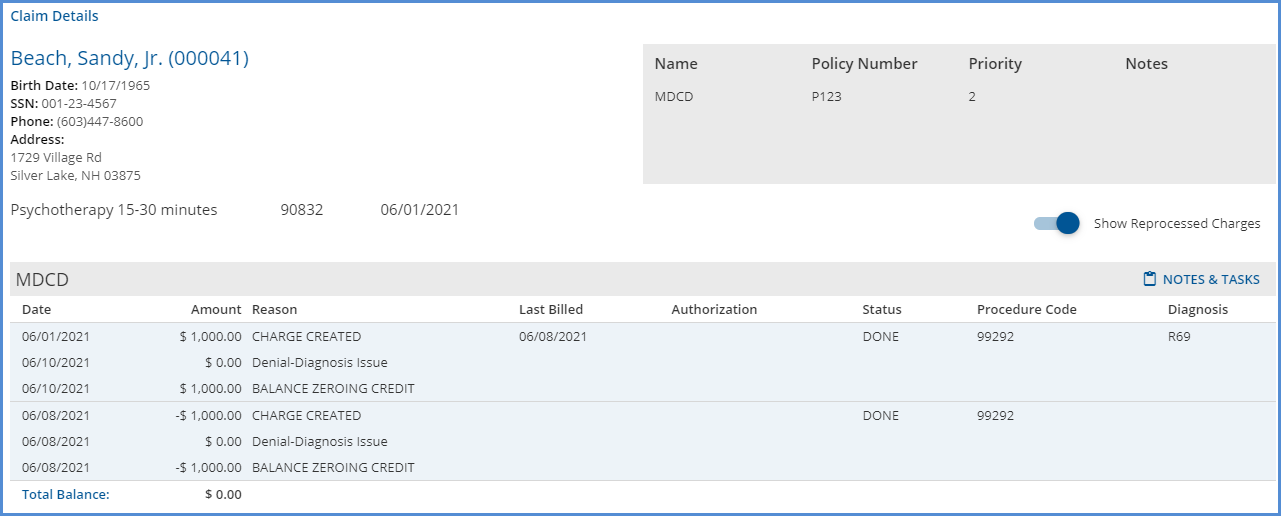
The following transactions display when the Show Reprocessed Charges toggle is enabled in Claim Details.
Review and Correct the Ready Services

Navigate to the Services main menu item to view and correct the now Ready Services. For example, the invalid diagnosis on the 6/1 Service must be updated.

Other Considerations
Reprocessing Charges Previously Sent to a Payer
During the 837 creation process in Fiscal Overview > Unbilled Charges > Create Bills, EchoVantage generates a unique ID for the billed Charge (dbo.Charge.Id837). This unique ID combined with the Client’s Code is used in the Loop 2300, CLM01 data element or the Loop 2400, REF*6R data element of the 837. The benefit of this method is that the unique ID links back to the original Charge because 837 specifications state that the Payer must return an 835 with a CLP01 or REF*6R that is identical to the CLM01 or REF*6R on the 837. However, reprocessing charges after they are billed archives the original Charge and creates a new charge with a new ID. The result is that the Payer could send back the original Charge ID in the CLP, which does not automatically match. This same scenario occurs when a Clearing House submits bills on behalf of the agency. The Clearing House often submits 837 files with their unique ID convention.
In EchoVantage versions 3.22 and higher, both original and reprocessed charges are checked when importing an 835 file. If an import references the original Id837 of a reprocessed charge, it does not match the Active Charge. The import process then compares DONE charges. If a match is found, the payment is linked to the related Active Charge, and the following Message is logged “Original Charge was reprocessed. Remittance has been attached to latest Charge.”
